Nowadays it is quite popular to do handicrafts. Thanks to imagination, accessible materials and skillful hands, folk craftsmen create amazing things. At the same time, you can make a thing that will decorate the decor or make it special from the most ordinary and unpredictable option. Let's take plastic bottles, for example. These are simply excellent raw materials, from which you can create the most various crafts and useful things for the household. Elements of furniture, garden products, pots, feeders, decorative elements - this list can be continued for a very long time. And the main thing is that such production is waste-free. The entire bottle is used in its entirety. After all, traffic jams that seem unnecessary at first glance can be used to create beautiful pictures.
Paintings from corks from plastic bottles look original and beautiful. And the main thing is that anyone can create such a product from corks. How to do it? What is needed for the work? What examples of paintings are there on the Internet? This article will answer these questions and also help you do it yourself.
Advantages of plastic stoppers
We can say that this is simply the ideal raw material for work. For many years this method has been popular and decorates the homes and gardens of many residents. What are the advantages of using plastic stoppers?

Indeed, the material has a lot of advantages. This is why corks are so popular in art. The good news is that everyone can start creating. All you need is desire, a clear drawing diagram and a large number of multi-colored traffic jams. Let's look at some techniques for creating cork paintings.
Mosaic of traffic jams
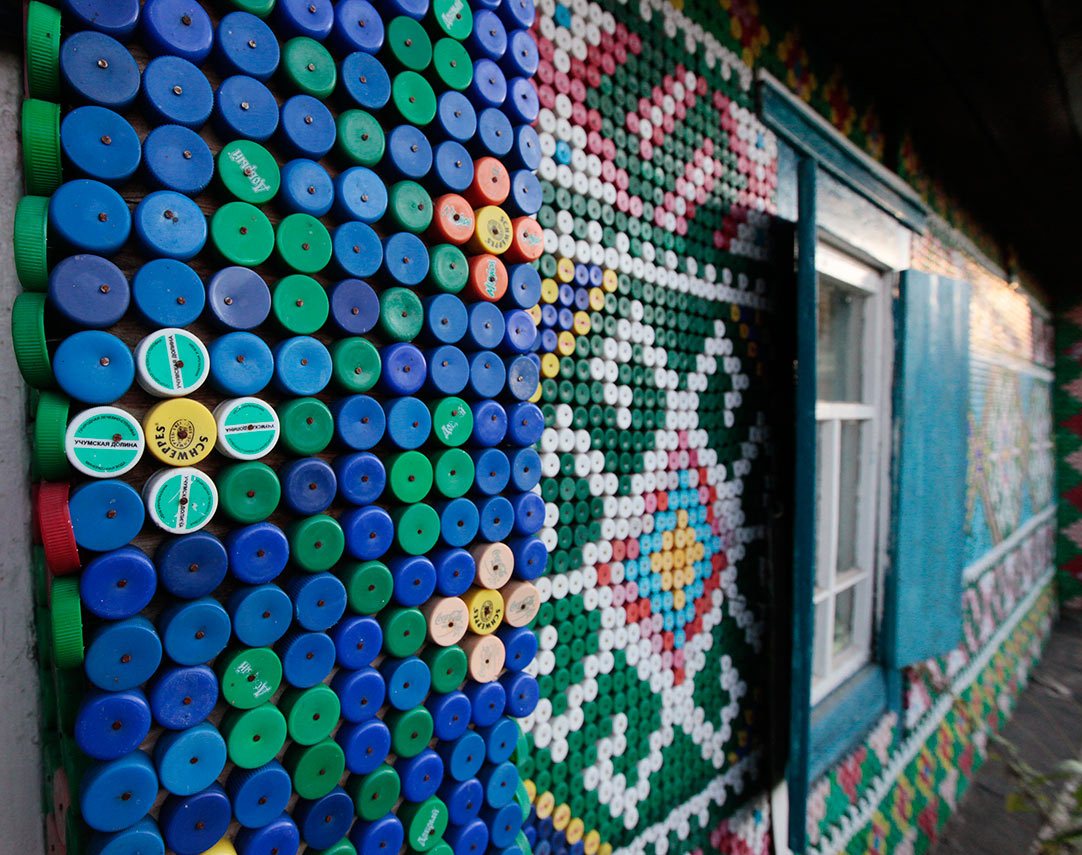
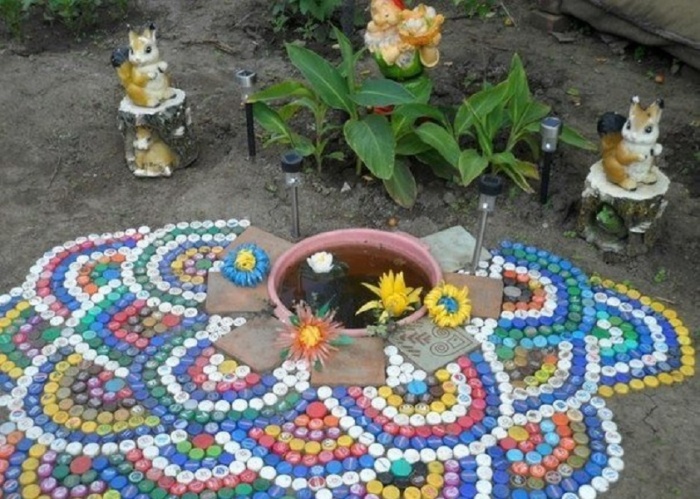
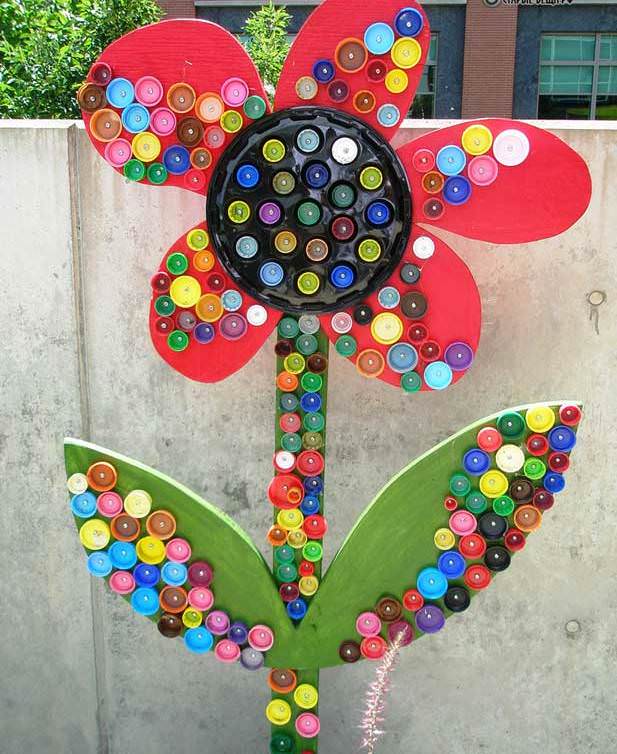
The main challenge in creating cork paintings is to find required amount material. Sometimes it is possible to collect a lot of corks within a few months. That is why it is recommended to involve your friends and acquaintances in the search. Then everything will be much faster. This is especially important when it comes to large mosaics. Often compositions are made specifically as room decoration. This could be an old hut or agricultural buildings. You don’t see this kind of finish very often, but it all looks very nice. You can see this in the photo below.
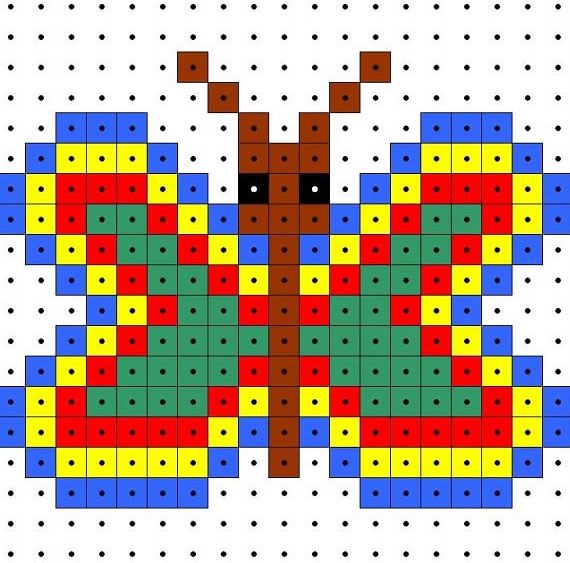
To create a similar picture on the walls, you cannot do without a detailed diagram. After all, you can’t just create an image by eye. If we are talking about beginners, then it is recommended for them to first choose simple circuits to master the technique and “get into the swing of things.” However, there is no need to immediately take up big sizes. It is enough to start with a small mosaic that is easy to make. Here is an example of such a simple scheme.
Having done it, you can start creating new drawings. If you have a printer, then just print out one of the diagrams and get to work. It is clear that there are not many similar schemes for paintings on the Internet. But you can print any other one to create a semblance of a picture. Having studied one technique, you can move on to another. After creating a simple mosaic from bottle caps, you can take on a new one, more complex and larger.

There are several directions for making mosaics. It all depends on the location of the pattern and the method of its formation. Mosaic from corks is made as a panel or as an independent pattern that is not attached to the surface. To create a mosaic of corks, there are several main stages of work, which can be divided as follows:
- To begin, apply it to cardboard or paper. detailed diagram, which is what they focus on in their work. By the way, there is one trick; you can take as a diagram ready-made options for cross stitch.
- After which the corks begin to be formed according to color, preparing for work.
- That's all, all that remains is to place the plugs in their places, fixing them to each other with glue, which is intended for this purpose.
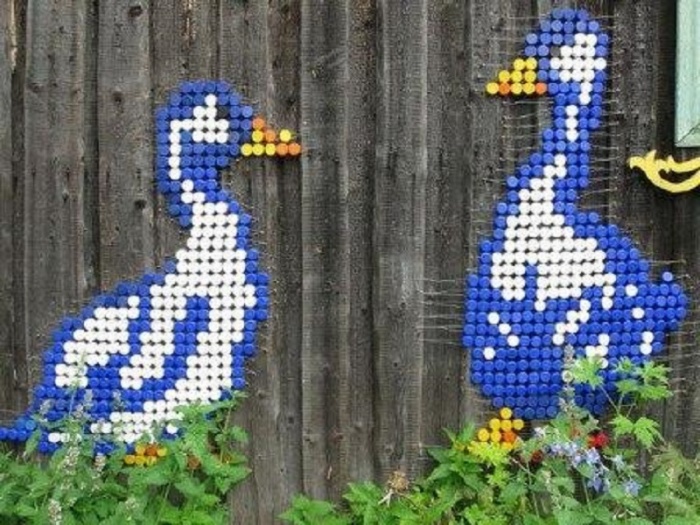
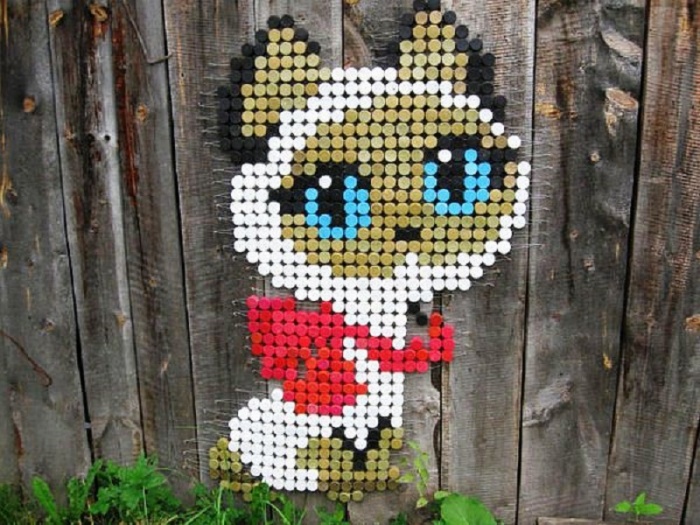
I wonder what similar technique used infrequently. Many people believe that it is much more practical to fix the plugs immediately on the surface that is planned to be processed. One of the options for implementing a mosaic is to make it on a wooden fence. It is considered an ideal surface for such tasks. You can work directly on the fence, or first make a picture on wooden plywood and then place it on the fence. As an option, simply install a picture with a drawing on the site.
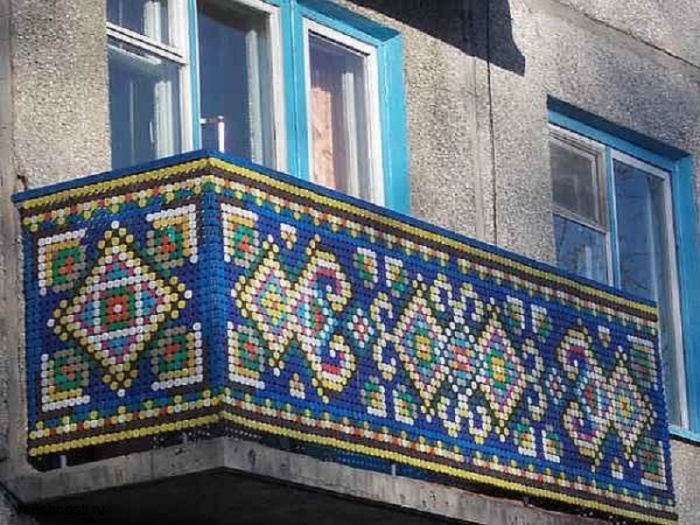
Note! Residents of apartments in multi-storey buildings often adopt similar tricks, thereby decorating their balconies. A pretty good method to make it original and highlight it against the general gray background.
However, cork mosaics have gained the greatest popularity for decorating a summer cottage. The decoration method is very simple, fast, cheap, original and beautiful. Just right for a dacha. The drawings are made in different ways. Some can serve as an ornament and be repeated at intervals, while others are full-fledged designs. If we talk about the fence, there is another option for fixing the mosaic:
- Pictures made from plastic bottle caps, namely diagrams, can be made on cardboard or directly transferred to the fence. To give the painting a deeper look and brightness, the outlines are applied with colored paint that will match the palette of the image;
- The corks are sorted by color and secured with nails. Their length is selected taking into account the height of the plugs and the thickness of the fence or plywood;
- Parts can be fixed both internally and externally. It all depends on the desired result.

Advice! If you have chosen the option of fixing the plugs with the bottom to the surface, then you need to be prepared for the fact that the recesses between them and inside them may become clogged. And this will ruin the whole surroundings. Therefore, from time to time you will need to clean the surface with water from a hose. IN otherwise It is better to fix them with the bottom up.
Cork rugs
Another popular option for using corks is to create rugs with different images or patterns. This invention is not only practical, as it can be used on the farm, but also useful. They can massage tired legs or back, relieve muscle tension and relax the body. Few people know that the feet contain unequal endings that are connected to all internal organs.

If this idea of creation interests you, then the work will require very little material, time and effort. The process is as follows:


A visual video will help you see exactly how to do all the work. It clearly shows exactly how to implement the idea of a cork rug with a specific pattern.
Note! Garden paths made from cork can be similar to this. Look at the photo how original it looks.

Let's sum it up
As you can see, plastic bottle caps are a universal material that can be used to decorate your dacha, apartment or house. There are a lot of options for using a roof. This could be a mosaic on the walls or fence, beautiful paths made from plastic bottle caps leading to the garden or to the gazebo, rugs for the feet, back or hallway. But that's not all. Some even create incredible paintings from lids that they simply hang on the wall. The creation technology is practically the same. The same scheme is taken as a basis, and the plugs are fixed in place. You can see similar products in these photos.

Crafts made from plastic bottle caps. From lids of different sizes and colors you can even make a unique reproduction of a famous painting you like
Creating original crafts from plastic bottle caps allows you to solve the problem of PVC disposal in the most harmless way. Due to the fact that these parts are often painted bright colors, household items made from them do not require additional decoration. Non-traditional uses Plastic bottle caps make it possible to acquire the things you need around the house.
The unconventional use of plastic bottle caps makes it possible to acquire household necessities
First you need to stock up on material. These can be plastic stoppers from 0.5-3 liter bottles, large containers, containers for dairy products, canisters, shampoos and other PVC packaging. Some crafts made from plastic bottle caps can be assembled only from the same elements, but for others, using material of different sizes is even preferable.
To fasten the elements together, you can use thin wire and fishing line. In some cases, instant glue or a heat gun will do. The lids can be glued or attached to a base made of cardboard or wood using nails and self-tapping screws. For large-scale design work, cement and sand are also useful.
In addition to these materials, to create products from plastic bottle caps you will need:
- awl;
- hacksaw for metal;
- candle or lighter;
- hammer or screwdriver;
- pliers.
When decorating surfaces with plastic mosaics, a construction rubber spatula can also be useful for grouting joints.

Mosaic made from bottle caps
It's very simple but exciting activity. Even children can lay out mosaic paintings and panels from corks. For them, it might be a game where bottle caps are used instead of colored pieces. You can draw the diagrams yourself, to your taste.
When adults get involved, the game becomes even more interesting. The result is walls and fences richly decorated with mosaics. plastic caps. They can be secured in different ways, depending on the surface material.
On a wooden wall of a house, a fence or a sheet of plywood, you need to draw a contour image, which is then gradually filled with lids desired color. If the drawing is complex (reproduction of a painting, for example), then it is possible to make a sketch on the wall with colored chalk. When creating a mosaic pattern, you can use elements of different sizes. For a graphic ornament, it is better to prefer parts of the same diameter, so that you can use patterns of folk cross-stitch patterns or samples of knitting patterns.
It is best to attach the covers to the wall with the top side facing out. To do this, you will need nails or screws 1-2 cm longer than the height of the side of the lid. Fasteners must be driven into the center of each mosaic element.
To create a smooth transition of shades when making an artistic painting from corks, you can attach parts with the open part facing out. In this case, several caps of similar colors are usually used, nested inside each other. The internal details can be moved to one of the sides of the largest one, emphasizing a darker or lighter shade in this place.
On a concrete wall, it is easier to attach mosaic elements using tile adhesive, liquid nails or a simple cement-sand mortar (1:3, respectively). When attached to a mortar, the mosaic should be created gradually. The wall will need to be marked into small squares (about 0.5-1 m2). Apply the solution like a regular plaster mixture, draw parts of the pattern on the wet surface, and then press the lids into the soft mass, filling the contours. After finishing the entire artistic canvas, the gaps between the covers can be filled with grout, applying the solution with a rubber spatula and rubbing it into the gaps. After the cement has set, rinse the mosaic surface with water.
 This is a very simple but fun activity.
 Using the same principle, you can make a mosaic pattern on a tabletop or window sill, on garden paths or benches. The small size of the mosaic elements allows you to decorate surfaces of any curvature with it. This makes it possible to design flower pots and flowerpots, columns and columns.
Gallery: crafts made from plastic corks (25 photos)


What can be made from plastic bottle caps (video)
How to make a massage mat?
A variant of mosaic, but on a flexible basis, can be considered panels of cork, which are used in a variety of qualities. There is nothing easier than making a mat from plastic corks or a massage surface for the feet. Flexible and durable mosaic panels can be turned into other crafts from plastic covers: a lampshade, a beach bag, a seat for an armchair or a folding chair.
To make a rectangular rug from corks, you will need an awl and thick fishing line for the base. It is more convenient to use covers of approximately equal diameter, but the use of elements of a different size is also acceptable. In the side edges of each lid, you need to pierce 4 holes with a heated tip of the tool, placing them crosswise. According to the prepared diagram, collect 1 row of plugs, stringing them on a fishing line through opposite holes. In the last element of the row, pass the warp thread inside the lid and out through the adjacent (side) hole.
String the initial element of row 2 in a similar way. Then lead the line straight through opposite holes to the end, where you turn again. Having finished the mat, do not tear off the fishing line, but transfer it to one of the holes, which is located near the penultimate row. Next, perform the steps already described, but now the direction of the thread will be perpendicular to what it was before. This will give the mat the necessary strength.

The finished cloth can be spread on the floor. If you attach it to the frame of the chair, you will get a comfortable, soft and springy seat. If you weave narrow strips for the sides beach bag and connect their edges and panels with a bright ribbon, cord or braid, then all that remains is to make strong handles. For the lampshade, you only need to sew the edges of the rug so that you get a pipe of the desired diameter. It is pulled over a frame made of solid wire and secured to the lamp socket.
What can be made from plastic caps (video)
Games and toys made from waste material
Didactic games with plastic bottle caps have long found their admirers among teachers. Bright and comfortable material makes it easy to make beautiful educational toys. When unscrewing or folding the caps, the child develops fine motor skills, and the selection of game elements by size and color serves for the baby’s mental work.
On plywood or cardboard you need to draw your favorite cartoon characters, clowns, fairy-tale characters, towers, etc. Having selected the color of the nose plug, buttons, spots on the animal’s fur, the windows of the mansion and other elements of the design, saw off the neck of the container to which this lid fits with a hacksaw. You need to cut below the rib at the neck. Clean the cut with sandpaper and glue the threaded part of the toy to the desired place. After removing the lids, invite your child to choose them by size and color and screw them where they should be.

In the little house, the child can sequentially open the round windows, inside of which the faces of the characters are pasted, and in the clearing with flowers, he can look for where Maya the bee has hidden. You can use lids of different sizes, with hinged valves. This will allow you to diversify your game options.
Games with plastic bottle caps can also involve making up words and arithmetic examples if the child already knows letters and numbers. To do this, you just need to stick the necessary symbols on the surface of the cork, and insert a small magnet inside it. On the refrigerator door or just on a sheet of tin, the child will be able to collect small messages to parents and solve homework in game form. The caps with numbers can also be arranged in the form of a calendar, removing past dates every day.
Toy watches are another example of what can be made from bottle caps. If there is a working mechanism suitable size, then the watch will be real. The mechanism will need to be attached to the inside of a large cover, and the pin for attaching the arrows will need to be placed on the front side. Place numbers on the pieces of wire along the circle.

A plastic robot made with your own hands from colored corks and wire will surely appeal to any boy. To make it you need to make 4 flexible limbs by stringing the caps into in no particular order. The body and head can be from empty containers suitable shape. The feet need to be made large, providing stability to the toy.
There are many options for crafts made from plastic bottle caps. Small containers and boxes for various small items, a palette for a young artist, Christmas decorations- possibilities waste material very extensive. They often complement what can be made from plastic bottles. The master's imagination helps them come true.
Attention, TODAY only!
The imagination of folk craftsmen knows no bounds; the results of handicraft amaze the imagination with the variety of forms and methods. Recently, there has been a tendency to make crafts from plastic lids, since there is always enough material at hand. Let's look at the most popular methods of using and designs for plastic bottle caps.
Children's crafts
Create interesting crafts Even children can make plastic bottle caps. The simplest option is original magnets.
To work, you must ensure that you have the following materials:
- multi-colored corks;
- small magnets, which can be found in craft departments;
- double-sided tape or glue;
- colored paper;
- alcohol;
- felt-tip pens, pencils and paints.
Alphabet

A craft in the form of an alphabet set made from plastic caps will be a useful tool in teaching children the alphabet. Basic manufacturing steps:
- The bottle cap is degreased with alcohol.
- The magnet is fixed to the plastic plug with tape or glue.
- Circles with a diameter corresponding to the size of the lid are cut out of colored paper.
- Letters are written on the blanks.
- The parts are glued inside the lid.
Advice! The craft is very convenient to use on a magnetic board.
In a similar way, create a craft in the form of an arithmetic set.

Aquarium
An aquarium made of fish based on plastic lids looks original. Depending on the age of the child, parental assistance may also be required. The process of creating an attractive craft includes the following steps:
- Small triangles of colored paper will serve as tails.
- They are glued in random order onto a sheet of blue cardboard.
- The tails are complemented by plastic plugs, which are fixed with glue or double-sided tape.
- The eyes of the fish are decorated different ways: glue plastic blanks, draw with a marker, or cut out and glue parts from colored paper.
- The basis for various algae is green paper.
- Bubbles applied with a stroke will add more realism to the craft in the shape of an aquarium with fish.
At the final stage, the craft can be supplemented with an applique in the form of a fairytale castle or sea stones.

Mosaic
Mosaic made from plastic bottle caps - another option original crafts. The need for a large number of traffic jams can become an obstacle, so friends and neighbors are often enlisted to help with collection. There are several options for making mosaic-shaped crafts; the main difference is the surface on which it will be located.
Independent unit
This type of craft made from bottle caps is rare. The design principle is quite simple. Initially, a sketch of the future craft is created on a sheet of cardboard, drawing all the multi-colored elements. Based on the sketch, the plugs are fastened with plastic glue.
Comment! Mosaic designs are chosen to be simple, without a lot of ornate details.

Paintings on houses and fences
Much more often, mosaics decorated with lids are found on wooden fences. There are several creation options. As in the previous case, you should make sure in advance that you have a sketch with drawn color markings. Cross stitch blanks can be an excellent assistant in this matter.
The first method is to glue plastic bottle caps onto plywood in accordance with the selected image. After which the entire part is fixed to a fence or wall of a wooden house.
The second method is to initially prepare holes on all plastic lids. This work is quite labor-intensive; it is better to do it with a hot awl. The corks are then strung in rows on wire. When all the elements are assembled, each row is fixed to the wall or fence with nails. Vivid examples paintings made from bottle caps are shown in the photo:

Another popular way to make mosaic-shaped crafts is to attach plastic lids to a wooden surface with nails. Naturally, having a pre-drawn image is necessary. Nails are selected with a small head of length corresponding to the thickness of the wooden base. Bottle caps can be nailed on the inside or outside.
Comment! The second option is preferable, since fastening from the inside causes a lot of inconvenience at the fixation stage. In the future, the lids quickly become clogged, and the craft loses its original attractive appearance.

A concrete or brick wall requires a different approach when creating a craft in the form of a picture based on plastic bottle caps. Here you will need a special solution designed for laying ceramic tiles. To save money, you can prepare your own cement mixture. Bottle caps are attached gradually, treating a small area of the wall with the solution. It is important to choose the right consistency of the adhesive, otherwise the plastic lids will move down and the craft will turn out sloppy.
Subsequently, the gaps between the plugs can be sealed with a solution, this will extend the life of the craft and give it greater aesthetics. Masterfully crafted do-it-yourself bottle caps are shown in the photo below:


A few more original ideas
Corks are a universal material. They even learned to make massage mats and decorative paths for the garden from them.
Massage mats
A mat made from plastic bottle caps perfectly relieves muscle tension after a hard day. The craft is useful both for the back and for massaging the feet. Here you need to be patient. The principle of creation is similar to the design of an independent mosaic:
- A geometric pattern is often chosen for a rug, although this is not at all necessary.
- The image is drawn on paper with all the colorful lines reflected.
- Each bottle cap is pierced with an awl at four points arranged crosswise.
- Next, the selected pattern is formed from plastic plugs.
- The parts are alternately strung on a fishing line in rows.
- A rug of lids can be assembled all at once using the snake principle, or you can string individual rows and then fix them together.
- The ends of the fishing line are bitten off or carefully set on fire.
This method is suitable for creating various crafts from bottle caps: coasters for cold dishes, rugs for the hallway or shower.

Garden paths
Another area of application for free material is tracks made from plastic bottle caps.
Attention! Experienced users warn about slipping of the surface from the covers during frosty periods, so the paths are located in that part of the garden that is not used for walking in winter.
To work you need to prepare:
- A large number of plastic bottle caps.
- Sand with cement for mortar.
- Construction adhesive.
- Wooden elements for formwork.
Registration process:
- In the back, the outlines of the future path are marked.
- If there is grass upper layer The turf is removed and a trench 10 cm deep is dug.
- Wooden elements are used to form formwork, fastened with nails.
- When preparing the solution, glue is added to the mixture of cement and sand.
- The composition is spread over the surface in a small area, after which the bottle caps are carefully pressed into the uncured mixture. The plugs go deep to the base.
The main rule of a labor-intensive craft is to achieve the same level of plastic lids. When the solution dries, the remaining cement is removed with a stiff brush. At the end of the work, the formwork is dismantled.
The following photo will help you enjoy the beauty of paths made of plastic bottles:

In addition to the proposed craft options, curtains for a country house are often made from lids.

The main thing is to show your imagination, and the fascinating process will lead to the creation of individual masterpieces from bottle caps.
Bottle caps are an ideal option for making various kinds of crafts and useful things for the garden. They come in different colors, are inexpensive, and are quite easy to work with.
- Design rafts, boats. The process requires persistence and skill. But in the end it turns out original products. There are various ways to place covers on a watercraft.
- Carports. By making a canopy using a variety of bottle caps, you can protect your car from direct sunlight. First, a wooden or wire frame. Then the covers are attached. Then they are simply painted.

- Furniture for the garden. You can decorate benches, ottomans, sofas, and beds with covers. In a country house, there will be a lot of trouble with cleaning. If you use plastic covers instead of traditional fabric upholstery, problems can be avoided. Cork tables and chairs designed for outdoor use look especially good.
- Decorating pots for plants. It is enough to take ordinary pots and glue colorful lids on them.
- Gates, fencing and fences. You can save a lot of money by making a fence at your summer cottage with your own hands. IN in this case A mosaic of lids is laid out on the finished frame of the structure.
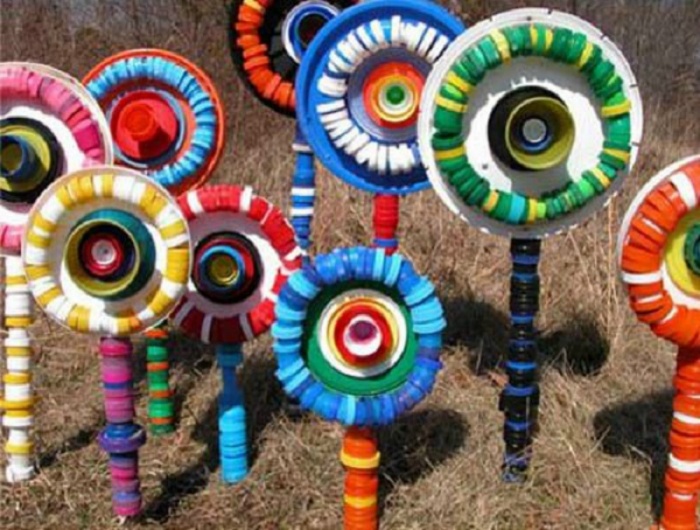
- Decoration of flower beds. Landscape installations: figures of airplanes, birds and animals. Anyone can do these crafts.

Gazebos decorated with bottle caps
It is not necessary to make crafts from the lids. You can do something more meaningful, for example, a gazebo. At the same time, you can save a lot.
The frame can be made of any material. Experiment! The shape of the structure may not be the standard rectangular, but also hemispherical. After constructing the frame, covers are attached to the walls using nails or screws. You can use regular glue.
Using bottle caps you can lay out various ornaments. This will add variety to otherwise colorless walls.
First, a frame is made of dense wooden or other sheets. Then it is decorated with the products in question.

Manufacturing of lamps
You can also save on purchasing lamps. You will need: a canister of household chemicals, socket with light bulb, covers.
- The neck of the canister is cut off.
- A socket with a lamp is installed inside.
- Lids are glued onto the canister as decoration.
The presented type of lamps look very beautiful. The lampshades for country lanterns are made in the same way.
Home decor: what you can do, creative uses
How to decorate a dacha with plastic corks (video)
Despite the fact that at first glance it is quite simple to decorate a country house using bottle caps, there are some rules that should be taken into account.
- It is better to “plant” the lids on cement mortar.
- Cement does not react with plastic the same way as brick, so it is recommended to pre-make holes in the lids.
- Plastic breaks down under the influence of heat and frost. This must be taken into account.
- Bottle caps can also be used to decorate the roof. At the same time, the products are attached to self-tapping screws.
- If there is a building made of brick or wood on your site, you can easily decorate it with plastic covers, laying out any ornament you like. This could be: images of animals, geometric patterns, cartoon characters, flowers.

Corks are especially popular when creating country decor. From them you can create entire installations in the form of three-dimensional and flat figures of plants and animals, borders and flower beds.
- The outline for a flower garden made from lids looks original in the form ladybug.
- Among other things, covers are actively used to create garden paths. Making them is very simple: pour cement (immediately give it the required form), and then multi-colored or plain-colored plugs are stuck into it. Due to the corrugated sides, they are firmly stuck in the material. You can make paths in the form of original panels.

- If we talk about installations, the simplest option is to make a Christmas tree. A shape is cut out of plastic bottles. And then Christmas tree decorated with multi-colored caps connected into garlands. You can make miniature Christmas trees from green corks.
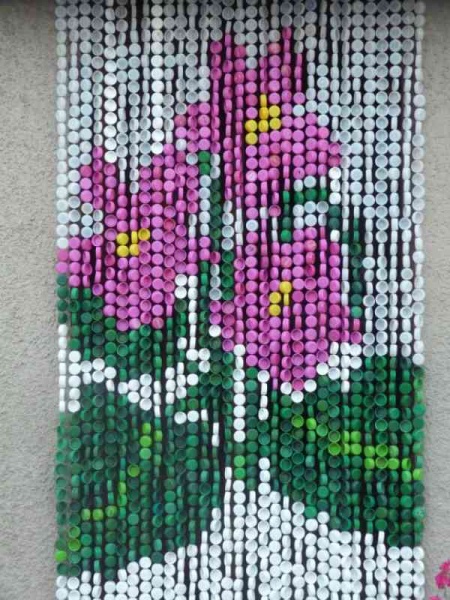
- Using lids you can decorate the interior of your home. Curtains, panels, screens and partitions - all this can be done with your own hands. You definitely won’t see similar products from anyone else.
- Rainbow curtains made from corks of various colors look modern. Even a child can assemble them.
Ideas for a summer house made from traffic jams (video)
Almost anything can be made from bottle caps. Many summer residents skillfully use this. It is recommended to use corks of different colors and shapes, then the designer creations will look more original. You can combine the use of caps with plastic bottles and other seemingly unnecessary things. The main thing is to use your imagination and everything will definitely work out. The work will require patience, so you can involve your family and friends. It's more fun to act together!


Reviews and comments
Alisa 08/26/2015
I recently started getting into Hade-made and my attention was drawn to plastic bottle caps and jar caps for children’s attention. Such pictures come out!) I decorated the whole dacha, the neighbors just gasped and went to take pictures) And most importantly, it turns out beautifully and effectively)
Stanislav 01/20/2016
How many interesting ideas, I wouldn't even have guessed. I just found a use for creating a path by simply pressing corks into the sand, and my wife and I made the curtain. But to make a small picture on the wall with some kind of image - this is now our task, we’ll just collect the covers.
Olga 05/24/2016
But I’m somehow indifferent to crafts made from plastic bottles and caps. Although, some works are, of course, worthy of attention. But already as art objects :) Still, I prefer country cottage area decorate with more natural materials - wood, stones...
Olenka 06/14/2016
Great! I would never have thought that such beauty could be created from such material as lids. The downside is that the work is painstaking and the lids take a long time to assemble. And one color. But then no one will have such decor in their dacha. And the child should also like this activity. We will try!
Add a commentThere are no limits to human imagination. How many crafts have been invented from plastic bottles? No less interesting ideas are embodied in the use of corks from such bottles. Only finished products It is less common with lids due to the fact that it is not very easy to collect a large amount of such material. But, if a person is interested in this, then he will involve the whole family, relatives, friends, neighbors, and work colleagues in collecting caps. As a result, he will have enough material to bring his masterpieces to life.
What is the difference between crafts made from plastic corks?
For those who have never been interested in crafts and recycling, plastic bottles along with caps are ordinary garbage that it is advisable to remove from the apartment on time. For creative and house-loving people, this is an invaluable material for realizing their fantasies and creativity. From caps you can make interesting and useful objects, toys, decorations that will delight others. Crafts made from plastic corks differ:
- the amount of material used;
- method of connecting the covers to each other;
- shape, color, size;
- purpose;
- complexity of the design or ornament.
 plastic cork toys
  mosaic made of plastic corks
  crafts made from plastic corks
For beginners - the path to creating unique masterpieces!
How to attach?
There are several ways to attach lids to products. For paintings and children's toys, special glue for plastic, “Moment”, or superglue is suitable. This connection is suitable for gluing corks to the base with the front and back sides and even sideways. Fastening to a wooden base can be done using nails with a wide head or gasket, or self-tapping screws. In order for the item to be strong and reliable, the covers are connected to each other with fishing line. In this case, you need to make from 2 to 6 holes in them. Making 2 holes in the middle is similar to sewing on a large button. 4 holes on the sides will ensure reliable connection with fishing line or nylon thread. This type of wire fastening will contribute to the integrity of the structure. This fastening is used in the manufacture of fences, enclosing products, and gazebos.
Application
Crafts made from plastic corks can have different directions. They are most often intended for a summer house, a summer kitchen in a private house, or a bathhouse. But they are also acceptable for apartments and even offices. Watches made from small amount lids of different sizes. Original stands decorate the table for tea drinking. You can use lids to decorate a mirror and create protection from water near the sink. At your dacha you can hang a homemade chandelier made from corks or a spectacular curtain. A table and chairs with a metal frame and a cork cover can stand outside all summer. Such furniture is not afraid of humidity and sunlight. A beautiful rug of colorful caps can be placed at the entrance to the house or in the bathroom. If the mat has a strong, reliable and safe fastening, then it can serve as a massage tool. The elements for the massage mat are fastened with fishing line, after making 4 holes in each lid with a hot awl.
 using lids for activities with children
  wall decoration with plastic caps
  crafts made from corks
  track
track


