One of the simplest and most popular women's hairstyles 2020 is a hairstyle with hair gathered in a bun. Comfortable and universal hairstyle A bun is always one of the first options when choosing a casual or evening hairstyle.
The 2020 bun hairstyle is suitable for absolutely all girls and women thanks to its large selection options. Everyday and evening bun hairstyles differ only in the technique and accessories.
In an everyday version, the bun can be careless, while evening hairstyle the bun requires careful styling in a more magnificent form.
Not losing its position from year to year Fancy Hairstyle The 2020 bun continues to conquer the catwalks and surprise even the most sought-after beauties with new styles and ideas.
Surely you have tried more than once to make a beautiful bun for medium or long hair using a donut or twisting jutes or braids around a tied ponytail.
Today we invite you to see what beautiful and original bun hairstyles are worth trying in 2020.
Photo ideas and options for bun hairstyles in everyday and evening style will definitely come in handy for you: bun hairstyles for school and work, holiday bun hairstyles with braiding, a bun of curls and wedding hairstyles with hair gathered in a bun for stylish brides.
Simple bun hairstyle for every day photo tutorials step by step
Let's start with a photo review of bun hairstyles 2020 from the simplest everyday options. A simple bun hairstyle with a donut can be done either low or high - at your discretion.
You can complement this type of bun hairstyle with a bow; this option is more suitable for studying and walking.
A messy bun with loose hair is suitable as a hairstyle for every day. A hairstyle with two buns looks very stylish and youthful.
If you want a more discreet version of the bun hairstyle, create a small backcomb on the top of the head and pull out the front strands.
For more options for everyday bun hairstyles 2020, see the photo step by step below.

Beautiful evening bun hairstyle – ideas for a festive hairstyle
You can style your hair beautifully for an evening bun hairstyle 2020 in different ways. Of course, the simplest hairstyle is a bun with a donut, but even here the hair can be styled in different ways.
Bun hairstyles with braiding look very cute and elegant. An original braid that frames the face and turns into a bun will be an excellent option for a prom hairstyle.

An evening bun hairstyle can consist entirely of weaving, which makes it elegant and unique.
A beautiful low bun hairstyle looks more elegant and stylish if the strands are laid smoothly and neatly. A similar evening bun hairstyle is suitable for dinner in a restaurant, corporate event and social parties.

Of course, the options for evening hairstyles with buns 2020 don’t end there, big photo you will see in our gallery.
Wedding hairstyle bun – beautiful photo options for brides
When it comes to wedding hairstyles 2020, the first choice for a bride's hairstyle will always be a bun.
Beautiful collected hair in a voluminous bun - the perfect hairstyle for a wedding. Comfortable, stylish, beautiful and sophisticated wedding hairstyle, a bun of curls is perfect for a wedding dress.

Moreover, a wedding bun hairstyle can be complemented with sophisticated hair decorations. A wreath, tiara, and comb hairpin go perfectly with this hairstyle.
A mandatory wedding attribute, a veil will suit any bun hairstyle, smooth or voluminous. high bun based on curls.
Beautiful hairstyles in the form of a bun – photo ideas for 2020, options for evening, wedding and everyday bun hairstyles


Scythe
If you think that a classic braid is too banal for a summer walk, we offer several fairly simple, but stylish options which will be an excellent alternative to traditional hairstyle.Option 1
To begin, make a parting on one side and start braiding from the opposite temple. Move diagonally, weaving strands from the crown and forehead area. As a result, you will get a stylish asymmetrical and not at all hot summer hairstyle.Option 2
This is a very simple and quick technique that will help you slightly improve the classic braid. First of all, tie a not too tight ponytail with a thin, invisible elastic band. Make a gap in your hair above the elastic and thread your ponytail through it. Then, braid your hair using any technique you like. So simple casual hairstyle ready.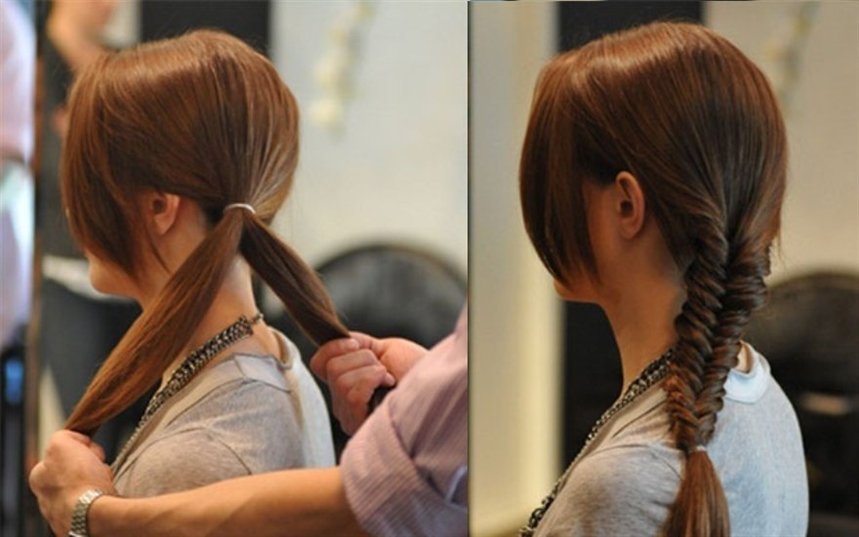
Option 3
This hairstyle looks great on long hair Oh. To begin, tie a ponytail that is not too tight at the side. Make a gap above the elastic and let all the hair through it. To add volume, loosen a few strands. A little lower, tie another elastic band and repeat all the steps again. The number of sections depends on
Option 4
To make it look so careless, but stylish braid, you need to wind it up hair light waves and backcomb the top of the head. Then braid your hair using any technique you know. When the braid is ready, pull it different sides to add volume. At the end, divide the hair into two parts, tie it in a knot and secure it with a bobby pin on the inside.
Option 5
Separate one side strand at each temple (above eyebrow level). Braid them into a braid. Grab a curl next to each braid and secure it to the back of your head with an elastic band or hairpin.Repeat the steps, separating the strands near the ears. Braid them into braids, grab adjacent curls and secure them at the back of your head. The rest of your hair can be left loose or braided.

Option 6
Comb your hair with a side parting. Separate the strand near the ear and braid the hair using any technique. Don't braid too tightly. Secure the end of the braid with a clear elastic band. Release the strands from the braid to give them volume. The final touch: spray your hair with hairspray. This option will look best on curly hair. If you have straight hair, spend a couple of minutes curling it with a curling iron.
Option 7
Make a side parting. Separate a section of hair from the parting and begin braiding, taking in the hair that frames your face. Use any technique. Having reached the neck, change the braiding technique and weave the remaining hair into the main braid. When finished braiding, place an elastic band on the end of the braid. Release the strands, which will make your hair look fuller. Finally, spray your hair with hairspray.In the photo below you can see the combination of a simple braid and a fishtail. It looks very impressive.

Option 8
A quick and simple hairstyle option that even a first-grader can handle. Despite all the ease of weaving, the final result is a styling that others will consider unusually complex.So, divide your hair into three equal parts. We braid one braid from each part, the ends of which are secured with small elastic bands. Now take one braid and roll it into a ball. We secure it with hairpins at the base of the back of the head. We make balls from the remaining braids.
This hairstyle has only one drawback: true Rapunzels will have to tinker with braiding their curls. But the owners of hair middle length will cope with weaving in a matter of minutes.

Option 9
An inverted braid seems unusually complicated, but in reality everything is very simple. The braiding technique is surprisingly simple and with its help you will create a unique hairstyle in a couple of minutes.First level: separate one strand above your forehead and make a ponytail. To prevent the ends of your hair from interfering with your work, curl your ponytail onto the top of your head and secure it with a clip.
Second level: grabbing the side curls, we make a second tail. At the same time, we retreat a little from the first tail. Now remove the clip. We divide the first tail into two halves, between which we draw the second tail. We bring the tip of the second tail up and secure it with a clip. Leave the ends of the first tail at the bottom.
Third level: grab a strand a little lower, connect it to the free ends (from the first tail). Making the third tail. We remove the clip, divide the ends of the second tail into two halves and pass the third tail between them. We attach the third tail with a clip at the back of the head. Leave the ends of the second tail below.
We repeat the steps as necessary. Once you've finished braiding, secure the end with an elastic band. The final touch: carefully release the strands, starting with the very first ones. The higher the strand, the more volume we give it. It is not necessary to braid your hair all the way – the hairstyle will look chic even with three levels.

If you are looking for a simple but original summer hairstyle, an unusual ponytail will be an excellent option for both Everyday life, and for an evening walk.
Option 1
To create this hairstyle, first curl your hair a little at the ends. Tie the ponytail with a thin elastic band. Make a gap in your hair and thread your ponytail through it. If necessary, curl your hair a little more or separate the curls with your fingers to add volume.
Option 2
For this hairstyle, the hair must be straight, so if necessary, use a straightening iron. Then, divide your hair into two layers: top and bottom. Upper layer Gather your hair with a thin elastic band at the back of your head on either side of your head. From the bottom layer, weave a braid in the opposite part. The thickness of the braid depends on your personal wishes. Wrap the braid around the elastic band of the ponytail and secure the end with a small hairpin.
Option 3
To create a more elegant ponytail, you will need hair foam or wax. Make an even parting (in the center or side, whichever suits you best) and gather your hair on one side. Apply foam to them and divide into two equal strands. And then just tie a knot twice in a row. Secure with a thin invisible elastic band directly under the knot, and twist the ends of the hair a little or lightly backcomb it.
Option 4
To make it so stylish ponytail, which is perfect for any kind of summer event, you will need a curling iron or straightener, hairspray, bobby pins and a little time. To start, curl your hair at the ends. Then divide them into 4 parts: at the back of the head, at the crown and on both sides at the temple, and tie them with elastic bands so that they do not mix with each other. Take the hair from the top of your head and comb it a little from the inside, and then twist it with a flagellum and secure it with bobby pins. Repeat the same with the hair at the temples. When the hairstyle is ready, spray it with hairspray to be secure.
Option 5
A very romantic summer hairstyle. To do it, divide your hair into two parts along the parting line. Braid braids on both sides, which converge from the temples at the back of the head. Tie them together with a thin elastic band. Then separate a thin strand from the ponytail and braid it. Wrap it around the elastic band and secure it with a bobby pin on the inside. Comb the tail a little with a comb or curl it with a curling iron.
Option 6
The ponytail is one of the most popular and versatile hair trends in the world. This option is very fast and original. To begin, curl your hair at the ends and then divide it into two parts. From the hair at the top of your head, begin to weave a loose braid, weaving all the strands into it along the line of your forehead to open your face. The braid should end at the back of your head, and then lift the rest of your hair and tie it together using a thin elastic band. To hide the elastic, you can wrap it with a strand of hair and secure it with a bobby pin on the inside.
Option 7
Another easy one quick way how to make an elegant ponytail. Curl your hair at the ends to create light waves. Then divide them into two parts. Comb the hair on the top of your head a little and tie it high with a thin elastic band. Gather the rest of your hair a little lower and also tie it with an elastic band. To create more volume at the top of your hair, loosen a few strands at the top of your head.
Option 8
This is a great way to turn an ordinary ponytail into a original hairstyle. Tie all your hair into a ponytail at the back of your head. Separate a small strand and wrap it around an elastic band to hide it, and secure with a bobby pin on the inside. Then tie another elastic band just below. Make a gap in the resulting sections and pass the hair through it. Tie another elastic band a little lower and repeat the procedure. The number of sections directly depends on the length of your hair. To make the ends look natural, curl them a little with a curling iron or flat iron.
Option 9
Divide your hair into 3 strands (central and two side). Secure each strand with an elastic band if you are doing your hair yourself. This way your hair won't get tangled. Roll the central strand into a rope and wrap it around the side ponytail on the right. Separate one curl from the left strand. Roll it into a rope and wrap it around the right tail. We also roll the remains of the left strand into a bundle and wrap it around the tail. We secure the hair with an elastic band.This hairstyle has several advantages. Firstly, we don’t need to maintain clear symmetry (uneven strands give a chaotic shine). Secondly, the absence of a parting allows you to disguise some defects: unpainted roots, dandruff or too thin hair.

Hairband made of… hair
This is the simplest and original way replace a regular headband and keep your hair out of your face on a hot day.Option 1
First, divide your hair into two sections. Gather the hair at the back of your head with an elastic band to keep it out of the way, and proceed to the strands at the front of your face. Make a parting on either side and begin to weave a braid, weaving strands into it along the line of the forehead. When the “headband” is ready, loosen the hair at the back of your head and enjoy the original hairstyle.Option 2
Separate a small section of hair from the neck area and weave it into a thin braid. Wrap it around your head and secure it with a bobby pin on the opposite side. This hairstyle looks great on curly hair.
Option 3
Make an even parting and separate two strands from both sides of your head. Weave them into braids, not too tight, and tie them at the ends with invisible elastic bands. Connect them together at the back of the head and secure them with bobby pins.
Option 4
Separating the strand in the bang area, we backcomb it. Near the ear on the right, we separate one curl and form a flagellum, twisting the hair away from itself. Secure the tip with a clear elastic band. Take the bobby pin and secure the tourniquet at the back of your head, closer to the left side.We repeat the steps on the opposite side: separate the strand near the ear; we form a flagellum; secure the tip with an elastic band. We place the second flagellum under the first and secure it with an invisible one.

Hairstyle in 30 seconds
If you’re running out of time and you’re in a hurry to attend an event where you need to be dressed up, these options are for you!
Option 4
Divide your hair into three sections. The middle one should be larger than the others. Weave it out voluminous braid and roll it into a knot using bobby pins or bobby pins. Roll the strand on the left into a bundle and pass it around the knot counterclockwise (from below). Wrap the strand that remains on the right around the hairstyle clockwise (through the top). Secure with bobby pins or spray with varnish.
Option 5
To achieve this hairstyle, you need hairspray, bobby pins and a little time to practice. To begin, fluff your hair with your hands to create good volume and apply generous amounts of hairspray. Then gather your hair together and curl it inward to form a shell. Secure your hair with bobby pins. You can leave a few loose strands to give your hair a sophisticated casual look.
Option 6
This is a very simple way to make a knot at the back of your head. First, tie the ponytail and divide it into two equal strands. Twist each strand clockwise. Then start weaving the strands together (counterclockwise). Tie the tourniquet at the end with an elastic band and twist it into a knot at the back of your head, securing it with hairpins.
Option 7
Tie a ponytail at the back of your head, not too high. Make a gap above the elastic and pull the hair through it. Then, carefully curl the tail into a shell and secure with a hairpin or other accessory.
Option 8
To make a hair bow, you will need a thin elastic band, bobby pins and 1 minute of time. To begin, tie a knot high on the top of your head and divide it into two parts. Pass the tip of the tail in the middle and secure it at the back with a bobby pin. This hairstyle is also called “Lady Gaga style bow”.
Option 9
This hairstyle will take longer to create than the previous ones. You will need a foam donut and pins. Tie a high ponytail, put a donut on it and hide your hair under it one strand at a time, securing it with hairpins for security. At the end, the hairstyle can be decorated with a bow or other accessories.
Option 10
Curly “donuts” look much more interesting than regular round ones, if you like ballerina buns. Such “donuts” can be bought in specialized stores or ordered online. The technique is no different from classic options. The hair must be tucked behind the donut.
Option 11
Pull your hair into a ponytail high on the crown of your head. Divide the tail into two halves, wrapping each with a flagellum. Now roll the ropes around the elastic band. We twist them tightly and in opposite directions (left - to the right, right - to the left). Secure your hair with bobby pins and fix it with hairspray.
Option 12
Divide your hair into two halves. Take the first strand and separate a curl from your forehead. We twist the curl away from ourselves, starting at the forehead and ending behind the ear. We tie the first ponytail low at the back of the head. We do the same with the second half of the hair. Now all that’s left is to roll the bagels. Ready!
Perhaps the most easy way To escape the heat in the summer and at the same time create an exquisite hairstyle - this is a Greek headband.
Option 1
Place a Greek headband on the top of your head and thread small sections of hair under the elastic. You will have a beautiful hairstyle in just a few minutes.
Option 2
This is a more complex example of how to use a Greek headband. For this hairstyle you will need two headbands. Place one under your hair and then backcomb the back of your head. The second one - put it on the top of your head and wrap the strands under it. Voila!
"Malvinka"
One of the fastest and cutest hairstyles is familiar to us from an early age, thanks to Malvina, a girl with blue hair. The main difference between this hairstyle: the hair is loose, the upper strands are pinned high on the back of the head.Option 1
A great way to add variety to your look if your hair barely touches your shoulders.Separate the strand above the bangs and backcomb it. Place a roller under the strand and secure it. You can use Velcro curlers as a roller. They stay on the hair better. We grab the side curls and (together with the combed strand) secure them to the back of the head with an elastic band. Using any thin object, we pull the hair out a little from above, giving it volume. A Chinese stick or an ordinary hairpin will do. It is better to pull out strands with your fingers on long hair, but not on short hair.

Option 2
Separate one strand at each temple (above the ear) and secure them at the back of the head with an elastic band. We grab the curl with the first strand, pass it over the ponytail and wrap it behind the first strand. We repeat on the opposite side: grab a curl, pass it over the ponytail and place it under the strand. We connect the ends of all four curls with an elastic band. It turns out to be a cute heart.
Option 3
Using a hair straightener, curl the ends on a few side strands. Separate one strand at the top of your head and backcomb it with a comb. To keep the strand in place, spray it with hairspray. Having laid the combed strand, pin your hair with a hairpin, making a “malvinka”. Ready!Beautiful option will do for a romantic date, going to the theater and even for a wedding.

Option 4
Grab a wide strand (from forehead to ear) at each temple. Secure the strands at the back of your head with an elastic band, masking it with a thin curl. Chaotic, in in no particular order, braid a couple of thin braids. To make it even more fun, you can curl the ends of your hair a little.
Option 5
Separate a strand at each temple and make two flagella (turning the strands away from you). Connect the flagella at the back of the head, tying them with an elastic band. Braid the loose ends of the braid using your favorite technique. For example, ala “fish tail”.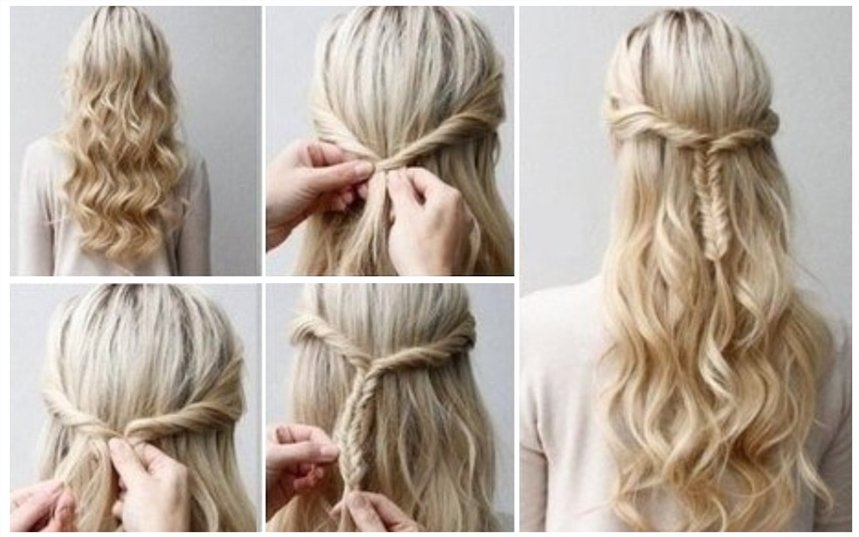
Focus on accessories
With the help of ribbons and scarves, you can turn even the most ordinary ponytail into a work of art. Someone will think that hair with a scarf resembles a collective farm style. And he will be wrong! It's fashionable and beautiful - even Hollywood stars flaunt branded scarves skillfully tied to their hair. In summer, a scarf will protect you from the scorching rays of the sun. It also has other advantages: with the help of a well-placed scarf you can hide hair imperfections, overgrown roots, gray hair or a sparse parting.Option 1
Unwind and comb your hair. Tie a knot about halfway through the scarf. It can be a regular or decorative knot - to your taste. Place the scarf over your forehead (with the knot slightly to the side). Tie a double knot at the back of your head and hide the ends of the scarf behind the base of the fabric.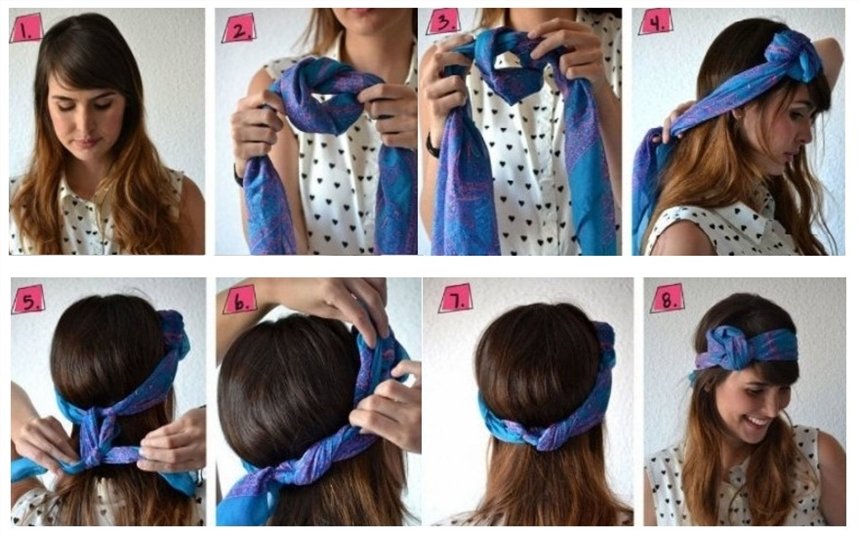
Option 2
Love fashionable images V pin-up style? Then you will like this option.Divide your hair into two parts: the back (crown and back of the head) and the front (forehead). Gather your hair in a bun at the back. You can pre-braid it into a braid, which will give your hairstyle a fixation. Twist the hair in the front into a braid, style it into a donut and secure with bobby pins. The finishing touch: tie a cute scarf or scarf around your head.

Option 3
Another great version of the “pin-up girls” image. Do long bangs, separating a strand above the center of the forehead. Gather the rest of your hair into one or more ponytails (the ends of which are curled with a curling iron). The most important stage is the formation of bangs. It is the large bangs that are one of the distinctive features of this style. We wind the front strand onto a curling iron. Let's give it desired shape and spray with varnish. We tie a small polka dot scarf behind the bangs with a bow.
Option 4
The popularity of the film The Great Gatsby renewed interest in American culture of the 1920s. And, of course, this interest has not bypassed the fashion world. Ladies of that era, going to a party, preferred short hair, and long curls were tucked under a catchy headband. However, the headband was also worn on short hair. In addition, hair was often curled. If you like to visit Mafia clubs or jazz bars, then retro styling will come in handy. Let's look at one way to create this hairstyle.Comb your hair to the side and wear a glamorous headband. We pass the hair through the headband - strand by strand. Voila! To the owners short hair We advise you to smooth your curls with gel and (where would you be without it?) put on a headband!

Among these hairstyles, you are guaranteed to choose several for yourself.
Long, thick and well-groomed hair has long been considered the pride of any woman. Moreover, such luxury opens up an excellent prospect for realizing fantasies in order to create fashionable, creative hairstyles. But how to do hairstyles for long hair in a short and simple way?
Indeed, in the conditions of modern life, the fair sex cannot always devote enough time to the process of creating them. In fact, there are a lot of easy and attractive options that you can create on your own in a short time.
There are a lot of beautiful hairstyles for long hair. You can easily make them yourself.
Quick and easy styling techniques based on the tail
The simplest and quick method beautifully collect long strands - make a ponytail. It never went out of fashion. This seemingly elementary hairstyle has a lot of unique varieties, so it won’t look boring at all and won’t get boring if you periodically change the ponytail to a low one, a casual one in a braid, a side one, or a high one.
So, how to make your own hairstyle for long hair using this element as a basis? Let's consider more than one option.
Twisted into a rope

The photo shows a beautiful rope ponytail made of thick long hair.
This styling will take no more than 3 minutes, but will create the appearance of well-groomed and neat. To construct it you need to complete the following steps:
- All long strands must be gathered into a ponytail at the top of the back of the head, secured with an elastic band.
- Divide it in two in equal proportions.
- Roll each piece into a spiral.
- Twist all the spirals into one rope.
- To prevent the ponytail from falling apart, backcomb the tip a little and secure it with an elastic band so that it is invisible to prying eyes.
Stepped, like Disney princesses

Such tiered tails will add mystery and magic to the image.
This option is also easy to implement. You can do it yourself very quickly:
- Create a high ponytail.
- Secure with an elastic band.
- We do a light backcombing.
- Lightly spray with varnish.
- Now all that remains is to tie it with strands taken from the tail along its entire length in steps. Or you can do this with rubber bands that match your hair color.
- At the last stage, the protruding elements are corrected. Each of the steps can be adjusted to give the desired volume and size.
Complex with several tiers

Step by step process for creating a tiered ponytail for long hair.
In fact, the name of this styling is deceptive, since there is nothing complicated here. It is done quickly - only about 5 minutes.
The process occurs as follows:
- Curls are combed to the back of the head.
- A part is separated from the total mass at the top based on the number of future tiers.
- A tail is formed from the separated part and secured approximately at the top of the head with an elastic band (preferably matching the existing color).
- The lower second part is selected.
- A tail is made from it in the middle of the occipital region, connecting it with the previous element.
- Then all subsequent tiers are formed into tails in the same way.
- The last lowest strands are connected to the resulting upper tail, and everything is fixed in the lowest occipital region.
- At the very end, the tail is carefully combed along its entire length.
Inverted

Step-by-step creation of a tail “in reverse”.
If you answer the question of what hairstyles for long hair can be done for every day so that they look unusual, then this option can be considered one of the simplest and most beautiful. This installation is done simply and quickly, and looks simply great.
It can be done with either a high or low ponytail. To create it, the following steps are performed:
- First, we decide on the height of the future hairstyle.
- Next, we collect the entire long mass into a bun and form the tail itself, which we then secure well with an elastic band.
- We form a “hole” directly above it.
- We twist the tail into a rope to make it easier to thread it through.
- We pull it into the formed hole and fasten it again with an elastic band.
- Hanging strands can be left straight, curled with curlers, or made into wavy curls.

With the help of many inverted elements, you can also create one such beautiful and unusual tail.
Quick styling with braids
How to make a hairstyle for long hair using braiding? It's not difficult if you learn the techniques for creating various options.
Headband of several braids

Step-by-step process for creating a braided headband for long hair.
Every girl with long curls can do this hairstyle. For these purposes, it is enough to follow these steps:
- Take the bottom strand from one side in the ear area and weave a tight braid (the thickness can be adjusted at your discretion).
- We braid a second similar braid on the other side.
- After this, we throw the braids in opposite directions over the head so that they form a headband.
- We fasten their ends with bobby pins under the hairstyle in the lower back part of the head.
That's all! Romantic styling is ready.
NOTE! If the headband is made on long hair without bangs, then the braids should be passed directly along the line of their growth on the forehead or slightly above. They can also be placed higher above the bangs, if any.
Decorating loose curls with a hanging braid

Step by step process for creating braids on long flowing hair.
This is a very simple styling, but despite its simplicity, it still requires some skill and effort. A braided braid must be neat, otherwise it will simply look out of place.
How to make a hairstyle with long hair with a decorative braid? Step-by-step instruction is this:
- Select a small strand from the front of the head on either side and start weaving straight from the base thin braid, gradually directing it slightly to the side and back.
- We braid it to the very end and secure it with a silicone rubber band. It looks more beautiful if it is not made too tight.
- We leave it hanging freely along with the general mop.

And this is how you can use this braid to remove the rest of your hair if it gets in the way. You will get a tail wrapped in a braid.
Spikelet "inside out"

In the photo there are variants of spikelets “on the contrary” for long hair.
For some reason, many people think that this weaving is very complicated and takes a lot of time. In reality, this is not the case at all. Making it yourself is quite simple.
This style looks romantic, feminine, strict and elegant. Suitable for romantic dates, and for business meetings, and for walks in the park, and outdoor recreation.
How to make your own hairstyle from long hair with a spikelet “on the contrary”? This weaving occurs as follows:
- Separate a wide strand in the front area of the head.
- We divide it into 3 parts.
- You need to start weaving at the very beginning, just like with a regular braid, only the strands should be applied not from above, but from below, as if vice versa. The looser the weave, the more delicate the hairstyle will be.
- Next, weave the remaining curls in the same way “inside out.” In this case, each time, alternately on each side, you need to add new strands to the braid, grabbing them thumbs hands
- The braiding can be completed on half of the braid, securing the hair in this place with an elastic band. This option will leave loose curls.
- Such a braid can be braided to the end using regular braiding, starting from the middle, after which its tip should also be secured.

Step-by-step diagram for weaving a braid “reverse spikelet”.
NOTE! This spikelet “on the contrary” can weave not only exactly in the middle of the head. This hairstyle also looks great when the braid is pulled to the side. In this case, the strands are initially taken from the front of the head either on the right or left, and the weaving itself is directed in the opposite direction. As a result, the braid will be located on one shoulder.
Bunches

A bun of long hair is made in 5 minutes.
Surely all women who have a long head of hair have done a smooth bun at least once, so they know the technique for doing it. This styling is appropriate not only for home use, in order to quickly collect locks so that they do not get into your eyes. It is appropriate in sports, in business, and just in everyday life.
How to make a hairstyle for long hair at home using a bun? There are several methods for creating such options.
Bun of knots with the effect of negligence

Step-by-step process for creating a bun for long hair using knots.
This styling, in addition to being easy to perform, gives its owner a perkiness, and we are not talking about age at all. It's done like this:
- Comb your hair and divide it into 2 parts. To make them obedient, you can first apply a little foam to them.
- After this, a loose knot is knitted from two parts. It will look more beautiful on the back of the head. It can be done either in the middle or on the side.
- Next, from the remaining free strands, as many knots are again created as the length allows. For reliability, the resulting structure can be secured with studs.
- Protruding elements can be hidden, or you can fluff them slightly, thereby creating an even greater impression of original negligence.
Airy openwork bun with weaves

Step-by-step photo for creating an airy bun with braided elements.
This arrangement is one of latest trends in the hairdressing industry. It is suitable for almost any occasion. It’s a little more difficult to do, especially for the first time, but the result is worth it:
- First, the sagittal parting is separated. In the frontal-parietal zone, interfering elements must be temporarily fixed with a clamp.
- Next, the entire mass is divided into 4 equal parts and braids are woven from each. All of them should be secured with rubber bands.
- To give more volume, the braids fluff up a little.
- Afterwards, each of the weaves should be pulled to the base with two fingers (as if gathering), holding the ends with one hand. In this case, each of these elements is fixed with invisible pins so that the ends are hidden.
- Then, leaving a few loose strands near the face, you need to braid 2 braids using the reverse French braiding method in the frontal parietal region on both sides.
- At the very end, 2 braids are placed above the resulting air bun and secured with hairpins so that the ends are invisible.
- The strands on your face can be twisted a little.
Bunch-bud

Elegant bud bun of long hair.
This hairstyle is just super quick. To create it, you just need 5 minutes of time, an elastic band and hairpins.
The creation instructions are as follows:


The photo shows the third stage of creating a bud bun.
Simple techniques for evening and holiday hair styling
Holiday hairstyles should always look amazing. After all, they, adding charm, femininity and elegance, make any woman more confident.
But evening styling does not always involve a visit to a beauty salon or personal hairdresser. If you know how to do your own hairstyle for long hair, then before the upcoming festive dinner or special event it is quite possible to do without the help of an expensive specialist.
Elegant shell

The shell can be decorated with hairpins, curls and other elements.
This styling option is always an appropriate classic. With it, a woman of any age will look elegant, feminine and attractive at a gala event. It is done quite simply:
- Comb the curls back.
- We gather it into a loose tail so that it is located approximately 7 cm above the occipital region.
- We twist the head of the tail into a loose bundle and, folding it inward so that the elastic is not visible (it should be in the middle of the structure), we also hide the ends there. Or, they can be curled and left, so that later you can decorate the side of the shell with curls.
- Formed neat smooth shell.
- Secure with studs.
- Lightly spray the finished hairstyle with hairspray. To make it more romantic, you can let out a couple of strands at your temples by curling them with a curling iron.

The diagram shows step by step process creating a shell from long hair without using an elastic band.
ADVICE! To create voluminous futuristic shell hairstyles from long curls, you can use the good old method at the very beginning of creation - backcombing.
Greek easy and beautiful option

Easy options greek hairstyles for long hair made with decorative headbands.
Feel like you're in a role greek goddess– this is the dream of many. Especially if a woman is going on a date or a romantic party. And it is Greek hairstyles for long hair that will help add mystery and grace to the image.
It’s not at all difficult to do a hairstyle in this style with your own hands. Let's consider the simplest and most popular option - an air bun on the back of the head and a bandage.

The main thing in this hairstyle is accuracy, and even special skill is not needed, since it is done quite simply.
It is done this way:
- Wash, dry and comb your hair.
- We put a beautiful headband on our head (you can read about similar accessories here). The height of its location can be adjusted to your liking.
- Next, we collect an air bundle at the back of the head so that it is, as it were, wrapped over the bandage. Additionally, it can be secured using pins.
- At the end, we straighten the hair and spray it with hairspray.
Finally
As it became clear, there are a lot of easy options for long hair that you can do yourself. Of course, it is not possible to describe all of them in one article, so for those who are not satisfied with this, they can watch the video.
Also, many of our readers will be grateful if you share your experience or ideas in the comments, because every woman is a “sorceress” who keeps her secret in her “chest” for this or that occasion.
Owners of long hair can not only boast a chic “mane”, but also create hairstyles of extraordinary beauty. It is on long hair that you can make a wide variety of hairstyles, braid openwork braids, make volumetric beams or simply loosen your curls and attract attention. Some girls believe that with long hair, you can only braid it, since there is a lot of hair and it is heavy, but this is not so. With the help of this article you will learn how to make simple and beautiful hairstyles for long hair.
1. Hairstyles for long hair with loose hair
What could be more beautiful than long flowing hair? This hairstyle will suit absolutely everyone, but to make your loose hair look beautiful, you also need to try. We offer you two options for the “loose hair” hairstyle:
Curly hair(curls and waves)
To create curls, curling irons or curlers are suitable. Please note that if your hair is very long and thick, then most likely, with normal styling, the curls will quickly straighten. Therefore, the use of styling products is mandatory!
- Matrix Total Results Sleek;
- Wella High Hair - Flat iron Spray strong control - two-phase thermal protective spray;
- Got2b Thermal protective hair spray “Guardian Angel”;
- Osis+ Flatliner Foam, Schwarzkopf Professional;
- Kerastase Nectar Thermique - Thermal protection.
It should be taken into account - what larger curls you want, the larger the diameter of the curling iron should be. Before curling, the hair must be thoroughly dried, then apply protective and styling products, and only then proceed with curling.
If you prefer to perm with curlers, then it is better to choose soft curlers and leave them on wet hair for the night. This style will last much longer, especially if you have heavy hair.
If you use curlers at night, then your hair should not be too wet, otherwise it will not dry by the morning and the long-awaited curls will not appear.
Another way to make your hair wavy is to braid it, preferably at night. Before doing this, it is recommended to slightly wet your hair, you can use a little styling product. If you want the waves to start from the roots, then you should braid two French braids.
If you want to learn how to make curls without curling irons and curlers, read.
Straight hair
For straight hair to look beautiful and elegant, you need to take care of it, it must be healthy and shiny. The ends of the hair should be trimmed evenly. To go out with straight hair, you need to style it correctly.
Typically, a hairdryer and a round comb are used for styling. First, your hair needs to dry. naturally, under no circumstances start drying wet hair. When styling, warm air should be directed from top to bottom so that the hair “lies” in one direction. Using a round comb will make styling your hair easier as it will curl the hair in the desired direction.
You can also use a straightening iron to straighten your hair. High temperatures can seriously damage your hair, so it is better to choose a curling iron with a thermostat.
If your hair is dull, you should purchase a hair shine product in advance. Now such products can be found in the line of almost any cosmetic brand:
- Spray veil for shine L "Oreal Professionnel Crystal Gloss;
- OSIS + Sparkler Gloss;
- Hair spray-shine Got2b Stardust;
- Estel Otium Diamond.
Straight long hair with a mirror shine will be your most beautiful decoration.
2. Hairstyles for long hair - spicy details
If you think that loose hair is casual and simple, then you can diversify the look with interesting details.
For example, a hairstyle looks very elegant when the hair is collected, so to speak, halfway. Usually we are talking about hairstyles where part of the hair is combed back, and the rest remains in a “loose” state.
There are a lot of options for this hairstyle, for example, you can take the front strands and pin them back, your face will become more open and the image will become more delicate. Another option is to bouffant the top part of your hair and leave the bottom part loose—this is the hairstyle favored by many celebrities on the red carpet.
The front strands can be twisted into bundles or braided and connected at the back of the head; this hairstyle will only take a couple of minutes. Don't forget that small details can transform the most ordinary hairstyle.
3. Weaves and braids for long hair
There are an infinite number of braiding options for long hair; changing the direction or style of the braid, the image also changes. Representatives of long hair can pamper themselves with complex weaves and fancy braids. This hairstyle will look especially advantageous on graduation party or a wedding. After all, some hairstyles with braids can only be done by a long-haired beauty, why not take advantage of this?
A hairstyle with a waterfall braid looks especially advantageous; if you practice, it will take about 5-7 minutes to braid.
Helpful advice: beginner braiders always need long-haired models; if you look for such a master, you can please yourself with unusual hairstyles completely free of charge or for a nominal price.
You can experiment endlessly with braids and long hair - go for it!
4. Hairstyles for long hair with a headband
This simple hairstyle accessible to absolutely everyone, all you need is a headband or hair ribbon.
You can find a variety of headbands in stores, but if you want to stand out, you can make such a simple accessory yourself.
There are a lot of options for a headband, it can be a thin braid, a headband that imitates jewelry, a fabric headband, etc. The main thing is that such a hairstyle is in harmony with your appearance, so think over the look before doing such a hairstyle.
Usually, when creating such a hairstyle, the hair remains in slightly careless condition, a hairstyle with a headband will also go well with curly hair.
5. Greek style hairstyles
This type of hairstyle does not lose its popularity; a hairstyle in the Greek style is not only very beautiful, but also simple, making it yourself will not be difficult.
For a Greek-style hairstyle, we need a special headband that will fit tightly to the head and hold the hair; usually an elastic band is used for the hairstyle.
Video tutorial on creating a Greek hairstyle for long hair6. Ponytail for long hair
Many girls consider this hairstyle boring and casual, but even a ponytail can look interesting and new. We bring to your attention several options for creating an interesting tail.
Hairstyle for long hair – ponytail with braiding
Separate part of the hair from above, we need it in order to weave french braid, we start weaving from the forehead and move towards the back of the head. Braid your hair to the point where you want to place your ponytail. We make a ponytail from the bottom of the hair, and twist the end of the braid around the elastic band. Our hairstyle is ready!
Ponytail
We collect the hair in a ponytail and secure it with an elastic band.
Divide the hair into two equal parts and begin to twist them clockwise.
When both parts of the hair are twisted, we begin to weave a “rope” out of them. To do this, we cross the hair and twist the parts one above the other. When the braid is ready, secure its end with an elastic band. This hairstyle is suitable for long hair, because after we make a braid out of the hair, its length will be halved, so this hairstyle is suitable for outdoor activities, the hair will not interfere and will look good at the same time.
Ponytail with backcomb
It's very simple and spectacular hairstyle. First, we make a backcomb from the top of the hair, then we form a ponytail. Its height can be adjusted, it can be high, low or placed on the side.
With the onset of warmer weather, every woman tries to get rid of her boring hats as soon as possible and begin bold experiments with her hair. Beautiful bun from curls - this is just what you need to look beautiful.
Lush bun in retro style
Exquisite styling, reminiscent of the traditions of the 30s, is suitable for hair of various lengths. It can be combined with a luxurious evening dress and even a trouser suit.
- Using the thin tip of a comb, separate the strands of bangs and comb them to the side.
- The rest of the hair needs to be put back.
- Separate a thin strand, curl it with a curling iron or straightener, holding it away from your face.
- Wrap the curl around your finger, then carefully remove it and pin it with a bobby pin.
- Repeat this process with the remaining hair.
- Let the curls cool and remove the bobby pins.
- Gently comb the strands at the very roots.
- The bangs should be separated with an asymmetrical parting.
- Catch the remaining curls with an elastic band approximately in the middle and form a loop, moving it slightly to the side.
- Arrange your curls beautifully around the resulting bun and secure them with hairpins.
- The bangs on the smaller side should be pinned behind the ear, on the larger side they should be left free, sprinkled thoroughly with hairspray.
Basket-shaped bun
A bun that resembles a basket of hair looks simply luxurious! With it you will become like a beautiful princess.
- Comb your hair.
- Divide it into thin strands and curl each one with curlers.
- Once they have cooled, unwind the curlers and lightly comb your curls with your hands.
- Make a straight or side parting.
- Separate one thick strand on each side and twist them towards each other.
- Arrange the remaining curls, giving the bun a semicircular shape. Secure with pins.

Low bun with clip
This low bun is perfect for those with naturally curly, full hair.
- Squeeze into palm a small amount of styling foams.
- Distribute it over your hair and then dry it with a hairdryer.
- If necessary, curl the strands a little with a curling iron.
- Comb them with your hands.
- Separate a small section of hair from your face and pin it up with a crab for a while.
- Separate one similar strand on the sides.
- Twist them into a light rope, pin it with a hairpin - you get a shell.
- Tie your hair into a ponytail at the very back of your head.
- Wrap your curls around an elastic band to form a fluffy bun. Pin it with pins.
- Release the crab from the front of your hair.
- Comb it back and twist the end around the finished bun.
- Spray your hair with hairspray.
- Decorate with a large hairpin.

Bun for long hair
This styling will be a real salvation for girls with long but not very thick hair.
1. Comb it all back.
2. Separate a section of hair at ear level. Leave the front part, tie the back part into a tail. Use the sharp tip of the comb to slightly pull the strands up to make your hair look fuller.
3. Curl the front part of your hair with an iron.

4. Twist the ends of the ponytail around the elastic, forming a messy bun.
5. Stretch it in the center so that it becomes symmetrical.
6. Secure with pins.

7. Lay the curls from the front one at a time on top of this bun. Pin each one with a hairpin.
8. Using curls, spray your hair with hairspray.
9. Release a couple of thin curls near your face.

Bun of curls for every day
A high bun of curls can be done not only for holidays or celebrations. Many people prefer to do it daily for school and work. This styling looks quite neat, comfortable and cute.
1. Apply a small amount of foam to washed hair and comb it well.
2. Tie a high ponytail without pulling out the ends on the last turns of the elastic. You should now have a loop.
3. Now try to give the loop as casual a look as possible. To do this, you need to thoroughly ruffle it or lightly comb it.
4. You also need to comb the ends of the tail sticking out from under the elastic band.
5. If the hairstyle doesn’t hold its shape well, spray it with hairspray.
6. Release a few thin strands of hair from your face.

Bun with roller
Beautiful hairstyles can be done in literally 10-15 minutes. You don’t have to go to an expensive salon to do this! All you need is patience and a set of basic equipment.
- Comb it all back.
- Take a small section of hair from the top of your head.
- Place a round roller on it.
- Divide the strand in half and secure both halves with bobby pins. This will help secure the roller.
- Separate a fairly wide curl over the roller. Comb it with a comb.
- Place the backcomb on top and smooth the top layer.
- Gather all your hair into a ponytail, completely covering the roller. Just leave a couple of curls near your face for bangs.
- Curl the ends of your ponytail and place them in a bun. Secure it with pins.
- Separate your bangs with a side parting and style them beautifully.
- Decorate your hair with a ribbon.

Greek bun with curls
Greek styling for medium hair will make you look like a goddess, and most importantly, it will suit women of all ages! Making it yourself will not be so difficult, and we will help you with this.
- Separate your hair with a horizontal parting running approximately along the top of your head.
- Tie the lower part into a neat low ponytail.
- Wrap it inside and form a bun. Pin it with pins.
- Use an iron to curl the upper part into tight curls.
- Separate one strand at a time on the sides and twist them towards the back of the head. Secure with hairpins or bobby pins.
- Twist the remaining curls around the bun, hiding the ends inside.
- Decorate your hair with decorative pins.

Side bun of curls
This simple hairstyle will allow you to quickly tidy up your long hair. You can safely go with it to a party, a date or even a social event.
- Comb your hair to the side.
- Tie a low ponytail, placing it to the side.
- Curl the strands with a curling iron.
- Take one curl at a time and twist it around several fingers from bottom to top. Secure each one with a pin.
- For lightness, pull a couple of thin curls out of the bun.

Light bun for medium length
A bun right at the back of the head is a traditional option, which is already difficult to surprise anyone with. If you want to be creative and original, try a one-sided hairstyle. It will make you bright and extremely stylish.
- Curl the strands with a curling iron and comb with your hands.
- Comb at the roots with a thin and frequent comb.
- Throw your curls to one side.
- On one side, take a strand near the neck and twist it into a rope.
- Gradually adding loose curls, work your way to the other ear. There is no need to hide the ends - they will become the basis for the side bun.
- Style your curls beautifully, securing them with hairpins.
- Spray your hair with hairspray.

Tips to help you do romantic hairstyle at home on your own:
Ceremonial option
How to make a bun for a wedding, graduation or other serious celebration? It's very easy to do, but you have to try!
- Separating layer by layer, comb your hair with a thin and frequent comb.
- Now divide it with a horizontal parting at ear level and tie a not too wide ponytail in the center.
- Attach a roller underneath and lower the ponytail on top.
- Distribute the hair evenly over the roller until it completely covers it. Hide the ends inside and secure with a bobby pin.
- Curl the hair near the neck with an iron and arrange it beautifully around the bottom of the bun.
- Curl the top part and place it on top of the bun, trying to create volume.
- Divide the curls near your face in half and pin them on the sides.
- Decorate your hair with a headband or tiara.

French braid bun
This hairstyle is suitable for every day. You will only spend a few minutes doing it, and you will look your best all day long.
- Comb all your hair back.
- Take three thin strands and intertwine them as in a classic braid.
- Gradually adding loose strands from the sides, continue to braid a light French spikelet.
- Having reached the back of the head, gather the strands into a ponytail.
- Wind the ends onto a curling iron.
- Place your curls in a bun and secure it with hairpins.

Air bun of curls
An airy bun of curls is the best choice for thin, fluffy strands. A girl with such a hairstyle looks very feminine and gentle. Be sure to try it on yourself!
- Comb thoroughly, divide your hair into many thin strands and curl each one.
- Gently comb through curls with your fingers. Throw everything back.
- Take a needle and thread.
- Gather your hair into a ponytail and sew it with thread.
- Crimp the ends of the tail, gathering them into an air bun, and sew them again with thread.
- Comb the strands near your face at the roots and style them beautifully.

Curls in the form of plaits
To create a luxurious bun of curls, it is not at all necessary to curl your hair with a curling iron. It is enough to twist them into loose strands - the result will be excellent and, moreover, without harm to the health of the hair.
- Part your hair in the middle and comb your hair well.
- Tie a low ponytail, moving it slightly to the side.
- Make two turns of the elastic band.
- Correct any imperfections.
- Lift your strands up to create volume.
- Comb your tail with a comb.
- Separate a strand of medium width from it.
- Twist it into a bundle.
- Lightly fluff it up.
- Twist the tourniquet into a ring.
- Secure it with a hairpin.
- Repeat with the remaining curls, creating a full bun.

Bun all over the head
If you distribute the strands over your entire head, you will get an unusually beautiful evening hairstyle that imitates stylish curls.
- Comb it all back. Divide your hair into several thin strands and curl with a flat iron.
- Comb your hair right next to your forehead with a fine comb.
- Lay them back, twist the ends into a rope and pin with a bobby pin.
- Take a thin strand and twist it into a braid.
- To give the bundle volume, stretch it with your fingers from bottom to top.
- Attach the resulting curl to the place near the bobby pin and secure with a hairpin.
- On the other side, take exactly the same strand, twist it into a strand and pull it with your fingers.
- Place the braid into your hair and secure it securely.
- Repeat the procedure with the rest of your hair, selecting curls from one side or the other and arranging them in a beautiful hairstyle.
- If necessary, spray it with varnish.

Romantic styling
Girls with medium-length locks can try this stylish hairstyle. She looks light, feminine and romantic.
- Comb your hair, pulling your hair back. Curl them with an iron.
- At the top of the head, separate a small part of the hair and twist it into a rope - this will be the basis for the future bun.
- Take one thin curl right in the center, twist it in a circle and pin it with a bobby pin.
- Gradually pick up the strands on both sides, collecting them with a pinch and securing them securely.
- Finally, lay the ends and spray the styling with varnish.

What do you think of this stylish option?
Cleopatra's hairstyle
Do you have voluminous curly hair that is difficult to manage? We offer a master class that will allow you to literally repeat in 5 minutes the image of one of the most famous and most beautiful women. A Cleopatra-style bun is suitable for both an evening out and a romantic date.
1. Comb with a comb.
2. Lift the strands up and tie a fluffy ponytail.
3. Prepare a long ribbon, braid or a special hoop.
4. Carefully secure your curls with hairpins, tucking the ends underneath. There is no need to round off the bun - it is better to leave the curls for a lush halo.

5. Tie a ribbon or braid around your head, making 2-3 turns, or put on a hoop. For security, secure the tape with bobby pins on the sides.


When creating a bun of curly hair, follow these simple but very useful recommendations.
- Tip 1. Like other hairstyles, buns should be done exclusively on clean hair. Although, for unruly strands, it is allowed to “use” second-fresh hair (you washed your hair yesterday and styled it today).
- Tip 2. To keep your bun neat throughout the day, do not forget about styling products - foam, mousse, varnish, spray.
- Tip 3. While doing your hairstyle, do not wet your hair with water - this will complicate the work. Firstly, curls will unwind much faster under the influence of moisture. Secondly, the strands will begin to stick to your fingers and comb.
At first glance, creating low and high buns is not difficult, but, alas, this is not the case. If you have never created a hairstyle before, then the bun may not work out the first time. Be patient and believe that everything will work out for you.
There is still a lot beautiful hairstyles. We hope these photos will help you choose the perfect option.


