When the need or desire to build a fence arises, the first step is to decide what material it will be made of. In cases where the main criteria are strength, reliability and durability, it makes sense to build it from stone. Construction stone fences has been known since ancient times. They looked like powerful walls that could withstand not only bad weather, but also attacks from enemy forces. It is quite possible to build a stone fence yourself. Owners of a property with such a fence will not only have a barrier against the entry of uninvited guests, but also an interesting piece of landscape design.
A stone fence, as a structure, deserves special attention; it has many positive qualities:
- unlimited service life - the better the quality of the solution used during construction, the longer the service life will be;
- stone - natural material, which means it is environmentally friendly and harmless to the environment and living beings;
- the ability to carry out construction with low financial costs; the price of a stone fence directly depends on the type of stone;
- this material is endowed with high fire safety properties;
- the process of erecting a stone fence is subject to one person;
- The aesthetic appearance of a stone fence will fit perfectly into any design of a personal plot, as well as into the surrounding landscape, this can be seen by looking at the stone fences in the photo.

Stone barriers are subject to a certain classification. They are mainly divided according to the type of natural stone that is used to build the fence. Most often for this type of construction, the following materials are used:
- a boulder or cobblestone is a relatively inexpensive material that is highly durable; a fence made of such a stone will be in brown-red tones, its shape will add some roughness to the structure being built (if you want to have a smooth surface of the structure, you can use a sledgehammer, the chip of the broken stone will be smooth and flat) ;
- dolomite - varies in size, shape and thickness, mostly flat, mined in quarries through explosions rocks;
- limestone - divided into several different types (bryozoan, shell rock, marble), this rock is easy to work with, but has one drawback (it crumbles in damp and cold climates from easily absorbed moisture, advance treatment with a water repellent will help avoid this);
- sandstone - has been used for a long time and is highly popular in this type of work, reliable and durable, easy to carry low temperatures, not susceptible to moisture, can have a smooth or hewn surface, as well as chipped;
- but - almost all Not correct form with an edge length of up to 50 centimeters, used in both facing and construction works;
- gravel and pebbles are used infrequently because the material is small in size; when constructing such a fence, the corners and base are made of brick (the right combination of such materials can look quite extraordinary).

Natural stones are also divided into processed and wild. Today, stone of artificial origin is very popular. This happens because its price is significantly lower than the price of natural one. It is made from ordinary concrete, then given a natural look. The service life of such stone is much shorter than that of natural stone, especially in cases where the fence is located in a lowland or near a road. Only a specialist can distinguish such a stone from a natural one by sight and touch.
The stages of fence construction are as follows:
- the planned fencing is marked;
- the foundation is drawn up;
- The fence itself is laid out directly.
The first stage (marking) is carried out in the same way when constructing any type of fence. On a drawing made in advance, you need to indicate the length of the future fence, and calculate the required amount of starting material (this calculation will be directly related to the planned height of the structure). At the same time, it is necessary to take into account the height of the structure on all sides of the fenced area.

The construction of such a structure will require more time and expense than it might seem at first glance. A stone fence needs a solid foundation, using reinforcement rods to form the frame; a layer of waterproofing must be laid. You will also need formwork from boards for the construction of support pillars.
Whenever possible, stones for masonry should be selected to be approximately the same size. During operation, each unit of material can be adjusted using a hammer or sledgehammer.
Do-it-yourself stone fence - we build a foundation and support pillars

The construction of this structure begins with precise definition and installation suitable type foundation. A stone fence weighs quite a lot, so the foundation for a stone fence must be strong, capable of withstanding uneven subsidence of the soil and its vertical or horizontal displacement.
Work begins by digging a trench, the width of which is 0.5 m, the depth is from 0.6 to 0.8 m.
Next, prepare a place for pouring the shoes and place them under the racks. To do this, dig grooves perpendicular to the axis of the fence, with outlets of 0.6 m, deepening them by 0.4 m at the locations of the posts. At the installation site of the racks, after pouring the concrete, a cross with a recessed end is obtained.
Simultaneously with the pouring of the foundation, stone pillars for the fence are erected. To do this, formwork is installed in the marked places, reinforcement is mounted and then concrete is poured.
The shoes are built at a distance of 2 to 5 m from each other. They are poured for racks, for each or through one. Next, the reinforcing elements are installed, usually this is a rectangular frame with a side of 0.3 - 0.4 m, along its corners there is corrugated reinforcement with a diameter of at least 12 mm, surrounded by wire rod. The reinforcement skeleton is placed in the center of the dug trench, and the reinforcing fragments are installed vertically at the location of the posts. In this case, the intersection points of the elements should be connected to each other.
Next, you can begin installing the formwork; it is assembled in such a way that it is possible to simultaneously pour the foundation and the shoe, leaving reinforcement outlets for the racks. Concrete is poured to the ground level, along the entire perimeter of the fence, including under the gate and wicket.
The concrete to be laid is compacted and compacted, preventing the appearance of voids in the thickness of the foundation. The formwork is removed after 6 hours, and the concrete is expected to completely harden within a couple of weeks. If very high temperature air, the foundation is covered with dense material, you can use a tarpaulin.
When building a stone fence, one should not assume that the support pillars are just a decorative fragment; they are the ones who are able to preserve the integrity of the structure, holding the stone spans and protecting them from cracks and distortions.

To increase the functionality of support posts, it is recommended to take care of the quality connection of the posts and the edges of the spans. There are several options for a reliable bond; when building a stone fence with your own hands, you can use the bonding method, especially if the masonry is made from angular stones. To perform the dressing, the first two stones are laid on both sides of the outlet of the reinforcement for the supports. Next, the first and second rows of the support, the first row of the span, are formed.
Before starting masonry, you should select stones of the most correct shape and equal size - they will be needed for the construction of support posts. The rest can be used to form walls, the smallest pieces and debris will be needed to fill voids in walls and studs.
How to make a stone fence - constructing an object from wild stone

The financial side of building a fence made of such material will not be relatively high; a long period of trouble-free operation will pleasantly surprise the owners. Looking at a photo of a stone fence built with your own hands from wild stone, one can note its high aesthetic qualities.
Work with such a stone begins by washing it in running water. Latex glue is applied to the parts that will be in contact with concrete in advance. If the surfaces on which the glue will be applied are smooth, then they need to be scored, coated with glue and laid.
To prepare a high-quality, good solution you will need 1 part cement, 3 parts clean sand and 1/4 part glue similar to PVA. To give the masonry a more noble appearance, you can apply a tonic to the seams that is most suitable in color to the shades of the stone used. Tonic can be added when mixing into the solution or directly onto the seams after the solution has completely hardened.
What types of masonry are used

When building a stone fence can be used different types masonry Let's look at some of them:
The most common is plank, the stones used should have a shape close to rectangular. High quality masonry is facilitated by better stone processing, but rough-cut stones give the fence a more attractive and picturesque appearance. The use of processed stones of the correct shape with a smooth surface will lead to the fact that the surface will resemble tiling, and the attractiveness of natural stone will be lost.
Horizontal masonry of flat stones involves the use of flat-shaped cobblestones, which are laid in horizontal rows. Another type, vertical flat masonry, is rarely used; stones of the same shape are used, but they are placed vertically. You can start laying when they are laid out stone pillars for the fence.
To perform rubble masonry, rounded cobblestones are used; before pouring the mortar, they are placed close to the surface of the formwork.
As decorative finishing structures, facing masonry can be used. The stones for it are selected of the same thickness and attached to the prepared surface using mortar. Work begins with the thickest fragments, installing thinner ones - adjusting them to the level.
Stone fence with forging

Particularly attractive in terms of design is a stone fence combined with forged elements. It has a considerable price, but it looks original, rich, and performs its immediate functions of protecting the territory perfectly.

When constructing such fences, forged elements made in Gothic or Baroque, classical or avant-garde styles can be used - depending on the funds that the home owner plans to spend, on his taste and imagination. The fence consists of combined pillars, stone fragments, gates and wickets, and, of course, spans filled with forged elements. Forging should be selected depending on the materials used in the construction of the fence and the overall design of the fenced area.

The positive aspects during the operation of such a fence will be its reliability and durability, the absence of the need for regular maintenance - it looks perfect at any time of the year.
Preface
A stone fence has a large physical mass, so to fix its position you need a fairly massive foundation.
 Before making a stone fence, read this material carefully. We offer all options for such fencing and provide information regarding laying the foundation, laying fencing and installing structures. You should start making a stone fence with your own hands by installing the correct type of foundation. A stone fence has a large physical mass, so to fix its position you need a fairly massive foundation.
Stone fences are perhaps the most ancient among those used by man to protect his home. They come in several varieties.
Laying a stone fence
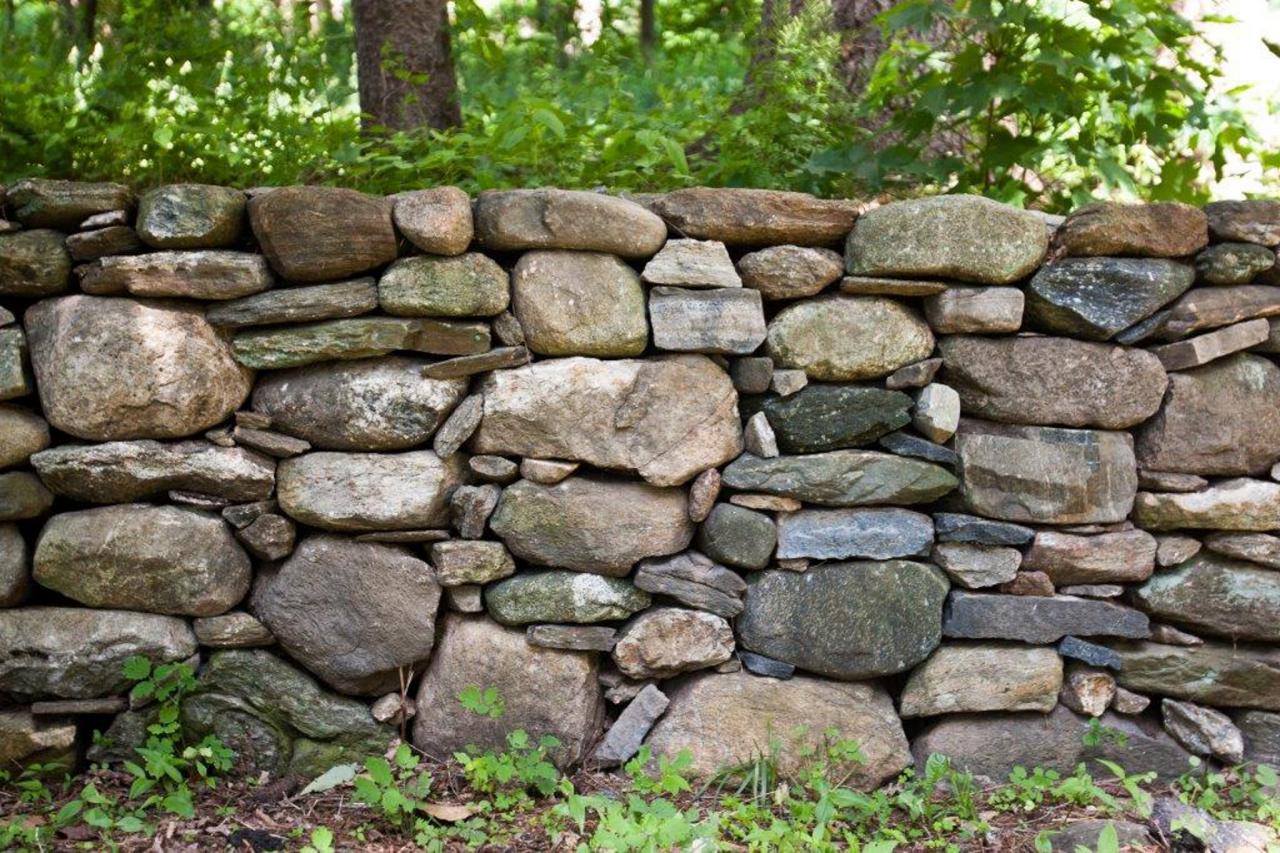
“Wild” fence masonry - it is constructed from stones of any size and configuration that have an irregular angular shape. To obtain more or less even vertical surfaces from the front and back sides fencing, work is carried out immediately along the internal and external lines of the wall, filling the central part with unnecessary pieces and chips of stone.
If the source material is large enough, the stone fence is laid in a waste area, leaving seams 2-5 cm deep. This gives the fence a special charm and natural look.
Laying a stone fence
The masonry of a stone fence is made from angular stones, previously hewn to a more or less rectangular shape. How better processing, the smoother the seams and the masonry itself. However, rough processing is more often used, giving the fence natural look. The smoother the front surface and more correct angles stones, the more such masonry resembles cladding with ordinary tiles.
Stone fences
Stone fencing acquires its own individual style and external design thanks to large selection types of masonry materials. Some of the most popular are presented below.


Flat horizontal masonry. They are formed from layered rocks of stones or cobblestone cakes, which are laid in rows in a horizontal position.


Flat vertical masonry. They are made from the same types of stones as flat horizontal masonry, but in a vertical position. This method is used very rarely, mainly in combined fences to fill voids. Laying begins only after the support posts have been installed or laid out.


Rubble masonry. It is produced in approximately the same way as butted fencing. Round-shaped cobblestones are used as the starting material, which during pouring are installed flush against the side walls of the formwork.


Facing masonry. This type of masonry is usually classified as finishing work. IN in this case flat stones of approximately the same thickness are fixed on a pre-prepared foundation area, wall or other surface. To make the front part of the masonry more or less even, install the thickest tiles first, and then level the rest of the masonry along them, not forgetting to check the horizontal or vertical lines.
Foundation for a stone fence
Regardless of the type of masonry, the fencing design includes a foundation for a stone fence and support pillars. It is their strength and quality that determine the durability and aesthetics of the structure as a whole.
Stone fences are heavy, and the stones themselves are not porous enough, which significantly impairs adhesion to the mortar. That is why the connections between elements are much weaker than between bricks. On weak, swampy and sandy soils, as well as in places with frequent manifestations of seismic activity, such fences should not be built.


The finished formwork and filling of the reinforced foundation are shown in the photo.
The foundation must be solid and resistant to uneven subsidence and displacement along the horizontal and vertical axes. To achieve this, proceed as follows. First, they dig a trench about 50 cm wide to the depth of soil freezing (usually 60-80 cm). Moreover, if the fence system includes a gate and a wicket, a trench is made under them too. Then a space is prepared for pouring the “glasses”, or, as they are also called, “shoes”. To do this, transverse grooves are dug at the location of the racks with the same parameters as the trench. The grooves are made perpendicular to the axis of the fence with outlets of 60 cm so that the intersection of the axis of the trench and the grooves falls on the center of the section of the posts. At the indicated location, the racks are recessed by another 40 cm. As a result, a cross with a recessed “tail” should be formed at the place of their installation.
Laying fence posts
The laying of fence posts is carried out simultaneously with the pouring of the foundation. Typically this operation includes installation of formwork, reinforcement and pouring of concrete mixture. The distance between the “glasses” is left within 2-5 m. Depending on the pitch, the “glasses” can be filled for each rack or through one.
Upon completion of the excavation work, reinforcement begins. The best option- a quadrangular frame with sides of 30-40 cm, at the corners of which there is corrugated reinforcement with a cross-section of at least 12 mm, surrounded by wire rod every 40-60 cm. A skeleton is constructed from the reinforcement, which is laid along the central part of the trench and grooves, and is also installed vertically in place rack locations. The intersection points must be tied together.


At the next stage, formwork with a height of 10-30 cm or more is installed. At the same time, they try to install it in such a way that both the foundation and the “glasses” are poured at the same time, leaving the outlets of the reinforcement for the racks. For side outlets, no formwork is installed; pouring is carried out only at ground level. The trench running under the gate and wicket is filled in the same way.


Next, proceed directly to laying the concrete solution. It is carefully vibrated, compacted and compacted with any available means to avoid the occurrence of voids in the structure of the foundation and “glasses”.
After 5-6 hours, the formwork is dismantled and the filling is left for 2-3 weeks. If the weather is too hot (+30 °C and above) or rainy, it is advisable to spread a thick tarpaulin over it and lean the formwork walls on the sides.
DIY fence installation
When constructing stone fences, some people commit gross mistake and do not fully use the functions of support pillars, considering them only decorative elements. While it is the pillars that help maintain the integrity of the structure: they reliably hold the stone spans and protect them from cracks, distortions and destruction.
When constructing stone fences Special attention attention should be paid to high-quality fastening of the edge of the span to the column. There are several options.


With dressing. This type of DIY installation of fences is usually used for masonry made from angular stones. The first and second stones are laid end to end on both sides of the outlet of the reinforcement for the racks. Then dressing is carried out, forming the first and second rows of the rack, as well as the first row of the fence. For the racks, the best stones of more or less regular shape and approximately the same size are selected. Medium-quality stones of various sizes are used to form the fence wall, and small pieces, chips and debris are used to fill voids in the posts and wall.
Construction of stone fences
The construction of stone fences with the release of mortgages is recommended for all types of masonry, with the exception of facing.
First, pieces of reinforcement are welded to the reinforced frame of the rack so that they are parallel to the foundation line and protrude beyond the rack. The step is chosen based on the size of the stones: if their height is up to 10-15 cm - 30 cm, if more than 15-20 cm - at least 50 cm.
When laying out rows, when the height of the fence reaches the level of the welded embed, the last laid out row is leveled horizontally using suitable stones different sizes. Then the mounting mesh or other reinforcing part is welded to the embedded parts and the laying continues.
How to build a stone fence
Let's consider the question of how to build a stone fence filled with concrete mixture. It is advisable to use this method in masonry where round-shaped stones are used. Laying is carried out immediately along the entire fence line. First, three or four rows of stones are laid out, placing the edges of the spans close to the rack reinforcements. Then, at the locations of the racks, a C-shaped formwork is installed, into which concrete is poured. After 2-3 hours, the formwork is removed, the solution is left for a day so that it finally sets, and the construction of the fence continues as before.
To ensure high-quality masonry, follow the following recommendations.
How to make a stone fence and laying wild stone on video
You can build a beautiful, durable and inexpensive fence from wild stone. Rinse the stones thoroughly in running water, and pre-treat the areas of contact with the solution with latex-based, albumin-based, or any other glue used for gluing ceramic tiles.
Before making a stone fence, score the stones with a smooth surface before applying glue and installing them. You can even chip off a piece at the point of contact with the solution.
To reliably connect the stones, prepare a solution from one part of cement, three parts of millet sand and 1/4 part of any water-dispersed PVA glue.
To ennoble appearance masonry, tint the seams to match the color of the stones. To do this, add dye to the solution or tint the seams after they have completely dried.
Fences made of stone have been used by humans since time immemorial. Currently, natural materials, including stone, are at the peak of popularity. Huge variety natural stone often leads the average person to confusion. Therefore, it is important to select and make right choice a certain type of stone suitable for constructing a fence, the intended design. 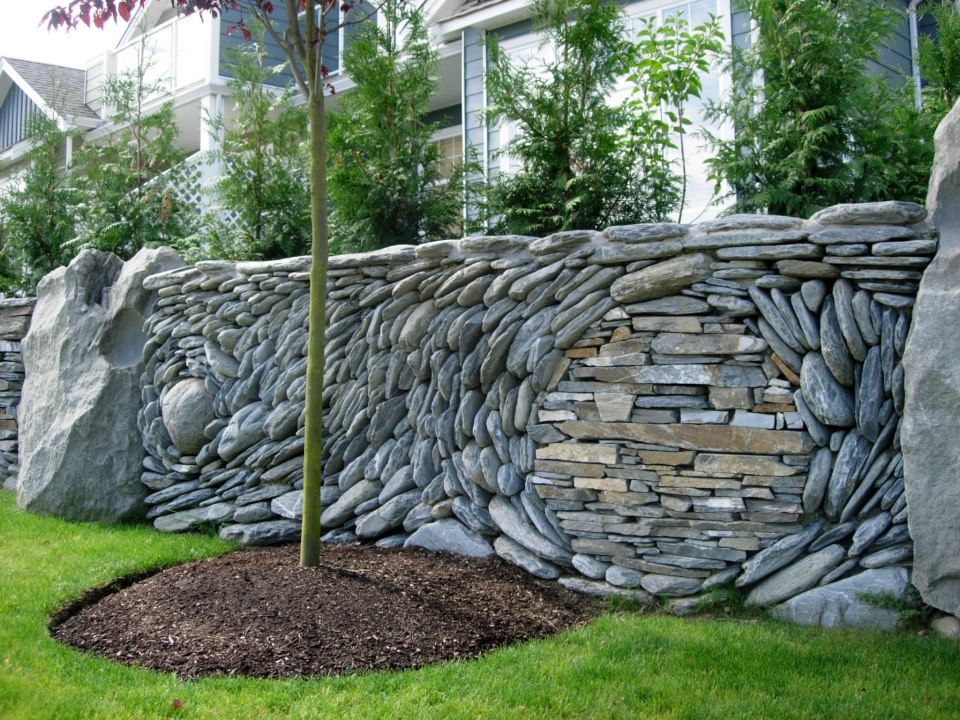
Selection of materials (comparison table)
| Name of the stone | Price | physical characteristics | Material processing | Weather resistance |
| Cobblestone (boulder stone) | — fraction 70-100 mm -850 rub/m3; — fraction 105-300 mm – 2500 rub/m3; — cobblestones for gabions -70-130 mm – 300 rub/m3. | durable, strong, available in only a few colors | with great effort | highly resistant |
| Gravel | From 800 RUR/tn | durable, strong | with effort | highly resistant |
| Dolomite stone | From 700 RUR/m2 | durable, strong | with little effort | highly resistant |
| Limestone | 750 rub/t | durable, strong | soft to handle | absorbs moisture, requires treatment with water repellents |
| Sandstone | Depending on color from 2200 to 9300 rub/m3 | durable, strong, a variety of colors | with effort | highly resistant |
| Crushed granite | 1800 rub/t | durable, strong | with effort | highly resistant |
| Booth | 1000 rub/t | durable, strong | with great effort | highly resistant |
An equally popular building material for stone fencing is fake diamond. Its cost is much less than the cost of natural stone.
Preparatory activities
Before starting to build a stone fence with your own hands, you need to decide on its exact location, draw a diagram of the structure, a foundation plan, and also make approximate calculations of the required volume of building materials.
If the site and household are located in close proximity to neighbors, then their written consent to erect the building should be obtained. To avoid this, you should prepare and register a package of documents for construction at the technical inventory bureau. These activities will allow you to build a fence without complications and problems.
TO preparatory stages The construction of a fence made of natural stone can also include:
- clearing the land of all kinds of debris and its planning (leveling);
- markings for foundation construction in accordance with diagrams and drawings. Marking (fence lines, gate locations, gates) on the ground is carried out using cords attached to stakes;
- purchase of building materials - stone, sand, cement, reinforcement;
- purchase the necessary tool– a welding machine, a shovel, a tank for preparing cement mortar or a small concrete mixer.
The next step in constructing a stone fence is laying out the foundation.
Foundation
Digging a trench for the foundation is carried out in accordance with the markings made. Considering that stone is a fairly heavy and strong building material, the foundation should easily withstand the proper load, ensuring the reliability and strength of the structure.
Fences made of stone material are being built exclusively on a strip foundation based on reinforced concrete blocks or bricks. At the stage of arranging the foundation, it is necessary to adhere to the following requirements and rules:
- the width of the prepared foundation should be 15.0 cm greater than the thickness of the fence, the trench is dug up to 80.0 cm in depth. If the fence is erected to a height of more than 2 meters, then the depth of the trench increases by 10.0 cm for each meter of fence;
- first of all, a sand cushion with a thickness of at least 50.0 mm is made, which is spilled with water and compacted;
- then laying reinforced concrete blocks is carried out using mortar and additional connecting reinforcement from 30.0 to 40.0 mm in diameter;
- then a reinforced frame is mounted in the groove, around which a formwork made of edged boards is installed, rising above the ground level by approximately 20.0-30.0 centimeters, and the entire structure is filled with mortar;
- dismantling of the formwork is carried out several weeks (3-4 weeks), after the final hardening of the cement mortar;
- Gate and gate openings require the installation of support pillars, so the load-bearing parts are dug in and filled with reinforced concrete mortar.
At a time when the foundation gains strength (hardens), you can start sorting the purchased stones, which will help increase the speed of construction of the stone fence.
Pillars
In order to speed up construction work, all pillars must be constructed simultaneously. In the construction of stone fences, floating forms (formwork) are widely used. To do this, you will have to make the required number of sectional formwork from self-tapping screws and boards about 150 mm high. The internal parameters of which correspond to the dimensions of the foundation. One column requires 2 pieces of collapsible formwork.
After making the frames, you should proceed according to the following algorithm:
- The formwork is installed and the initial layer of stone is laid out. They are laid so that they fit as closely as possible to the collapsible form and to each other;
- then all cracks and voids are filled with a thick solution;
- then the next formwork is secured with self-tapping screws and filled with stone and mortar in the same way.
After a day or two, the lower parts of the collapsible forms can be removed and the construction of subsequent layers can begin. The voids found after dismantling the formwork must be immediately filled with mortar. In the places where the lags are attached, metal corners should be released, which are welded to the pipes.
Formed and constructed pillars must be protected from the effects of precipitation. An ideal option is to install plastic or metal caps.
According to rough estimates (in the case of simultaneous erection of pillars), it will take 20-25 days to erect supports for the stone fence.
Walls
The construction of fence walls begins with marking the foundation. The spans of stone fences are made narrower than the pillars by 100.0 mm, that is, the wall moves inward by 50.0 mm from the outside and inside. Using a level, symmetrical installation of stones is carried out along the edges of the wall. The optimal size of stones for laying a wall is up to 25.0 cm.
The threads stretched between the sections are used to guide the subsequent laying of the walls. For ease of use and structural strength, it is recommended to lay the stones with their flat side up, carefully filling the cracks and voids between them with cement-sand mortar.
The process of laying the wall is controlled by the level. The permissible deviation from the vertical position is no more than 10 mm per 2.0 m of wall height.
Joining the fence
Surface treatment and jointing are the final processes in the construction of fencing made of natural and artificial stone.
Masonry seams can be embroidered in three ways: deep, convex and shallow. The first option visually increases the volume of the masonry.
Joining is done using:
- scraper - a strip of metal (4 mm x 150 mm x 2.5 mm), at the end of which there is a protrusion (“tooth”) measuring 10.0 mm by 20.0 m;
- flat scrapers and brushes with metal bristles;
- pieces of rags and foam rubber.
3-4 hours after laying, they begin jointing, after which time the solution hardens and is difficult to process.
The step-by-step process for deep jointing looks like this:
- cleaning stones and seams with a wire brush;
- creating neat, rectangular recesses with a scraper up to 20.0 mm;
- washing seams and stones with foam.
If you ignore the jointing, the external attractiveness of the stone fence will significantly deteriorate.
Details
The main decoration of natural stone is texture and color. Therefore, fences built from natural stone are self-sufficient and do not require the use of decorative details to improve their appearance. However, if desired, the top of the support pillars can be equipped with elegant waterproof structures - caps with peaks.
Often monumental stone fences are decorated with openwork forging, various lanterns and “live” decorative elements– –lianas (grapes, roses).
The canvases of blank fences can be enlivened with the help of glass mosaics, panels made from waste CDs. The use of certain decorative details depends on the preferences and wishes of the owners of the land plots on which stone fences are erected.
Cost of time and money
 Stone fencing has many positive advantages, but despite this, there are several disadvantages:
- erecting a stone fence is a rather long, painstaking construction procedure;
- for the construction of such objects a foundation is required;
- the high cost of some natural stone materials.
Construction of stone fences significantly more expensive than fencing or metal. Arranging the foundation, the cost of natural material, the cost of its transportation, and paying for possible additional labor will require a significant investment of money. You can reduce financial costs by performing construction work yourself.
Nowadays, getting master classes (video lessons) on the construction of stone structures, including fences, is not difficult; to do this, just go to YouTube and use a search engine to select a suitable video. An example of a shell rock fence with deep seams:
Below is a series of photographs where you can see different versions fence made of stone.
If, when creating a fence around a house, its protective functions are important along with its respectable appearance, then it is better to give preference to stone. This is the oldest building material created by nature itself. A stone fence has many advantages and deserves to be discussed in more detail.
Advantages and disadvantages
All the advantages of a fence made of stones around the house can be manifested when it is constructed according to the rules using high-quality cement mortar. The advantages of a stone fence are as follows:
- practically unlimited service life;
- environmental friendliness and safety of raw materials;
- a wide range of stone prices, allowing everyone to choose an option that suits their budget;
- absolute non-flammability, frost resistance, low water absorption and the ability to protect the area from street noise;
- installation does not require the use of expensive equipment;
- a stone fence around the house will easily fit into the design of the site, made in almost any style, and will look great against the background of the surrounding landscape.
Stone fencing also has disadvantages. There are few of them, but they are significant. Firstly, construction is a labor-intensive and lengthy process. Secondly, due to its heavy weight, it requires a strong foundation. This will make construction even more expensive and increase its time.
About the types of stone for a fence

The choice of material in this case is the main factor determining the price of the structure. When erecting a stone fence around the house you can use:
- Ordinary cobblestone. The cheapest, but very durable. You can find it literally under your feet, but in this case you will have to be content with the gloomy gray of its structure. It will cost a little more to buy a special red-brown cobblestone. It has a more regular rounded shape and will add an attractive texture to your fence design.
- Pebbles are not used often because they are too small in size, and for this reason it is quite difficult to work with. Typically, coarse pebbles are used to build stone fences, and the corners and base of the fence around the house are laid out of brick. It will give the structure the necessary strength.
- Dolomite is a durable, but easily processed stone obtained by blasting. Next, the rock is polished, thanks to which the stone and buildings made from it acquire an elegant appearance. It perfectly complements the design of both the house and the site.
- Limestone. This type of stone attracts with its availability and ease of processing. But we must not forget about its shortcomings. It has a porous structure and easily absorbs moisture, which, freezing and thawing, will quickly destroy the fence. To prevent this from happening, the surface of the limestone is treated with water repellents.
- Sandstone is many-sided and varied; it can have a polished or hewn surface. Beautiful, durable, frost-resistant and practically non-absorbent material.
- Rubble stone is the name given to the fragments of the most different breeds, which differ in size. A fence made of rubble stone around the house will look especially neat from rubble stones measuring 20-40 cm.
- Flagstone is a variant of wild stone. These are also rock fragments, but, unlike rubble, they have flat shape. Only an experienced craftsman can build a fence from this material, since it must be carefully sorted by size.
- Granite is the most durable, most beautiful and most expensive. Not only the material, but also the work with it will be expensive. The stones are usually large and have to be broken and then adjusted to fit the overall design of the fence.
- Marble competes with granite in cost, is not inferior to it in strength, but is easier to process. Marble rubble fences around the house are almost eternal structures that can last for several centuries, remaining just as elegant and durable.
- Artificial stone is an excellent option for those whose wallets cannot support the purchase of natural stone. In essence, it is concrete, but in appearance and in terms of performance, it is no different from natural stone except for cost.
After choosing the material, construction should begin. Building a stone fence with your own hands is a long and difficult process. It will require both patience and knowledge of the main stages of construction.
Pouring the foundation and preparing the stone

First, the site is marked, in which the points where the corner posts will stand are determined and marked with pegs. Then twine is stretched between the pegs, and places for row posts are marked. The distance between them should not exceed 3 m.
Next, a trench is dug, the width and length of which is determined by the width and length of the future fence, from 50 to 70 cm deep. In the places where the pillars will be located, holes are dug to a depth below the freezing level of the soil. In them, metal pipes with a diameter of 4 to 10 cm are installed and fixed vertically on a crushed stone cushion - supports for future pillars.
The boards are used to create formwork into which reinforcement is placed. On both sides near it, stakes are driven in every 1-1.5 m and connected by transverse beams. They will protect the boards from deformation when pouring.
The foundation is poured with a concrete mixture the consistency of thick sour cream. It consists of cement M300 or M400 - 1 part; sand – 2 parts; crushed stone - 4 parts. The foundation should be slightly above ground level, otherwise water after rain and melting snow will accumulate along the fence, erode the soil and cause mold to appear on the stones!
After pouring, the concrete must be pierced, covered with PET film (for more uniform drying), and wait about 2 or 3 weeks. This is necessary for the mixture to harden and gain the required strength.
The stones are sorted by size and color, and large cobblestones are broken. The smoothest fragments and stones, the shape of which is close to rectangular, are put aside; they will be used for the construction of pillars. When the material has been sorted and the foundation has gained the required strength, then it’s time to proceed to the most important stage.
Construction of pillars

When using processed rectangular stone, the fence is laid using the same technology as brickwork. This is the so-called plank masonry. There is also an improved plank masonry, for which it is used perfect shape material. But more often, home craftsmen use unprocessed stone, the shape of which is far from perfect. Rubble or “wild” masonry is used for it.
The simplest is the sliding formwork method. It allows you to create smooth, beautiful pillars from stones of different sizes and shapes with minimal time. In this case, two modules assembled from boards in the shape of a hollow parallelepiped are used as formwork for the supports of a fence made of stones. Its internal dimensions are equal to the parameters of the future pillar, and its height is no more than 50 cm. The modules should be easy to disassemble, so it is better to use self-tapping screws for fastening.
Prepare a concrete solution from the following ingredients: cement - 1/3 of a bucket; sand – ½ bucket; gravel ½ bucket. Add enough water to obtain a thick mixture that holds its shape well.
One of the modules is installed strictly horizontally so that the support pipe is in its center, and stones are laid around the perimeter. In this case, you must try to place them so that the gaps between them and the inner surface of the formwork are minimal, and the stone itself lies as tightly as possible. After the first row is laid out, it is poured with concrete. Next, the second row is laid out and so on until the formwork is completely filled. The concrete must be pierced to get rid of voids.
Now secure the second module to the first module with self-tapping screws, check that it is horizontal and continue working. A day later, when the concrete has hardened, the lower formwork is disassembled, removed, reassembled, attached to the upper edge of the second module, and so on until the very top of the column.
Do not forget about the mortgages to which the sections will subsequently be attached.
While the mortar hardens on the upper sections of the stone fence support, you can begin finishing work below. For them you will need a stiff brush, a piece of foam rubber and a scraper - a metal tool with a sharp tooth at the end. The work itself is as follows:
- existing voids are filled with cement;
- when the cement hardens, use a brush to clean the material from excess solution;
- the seams are cleaned, and they are jointed with a scraper, that is, grooves of the required depth (about 1 cm) are made, which will give the pillar relief and a more attractive appearance;
- Using a piece of foam rubber, the stone is finally washed off.
Don't put off unstitching too long! Over time, the solution will harden and it will be difficult to do it.
After the pillar is completely ready, its top must be covered with a metal cap, tiles, decorative stone - any material that can provide the pillar with protection from moisture.
Installation of sections

There are options here. Experienced craftsmen they stretch twine between the pillars, which serves as a guide for them. Place a layer of cement on the foundation and lay out the first layer of stones, trying to place them with the even side facing out, then fill them with concrete. When it hardens, apply the second and subsequent layers.
If there is not enough experience, then it is better to build sections in the same way as pillars - with the preliminary construction of formwork. The process is the same, only now it is not necessary to try to lay the stone close to the boards. Small unevenness in the laying of spans of stone fences is quite acceptable. Consider some nuances:
- if round stones are used, then formwork, alas, will not help, and the work will have to be done “by eye”;
- concrete is poured in layers, each layer should harden depending on the weather from one to two days;
- do not make high formwork right away - you will not be able to pierce the concrete well - it is better to build it up gradually;
- do not forget to check the verticality and horizontality of the structure;
- so that all sections have the same height, at the last stages of laying the sections, measure them with a tape measure and select stones the right size;
- immediately unstitch the seams, as when constructing pillars.
- Be sure to cover the top of the section with a gable metal roof or tiles for waterproofing.
Now all that remains is to concrete the area along the fence at a slightly inclined angle so that water does not accumulate there, and look with pride at the work of your hands.
A little imagination

Today you can build a fence from fashionable torn stone, highlighting the design of the space around the house and bringing it closer to the natural style. To make it from ordinary cobblestones, just split the stones with the edge of a sledgehammer. The result will be flat, easy to lay and beautiful design material.
You can build a gabion. This French word literally translates to “stone in a net.” That is what he is. A mesh of the desired configuration is simply created and natural material of the required size is poured into it. This type of fence is easy to create, original design, practicality and low maintenance in the future.
Those who would like to build a fence around their house with an exclusive design can create entire pictures on their fence.
Fences in dacha or suburban areas are not only a way to protect against uninvited guests, but also business card home, decorating the main building and allowing the owner of the house to make a statement.
An example of a fence made of natural granite stone
A fence made of stone makes a personal plot stand out from the crowd. In addition to superior aesthetics, such fences have many advantages. Let’s look at what the construction of a stone fence on a personal plot will allow you to achieve, and whether you can handle it yourself.
Features of stone fences
Our ancestors built a stone fence to protect their homes far before us. Despite the fact that such fences have very ancient history, they can give a head start to some fences made from modern building materials. Let’s take a look at what makes these structures stand out so favorably:

Materials for the construction of stone fences
Let's consider what types of stones can be used to make a stone fence.
Boulders or cobblestones
If you are doing this and there is a need to save as much money as possible, then this stone option is most suitable. The price of such material is very low, especially since it can be obtained for free, for which you just need to look under your feet.
Such fences do not have a striking appearance and look quite simple and concise.

Example of a fence made of boulders
You can embellish such a fence made of natural stone a little by purchasing cobblestones bright colors. For example, you can find red boulders on the construction market, which will definitely make your site stand out from many others.
Gravel
This type of stone is the smallest one used for the construction of fences. Most likely, you will rarely see such a fence made of wild stone on your way: the size of the pebbles does not make its laying convenient. In this case, a fence is built from stone and brick, where the brick in the form of pillars is assigned load-bearing duties, and the gravel is assigned decorative duties.
The price of gravel, as well as cobblestones, is low, so if it is decided to make such a stone fence, the main expenses during construction will be associated with the purchase of bricks.
Dolomite
This type decorative stone has flat outlines. Its extraction is carried out using blasting operations in special quarries.

Original dolomite fence using forged elements
As a rule, if finishing fences with stone is necessary, then the choice is made in favor of this material. The price per square meter differs markedly: depending on the size and composition of the stone, it ranges from 200–3000 rubles.
Limestone
This type of stone, like the previous one, is used mainly for finishing finished fences. Its soft structure makes it very easy to work with. You can buy such material for 250–300 rubles/square meter. It is necessary to note some of it negative sides. The structure of this stone is porous, which makes it hydrophobic.
In regions with a damp climate, such a fence made of decorative stone will quickly become unusable: moisture will penetrate the pores and destroy the limestone from the inside. Thanks to moisture-proofing impregnations, you can avoid problems associated with this, however, you must understand that this will entail additional costs.

Tiger sandstone fence using metal elements
Sandstone
This type of stone is used not only for the construction of fences for suburban areas, it is also actively used in the construction of houses. Sandstone is not afraid of water and cold, so the service life of fences made from this decorative stone is very long. Thanks to all the advantages, it is very popular and very expensive.
To buy a cube of such material you need to shell out about five thousand rubles.
If you only need to finish the fence, then you can buy tiles from this material, which will cost up to a thousand rubles per square meter.
Rubble stone
A fence made of rubble stone can be built entirely or can be lined with it. This material is very common in the construction of fences due to its strength characteristics. You can buy rubble stone for about 250 rubles per kilogram.
Artificial stone
Thanks to development modern technologies In the construction industry, new materials are increasingly appearing on the market. Artificial stone is very popular for finishing fences, using which an imitation of any natural stone is achieved.
Looks no worse than fences natural materials, and its cost is significantly less. Thanks to the variety of colors, textures and shapes, such a fence can fit into any exterior of a personal plot.
Construction of a stone fence
Building a stone fence with your own hands is not easy. You need to have a lot of free time, and also be prepared for some difficulties. Let's look at the process of constructing fences of this type step by step:

Let's talk about each of the stages of construction in more detail.
Marking
Determination of the boundaries of the future fence is carried out in the case of erecting fences from any materials. At this stage, you can decide on the consumption of materials, for which you need to calculate the length of the fence, its height and width.
Construction of the foundation
Usually they provide for fences. Work begins with excavation of soil along the border of the fence being built. The trench is made up to 600 mm wide and up to 800 mm deep, after which it is filled with mortar. It is necessary to equip the foundation even where the gate will be located to ensure the integrity of the structure.
It should be noted that it is imperative to strengthen the foundation with reinforcement to prevent cracking in the future.

Installation of formwork for pouring the foundation
After pouring, the base is left to dry. If work is carried out in hot weather, it is necessary to periodically wet the hardening structure so that the foundation does not dry out.
Preparatory work
Since there are about three weeks before the foundation hardens, you can devote this time to preparing the building material. First, you need to sort the stones by size, which will allow you to lay the stones much faster in the future.
If you come across very large elements, it is better to crush them, because they may not fit anywhere. You should also clean the stones from dirt and wash them.
Installation of poles
The pillars are needed in the fencing structure to ensure the reliability of the future structure. It is recommended to install them in glasses pre-installed into the foundation. The core of the pillars should not be left hollow; it is best to place stones there and fill it with mortar.

Example of a natural stone fence post
To save money, you can use cheaper stones or use unnecessary leftovers. The height of the pillars can be equal to the height of the fence or be greater at the discretion of the builders. After completing the work, you need to let the pillars stand for two weeks, and only after that begin further work.


