DIY web and spiders
A web with spiders is a simple and effective room decoration for Halloween, especially if you are planning a party with guests and you need to create the appropriate atmosphere.
The most obvious option is to wind woolen threads in the form of a web on the wall, securing them with push pins. First you need to secure the warp threads (diagonal), and then wind the thread in a circle.

You can attach a web thread to a plastic disposable plate, populate it with a cardboard spider and hang it on the chandelier.

The basis for the web can be the crosshairs of any sticks, for example, thin branches or ice cream sticks.


A web can be cut out of paper or oilcloth using the same principle as a snowflake for the New Year.

You can either buy ready-made spiders for Halloween as a decoration on a web or as an independent decoration, or you can make a craft with your own hands. It could be just a figure cut out of cardboard or a three-dimensional version.
These cute spiders can be made from the same plastic plates. The materials you will need are chenille (fluffy handmade wire) and eyes for toys of different sizes.

But such a not only funny, but also tasty spider can be made from lollipop and chenille:

A more complex design is the glamorous spider made from a decorative mesh shaped like a bubo.

You can make this cute spider with your own hands from two foam balls of different sizes.


And another version of a spider made from a ball, this time wrapped in acrylic thread.

A very simple to create, but impressive looking spider - made from a black ball with paper legs. It may well frighten a guest who enters the room!

Halloween crafts from toilet paper rolls
Rolls (tubes) remaining after use toilet paper- excellent material for children's creativity. From it you can make figures of any animals and birds, and for Halloween - monsters, mummies and bats.

To create such mummies, you don’t need anything other than toilet paper and eyes. Wrap the roll of paper in in no particular order, glue the eyes - the mummy is ready!


As for creating monsters, here you can fully express your imagination.


The same applies to making witches, ghosts and bats - no instructions are needed to make them.


Well, if you don’t have any extra rolls lying around at home or there isn’t enough material to fulfill all your fantasies, use empty juice boxes as an alternative.

Candlesticks
An original decoration for your Halloween room will be a craft in the form of a candlestick. Making it is not as difficult as it might seem at first glance.

Take a glass container (jar) and stick thematic figures cut out of paper (witch, bat, pumpkin, spider, cobweb, etc.) on the outside. Place a candle at the bottom of the jar, light it - the lamp will effectively light up.


You can apply a drawing with a marker, and paint the container with any color - then the lamps will glow different shades and will look monstrously gorgeous in a dark room. Boooo!


You can wrap the jar in gauze and glue on the eyes - you’ll get a mummy lamp.

Wrap the jars with thread and plant spiders on them - again we return to the theme of the web.

Fairy lights
A holiday craft option that offers unlimited scope for imagination. After all, you can hang anything on a garland!
Paper ghosts.

Skeletons, black cats and bats.


Skulls and ghosts made from felt.


Faces of monsters and witches.

Balls made from threads in the shape of “sugar loaves”.

Paper pumpkins.

Ghosts made of threads.

Or made of fabric.

Halloween wreath
A wreath on a door or wall is a very popular home decoration. Nowadays such wreaths are made for many holidays - and Halloween is no exception. As a blank, you can use a circle made of cardboard, plywood or a foam circle - they are sold in handicraft stores.
You can make such funny monsters if you tie a lot of tulle strips tightly in knots on the workpiece.


The tradition of celebrating Halloween has recently entered the lives of Russians. But this interesting, original holiday is never complete without a sea of impressions. One of the main attributes of home decorations is not only pumpkins, but also cobwebs. A DIY Halloween spider web is quite simple. To do this, there are several techniques from the most different materials.
We knit decor
You can crochet a very beautiful decorative web, which will add an appropriate ambiance to the setting. Having real cobwebs in the corners is not very pleasant, but such an openwork thing will definitely become the envy of your skill. If you have sufficient knowledge, you can knit such a product.

To work on more easy option you will need a hook (in the example we used No. 8470) and yarn. You can choose any color, but the material is suitable with a large amount of polyester. You will notice the difference already when attaching it to the wall, because the material will stretch perfectly. Therefore, the span of the web will take about 30-35 cm, depending on the tension of the threads.
The process will not take much time if you know how to handle a crochet hook. For those who are not new to this business, we can suggest replacing the first column in each row with air loops. This way your web will become not only more voluminous, but also more realistic.
- 1st row: 12 tbsp. with a ring over it.
- 2nd row: 12 tbsp. yarn over and between each stitch there are 2 air loops.
- 3rd row: 12 tbsp. and between them there are 3 air. P.
- 4th row: 12 double crochets and 5 chain stitches between each stitch.
- 5 row: 12 tbsp. with 3 yarn overs, 9 ch between loops.
- Row 6: 12 st. with 4 yarn overs, 11 chain stitches between each.
- Row 7: 12 st. with double crochets, 15 ch between each.
It turns out a neat, small web on which you can attach its owner, also made from scrap materials, beads, threads, etc. But this is only an approximate size. You can continue knitting as needed.

Sturdy and reliable
There are several options for making a web from wire. For the first one, you will need several branches, which can be found even in the city strip.
Connect them in the middle with wire, and then continue the spiral weaving from the center, securing the thread to each branch. As a result, you will get a composition from the floor natural materials. This definitely cannot be ignored.

More complex options will require perseverance and skill. You will need thick wire. Since the composition is angular, it is necessary to make five “rays”, the outermost of which will be at an angle of 90 degrees relative to each other. The ends can be left straight, but if you wish, curl them, as shown in the photo below. We twist the place where they connect. We stretch the threads of the web across the entire width of the resulting element from one ray to another, etc. It is better to start from the wide part and gradually narrow the distance between the threads. This composition can be decorated with a homemade spider or dry leaves.

The most realistic spider web
Do you want to really scare your Halloween guests or tease your neighbors with your skills? Try to create a truly scary and realistic composition for the holiday.

Such a web is suitable both for the facade of a house and for decorating a small apartment inside.
A web made of gauze is a win-win. Firstly, the material is accessible and will definitely be available to everyone. Secondly, working with it is easy and simple.
To create a lighter, airier version, you will have to tinker. It is necessary to stretch each thread of gauze. But the effect exceeds expectations.

Even workplace can be decorated this way.

The second option is easier and faster - hang the gauze, stretch it slightly or tear it. The effect of realism will be less, so it is worth placing spiders and corresponding attributes on the canvas.

A web made from threads or ropes will look great. Will do wool yarn. If the threads are thin, then the white cobweb will look faded and unprofitable; it is better to use black.
Stretch six long threads crosswise in the place where you decided to install the composition, secure the ends with pins, nails, and masking tape. Closer to the center, attach a thread of the same color to any ray using a knot.
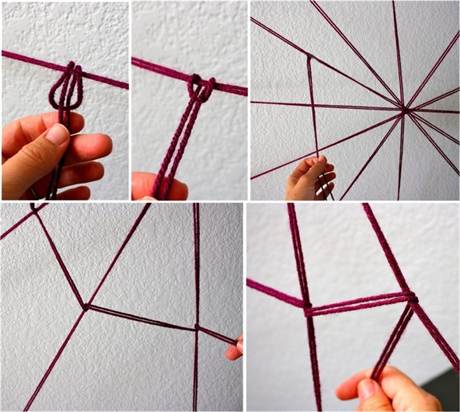
Moving in a spiral, secure parts of the web, making the distance between levels increasingly greater depending on the distance from the center. And at the end, secure with a strong knot.
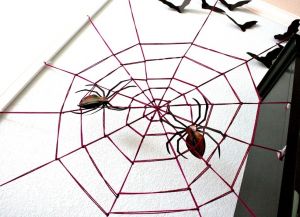
The web is ready! It will look especially beautiful hanging on the corners. All that remains is to attach spiders and other decor to it.
Paper version
Patina from paper is easy to make according to the principle New Year's snowflakes. You will need a square sheet of paper and scissors.


We cut off the lower part so that an even triangle remains.
It's October outside, and we continue to prepare for the most creepy and mysterious holiday - Halloween. In the previous article, we looked at, and today we will learn how to make classic Halloween crafts with our own hands - the most traditional and bright symbols of this holiday.
Any holiday is primarily about mood and atmosphere. And even more so for something as unusual as Halloween. To create an aura befitting this holiday, give your home a mystical ambiance. We offer several handmade decor options that will briefly immerse your home in the atmosphere of the other world and mysticism.

The theme of Halloween decorations is unchanged - various kinds of horror, other world and its characters. And the only bright spot this evening is the pumpkin.

The pagan origins of the holiday are evident, when the signs of autumn served as symbols - bright leaves, harvest, garden scarecrows.
Jack of the Lantern is traditionally made from pumpkin.
According to Celtic legend, a greedy blacksmith, having entered into an agreement with the devil, after death did not end up in either Hell or Paradise, and his soul wandered the earth restless. The devil gave Jack a tiny coal to light his way. The blacksmith, protecting the coal from the rain, hid it in a pumpkin. Since then, it has been believed that such lanterns help homeless souls find their way to Purgatory. In addition, they say that the light of a candle in a pumpkin scares away evil spirits, which from October 31 to November 1 move from the world of the dead to the world of the living.
 A Halloween pumpkin can be scary, fancy, or funny. It's a matter of taste and your imagination


DIY Jack Lantern

Materials for work:
- Bright, medium-sized pumpkin without damage;
- Sample;
- Awl;
- Spoon;
- Candle,
- garland,
- flashlight;
- Marker;
- Scotch.
1. Decide what we will use to illuminate the pumpkin. When lit by a candle, cut out the top of the pumpkin; for a flashlight or electric garland, cut off the bottom.
2. Consider the option with a candle. Cut off the cap from the top of the pumpkin in a cone shape.
3.Scrape the pulp and seeds from the pumpkin.

4. Take the finished template and fix it on the peel (with tape). Using an awl, we draw outlines on the pumpkin according to the template. You can then, for clarity when cutting out, circle them with a marker or felt-tip pen.

5. Cut out the elements of the face along the contours.

6.To add flavor, add vanillin, cinnamon, nutmeg or coffee beans.
7. We carefully secure the candle inside, about 3 times smaller than the size of the pumpkin.

If we are going to cover the pumpkin with a lid - its cut off top, we should drill two or three holes in it to allow the heated air to escape.
When using a flashlight or electric garland, the cut off part will be at the bottom, and place the light source inside.
Halloween wreath for door decoration - video master class

Another of our favorite DIY Halloween crafts is a festive wreath, which is usually hung on the door. It can be made from a variety of materials. The only thing that remains constant in production is the presence of the mystical attributes of the holiday.
How to make a Halloween wreath with your own hands, watch the video master class below:


Mystical garland for Halloween decor

One of the most budget options DIY Halloween crafts - themed paper garlands. They are easy to make even for a child.
We take the paper and fold it into several layers like an accordion. On the first folded sheet we draw a template. Then we cut out a part along it, leaving the sides uncut.

Template Cast

Pattern Bats

Halloween Templates 
Pumpkin patterns


Bloody palm and marks on the floor
Such a “pleasant” trifle will fit perfectly into the overall atmosphere of the holiday.
In a flat bowl, dilute red paint - gouache or watercolor, dip your palm into it and leave your impression on glass or any other surface. Footprints are made in a similar way.


You can cut out foot templates and tape them to the floor.
Less effective, but will save time on cleaning floors
Head in a jar - very scary and realistic DIY Halloween crafts
With this super-realistic holiday “decoration” you can not only surprise your guests, but also quite frighten them.

Find out how to place a severed head in a jar in this video master class:
Vampire candles
Take scarlet gouache or acrylic paint and generously paint the top of the candle around the wick. As the paint burns, it will melt and flow down in “bloody” streams.

Fun Halloween Crafts - Witch Legs
If you have pointed shoes, you can build fun craft in bright striped stockings, the traditional footwear of a witch.
Stockings can be stuffed with holofiber, padding polyester from old pillows, or unnecessary things cut into ribbons. The legs can be hung from the door, placed in a pot and decorated.

Scary glass stickers

Stickers on the glass of doors and windows can be an excellent option for Halloween decor. Print on a printer ready-made templates pumpkin silhouettes, various evil spirits and other mystical characters, cut out and attach to glass. Baking paper is ideal for this, and a whole bunch of different “Halloween” templates can be found on the Internet. For example.


Witch roses - beautiful and terrible
Black roses will bring a little mysticism to the overall Halloween atmosphere. To make them even more creepy, you can decorate them with “blood” by splashing red paint on them.

You can read our other article, the main thing is not to forget to take paper or other material of the appropriate “frightening color” to make them.
DIY Halloween spider web

DIY Halloween crafts turn out to be very unusual and bright; they easily create a very special, mysterious atmosphere in the house that is not found on any other holiday. For example, only on Halloween you can place homemade webs with spiders around the house or hang them in the form of panels!
Materials for work:
- Disposable plate;
- Scissors;
- Hole puncher;
- Thick threads (wool).
This craft is very simple, so it will be fun to do with your children.
Use a hole punch to make holes along the edges of the plate and insert threads through them. Then we weave a web from them.


Halloween is a holiday when we, more than ever, can let our imagination and imagination run wild. And making various crafts on Halloween with your child, you thereby allow him to overcome childhood fears. After all, a ghost or monster made together with your mother no longer seems so mysterious and scary.

We hope that the ideas proposed in the article will allow you to fill your home with elegant “Halloween” accessories and give this evening a fabulous and mystical atmosphere.
Every year there are more and more enthusiasts who are ready to put on scary rags for fun and decorate the house for Halloween. If you belong to them, here are some tips on how to decorate your home for the holiday very simply and quickly. In this master class I will show you how to make Halloween decorations with your own hands - 20 options with step by step photos how to decorate a house terribly beautiful!
How nice it is to dilute the gray autumn days with a bright, warm and tasty holiday. Even though this holiday came to us from Celtic countries and its roots go far into Western history, this does not prevent residents of other countries from treating it with warmth.
In Russia, the attitude towards Halloween still remains ambiguous. Some people consider it an incomprehensible and uninteresting event, which only young people are interested in, while others are excitedly waiting for it to have fun from the heart!
In any case, you should start preparing for this holiday in advance. In order for the party to turn out in the desired style, you should first of all take care of the decor of the rooms in which it will take place. Unfortunately, there are very few places in Russia where you can buy decent decorations for this holiday.
It is best to order them online, although chain stores often add themed accessories to their assortment before the holiday. But you can do everything yourself. So, let's make our house scary beautiful for Halloween!

The most popular decorations were:
- Pumpkins with cut out eyes
- Webs and spiders
- Ghosts and witches
- The bats
- Walking zombies and mummies
- Brooms, magic wands and other belongings
- Black cats in all forms
- Candles, dry leaves and other attributes of autumn.
A pumpkin walked around the garden... and ended up at a party
The main attribute of Halloween, of course, is the pumpkin, and it has many options to make your wildest fantasies come true: it can be cut out in the shape of a head with a terrifying smile and crooked teeth, dressed up with an elegant hat, painted with paints, wrapped in bright threads or covered with black lace stockings - who cares? that he is capable.
Pumpkins will ripen in the fields in October. And you can bring one such huge fruit into the house, extract all the pulp, cut out the scary face and put a candlestick inside.

In the dark, such a head will look very scary.

Jack-o'-lantern
Now you can make a real creation out of a pumpkin decorative arts. You can draw intricate shapes and patterns on it, either with paints or with a regular pen, to suit every taste. You can also cut beautiful lines across the entire surface or make fancy-shaped through holes so that the chiaroscuro from the candle creates beautiful patterns.
Pumpkins come in a variety of colors, shapes, and sizes. Large pumpkins should be placed near the entrance to the house. Smaller ones can be placed in rooms. They can be decorated with beads, sequins, rhinestones (suitable for light pumpkins) or fabric, bows and buttons (for bright orange pumpkins). On the surface you can depict drawings of spiders, cobwebs, bats, etc.
See how quickly and easily you can make a bat out of a pumpkin.


You can also cut out funny faces and scary pictures. Pumpkin can also be used as a flower vase. You can put asters, chrysanthemums and any other flowers in it. autumn flowers. Here you can also use rowan brushes and autumn leaves. Small pumpkins can be made into candlesticks. It will look very neat and cozy.
Perhaps because Halloween occurs in the fall, the pumpkin is the centerpiece of the day. This can be a decor item, a costume, or a children's craft. The main thing is to ask a terrifying appearance, scare everyone.
On our website we offer a craft option for young children, since they are the ones who love to sculpt from plasticine. You can make a pumpkin from an orange block, and not just one, but 3 pieces at once. You can also draw wonderful faces with plasticine and a toothpick on a soft surface. And also then make an unusual pyramid design, so to speak, a snowman out of pumpkins.
To create a Halloween decoration from plasticine, prepare:
- orange and black plasticine;
- toothpick
We will make the autumn fruits themselves from orange plasticine. Black will be needed for the eyes, and you can also put a black witch's cloak on the figure.

Divide the orange block of plasticine into 3 portions, but not equal, but gradually reducing the amount of mass in each of them. Mash each piece individually in your hands. Pumpkins will be made from them, they will become a kind of lumps for creating a snowman. The finished faces will need to be collected into a pyramid.

Roll the prepared pieces into balls. Then press down on top of each one with your palm to make the balls more flattened. It’s convenient to press out the veins with a toothpick.

Now turn each prepared part into a muzzle. It will not be just a vegetable, but a kind of specimen that forms one part of a single structure. The first largest pumpkin has a hard time, because it is located at the foot of the pyramid. Give her a nose, a distorted mouth and pits for the eyes.

Also, stick on a patch for decoration to show that the strongman pumpkin has burst more than once and has been sewn up to be repaired.

The second pumpkin is in the middle. It’s hard for her too, but not as much as the previous one. She is surprised and tries to gather her strength. Come up with a facial expression for her.

For decoration, make a black blot on the side.

Now comes the smallest and most cunning pumpkin, which completes the whole structure. She smiles and winks at everyone around her, her cheeks stand out, it’s not hard for her at all, because she doesn’t hold anyone on her.

When your pumpkin fantasy is ready, assemble your snowman. Glue one piece to another to size.

Mash a large amount of black plasticine in your hands, crush it with your fingers, pulling out a rectangular, very thin cake. From the prepared part we will make a long cloak with a cap. On one side, close the corners and smooth the seam with your fingers, pull out the sharp cap.

Glue the cape onto your head, or rather your face. The cap will be placed on the head and go down in the form of a long cape.


This witch is made from scrap materials - a plastic bottle, garbage bags and ribbons. The special thing about this one is that it can be used on Halloween to decorate your garden and yard.


The bat can be placed on any surface, or hung from the ceiling or door frame. The bigger, the better! They can be made from black bags, black tape, fabric and other materials. You can simply buy a toy at the store. You can place a web nearby and place it on a small spider. It is convenient to make a web from gauze or thin wool threads. Most guests will definitely be impressed.
How to make a Halloween decoration - a bat from corks

These bats are made from cork and black paper.

To bring your finished mice to life, don't forget to glue on the eyes!

Black Cats
Black cats like ancient symbol witchcraft will be appropriate always and everywhere. These can be stickers, cut-outs, toys, figurines and even drawings.
How to do black cat from plasticine - master class

You can make such a cat together with your children - they really like modeling from plasticine!


You should definitely think about mummies when you decorate your bathroom, kitchen and toilet. The element of surprise is important here. And since guests usually enter these rooms alone and relax, the effect will be very unexpected. Decorate your zombie costume with red spots, and you can even make a mummy out of toilet paper.
Items related to magical world, can be placed evenly throughout all rooms, giving priority to the hallway and living room. These can be brooms, magic wands, old hats, bowlers, etc. The picture will be perfectly complemented by candles of different colors and shapes, wreaths of dry colorful leaves, as well as red apples and oranges.

An owl is one of the attributes of Halloween; it can also be molded from plasticine.

Feel free to decorate any candlestick!
Burn, burn clearly, so that it doesn’t go out! Candlesticks and candles are no less important objects at a Halloween party than a pumpkin. As a basis, you can take an ordinary candlestick from the IKEA range, and then as your rich imagination will tell you.
You can paint it, wrap it in a white bandage and pour red paint on it for a bloody effect, scrape a pattern of cobwebs onto the wax, stick on blanks in the shape of flies or bats - it’s all very simple!

How could there be no festive table???
Halloween is the perfect holiday for those who break the rules, and this also applies to table decor. Only for Halloween among delicious dishes You might find severed fingers or dead spiders. For those who prefer a more classic style, we recommend using autumn natural decorations: yellowed leaves, rowan berries, chestnuts, hay, etc. Burning candles on the table will add a mystical atmosphere.

This is a master class on how to decorate a table for Halloween.

It doesn't take much time or effort to decorate your home for Halloween. The main thing is a little creativity, good mood and company. Decorating a house in a terrifying style with a cheerful circle of friends is a good warm-up before a noisy party, isn't it?
There is probably a lot more that can be said about Halloween decorations, but these are the most spectacular and popular of all. Just add some food, music and good company and the party will be a success!
Halloween is not an ordinary holiday. It's more of a tribute folk traditions, found even among the ancient Celts. In Russia, All Saints Day has not yet fully taken root, however, in many educational institutions it has already become a habit to decorate classrooms for this holiday original jewelry made with your own hands.
Pumpkin is an integral attribute of the celebration of All Saints' Day. An old Irish legend says that one day the blacksmith Jack, a lover of drink, invited the evil one to join him in a nearby inn. When it was time to pay for the drink, Jack asked the devil to turn himself into a coin, after which he put it in his pocket, where there was already a silver cross. No matter how hard the evil one tried to regain his original appearance, he failed. The devil had to promise Jack not to claim his soul after death. When Jack died, he was not allowed into either hell or heaven. He was doomed to wander the earth forever, awaiting Judgment Day. Jack made himself a lantern from a pumpkin to light his way. This is where the tradition of carving pumpkins for Halloween came from.
DIY Halloween pumpkins
You can also make your own pumpkins from corrugated pipe.
To work you will need:
- orange paint;
- glue;
- decorative elements (for the “tail”).
How to do:
Balloon decor
Usually, a design is first applied to pumpkins - eyes, nose, mouth, after which the “extra” details are cut out using a knife. But if you don’t know how to handle a knife, you can do without it. Bright orange balloons can easily replace the pumpkin. You just need to draw funny faces on them using a regular marker.
Ghost made of gauze
A handmade ghost will decorate any classroom.
To work you will need:
- liter plastic bottle from under water;
- foam ball;
- wire;
- starch;
- gauze;
- two small pieces of black fabric.
How to do:
- Place the bottle on a flat surface (it is advisable to secure it or support it with something for stability). Place a foam ball on the neck, slightly pressing the neck inside the ball.
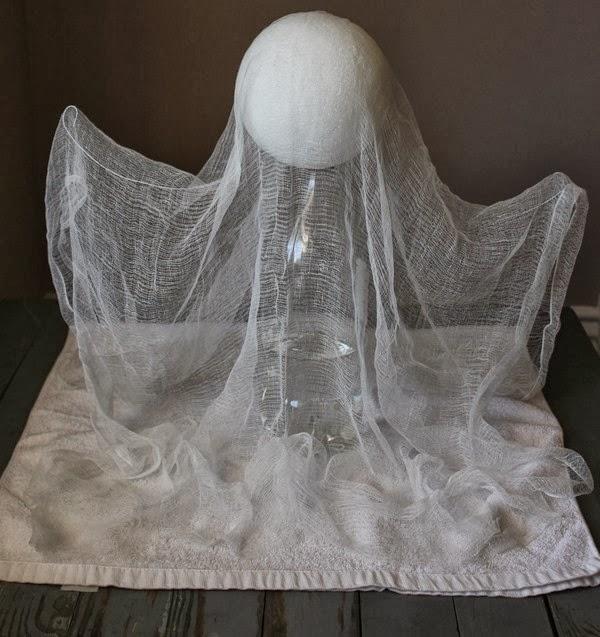
- Make hands from wire. Place gauze on top and generously spray the structure with starch.

- After complete drying, glue eyes cut from black pieces of fabric to the front of the gauze.

Chandelier with bats
An original chandelier with bats is another craft that can decorate a classroom.
To work you will need:
- black paper;
- hoops of various sizes;
- acrylic paint;
- scissors;
- scotch.
How to do:
- Paint the hoop black and let it dry.
- Draw or print a template bat, trace on paper, cut out several figures with scissors.

- Attach three threads to the largest hoop as shown in the picture.

- Attach smaller hoops to the large hoop, placing them at the bottom.

- Distribute the bat figures evenly around the circles and secure them with tape.

Glowing eyes
Glowing eyes will look especially impressive in complete darkness.
You will need:
- toilet paper rolls;
- glowing sticks;
- pencil;
- scissors;
- scotch.
How to do:

Scary eyes are ready!
Decorating the classroom with cobwebs
One of the corners of the classroom will be perfectly decorated with a cobweb with a huge spider in the center.
To work you will need:
- gray thread;
- toy spider;
- Double-sided tape.
First you need to figure out how the web will be located - this will help you understand in which places the double-sided tape should be glued. You need to start gluing with “rays” - threads diverging from the center. After this, stick the threads that make up the web in a circle. When the work is finished, place a toy spider in the center of the web.
You can also decorate the room with small spider webs made from popsicle sticks. The work process is shown in the photo.
You can place a mat with cobwebs at the threshold of the classroom. The web is drawn with an ordinary permanent marker.
Mummy heads
Since the holiday is conducive to black humor in all its forms, you can decorate your office with mummy heads. For this you will need:
- oranges;
- toy eyes (sold in craft stores);
- glue;
- black tape;
- gauze.
How to do:
- Glue a strip of black tape to the place where the mummy's eyes will be.
- Carefully wrap each orange in gauze, securing it with glue.
- Let dry, then glue on the toy eyes.
Candlesticks
Baby puree jars can make wonderful themed candle holders. Jars need to be painted bright acrylic paint, and then glue faces made of black paper.
Toy spiders
Using the same toy spiders, you can decorate the space next to door handle. Thrills are guaranteed for everyone who enters the classroom.


