Nadezhda Viktorovna Suyurova
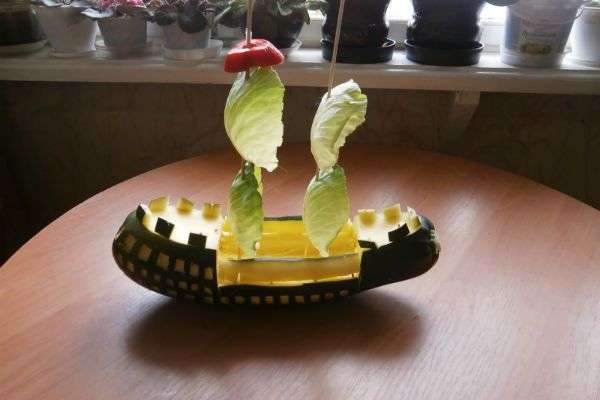
Master class on making autumn crafts from zucchini"Ship":
Step 1. Select zucchini the right shape for the future ship.

Step 2. We plan on zucchini lines for the sides and cut out the peel first with a regular kitchen knife zucchini, and then take out all the pulp with a spoon so that our ship was hollow inside and did not rot prematurely.

Step 3. Mark with a knife and cut out windows on ship. They are located symmetrically.

Step 4. Peel the carrots and cut a small part of it into circles, and from the other part we form an anchor and others ship supplies(at your discretion).

Step 5. Prepare skewers and cabbage leaves (they can be cut with scissors to the desired size) for sails ship.

Step 6. Insert the sails into ship, let's start decorating ship with carrot flags, hold windows, anchor, etc. All carrot decor ship It is attached using halves of toothpicks or sharpened matches, whatever you have on hand.


Like this we made a ship from zucchini!

You can go on a long voyage!

Have a nice trip!

Upon request, for this autumn crafts from zucchini"Ship" Can make a ship's crew from vegetables and fruits (For example: captain, sailors, etc.)
There will be very interesting and exciting joint creativity for children and adults, manual labor and game at the same time.
Publications on the topic:
Paper construction develops Creative skills and children's skills. If you don’t learn creativity in childhood, where does this skill come from?
Inspired by our exhibition for Victory Day, parents asked to give them a master class on making crafts. I tried to make it.
I present to you a master class on making crafts using the cutting method. Required material: Corrugated paper(color: yellow, green,...
Carnation for Dad Making gifts with your own hands for your loved ones and relatives always has a beneficial effect on the emotional mood of children.
Spring came! And with it comes a holiday for all women! I bring to your attention a master class on making crafts for March 8th on the “Tsvetnoy” mug.
My grandson Nikita made this craft for his mother. To make it you need: a frame, a yellow felt-tip pen, a blue sheet of cardboard, two.
To make a basket we will need: 1. Two sheets corrugated cardboard yellow and green. 2. Scissors. 3. Stapler. 4. Stationery.
In autumn, handmade crafts from vegetables and fruits for exhibition are very popular. Photos will help you create your work step by step incredible beauty. If children participate in the creative process together with their parents, they will be able to spend time usefully and be charged with positive emotions.
Autumn crafts are quite varied. These could be animals, cartoon characters, various items and even entire compositions. Thanks to imagination, you can create amazing works.
Caterpillar
Even children can easily make a funny caterpillar. Ideal for creating original crafts. Such work will not get lost at the exhibition and will delight visitors to the event. Making the product is not difficult.
In addition, the work will require a little time and a small list of tools.

Materials for work:
- apples;
- toothpicks;
- carrot;
- rowan berries;
- grape;
- decorations.

- Cut the carrots into thin rings. Their thickness should not exceed 5 mm.

- Using a toothpick, we prick the apple at the place of the tail, thread the carrot ring, and connect it with another apple.
- We repeat the same thing until we get the insect body of the desired size.
- We attach the whole apple vertically, this will be the head.
- We use the remaining carrot rings to create legs. To do this, we attach them to the sides.

- The grape will act as a nose, chokeberry will replace the eyes.
Decorations will help complement the composition. A dried flower will turn a caterpillar into a yoke, and a cylinder will help create elegant gentleman.

Hare
It’s easy to make crafts from vegetables and fruits for an exhibition with your own hands, step by step with photos creative process will be entertaining and interesting. It is best to involve the whole family in the work. This will help not only create original work, but also spend time usefully.
Materials for work:
- White cabbage;
- zucchini;
- carrot;
- toothpicks;
- plasticine.

Execution sequence:
- Take 2 heads of cabbage and connect them together with toothpicks.
- Cut the zucchini lengthwise.
- Cut a large zucchini into 2 equal parts. These will be the hare's paws. The second zucchini will act as ears.
- We secure the paws and ears with toothpicks.
- We make the eyes and mouth using plasticine.
We secure carrots in the hare's paws. It is best to use a vegetable with tops, so the composition will be more natural.

Ram
Making lamb from vegetables is very simple. This will require a minimum set and some free time. Such a product will not get lost at the exhibition; it will attract everyone's attention.
Materials for work:
- cauliflower;
- buttons;
- toothpicks;
- glue.

Execution sequence:
- A head of cauliflower will be the body of a ram. We attach horns to it, which can be cut from cabbage.
- Glue on the eyes.
- Let the craft dry a little.

Alarm
If you want to do unusual craft, you can pay attention to the alarm clock. Even children can make a product; parents just need to control the process. If the whole family participates in the master class, you can have fun and create many original products.
This will give you more chances to win valuable prizes at the exhibition and show everyone your creative abilities.

Materials for work:
- pumpkin;
- eggplant;
- toothpicks;
- plasticine.
Execution sequence:
- Trim the sides of the pumpkin by 2-3 cm.
- Cut off the tail of the eggplant. Trim the vegetable front and back by 5 cm.
- Cut out numbers from the eggplant peel.
- We make arrows from plasticine.
- Using toothpicks we fasten all the parts.

Characters from the cartoon "Smeshariki"
You can easily make crafts from vegetables and fruits for an exhibition with your own hands. The photos will help you understand the intricacies of the work step by step and will make the master class interesting and entertaining.
Using your favorite vegetables, you can make characters from the famous cartoon. The characters seem to come to life, they will give a lot of positive emotions and good mood.

Materials for work:
- potato;
- beet;
- lemon;
- tomato;
- squash;
- plasticine;
- pallet;
- autumn leaves;
- colorful mushrooms, berries, fruits.
Execution sequence:
- We take vegetables, each of them will act as a separate character. To make the shapes more stable, cut off one edge a little from the bottom with a knife.
- We make eyes, nose, mouth from plasticine.
- Attach the parts to the body.
- We place Smeshariki on a pallet, complement the composition with leaves, grass, fruits, and mushrooms.
 Smeshariki from vegetables
 Cheburashka and crocodile Gena
You can bring characters from a famous cartoon to life using ordinary vegetables. This will require a little patience and free time. As a result, you will be able to create a work of incredible beauty and get loved ones cartoon characters.

Materials for work:
- potato;
- cucumber;
- colored paper;
- glue;
- scissors;
- toothpicks;
- pallet;
- leaves;
- colorful fruits and vegetables.
Execution sequence:
- Cut a ring from the potato, no more than 2 cm wide.
- We place a cut ring across the remaining part of the potato and secure it with toothpicks. The result will be a torso and head.
- Cut 2 circles from the potatoes, these will be the ears. Using toothpicks, attach them to the craft.
- We form arms and legs from potatoes. We also attach them to the body.
- Cut out eyes, nose, and mouth from colored paper. Glue them to the potatoes. Cheburashka is ready.
- Let's start making a crocodile. To do this, cut the cucumber into 2 parts. A large piece will act as the body. We make a cut on the second piece and attach it to the first part.
- Cut out arms and legs from a cucumber. We attach all the parts with toothpicks.
- We make eyes and a nose from colored paper. Glue the elements to the body.
- We plant the characters on a pallet and complement the composition with mushrooms, berries, and leaves.

Original hedgehog
The photos will help you make step-by-step crafts from vegetables and fruits with your own hands. The original hedgehog is an excellent option for an exhibition. Such a composition will not go unnoticed; both adults and children will pay attention to it.
It won’t be difficult to complete the work; even kids can make a craft. First you need to prepare everything necessary tools, and you can get to work.

Materials:
- mushrooms;
- Rowan;
- carrot;
- chestnuts;
- pumpkin;
- apples;
- fir branches;
- potato;
- leaves;
- acorns;
- toothpicks;
- tray.
Execution sequence:
- The tray will act as a clearing. Therefore, it needs to be decorated. To do this, place leaves and spruce branches on a tray.
- We install the pumpkin - this will be the body of the hedgehog.
- Cut the potatoes in half and make paws. We attach them to the body with toothpicks.
- We form a muzzle from carrots. The chestnut will act as the nose, the caps of the acorns can be used for the eyes.
- We stick toothpicks into the pumpkin over the entire surface.
- We attach mushrooms, apples, berries, and acorns to the top.
- IN autumn period There is an abundance of vegetables and fruits. This is the time when parents need to cook. original crafts for school and kindergarten. The ideas are quite varied and interesting.
Thanks to imagination, you can create real masterpieces and take prizes at exhibitions. This is a great reward for the work done.
Useful tips
You can make a huge number of different crafts from vegetables and fruits.
Many of these crafts can be made together with children - this will not only bring pleasure, but will also have a positive effect on the child’s imagination.
Here you will find crafts for every taste and color.
Arm yourself with the necessary materials and use the accumulated information to create beautiful and original crafts.
Read also:
Crafts from autumn vegetables for children
Children will love playing with paints. To make it fun for them, make vegetable stamps for them.
A potato, for example, can be cut in half and a certain pattern can be cut out in each half - the child will dip the potato in paint and stamp it on the paper.


Besides potatoes, there are other vegetables that can be used.
Look closely at the pictures to see how you can surprise children with simple vegetables and colors.


Crafts from vegetables for kindergarten: eggplant man

You will need:
1 eggplant
Glue stick
Pompoms
Plastic (toy) eyes

Everything is very simple, and even small children can do the craft.
1. Glue the toy eyes to the eggplant.

2. To make the nose, you can glue a large pompom or cut a circle out of paper and glue it on.

3. You can glue small pompoms in the shape of a person’s mouth. You can also use pompoms instead colored paper, cardboard or even other vegetables - a strip cut from a carrot, for example.
DIY vegetable crafts: potato men

Making eyes
* To make eyes for the potato man, you can use small buttons of any color (except white), which should first be sewn to a piece of fabric white- further cut the fabric in a circle, grease it with glue and glue it to the potatoes.
* You can also make eyes from: peas, berries, black pepper, seeds, colored paper, or pieces of carrot, which are secured with a toothpick.
Making the nose
To make a convex nose, use a button sewn to a piece of fabric - cut the fabric in a circle a couple of millimeters larger than the button. Spread the fabric with glue and attach it to the potato.
Making ears
To make the ears, use pumpkin seeds - just insert them into the potatoes, pointy end down. You can also make ears using plasticine.
Making hair
Hair can be made from different materials, for example, from thread, paper (cut fringe) or thin wire.
Crafts from vegetables for school: potato pony

INyou will need:
Three potatoes
Toothpicks
Carrot
1. Insert one toothpick into a small potato - this will be the head.
2. To make the neck, take out a small potato and insert the other side of the toothpick (from step 1) into it.
3. For the body you will need a large potato. Attach it in the same way.
4. Use toothpicks to make the horse's legs. Insert them into a large potato, i.e. horse's body.
5. To make the horse stand, attach small pieces of carrots to the toothpicks that act as the horse’s legs.
6. You can also make ears from carrots. Insert the ears into the pre-cut holes.
7. For the mane and tail, use knitting threads. Just cut as many as you need and glue to the craft.
How to make a vegetable craft: radish flower

Before you start cutting the radishes, soak them in cold water for a couple of hours - they will become firmer and fresher.

1. Cut off the bottom of the radish. Decide how many petals you want for your future flower, and think about where you will make the cuts.
2. Take a knife and start making cuts from bottom to top (see image).
*You may need to practice a little to ensure that all the petals of the radish flower are even.
* If you want the petals to be more open, gently move them with your finger from the center of the flower in the opposite direction.

3. Using scissors, cut the petals so that you get “arrows” (see image).
4. Repeat the previous steps to make a second layer of petals from the middle of the flower, but this time the petals should be between the outer petals.
A similar flower can be made from tomato or kiwi peel:


How to make a flower from a tomato - video:
Crafts from vegetables instructions: flowers-decorations from vegetables
These crafts can be used as decoration for dishes or simply as a beautiful display of vegetables for children who are known to not be very fond of vegetables.
You can use different vegetables. This example uses cucumber and carrots. You will also need a toothpick.


Food crafts: snowman made from eggs

You will need:
6 large boiled eggs
6 boiled eggs big size
Black pepper (peas)
1 carrot
1 skewer
1. Peel one large and one small egg and cut off the top and bottom parts.


3. Place a small egg on a large one and secure them with a skewer - thread it through.

4. Make a hat from carrot rings. To attach it to the snowman, first make one hole with a skewer through the circles. Now place the hat on the protruding skewer.


* You can safely trim off the excess part of the skewer.
* Instead of a skewer, you can use thick, uncooked pasta.

5. Make eyes, nose and buttons using black pepper and for the nose you can use a small piece of carrot.


6. You can use parsley as arms for the snowman.

Children's crafts from fruits: decorations from dried orange slices

You will need:
Orange
Oven
Oven rack
Satin ribbon
1. Cut the orange into several slices approximately 1-1.5 cm wide.

2. Place the orange slices on the grill.
* Do not use a baking sheet, otherwise the slices may burn.
3. Place the slices in the oven and keep them there at 130 degrees Celsius for a couple of hours (monitor them periodically).
4. Remove the orange slices from the oven and let them cool. You can put them on a plate to cool.

5. Now the slices can be used to decorate dishes or for a Christmas tree or interior - they not only look beautiful, but also smell nice.
6. You can make holes in them and thread a ribbon so that the slices can be hung.

DIY fruit crafts: fruit cup

You will need:
Orange or grapefruit
1. Take an apple and place it on the table with the handle down. Cut off the top part, and the bottom part will act as a cup.
2. Using a knife, cut out the core of the apple.
3. To prevent the apple from turning black inside, brush it with lemon juice.
4. Make a cutout in your apple cup for a handle. Cut a slice of kiwi and insert it into this cutout - it will act as a handle.
5. For the saucer, just cut a slice of orange or grapefruit.
You can also make a fruit cup like this to decorate the table:

Berry crafts: strawberry Christmas tree

You will need:
Scissors
Baking paper
Paper (lace) napkin
Adhesive tape (scotch tape)
Strawberry
Chocolate
1. Make a cone out of cardboard. To find out how to make a cone, you can go to our article: Paper cone. Also cut a circle from cardboard - this will be the base of the tree.
* Instead of paper cone You can look for a foam cone in stores.

2. Cover the cone with baking paper. You can insert the ends of the paper inside the cone. To secure the paper to the cone, you can use duct tape(scotch).
3. Melt the chocolate to glue the cone to the base.
4. Cut a circle in a napkin with the same diameter as the base of the cone and push the cone through the napkin.
5. Prepare the strawberries and separate them by size. Remove the tails.
6. Start gluing the strawberries from bottom to top, starting with the largest berries. Dip the strawberries into the melted chocolate and stick to the cone (wrapping paper).

* Save the smallest berries for the top of the tree.

7. You can also attach other chocolate decorations (ready-made or homemade) to the tree.
Children's crafts from vegetables and fruits: butterflies

You will need:
Clothespins
Toy (plastic) eyes
PVA glue
Sealed bag (ziplock bag)
Thin brush or wire (if desired)
Paints (if desired)

1. Using glue, attach the toy eyes to one side of the clothespin and let the glue dry.
2. Place your favorite treats (yours or your children's) in a ziplock bag - you can distribute them to the sides, but this is not necessary.

3. Use a clothespin to grab the bag as shown in the image.
4. If you wish, you can make antennae for the butterfly from a thin brush or wire. You can also paint the clothespin if you feel it is necessary.
Crafts from vegetables: pumpkin faces

So autumn has come. One of the first activities you will encounter in kindergarten is an exhibition on the theme of autumn and everything connected with it. You will have to make some kind of craft, preferably so that it is not repeated among your child’s classmates. Here we have collected about 40 options for crafts made from vegetables and other natural materials, varying in complexity.
Lamb.
Our article will present autumn crafts from vegetables in the photo. All these ideas are wonderful. That’s why they should definitely be done. Take a branched head of cauliflower, in principle, the product is almost ready, all that remains is to mark the horns and eyes on it. You can buy eyes and attach them ready-made, or you can make them from plasticine or autumn berries. The horns are made by cutting the cabbage itself with a knife in the right places or by rolling up its individual elements and inserting them into the head of the lamb. Everything is attached with glue or toothpicks.

The clock is an alarm clock.
Already now in many school institutions exhibitions called Autumn Fantasy are held. Therefore, it’s time to make crafts from vegetables for this occasion. For the second craft, take:
Plasticine.
- Toothpicks.
- Round pumpkin.
- Eggplant.
We cut the pumpkin on the side by 2-3 cm, not reaching the pulp and seeds. Cut off the tail from the eggplant. Then we cut off another 5-6 cm from the nose and tail of the eggplant. We cut out Roman numerals from its peel. The clock hands can be made of plasticine. And we connect everything into an alarm clock with toothpicks.

Helicopter.
- To create a craft we take:
- A couple of medium zucchini.
- A couple of small zucchini.
- Carrot.
- Skewers or toothpicks.
From one zucchini we make the body of the helicopter, from the other - its wings. A small zucchini will go on the tail, and from a thin plate of the second small zucchini and a carrot ring we make blades.

Fungi in a clearing.
It is worth noting that making crafts on autumn Ball Vegetables are a real pleasure. To create the next craft we need to take:
- The base is a box, cardboard, board.
- Carrots, apples, potatoes, herbs, toothpicks.
On the base, first lay out grass from greenery, or from fallen leaves. The carrots will be mushroom legs, and the caps will be made from potatoes and apples. We fasten the legs and caps with toothpicks; if desired, you can decorate the mushrooms.

Caterpillar.
And many people have probably seen this craft. But it’s worth mentioning again. Take:
- Apples, carrots, greens. olives or other berries.
- Toothpicks.
- Stand for the base.
From apples connected with toothpicks we make the body of a caterpillar, and from olives on toothpicks we make horns. We make a nose with eyes from plasticine or autumn berries. Carrot rings make excellent legs. Now all that remains is to place everything on the base and decorate it as you please.

Cabbage lady.
Vegetable crafts made from vegetables are very popular in the fall. And thanks to this article, making them will be a real pleasure. You will need:
- Head of cabbage, red sweet pepper, carrot, parsley.
- Hat.
- Toothpicks.
We sculpt a composition from a head of cabbage, parsley and a cap, making a cute face from olives, carrots, and peppers.

Hedgehog.
We select the material:
- Cardboard base.
- Elongated pumpkin.
- Olives or grapes.
- Carrots, apples, potatoes, mushrooms.
- Toothpicks.
We place a clearing on the base. We assemble the hedgehog from potatoes, carrots and pumpkins, as in the picture. Now we attach a nose, eyes and spines to it. And we load mushrooms and apples onto the thorns, maybe even leaves.

Krosh from Smeshariki.
We make this character from:
A medium head of cabbage, a couple of cabbage leaves, zucchini, carrots, parsley.
A couple of zucchini rings will be the legs, put a head of cabbage on them, it will be the body. We cut out ears from a pair of leaves and insert them into the cuts on the head of cabbage. We also make the handles from zucchini; you can put a carrot in one hand. We make hair for a hare from parsley and carrot tops. We make the eyes drawn or attach ready-made ones. We make a spout with teeth from melted material.

Spiny cactus.
If you are interested in vegetable crafts that you can make with your own hands for school, then this article was created especially for you. Here you will probably find a lot of interesting things. For example, to create the following craft, take:
- Sweet pepper or potato.
- Cucumber and toothpicks.
Cut 2/3 of the potatoes. Using a spoon, we make a notch in the body of the potato, scooping out the core, and carve the edges. We prepare sweet peppers in the same way. This will be a pot. We insert a cucumber there and stick it with toothpicks, they will become thorns. The spines can be painted and a cactus face can be made from the remaining materials.

Magic carriage.
The craft carriage, as expected, is made from pumpkin. You will also need:
- Small squash 4 pcs, toothpicks.
- For decoration - ribbons, rhinestones, beads. Flowers.
We cut out doors and windows in the pumpkin, and place squash as wheels (zucchini rings are also suitable if there are no squash). Decorating the carriage. If it is possible to seat a coachman and place horses, then we do it.

Stroller.
The most various crafts can be made from vegetables. And you can be convinced of this if you carefully study this publication. In general, to make a stroller you will need:
- An elongated watermelon and a pair of pineapple rings.
- A couple of zucchini or orange rings, 4 olives and toothpicks.
Scoop out the watermelon pulp, leaving the rind intact. the desired shape. The remaining peel will go to the handle. We make orange or zucchini wheels. Insert an olive or grape into the middle of each wheel. We make flowers for the roof from the pulp of watermelon or pineapple. All parts are attached with toothpicks.

Pig for candy.
- Again an oblong watermelon, also buttons.
- Felt Pink colour and toothpicks.
By scooping out the pulp, we maintain the desired shape of the peel. Using buttons we make a face for the pig. The ears and tail will be felt. We make the legs from leftover watermelon peels.

Ship.
Large eggplant or zucchini, sweet pepper (red), cabbage leaves 4 pcs.
Long skewers and toothpicks.
Cut out the boat shape with a knife. We make sails from skewers with cabbage leaves. Make a flag from red sweet pepper.
Basket.
Remove pulp and seeds from a large pumpkin. You can decorate it with carvings to your liking and fill it with vegetables, fruits, berries or nuts. Or maybe some candy.

Kitty.
This article also presents animal crafts made from vegetables. There were such examples above, and now it’s worth giving another one. With some effort you can make a wonderful cat. Peel the onion carefully, keeping the tendrils. We put it on an onion ring. Using small cuts we make the cat's ears. We also cut out the eyes and mouth. We make the tail from scrap materials.

Helicopter with a crocodile.
- Zucchini zucchini, small cucumbers.
- Carrots, whipped eggs, toothpicks.
We cut out the cab in the zucchini. We make the tail and wings of a helicopter from cucumbers. The propeller will be beetroot. And the steering wheel and wheels are carrot-colored. We make crocodile from cucumbers. We put him in the cabin and, if desired and possible, attach a plastic protective glass in front of him in the cabin. We make a hat with eyes using available materials.

Eh, bast shoes...
They will need a couple of yellow and long zucchini. We clean the core from them, and make the peel in the form of bast shoes. You can scratch or draw the desired patterns on them.

Lesovichok.
We make a forest clearing from fallen leaves, greenery, rowan berries, branches and flowers, and plant our zucchini on it. Next, we make him a little peasant - a forest villager, as your imagination dictates, draw a face, put on a hat, make a beard.

Little frog.
If you want to know how to make crafts from vegetables, then you can find a lot of interesting things in this article. To make a frog, take:
Green apple, small cucumber, olive or dark grape, 5 light grapes, toothpicks.
The apple will be the body, you just need to cut the mouth correctly. We attach light grapes as arms and legs, eyes. We put a cucumber crown on top.

Machine.
Here you will need:
Carrot, cucumber, 1 large and 3 small grapes, zucchini ring, toothpicks.
The car itself is made from cucumber. The wheels will be carrots. Peeled squash half ring for cabana. And the grapes will be the headlights.

The bear is clubfooted.
To create a character, prepare:
3 oval potatoes, 1 medium potato, 1 small potato, toothpicks.
Connect 2 large potatoes into a head and body, cut out piles and legs from 3 large ones and connect them to the body. A small potato is a barrel of honey, attach to your hand. Eyes and nose can be drawn.

Fly agaric.
Prepare:
- Green squash, long pumpkin.
- Colored paper and glue.
- Plasticine.
- Toothpicks.
Cut off the nose of the pumpkin, leaving 8-10 cm for the cap. Make a mushroom stem from a zucchini. Connect them together with toothpicks. The hat needs to be painted red with white dots.
Make a face from plasticine and colored paper.

The mouse is a bitch.
- The melon is small.
- Watermelon with white rind.
- A couple of dark olives or grapes.
- Toothpicks.
Using a knife, scratch eyes, a nose and a mouth on the watermelon, and scratch the antennae. Make the pupils from olives or grapes, cutting them in half. And make a spout from a whole olive or grape. Make ears from 2 melon halves.

Monkey.
Beautiful crafts made from vegetables will appeal to everyone without exception. Therefore, it’s worth making something unusual and beautiful as soon as possible. For the monkey you need:
Oranges large and small, pineapple, small watermelon with white peel, a couple of olives, toothpicks.
We cut the pineapple on both sides and combine it with the watermelon. Thinly outline the eyes on the watermelon. We attach halves of olives there in the form of eyes. We make a mouth out of a large orange and attach it to the head. We make a nose from an olive and also attach it to the head. Make ears from a small orange and attach them.

Octopuses.
You need to find similar carrots, highly branched, and add parts of the face to them from scrap materials.
- Palms.
- Sweet peppers green and red.
- Orange.
- Black and green olives.
- Green onion.
- Skewers.
Insert skewers into the oranges cut in half and thread the olives along their entire length. We make the tops of palm trees from peppers. One palm tree can be made from a bow. Place olives on the tops of all palm trees.

Spider.
Long pumpkin or yellow squash.
- Green pumpkin, flat.
- Small carrots 12 pcs.
- The basis for the clearing.
- Fallen leaves.
- Toothpicks.
Cut a long pumpkin or zucchini and insert it into a flat one, cut there too. Make legs from carrots. Next, we plant the spider in the clearing. We make the eyes and mouth from plasticine.

Penguins.
We cut out penguins from eggplants, make their faces from carrots, as well as paws and beaks.

Train.
It's easy to make from a few young zucchini. Their rings will make wheels. You can use chopsticks to complement the image and also make a pipe and a nose out of carrots.

Piggies.
Thanks to our instructions you will be able to do beautiful crafts from vegetables for the exhibition. Pigs are made from potatoes, and would be better suited pink. We sculpt snouts, ears, and tails onto it with pink plasticine. It is better to sculpt the eyes from black plasticine. Then you can place them in a clearing or in a pen.

Retro car.
TO middle length The zucchini can have wheels made of cardboard, a steering wheel made of wire, a cabin can be built from black cardboard and connected to the zucchini.

Fairytale fish.
You can use not only beautiful and smooth zucchini, but for example, one with a curved tail is very suitable for creating a fabulous fish. Cardboard and plasticine with paints will also come in handy. And you can decorate it to suit every taste and color.

Festive service.
From 1 large and a couple of small pumpkins you can make a tea pair with teapot. Pieces of thin and flexible hose will help as a spout and handles. Pumpkins need to be freed from pulp and seeds. Moreover, the lid for the teapot will be its own cut off top. For the cups, their tops will become saucers. Next, all that remains is to decorate your service.

Cartoons - Smeshariki.
From potatoes, onions, apples and pears, as well as plasticine, zucchini and toothpicks, you can make a whole team of Smeshariki. The zucchini will become a car, and from each vegetable or fruit you will make each of the cartoon characters.

Cabbage snowman.
So, from a couple of heads of cabbage, of course, carrots (where would we be without them), pepper, a scarf and a skewer, we build a snowman. We fasten the heads of cabbage together with a skewer, attach a carrot, put on a cap made of pepper and tie a scarf, and the eyes and mouth can be made from plasticine.

Tractor.
- A pair of long yellow zucchini
- Carrot.
- Plasticine.
- Cardboard base.
On the basis we make a clearing or a road. From one zucchini we make the base of the tractor, and from the second - the cabin. We make wheels from zucchini rings. The carrot will become a pipe. Her rings will serve as the steering wheel and headlights. You can also make a plasticine man and put him in the cockpit.

Pumpkin is a tower.
We place the pumpkin in the clearing - a decorated cardboard base. Having selected the pulp from it, cut out the windows and door. Place grass on the roof. Next, we decorate the house to your taste and capabilities.

Snail.
We cut the zucchini and pumpkin as necessary and connect them to the base. The face can be made from berries, plasticine, and beads. And decorate the snail with everything you have at hand - ribbons, beads, etc.

Owl.
A wood cutter will also be convenient for cutting watermelon. A carrot will make an excellent nose, and the eyelids and eyes are made from scrap material.

Turtle.
As part of this article, the names of crafts made from vegetables were presented. All crafts are simple in execution. This number also includes the last one. 3 cucumbers, a head of cabbage, toothpicks and wire can make an excellent turtle base. The cabbage should be trimmed for stability and the shell of your turtle should be made from identical cucumber rings. A third of the cucumber will go to the head. Glue the eyes of beads or berries onto it, and put on wire glasses. And you can sew or knit a tiny hat.

Many people love golden autumn because it is the time when the bins are already full. There is a lot of preserved food in the pantry, and vegetables and fruits are stored underground for the winter. And from all these natural resources you can not only prepare delicious, vitamin-rich dishes, but also make crafts with your children. interesting crafts with his own hand. Next, we will dwell in detail on how to make original products from ordinary zucchini.
In autumn it will no longer be as hot as in summer, and children will not be able to spend a long time outside. And the days are becoming noticeably short, it’s getting dark earlier, but you still don’t want to sleep. Therefore, on such evenings, to keep your child busy, make a craft with him using vegetables from the garden.
Look what a cheerful crocodile Gena made from cucumbers. And a cartoon green plane made of zucchini, beets and carrots.
And here's a mustachioed cat made from an oblong zucchini, again - carrots, corn hairs and leaves.

Zucchini crafts for kindergarten
If in kindergarten the teacher asked the child to do a craft, then you can make this Santa Claus on an all-terrain vehicle. To fasten the parts of the all-terrain vehicle, use toothpicks and plasticine. You can make inscriptions and decorate the work with paints or gel pens.

Look at these various works children. What a bright parrot came out of a white zucchini, orange, green pepper. And one of the preschoolers came up with the idea of making an acorn with a cap from a green vegetable.

In the fall, you can find a lot of material in the forest (cones, acorns, branches, leaves) for DIY crafts completely free of charge. Then use them to create still lifes together with zucchini.
How to make a zucchini craft?
Before you begin, discuss in detail with your child what the product should look like. Better yet, draw it so that there are no disappointments later. Then prepare the material. Select vegetables of the desired shape and do not forget about auxiliary tools. Let's, for example, make small shoes, like in the image below.

Tools, materials:
- Spoon
- Flowers for decorations
- Two approximately identical zucchini
Progress:
- Try to carefully and equally cut strips in the form of a fastener on both shoes.
- Peel off any excess zucchini skin. Using a knife and spoon, gradually and slowly remove the pulp from the zucchini.
- You can also use a carving tool for these purposes. Using special spatulas to remove the pulp is easier than using a regular spoon.
- When will the shoes be accepted? correct form, decorate them with flowers. Simply glue them to the sock. Or use carving knives to create a design on the front of the shoes, if you are familiar with this art.

Autumn crafts from zucchini
Which ones interesting works home craftsmen cannot come up with. Autumn is mushroom time. You can make a whole forest of mushrooms from long white zucchini. Cut caps for white legs from carrots, the same: zucchini, radishes, potatoes. And use large zucchini to make a ship, like in the picture.

DIY zucchini crafts for school
- To get a good grade on your work, you only need to devote an hour of free time to do your homework.
- To do this, take a knife in your hands and cut out five fins, as in the photo of a shark. And try to first peel the white zucchini, and then plan such a formidable fish.
- Then use toothpicks to attach the fins to the shark's body.
- Make eyes from allspice, sharp teeth from toothpicks.

A round overgrown zucchini will make a very beautiful basket, and if you also fill it with vegetables, you will get an original still life.

You can make this kind of machine with a sailboat with your own hands in a few hours. For the product you will need:
- zucchini
- several grapes
- wheels and parts from an old broken car
- plastic figures and your skill, effort

Zucchini craft - ship
Boys are more interested in making cars, ships and other transport equipment.

To make a zucchini ship you will need:
- Large zucchini of equal thickness throughout
- Toothpicks, colored paper
- Scotch tape, scissors, knife, plasticine

Progress:
- Cut an even slice off one side of the squash;
- Scoop out the pulp of the vegetable;
- Decorate the sides of the ship with windows;
- Make a sailboat;
- Place a steering wheel in front made of toothpicks and vegetables;
- The captain can be used ready-made or made, for example, from carrots.
Small boat made from zucchini - craft
Small boats can be made from medium-sized vegetables. Take a look at the artists' work below:

To make the ship look original, it was decorated with toothpicks and matches.

Zucchini whale - craft
Making a whale will not take you much time. The only thing you need is to find a zucchini approximately the same shape as in the picture. Make the fins and tail from colored cardboard, simply cut out the eyes and mouth on the vegetable itself or make it from plasticine.

Look at this whale with a parsley fountain, it looks very cute. The tail and fins are made from green pea skins.

Autumn-themed zucchini crafts
It is advisable to keep an eye on your children when making zucchini crafts, because you will have to use a knife to do the work anyway. Also explain to your child that a product with berries and vegetables will not be stored for a long time. Next you will see works that do not have autumn motifs. A small hedgehog made from a yellow-fruited squash with berries and apples on toothpick thorns looks cute.

A beautiful composition was made from a yellow, round zucchini in the shape of a carriage for Cinderella with autumn foliage and artificial stones.

Zucchini hedgehog - craft
It's easy to make a cute little hedgehog from a white pear-shaped zucchini. It is enough to use a little imagination and use everything that is at hand for work. In the first image, a cute hedgehog is made from young zucchini, toothpicks, and grapes. The nose is attached to the zucchini with a toothpick, molded from black plasticine.

This hedgehog turned out to be big, kind, and funny. Even its spines and seeds are not sharp.

Other zucchini crafts - pictures
Sometimes nature itself creates fairy-tale characters. Look at this swan princess from high-yielding Tsukesha squash. To make it, the master only had to paint the beak with red paint, glue on the eyes, cut wings from cabbage leaves and a crown from carrots.

You can even make an all-terrain vehicle with a cabin from an ordinary zucchini (from a piece of zucchini).

Zucchini machine - craft
To calm down the restlessness at least a little, invite the boy to start making a machine from an early ripe round Ronda zucchini. Believe me, the naughty girl will not leave your side for at least two hours until the car is ready.

Zucchini penguins - craft
Prepare tools and materials for crafting a penguin:
- One zucchini
- Carrot
- Allspice
- Knife, toothpicks

Progress:
- Cut the zucchini into two parts.
- Gently peel the skin off the zucchini to create a little face and belly shape, like in the image above.
- From an orange carrot, cut out a hat, legs, a nose, a butterfly for the neck and a bow for the girl penguin.
- Make wing cuts on the sides.
- Attach all other parts to the zucchini with toothpicks.
Zucchini turtle - craft
Materials, tools:
- Three zucchini different shapes. Two are long, one is round in shape.
- Toothpicks, knife.
- Plasticine.

Progress:
- Cut the round vegetable in half;
- Divide one long zucchini into six parts (turtle head, four legs and tail);
- Cut another long zucchini into rings;
- Then be patient and use toothpicks to connect all the parts;
- It is better to secure the turtle shell with two toothpicks;
- Also attach the plasticine eyes to the face with the same auxiliary material.
Zucchini pig - craft
To make a plump white pig, you only need to cut out the ears and snout from a cucumber. Then use toothpicks to fasten them to the body of an oval white zucchini. Make the eyes from black plasticine, the tail from wire.

Craft vase made from zucchini
A vase made of green zucchini will look truly festive. This craft can be given as a birthday present to your mother or grandmother. If you decorate the finished vase with paints, the effect will be amazing.

Using your carving talent beautiful patterns on vegetables and creating ikebana, your product will receive high praise from your family.

Zucchini minion - craft
Almost all children know the cartoon character Minion. But not everyone knows how to make it themselves from zucchini. It turns out it's simple. you need to take a yellow oval vegetable and paint it with ordinary paints, as in the photo below. Make legs from zucchini. Attach them to the body with toothpicks.

Craft “Zucchini Engine”
For a steam locomotive with one carriage you will need:
- one large cucumber
- three dark green zucchini
- carrot
- plasticine, toothpicks

Progress:
- Start with the trailer. Cut off the top of the oval vegetable and remove the pulp.
- Cut half of another squash to make a driver's cab.
- Cover the roof with plasticine.
- Secure all parts of the train together with sharp toothpicks.
- Then make wheels from cucumbers and carrots.
- Use plasticine to sculpt a small front grille and a horn for the roof.
- Make a pipe out of carrots.
Zucchini house - craft
Any house must have windows, doors, and a roof. Look how fabulous houses made from round hybrid zucchini look in combination with Christmas tree branches, flowers, pine cones, and rowan berries.

After the examples given, you yourself will be able to create your own zucchini craft, unlike all the others.


