Preparing a child for school is not only stressful for the future carpenter himself, but also for his parents, and, first of all, for their wallet. Pens, pencils, rulers, notebooks, copybooks - a considerable list is typed, the result of which is a number with three zeros. But you can save on some little things, for example, making a cup for pencils with your own hands. This is a functional element that must be on the desk of preschoolers and schoolchildren. He organizes the child and teaches him order, that everything should be in its place. Most of the techniques for creating a pencil cup are very simple, so you can learn them together with your child, or you can completely entrust them to him creative process. A glass made by yourself will be valued much higher than store-bought ones.
There are quite a few ways to create pencil cups. They range from the simplest, which even a child can do, to more complex ones that require certain skills and skill level. This article provides examples of just some simple methods.
From a toilet paper roll
Making a cup like this couldn’t be easier. This task can even be trusted younger preschooler. The process will fascinate him greatly, and the 100% guarantee of a good result will please him beyond words.
You will need:
- bushing from toilet paper;
- corrugated paper;
- colored cardboard;
- scissors and glue.

- Cut out a rectangle from paper. The height of the rectangle is equal to the width of the sleeve, and its width is equal to the circumference of the sleeve. To do this, it is not necessary to carry out complex mathematical calculations. Just wrap it in a sheet corrugated paper sleeve and make notches at the cut points.
- Using glue, the sleeve is covered with corrugated paper and set aside to dry.
- You need to cut out flowers of arbitrary shape and quantity from cardboard.
- At the last stage, cardboard flowers are attached to corrugated paper using glue.
You can stop here and get a very nice glass, or go further. You can add additional decor from scrap materials, such as ribbons or paper clips. And by adding a little imagination, it’s quite possible to get a funny caterpillar from several of these cups.

From a tin can
Not every household waste needs to be thrown away immediately. Some of them may acquire a second, completely uncharacteristic life for them. For example, from a used tin can you can make original glass for pencils.

You will need:
- empty tin can;
- a piece of linen or canvas fabric;
- transparent PVA glue;
- decorative tape;
- decorative element (flower, accessories, etc.).
- Rinse the can and remove the paper label if there is one.
- Using a file, sand down the sharp edges where the can was opened.
- Take a piece of linen fabric or decorative canvas tape and cover the jar with clear PVA glue.
- Glue decorative tape to the top of the jar over the base fabric.
- Glue a flower to the center of the front of the jar.

This is just an approximate algorithm of work. Using various materials, you can create absolutely unique cups.
Using origami technique
There is a way in which you only need paper to create a pencil cup. This method is called modular origami. The technique is simple, but requires perseverance and patience.

You will need:
- sheets of paper;
- scissors;
- sheets of cardboard;
- PVA glue;
- simple pencil.

- You need to cut out 176 rectangles from paper.
- Fold them as shown in the picture.

- To assemble the first level you will need 24 modules. They need to be folded in this way: 2 modules are inserted with sharp edges into the third, which will be located between them.

- Using the same principle, 8 levels are connected upward.
- Next, we seal the bottom of the product. To do this, you need to turn it upside down and reinforce the first row with another row of modules.
- A circle with a diameter equal to the diameter of the cup is cut out of cardboard and glued to the bottom. This will be the bottom of the cup.
The glass using the origami technique is ready.
To maintain order on your desktop at home, you need to buy, or better yet, make a pencil cup with your own hands. This stand can also be used for other office supplies, such as scissors and pens. It will allow you to always keep everything you need at hand, rather than looking for them every time in bottomless drawers desk. In this article we will present several simple ideas how to make a pencil holder, you just have to choose suitable option and bring it to life.
Pencil holder made from sewer pipes
It is not necessary to throw away the scraps of plastic pipes that you still have after repairs. They can be a good material for creating useful things:
- Use a handsaw or jigsaw to cut plastic pipes of different diameters into small pieces.
- Take a small board for the base and paint it, as well as the pipe sections, in the desired color.
- Glue each of the segments in a row onto the base board.
Important! If desired, the stand can be painted with acrylic paints, or left as is.
Pencil girl in a vest
A stationery stand in a cute vest will become a real decoration for your home desk:
- Take white felt and cut out a triangular piece from it - a “shirt”.
- Glue it to a canned fruit or coffee can.
- Take the layer gray felt and cut a rectangle out of it along the circumference of the jar.
- From the front, cut a triangle to the size of your white “shirt”, fold the edges and sew with thread to the collar area.
- Stick the “vest” on the jar.
- Draw a tie on the shirt with a blue marker or cut it out of blue felt.
Vintage style stand
Making a glass for pencils with your own hands in a vintage style is a great idea to create a wonderful decoration for the workplace of a romantic young lady:
- Take a tin can and cover it with pink cloth.
- Now encircle it from below, above and in the center with a beautiful lace ribbon.
- At the end part, glue pre-prepared accessories to the jar, for example, a flower with pearls.
Important! You can buy accessories at any sewing store or make your own from lace and beads.

A creative girl will appreciate this version of a glass for pencils with her own hands:
- Glue satin fabric onto the cardboard circle.
- Glue lace along the edge of the podium.
- Glue paper towel tubes of different lengths in the center of the circle.
- Decorate them with lace, fabric and faux pearls.
- Closer to the edge, place a mannequin cut out of cardboard and decorated with lace, beads and ribbons.
- Place a bird figurine in the center, and on the other edge place a small photo frame made in a suitable style.
Pencil holder made from toilet paper rolls
Even such seemingly useless material as toilet paper rolls can be put to good use:
- Place vertical marks on each bushing.
- Use these marks to cut the fringe.
- Apply PVA glue to each petal of this fringe.
- Glue all the tubes to a layer of cardboard - the base.
- Paint the stand as you wish, giving it a nice look.
Marine style pencil
In this version of making a stand for stationery you will have to work hard, but the result is worth it:
- Take several paper towel tubes and place them on a base cut out of thick cardboard.
- Cover each tube with white napkins, forming beautiful large folds (use PVA to glue the napkins).
- Glue the tubes to the cardboard base and paint them with water-based yellow, blue and orange paint.
- Finish by gluing cute plastic fish, starfish, shells and faux seaweed to the stand.
Important! Plastic decor (fish, stars, algae) can be bought at any pet store.
Pencil holder made from pencils
If you have accumulated a large number of unnecessary pencils, you can also find a use for them by making a kind of glass for pencils with your own hands:
- Trim the sharpened parts of the pencils (you can use a jigsaw or a stationery knife).
- Place the bottom row on a piece of cardboard (base) tightly to each other.
- Glue each pencil.
- Now start laying out the walls - place two pencils on the sides and glue them to the base.
- Glue pencils in opposite parts too.
- Continue this way until the height of the structure satisfies you with its appearance.
Pencil holder made from floppy disks
Such a previously useful accessory as a floppy disk has today become absolutely useless thing. But if you have several old floppy disks lying around, don’t rush to throw them away:
- Take four floppy disks and melt holes in them - each disk has four holes (two on the bottom and two on the sides).
- Make eight holes in the fifth floppy disk (for the base).
Important! Heat the awl over the candle, while being careful.
- Form the floppy disks into a cube without the top.
- Connect all parts to each other using flexible wire, connecting its “tails” in the inner part of the structure.
Shampoo bottle pencil
Old bottles of shampoo or shower gel can also be turned into useful items. This stand will be a wonderful decoration for your child’s desk:
- Cut the shampoo bottle in half, not in the middle, but a little higher.
Important! The cut line can be smooth or rounded or in the form of cones (this will be the hairstyle of the future monster).
- Cut out handles from the upper, no longer needed, part and glue them to the lower part.
- Use black paper to form the mouth of the future monster, and use white paper for teeth and eyes.
- Glue Velcro to the back and secure the pencil holder to the wall.
A universal selection of gift ideas for any occasion and occasion. Surprise your friends and loved ones! ;)
Greetings, Dear friends! Today I’m in a hurry to come to you to tell you how a pencil holder looks and is made with your own hands. I will show you several master classes and just interesting photo ideas.
A few months ago it was my husband's birthday. In this regard, I decided that in addition to the main gift, I wanted to give him something special, made with my own hands. The choice fell on a pencil holder, since Danil is interested in calligraphy and, accordingly, has a bunch of accessories for this type of creativity.
How to make a pencil holder with your own hands: master class
I'll show you how to make a pencil holder with cute characters from the cartoon "My Neighbor Totoro". In fact, this technology can be used for any type of pencil holder.
To create a pencil holder you will need:
- Tin can (from any canned food)
- Any fabric of your choice for wrapping the jar (I used fleece and Miki fleece)
- Felt for finishing
- Threads in the color of the fabric
- Scissors
- Glue with a thin spout or glue gun
- Plastic eyes
- A piece of padding polyester
First of all you will need to measure:
- circumference of the can,
- can height,
- bottom diameter.

In accordance with the measurements obtained, cut out 2 pieces of rectangles from the fabric with the parameters: (can height + seam allowance 0.5 cm) x (circumference length + allowance).
For both rectangles, first sew the back seam (using a “back needle” seam or sewing machine) to form a closed surface. Sew the bottom to the rectangle along the contour. Turn one part out and leave the other.

Set the resulting cylinders aside. Now cut out 18 pairs of animal parts from the fabric - in my case, small totori. I don’t provide patterns, since it’s easy to draw the outline yourself - an oval shape with ears))
Sew paired parts together, you will get 9 animals (don’t forget about the holes for turning them inside out).

In place of the future eyes, draw dots and make crosswise cuts, as in the photo.

Turn the animals inside out and stuff them with padding polyester.

Now add a little glue along the contour into the resulting holes. Be careful - next you will have to insert the eyes into the holes. Insert until the side of the eyes is completely buried in the fur.

Sew up the hole at the bottom.

Ooh, little eye


Cover the jar with padding polyester parts using an over-the-edge seam. This is necessary to prevent the pencil holder from knocking on the table. You can skip this step if you wish.
First, sew the edges of the padding polyester wrapped around the can. Sew the bottom as well.

Pull one of the cylinder parts onto the outside of the can. In my case, it does not reach the top edge a little - a special effect.

I also put a padding pad at the bottom of the pencil holder (I glued it so that it wouldn’t move out).

Place the second (unturned) cylinder inside the stand. If desired, you can also add a little glue to the bottom to keep the inside in place.

Sew one cylinder to the other with a blind seam.

This is the kind of pencil holder I make)) If you wish, you can stop at this stage or decorate the product as described further.

Glue or sew all the animals over the entire surface.

Cut out several leaves from felt and embroider characteristic lines on them using a backstitch. Glue the leaves to the resulting pencil holder. You can also embroider patterns on the bunnies themselves.
We admire the result


From cans
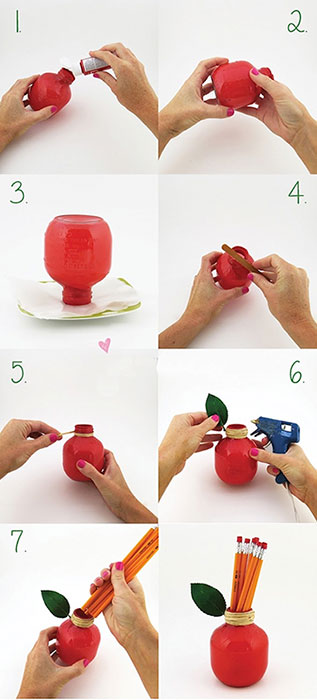
Apple
Very interesting way make a pencil holder - take a jar, liquid acrylic paints, paper, a plate, cord and an artificial petal with a glue gun.
Pour paint into the jar and shake. Drain off any remaining paint and let dry. File edges if necessary. Wrap the carving with cord and decorate with a leaf - voila
Lego guy
The method is identical to the previous one, only at the end you will need to apply a face with a black permanent marker.

Minion
The favorite of all children, welcome!) Here you will need already can and the colored polymer EVA (foam rubber, which can be purchased in plastic form at craft stores). By the way, the polymer can be replaced with soft felt.
Cut out all the parts according to the template and wrap the jar in a yellow rectangle. Also glue a rectangle on the inside to hide the metal part. Glue the muzzle and pants. Don't forget about your mouth.

From plastic bottles
Pears
To make these cute pencil holders, you only need a few oblong bottles, scissors, tape, acrylic paints and a photo frame for mounting (optional).
Cut off the thread of the bottle and cut out part of the top, as in the photo. Cover the central part with tape on both sides, leaving an empty space in the middle. Paint the empty space and decorate with the remaining lids, also painted. You can glue it to the frame, or you can leave it as is.

Monsters
This is where a shampoo bottle will come in handy. Cut off the top with the lid, choosing the shape as you wish. Cut out handles from the remaining part. Glue funny faces from felt or paper.

Made from cardboard and paper
Cylinders
The easiest way to make a pencil holder out of cardboard is to use cylinders from clothing rollers, paper towel rolls, or toilet paper. Wrap them in newsprint and glue them together if desired. All

book flower
Very unusual and bright idea. Take an old thick magazine or reference book. Divide all its pages into 5 equal parts. Glue the pencil to the side. Wrap the book around the pencil so that it is in the center and glue it together.
Prime the top with white acrylic paint. Cut out the bottom from thick cardboard, tracing the pencil holder. Glue the bottom.

Made of wood
Or rather, not even from wood, but from wooden pencils. To do this, you just need to glue a few pencils together to form a wall. You will need 4 such walls. At the bottom, glue a bottom made of thick cardboard.

But I described the 10th pencil holder in an article about New Year’s decorations. I highly recommend checking it out, there are a lot of interesting ideas there.
By the way, the minky fleece from which the outer green background of the first pencil holder and the white tots are made was purchased Here. I advise it, since it is very, very difficult to find it in woven fabrics.
Subscribe to updates and share your impressions! See you soon!
Sincerely, Anastasia Skoracheva
Color it a regular bottle permanent markers if you want something quick and easy. If you don't want to use paper towels, you can simply draw something on the bottle with permanent markers. The pencil will turn out translucent, and the plastic will look like colored glass.
- If you make a mistake, erase the line with cotton swab soaked in alcohol. Wipe the area you erased dry and continue painting.
Paint the bottle with acrylic paints or spray paint (available at art stores) to make the pencil holder colorful.
To make the paint adhere better to the bottle, try sanding it with fine-grit sandpaper. First, paint the entire bottle one color, wait for the paint to dry, and draw something, such as flowers. Decorate a clear or painted bottle with stickers if you want to do something simple. If you don't have If you have creative materials at hand, you can always cover the bottle with stickers. For example, you can paint a bottle dark blue or black, wait for the paint to dry, and cover it with silver or gold star stickers.
Wrap the bottle in regular, colored or decorative tape to create a continuous pattern. Separate the end of the tape about 2.5 centimeters long from the roll and press it to the bottle, as close to the bottom as possible. Hold the tape close to the bottle and carefully wrap it around it to create a closed circle of tape. When you get back to where you started, place about 1/2 inch of tape over the beginning of the strip and cut it off. Start the next circle directly above the previous one, or make it slightly overlap the previous one.
- If the tape extends beyond the cut line of the bottle, bend it so that it is inside the bottle and glue it.
Make your pencil holder even more beautiful by gluing buttons or large glitter onto it using a hot glue gun.
- You can cover the entire bottle with them or just small parts of it. However, it is better to glue buttons and glitter at the bottom of the pencil holder. If there are a lot of such decorations closer to the cut line of the bottle, the stand will turn out to be unstable.
To add some color to your pencil holder, paint or papier-mâché paper towels before adding buttons or glitter. Wrap the bottle with yarn or twine.
Run a bead of glue around the cut line and press the thread against it. Start wrapping the string around the bottle, adding a bead of glue every few centimeters. When you reach the bottom of the bottle, run another strip of glue and press the end of the thread to it. Punch holes near the cut line of the bottle and pull colorful yarn through them.
Using a hole punch, make holes around the cut line about 1.5 centimeters apart. Thread some yarn into a suitable needle and use the needle to pull the yarn through the holes. This will make the top of your stand more beautiful. This should be done after you cut the bottle but before you start decorating it. To find out what kind of plastic your bottle is made of, turn it over and look at the bottom and around the bottom. If there is a recycling sign with a number inside, then the bottle is made of PET/PETE plastic. Sometimes this sign is hard to see, so look carefully.
- Turn on the iron and check that the steam is turned off. Wrap the heating surface of the iron in a cloth or aluminum foil to keep it clean.
- Press the cut side of the bottle against the bottom of the iron.
- Every few seconds, lift the bottle to check the condition of the cut line. As the plastic heats up, it will begin to melt, making the cut line even.
- Turn off the iron and let the bottle cool before you start decorating.
Pencil holders are a necessary and useful item for a writing interior. Manufacturers offer us a huge, good range of pencil holders and that’s good. However handmade has its advantages. You can create an even better pencil holder to suit your taste in an exclusive version with your own hands. In this article we will look at how to make original pencil holders with your own hands.
You will need: toilet paper rolls, colored corrugated paper, scissors, glue, ruler and simple pencil.
Master Class

Salt dough pencil

You will need: water, flour, extra salt, cardboard jar for the frame, PVA glue, scissors, a piece of decorative rope or corrugated paper, gouache, brush, button, stacks, acrylic varnish for crafts, toothbrush.
Master Class
- Knead salty dough in this way: pour a glass of flour, a glass of salt, add water, then knead until the desired modeling consistency. Separate part of the dough, add beige gouache, then knead.
- Roll out the cake to a thickness of 10-15 mm.

- Apply PVA glue to the outer rim of the jar and wrap it with dough. Cut off the excess with a stack and smooth the joints with a damp brush.
- Create a small dotted texture with a toothbrush on the surface of the dough.
- Knead the dough Brown, roll it into a flat cake 10-15mm thick.

- Cut a 5cm wide strip of brown pastry and glue it to the bottom of the jar.
- Make 2 large owl eye bases from white dough, then glue them on.
- Make a beak out of brown dough and glue it on.
- Make eyes from turquoise dough and glue them on.
- Roll out 8 strips of pink dough, twist them into 4 flagella and make a bow, then leave it to dry for 2 hours.
- Make droplet-shaped owl wings using brown dough, then glue them on.

- Weave ropes of beige dough and glue them onto the neck of the jar.
- Roll out a sausage from white dough, draw the texture of the lace with a stack and glue it as a collar under the beak.
- Place the craft in a warm place for a day.
- Paint the bottom and wings with brown gouache and decorate with white dots.

- Draw the pupils and eyelashes with black gouache, wait until the paint dries, then paint white highlights on the eyes.
- Glue a pink bow above the wing.
- Glue a button with a bow from a corrugated strip onto the lace.
- Cover the craft with varnish and wait until it dries completely.
Pencil from salt dough ready!
Original pencil holder

You will need: tin can, fleece fabric white and Green colour, green felt, scissors, padding poly, glue gun, thread, needle, centimeter, pencil, plastic eyes for toys.
Master Class

Apple shaped pencil

You will need: oval-shaped plastic bottle, red liquid acrylic paint, golden cord, artificial leaf, glue gun, plate, nail file.
Master Class
- Pour paint into the bottle and shake well so that the entire inner surface of the bottle is painted.
- Drain off any remaining paint.
- Place the bottle on a plate and wait until it dries completely.
- File the edges of the neck if necessary, removing excess paint.
- Wrap the neck with golden lace and glue the leaf.
The apple-shaped pencil is ready!
Creative pencil holder

You will need: glass jar, liquid acrylic paint yellow color, black permanent marker, nail file.
Master Class
- Pour the paint into the jar, close the lid and shake well to evenly color the inside of the jar.
- Drain off any remaining paint.
- Wait until completely dry.
- File down the edges of the jar neck, removing excess paint if necessary.
- Draw a funny face with a permanent marker.
Minion pencil holder

You will need: superglue, hole punch, scissors, EVA polymer material (bathroom mats are made from it) blue, white, black, gray, brown, wooden skewer, black and blue felt-tip pen, simple pencil, printout of the template.

Master Class

Pencil holders made from plastic bottles

You will need: 3 plastic bottles (for example, shampoo), photo frame, glue gun, scissors, acrylic paints.
Master Class
- Cut off the neck and cut out the front top as shown in the photo for each bottle.
- Color the bottles to your liking.
- Glue the bottles to the frame.
Pencil holders made from plastic bottles are ready!
Cheerful pencil girl

You will need: plastic shampoo bottle, scissors, stationery knife, glue, colored paper, pencil, double-sided tape.
Master Class
- Cut off the top of the bottle.
- Draw with pencil desired shape: such as a crown or horns, then cut it out.
- Cut out the paws from plastic and glue them.
- Cut out eyes, teeth, and a tummy from paper and glue it to a pencil holder.
- Attach the pencil holder to the wall using double-sided tape.
Pencil from a book

You will need: thick soft cover book, pencil, cardboard, scissors, white acrylic paint, glue, clips.
Master Class
- Divide the pages of the book into 5 equal parts and secure with clips.
- Glue the pencil to the side of the book.
- Wrap the book around the pencil so that it is in the center.
- Form petals and secure with glue.
- Paint the top of the petals with white acrylic paint, thereby priming the pages so that they do not separate.
- Trace the bottom of the pencil holder onto thick cardboard, then cut it out.
- Glue the cardboard bottom and wait for it to dry.
Pencil holder made from pencils

You will need: 32 pencils, glue gun, cardboard, scissors.
Master Class
- Glue 8 pencils together to form a wall.
- Make 4 walls this way.
- Glue the walls together to make a square.
- Cut a square of cardboard to the size of a pencil holder and glue it as the bottom.
The pencil holder is ready!
Exquisite pencil holder

You will need: tin can, two-strand braid, braid with roses, satin ribbons, stationery pins, glue gun, scissors.
Master Class
- Wrap the surface of the jar with double-strand braid and secure with glue.
- Glue the rose ribbon to the top of the jar.
- Tie a bow from satin ribbon.
- Twist a rosette from a satin ribbon and attach it to the bow with stationery pins.
- Glue the bow with a rose to the pencil holder.


