Decorative finishing stone certainly has its fans. It's practical, after all. beautiful material, the installation of which can be done even by a non-professional.
The variety of textures and wide range of colors of the stone will help you decorate the interior in various styles, create coziness and comfort in your apartment or private house. The most widely used facing material is for finishing walls, columns, kitchen aprons, niches and doorways, including arches.
For interior work Most often, artificial stone based on gypsum is used. It is lightweight (much lighter than its concrete counterparts), breathable, environmentally friendly material with high performance characteristics.
Today we’ll take a closer look at finishing decorative stone arches and doorways.
Types of decorative stone
- decorative brick
Brick in a natural shade is a popular material in loft-style interiors. Brick-like tiles imitate brickwork. A brick arch looks good in combination with dark-colored ceiling beams in a country-style interior.

White brick will make the room more romantic and light. Suitable for interiors in Scandinavian, Mediterranean and vintage style and of course in Provence style.

- shell rock, sandstone
Cladding tiles made of shell rock will fill the interior with light and warmth. The warm colors and porous surface go well with columns in antique-style interiors.

- limestone
Limestone tiles or its imitation are distinguished by texture and a variety of shades: from white to brown.

- river stone
This cladding looks very brutal, reminiscent medieval castle or the entrance to a cave. A large stone is suitable for interiors in the chalet style and in the Gothic style.

When looking for suitable options, it is useful to study catalogs of finishing materials. Finished products made of natural stone include dozens of different items, skillfully combining which you will get a harmonious interior consistent in your style.
Decorating an opening with stone has a number of advantages. Firstly, it protects the side surfaces and outer corners from abrasion and contamination. Secondly, this finish is more durable.

Thirdly, the opening or arch acquires interesting view, can become an accent in the interior or emphasize its overall style.

Finishing the doorway with artificial stone will help to visually unite the hallway with the living space; it looks great in combination with decorative plaster or smoothly painted walls.

Decorating openings, arches and walls with natural or artificial stone provides ample opportunities for the flight of design ideas in interior design. The light pastel colors of the stone harmonize with various frescoes.

A long corridor can be visually “broken” into sectors using arches lined with stone, and “expanded” by decorating the walls with mirrors.

Carrying out finishing works with decorative stone
Artificial analogues of decorative stone attract buyers with their affordable prices, and appearance almost no different from natural material. You can also save money if you carry out cladding work without involving specialists.
For this, it is necessary to select lightweight material, and narrow tiles are easier to lay on the arched (vaulted) surface of the opening.
The composition of the adhesive solution directly depends on the material chosen for finishing. The glue must be mixed according to the instructions on the package. Use a special mixer to knead so that the structure of the solution is homogeneous and plastic.
The surface of the walls must be clean and treated with a primer. For better adhesion to the glue, some experts recommend making notches on the wall.
The glue is evenly applied with a spatula both on the wall at the place of gluing and on the back side of the tile. The layer thickness should not exceed 5-10 mm.
Place the tile against the wall, press it down and compact it using a rubber mallet, tapping the surface. Carefully remove excess glue around the edges with a spatula. The drying time for the glue is about a day or two.

Decorative facing stone can be laid in two ways: with jointing and without it. When laying tiles with jointing, use plastic crosses or wooden wedges of the required thickness.
Grouting of joints is usually done with a solution using a special syringe. After some time (20-30 minutes), after the mortar has set, the seams are smoothed with a jointing spatula.

At the end of the masonry, after the grout has dried, it is recommended to clean the artificial stone from dust and cover it with a transparent water-based acrylic varnish, for less abrasion of the surface during operation.
If the sequence of work is followed, finishing arches and openings, as well as decorating walls, can be done by any person who has the desire and at least some skills in repairs. Without hiring builders, you can transform your home into short time, decorating it with stone.
Finishing the arch with stone makes it possible to make the interior unusual and memorable. Such unusual design openings will definitely attract the attention of guests at home and will help you be proud of the decoration of your apartment in front of your friends.
Original decorative arches, decorated with artificial stone, turn the interior into a mysterious cave. By choosing unusual arched designs to decorate doors, you will get a visual expansion of the space.
As the main materials for finishing the arch, you can choose wood, stucco, and metal. Despite such diversity, professionals consider decorative stone to be the ideal option for creating an arch.

Currently you can choose different kinds this material. An arch decorated with artificial stone will be an excellent addition to the interior and will add a certain zest to it.
Advice! If your plans include creating a durable and reliable structure, then choose stone.

Advantages
Decorative stone is practically free of any disadvantages. It is made from a material that is not subject to chemical and atmospheric corrosion.
In addition, it is called an environmentally friendly finishing material.
It contains cement, pumice, expanded clay. Pumice is a glassy substance that has a specific origin, similar to volcanic lava, since it is formed when the mass instantly solidifies. Pumice has an airy structure, so it does not let warm air out of the room. Expanded clay is baked clay balls.
Thanks to the large assortment artificial material, you can choose an imitation natural stone, similar to natural material.

Arches in the interior
How to decorate an arch with decorative stone in an apartment, photos, some nuances of finishing work, all this can be seen in the video
Advice! In order to create an unusual entrance to an underwater cave in your home, you can arm yourself with blue-green and light beige stones.
Finishing arches with decorative stone currently allows urban property owners to realize the most daring creative ideas and projects.
Attention! Finishing an arch with decorative stone in an apartment requires additional decoration so that it becomes a harmonious part of the overall design of the room.
For example, if an arch is selected for the entrance to undersea world, it is necessary to use plants as additional decorative elements.
To add some mystery and solemnity to the atmosphere of the room, you can arm yourself with additional lighting. An arch decorated with green plants and additionally illuminated will become a complete illusion of an aquarium.
Selection of materials for creating an arch
Before you start finishing the arch with decorative stone, it is important to choose the right finishing material. Professionals prefer to choose narrow tiles for finishing. In this case, you can simplify the process of decorating the curves of the structure.
Attention! When designing a plasterboard structure, it is important to take into account the weight of the stone selected for the job.
If the material is too heavy, the drywall will not support it and the structure will not have a beautiful appearance.

To perform such work, there is no need to use the help of professional builders. If you use some algorithm of actions, in this case it is quite possible to build a beautiful arch, and even decorate it at your own discretion.
Before starting finishing work, you first need to remove all dirt from the surface of the arch, and also provide it with a high-quality primer. These actions are important, since the final result of the finishing depends on how well the surface is prepared, because the decorative stone will not adhere to uncleaned surfaces.

Advice! If you plan to create a smooth surface, it is initially advisable to make additional notches.
Next, you can proceed to preparing the cement mortar, choosing the proportion taking into account the type of stone, its size, and shape. It is at this moment that it is important to fulfill all the requirements set by the manufacturer of this finishing material.
Only after everything preparatory work will be completely completed, you can begin the actual laying. The stone is placed on the sections of the arch that are in contact with the wall.
Advice! In order for the decorated arch to be beautiful and aesthetically pleasing, you will need a building level, as well as plastic crosses.

First, lay the stone in the lower part, then smoothly move up.
To finish the arc-shaped part of the structure, it is first important to mark the material itself. It is applied to the wall, then cut off.
Attention! It is important to maintain the radius of the arch so that the finished arch is smooth and beautiful.
The cut areas are sanded using a special grinding machine.
To carefully cut the product, you need to go through the previously prepared markings with a knife several times. All excess can be removed using ordinary pliers. For the same purposes, you can use a grinder or pliers, as well as sandpaper. The adjustment of the remaining elements is carried out using the same method.
After completing the finishing work, you need to wait some time for the cement mortar to completely harden. Professionals advise waiting a couple of days, and only after that proceed to processing the seams, armed with a special putty.
After the initial processing of the designed structure, you can begin painting the stone.

Tools for work
Among the tools needed for work, we will highlight a cutting device, a level or plumb line, a tape measure, a spray bottle, wedges, a brush for cleaning metal, and a spatula.
As a consumable material for decorating the arched structure, you will also need special glue.
Advice! Try to select glue taking into account the weight of the stone so that it does not fall off immediately after you complete the finishing work.
Work must be carried out at an air temperature of more than five degrees. Before fixing the stone, it is advisable to check it for the presence of cement laitance (foamy layer). If it is detected, it is important to clean it back side, armed with a wire brush.

The fact is that such a film significantly reduces adhesion, which can lead to the tiles peeling off.
To ensure that the adhesive mass is homogeneous, you can use a construction mixer.
Advice! You should not apply too thick a layer of adhesive, as the tiles will slide off the wall and you will not get the desired result.

Conclusion
Arched structures are suitable for those owners of urban and country premises who do not want to put up with a conventional interior. Depending on what individual characteristics premises, you can use a variety of finishing materials to create arches. Among the most common materials for work is construction plasterboard. It is this material that is often the basis for the manufacture of such unusual structures.

When aligning the tiles to the right place, pressing them lightly, you need to arm yourself with a building level so that the stone is laid beautifully. Only if you follow all the recommendations given by decorative stone manufacturers can you count on getting the desired result.
Of course, with unusual design doorway, for example, using the original decorative arch, you can make positive changes to the design of your apartment or house.
Decorating a doorway in a living room or hallway in the form of a large arch has been popular in our country for decades. This gives the interior individuality and special charm. However, you should not leave the arch without additional cladding - modern finishing materials can emphasize the beauty of this design element. Today we will tell you how to decorate an arch with decorative stone.
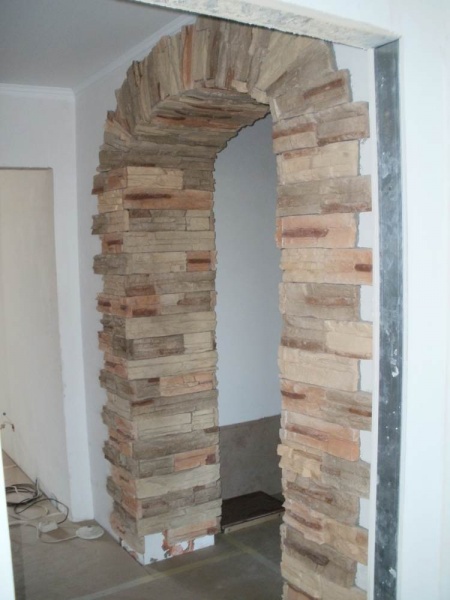
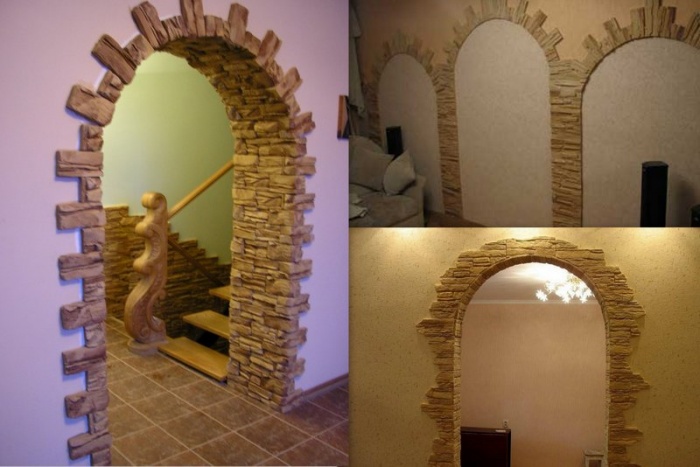
Finishing two arches in one room with decorative stone in an identical way
Decorative stone for finishing work is a material with virtually no disadvantages. Artificial in itself, it consists of components such as cement, pumice, expanded clay and others, which are environmentally friendly. Corrosion, putrefactive processes or fungus cannot occur on decorative stone. In addition, compared to natural stone, this material is cheaper and lighter in weight.

A variety of colors, textures and imitations of decorative stone in construction stores
When decorating arches, artificial stone exhibits the following advantages:
- Easy to care for;
To clean the surface, you only need water and any non-abrasive detergent.
- Many options for textures and colors;
The production of artificial stone is quite common, and today consumers can choose suitable option for any interior. Excellent imitation of natural analogues in color and texture allows you to create cladding that is indistinguishable from natural stone.
- Fairly simple installation of the material;
The process of covering a surface with artificial stone is completely simple, so you can handle it yourself.
- Protection for arch corners.
Artificial stone covering the corner of the junction of the wall and the internal opening will perfectly resist various mechanical damage.

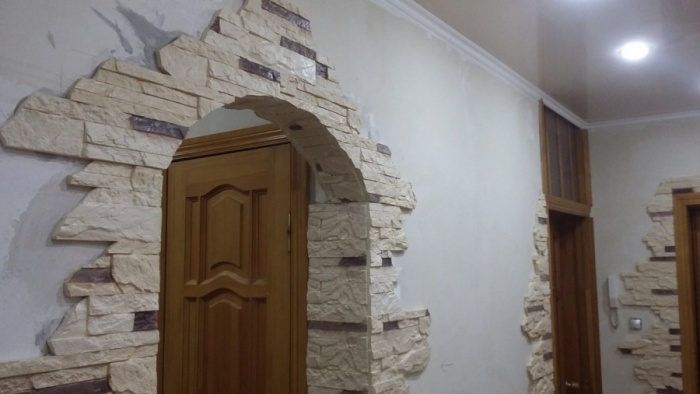
Corners lined with artificial stone are perfectly protected from mechanical damage
Stages of finishing an arch with artificial stone
If the pressing question for you is how to decorate an arch with stone, and moreover, if you decide to do the installation yourself, the following recommendations will prove useful.
Preparation for work
The preparatory stage of work consists of choosing material, purchasing necessary tools and preparation of the arch surface.
- Selection of decorative stone;

To decorate the arch you should choose thin and narrow plates of artificial stone
Usually the shape of the slabs is chosen in the form of thin narrow rectangles; such proportions will look best on the opening. Often the surface of walls (and arches) is leveled using plasterboard, which necessitates the installation of lightweight material, and thin plates are the ideal option here.
Another advantage of this form of stone is that if you arrange the tiles vertically, this will visually increase the height of the arched opening. In addition, in rounded arches such material is easier to attach.

Small plates of artificial stone are easier to use in finishing a semicircular arch
- Required tools for installation;
To decorate an arch with decorative stone, in addition to the material itself, you will need:
- putty;
- primer composition;
- masonry mortar or liquid nails;
- putty knife;
- angle grinder;
- plumb line or level;
- pencil;
- sandpaper (or file).
- Preparing the arch surface.
It is necessary that the surface of the arched opening be smooth. If this is not the case, then the defects in the walls should be smoothed out - cracks and depressions should be filled with putty, and bulges should be sanded.

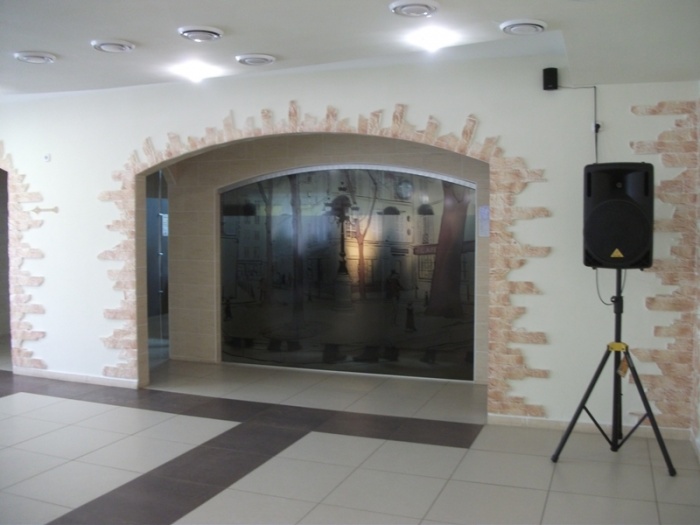
Careful preparation of the arch surface before finishing with artificial stone is necessary
In the case of a flat surface, notches are made on it using a small hatchet or similar tool. This will increase the adhesion of the applied materials.
It is also imperative that the entire area on which the stone will be applied must be cleaned of dirt and stains. Then the surface is primed, and you can proceed directly to installation.

To follow the correct technology for cladding an arch with stone, surface priming is required.
Technology of facing an arch with stone
Depending on the chosen design, the sequence of installation of materials on the surface of the opening may be different. Typically, installation begins from the bottom up from the junction of the opening and the wall.
The first plate is attached to the surface, leveled or plumb and fixed. Then adjacent plates in a row are fastened in the same way. When the first row is laid out, the installation of the second row begins. Usually, seams are left between the elements - about 4-5 millimeters. To keep them even, you can use special plastic dividers.

Beginning of installation of artificial stone on the surface of the arch from bottom to top
It is worth considering that when installing a stone on the inner surface of an arch, the element must protrude outward by the size of its thickness. This will allow you to decorate the external walls with overlapping material and avoid the need to mask the corners.
To accurately cut the required length of the plate, first it is applied to the wall, and on the inside, markings are made with a pencil directly along the arc of the arch - this will be the cutting line. The exact size of the tile is especially important when installing decorative stone on an arched arched opening.
Most main question, which worries inexperienced craftsmen - how to properly cut a plate of artificial stone. There are two common methods - using pliers and a handsaw.
In the first case, on the cut line made with a pencil, you need to draw it several times with pressure with a construction knife. Then everything that is unnecessary is simply bitten off with pliers, and the uneven edge of the plate is sanded with a file or sandpaper.

After marking, the excess part of the artificial stone is bitten off with pliers along the line
As a rule, already mounted material is cut with a hand saw directly on the surface. This method has its own nuances. Firstly, it is only suitable for plates installed vertically or horizontally and glued to a solution containing gypsum (in cases where the stone was mounted on cement, a circular saw is used for cutting). Secondly, some experience is required when working with a hand saw - if the material is damaged, then replacing one damaged element will be almost impossible.
The last stage of installing decorative stone on an arch is sealing the tile joints. About a day after the completion of laying the material, the gaps between the plates are filled with a special solution. To lay the grout into the seams, use either a rubber spatula or a construction syringe (gun). To make the seams look neat, they should be smoothed with a brush.

Filling the seams between artificial stone plates using a construction syringe
Important! Despite its high strength, artificial stone can be damaged during finishing work. Therefore, do not press the material too hard or bend it.
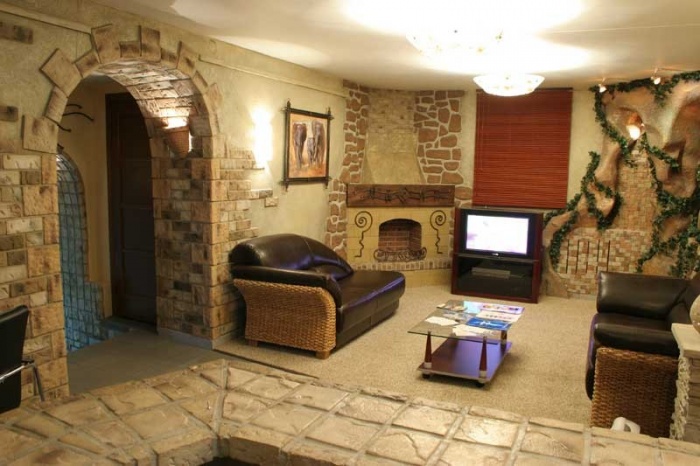
If you cannot imagine the result of such a design for an arched opening, we offer you photos of arches that were decorated with decorative stone. We are sure that among them you will definitely find a suitable option for your home or apartment.
An arch, as one of the design methods, is usually installed in the transition between the hallway and the living room.
This is essentially the first element of decor that can surprise visiting guests.
Nowadays arched structures are very popular, they have a variety of shapes, sizes and designs.
Decorating an arch with decorative stone is the most popular way to make it more functional, sophisticated and trendy.
Decorating an arch, what to choose?
You can decorate the arch in several ways: with plastic panels, with a wooden opening.
But all of them are no longer relevant: they are not environmentally friendly, since they do not allow air to pass through, plaster is very susceptible to mechanical stress, and wood does not always meet the high demands of trendy design.
Today, the most popular way to decorate arches is to decorate them with artificial stone, which has many advantages over natural stone.
In addition to everything, it has a highly wear-resistant surface and is able to maintain its original appearance for a long time.
Artificial is better than natural!
Perhaps such a statement may be confusing, since there is a general opinion that natural is always better than artificial, but not in this case. 
Firstly, the artificial (decorative) material is one hundred percent natural and consists of expanded clay, pumice, cement and other natural fillers, and is only obtained industrially, artificially.
It is strong, durable and no less beautiful.
Secondly, there are several advantages of decorative stone over natural stone:
- It is almost three times lighter than its natural counterpart, which allows the use of artificial material on arched structures of different strengths;
- Available for purchase on the construction market and costs several times cheaper than natural ones;
- The shape, texture, color can exactly repeat the popular types of natural stones used in decoration;
- Easy to care for decorated surfaces;
- Even an amateur can decorate an arched space with such material; the product is malleable when cutting and grinding sharp corners.
Thirdly, the material is impervious to high humidity, temperature changes, fungus, corrosion and rotting.
This certainly makes it a leader among similar ones when choosing a product for room decor.
Main stages of work: where to start?
When designing an arched space artificial decor There are three main stages:
- Preparation of the working surface of the wall and working equipment;
- Basic work on finishing the internal and external surfaces of the arch;
- Surface decoration.
The first stage includes preparing the base for laying artificial stone and the necessary working equipment.
In the first case, no special care is required, the main thing is that the surface is cleaned of dust and primed. 
For better bonding of the glue, wall and decor, before laying the layer, notches are applied to the base of the wall.
To work you will need the following tools and materials:
- Primer composition;
- Mortar or construction adhesive;
- Grout for joints;
- Auxiliary tools (pencil, ruler, sandpaper, plastic spatula, construction syringe).
It should be taken into account that the cement mortar (glue), its composition and proportions, must correspond to the selected type of material. 
The second stage is finishing the arch with decorative stone, in a word, laying it on the prepared surface.
The first row of material is formed at the junction of the arch and the wall according to the “bottom-up” principle, the second according to the same principle, but in a checkerboard pattern.
The complexity of the second stage lies in applying decorative elements to the arched shape of the arch with the designation of additional markings of the required radius. 
As well as trimming the product according to the intended pattern, followed by polishing the cut edges.
The time for the adhesive layer to dry depends on the type of solution chosen, most often it is about two days.
Artificial stone can be laid in two ways: without seams and with jointing.
In the case of using the second method, after the glue has completely dried, the gaps between the tiles are rubbed using a construction syringe or a plastic spatula with a special compound.
The third stage of finishing work is decorating the surface, that is, giving it a finished look. 
It is important to remember that the applied adhesive must be completely dry before otherwise When processing seams, a carefully laid out checkerboard pattern may be disrupted.
Decoration includes: primary treatment of seams with a composition for filling gaps between products, giving the finished surface the required shade using an airbrush.
Also, cleaning the masonry from excess glue and grout, treating the surface with polishing and water-repellent agents. 
Artificial stone can be laid using special construction adhesive, a mortar of cement and sand, or liquid nails; the adhesive base is selected depending on the type of wall surface and the type of decorative product. 
When preparing the adhesive solution yourself, you must use it in small portions, otherwise it may dry out and partially lose its properties.
You shouldn’t lay artificial stone right away; first you need to mix it together from several different packages.
Finishing the arch with decorative stone allows you to make the interior truly stylish and bright. Such unusual openings always attract attention. They are associated with triumphal arches or mysterious cave entrances. If you decide to create an arched opening in your apartment and design it correctly, you can make the space visually wider.
Stucco, carving, forging or wood can be used for decoration. But perfect solution- decorative rock. Exist different types of this material, so finding a suitable one is very easy. An arch trimmed with stone will fit perfectly into the interior and add some zest to it. She looks truly great. At the same time, the material itself is durable and reliable.
Decorative stone has virtually no disadvantages. It is made of a material that is resistant to any corrosion. It is also not susceptible to rotting and fungal infection, which makes it truly reliable.

The decorative material includes:
- expanded clay;
- cement;
- pumice.
All fillers are environmentally friendly. Pumice is a glass of volcanic origin that is formed when lava quickly hardens. It has a porous structure and retains heat excellently. Expanded clay is baked balls of clay. Perlite is also of volcanic origin.
Another advantage of artificial stone is ease of maintenance. It can be cleaned with a mild detergent.
The widest range of artificial materials allows you to find an imitation of any natural stone. The similarity is noted in texture and color.
Arches made of decorative stone in the interior

Today, arches trimmed with decorative stone are very often used in interiors. With its help you can easily implement any, even the most unusual design ideas. So, for example, if an arch is framed with stones of light and blue-green tones, it can resemble a fabulous entrance to an underwater grotto, and if you create an imitation of granite, it can look like a fancy entrance to a cave or an ancient castle.
It must be remembered that to create the most harmonious design, additional decoration is required.
An excellent solution is a plant and a masterful use of light. If the arch is stylized as a magical entrance to the underwater world, then plants are simply necessary.
Illumination will add special solemnity and some mystery. If you highlight a green arch with soft light, you can create the illusion of an aquarium.
Selection of material and arch finishing
Before you learn how to decorate an arch with decorative stone, you need to decide on the finishing material. It is worth noting that all types of artificial stone are quite easy to work with, so often the most important argument for choosing one option or another is its cost.

It is best to work with narrow tiles. In this case, finishing the arch bends is much easier. If you are decorating arches made of plasterboard, you need to take into account the weight of the material. Too heavy and it will deform or damage the surface.
How to decorate an arch with stone with your own hands?
- The process of laying stone is very simple. For this work you do not need the help of a professional builder; everything can be done with your own hands. Let's look at it in more detail:
- Before you start work, you need to clean the surface of the arch and prime it. The work must be done carefully so that no dirt or debris remains. This is very important, because in the future you will need to glue elements of decorative stone, and they simply will not stick to an uncleaned surface. If the surface is very smooth, it is worth making notches.
- After which a cement-based mortar is prepared, the composition and proportions of which depend on the type of stone. At this stage, it is extremely important to fulfill the requirements set by the manufacturer of the selected material.
 Only after this can you proceed directly to the masonry. First, the stone is laid in those places where the arch comes into contact with the wall. Work is carried out in a bottom-up direction. To keep everything level, use a building level. You can also use plastic crosses. After the first row is laid, the second row is laid according to the chessboard principle. There is an overlap along the corner.
 Stone laying work should start from the bottom and then go up
In order to cut the product as accurately as possible, you must first draw a marking and then go over it several times with a special construction knife. Excess can be easily removed with simple pliers. Special tile nippers or a grinder will also work. Sandpaper is used to process the cut surface. The remaining elements, if necessary, are adjusted according to the same principle.
 To remove excess decorative material, special tile nippers are suitable.
 To line the inner surface with decorative material, similar steps should be followed. In this case, the elements are also adjusted in length. For cutting, use a hand saw (suitable for gypsum-based material) or a circular saw. This is how the entire surface is covered.
When laying work is completed, a certain amount of time is required for the cement mortar to harden well. This usually takes a day or two. Then you should definitely treat the seams using a special putty.
After everything has dried well and the initial processing has been completed, you can move on to decorating the arch in a specific style or painting the stone. An airbrush is ideal for this type of work. It is enough to choose the necessary coloring mixture and also take into account your own taste.
As you can see, finishing the arch with decorative stone is as simple as possible. It can be done without the help of specialists. You can bring into the room stylish element. Even an amateur enthusiast can do this with incredible ease. You just need to do it very carefully and follow the entire sequence of work.


