We will send the material to you by e-mail
Some regretfully part with their once beloved CDs. Men are reluctant to give up rims from car wheels. In order not to have to part with your favorite things, the editors of the site found many ideas on how to make simple and beautiful crafts from disks.
Many people no longer use CDs or DVDs. But why throw away something that might be useful?
Beauty is nearby and created with your own hands. All you need to do is take a disk, scissors and... imagination. From such material you can build an excellent designer lamp, panel, Wall Clock. Car rims serve as a distinctive or harsh men's garage.
DIY crafts from computer disks
For many, an interesting technique for working with CD discs was a discovery. They are easy to divide into two halves, each of which can be easily cut into small pieces with scissors. But with these shiny mosaics you can already do interesting crafts: decorate any, decorate, veneer.

| Illustration | Description of action |
|---|---|
 | Let's prepare three pieces of plywood, a threaded rod, a light bulb with a socket, a cord with a switch and plug, washers and nuts. |
 | We trace the discs on a piece of plywood and cut them out with a jigsaw. |
 | In one circle we drill a hole for the cartridge and insert it inside. |
 | Let's make a recess for the wire. |
 | We connect three circles, the one with the wire in the middle. We drill three holes at equal distances from each other. |
 | All that remains is to make identical holes in the stack of disks. We string them onto three pins inserted into the base. |
Frames for photos and mirrors from disks
What else can you make from old CDs for your home? We propose to build beautiful frame for or photographs. The work process is simple: glue is applied to the base (ready-made flat mirror frame or cardboard) and pieces from the blank are laid. You can cut them into squares or choose any shape.


DIY watch made from disks
A clock in the house can also be created with your own hands. To do this, you will need an unnecessary DVD blank, a decoupage napkin or rice paper, a wide synthetic brush, hands and a clock mechanism, and craquelure varnish.
| Illustration | Description of action |
|---|---|
 | Lubricate the surface craquelure varnish, after wetting the brush in water and squeezing it out. |
 | Once the varnish has dried a little, apply acrylic paint. Both layers will be ready for further work in 2 hours. |
 | The drawing is torn out by hand. |
 | Apply PVA to the surface with a brush, lay out the design and coat it with glue on top. |
 | After we glued the sequins as numbers, we assembled the clock mechanism. |

What can you make for your kitchen from old CDs?
The kitchen is a special place. The housewives spend a lot of time there. To make your time more fun, you can make several DIY crafts for the kitchen. These can be flowers from disks, panels, lamps, mosaics on furniture, furniture decoration.


Kitchen furniture decor: original and easy


Related article:
What crafts for children can you make from disks with your own hands?
Plunging into the world of childhood is useful for many: to see how a child’s eyes sparkle with pleasure and the knowledge that he did everything BY HIMSELF! These are the kind of positive emotions that are easy to get when working with DVD discs: a child can handle the decor with minimal help from adults.


Related article:
This decor is especially popular when creating items in a vintage style. In the article we will consider detailed photo instructions decoupage: furniture, on glass from napkins, on a box.
Crafts from disks for May 9
Crafts for the holiday of May 9 come down to decorating the disk space with thematic elements and symbols.

Take a clean blank as a base. Using PVA glue, an applique made of colored paper, cardboard or satin ribbons will be glued onto it. In order for the panel to hang, a hole is pierced from the edge of the blank with an awl heated over a gas burner. A rope or ribbon is inserted before creating the applique.

If you use paper instead satin ribbons, then it is also worth studying the tutorial on creating flowers from satin ribbons. It is not advisable to touch the finished work until the glue has completely dried.
How to use old disks to make three-dimensional figures
From blanks you can build amazing three-dimensional figures. This work is more difficult than the previous ones, since it requires many pieces cut into elongated triangles and strips. All of them are attached to the base using Titan ceiling tile adhesive. Anything can be taken as a basis, up to plastic bottles or unnecessary plastic toys.


DIY crafts from old car wheels with manufacturing instructions and photo examples
Here you may need the help of a man - we involve fathers, husbands, and grandfathers. These are not only decorative products, but also practical ones. Let's try to make an original fireplace and table.
Crafts from wheels for the garden
Instructions for creating a fire pit are shown in the photo below. The construction of such a structure will take less than a day.

For creating a fire, the stamping is ideal: there are holes for the air duct, and there is enough space for both firewood and coals. If desired, you can weld two such disks together by welding 4 legs to them - the design will serve as an excellent barbecue for a cauldron.
Article
Over time, a lot of unnecessary things accumulate in the house, taking up extra space. But not all of them need to be thrown away during the next spring cleaning. For example, old CDs, DVDs and even cotton pads can become new life and turn into stylish element interior We have collected best ideas crafts made from this material: simple for children and more complex for adults.
Craft options for the New Year
As the long-awaited holiday approaches, children and adults strive to decorate their home with cozy handmade crafts. Computer disks can be found in any home; many interesting, beautiful things can be made from them. New Year's decorations.
New Year's toys
- Old CDs.
- Alcohol.
- Cardboard.
- Gouache is white, blue or any other light color.
- Paper napkin with a New Year's pattern (Christmas tree, Santa Claus, snowflakes).
- PVA glue.
- Glue gun.
- Ribbon made of organza or satin 2-4 centimeters wide.
- A lace or thin ribbon 0.5 cm wide.
Alternatively, instead of napkins, you can print any New Year's pattern on plain paper, but I recommend napkins, they fit better on the work surface.
- First, degrease the surface of the CD with alcohol or cologne. After drying, apply several layers of gouache until it stops showing through. We glue a cardboard circle into the central part, which should be slightly larger than the hole in the disk.
- From a napkin we cut out a pattern, drawing, or a circle slightly smaller than a disk. Cover it with PVA glue and stick a napkin on it. To level the surface, apply a towel or soft cloth to the surface, smooth out the resulting wrinkles.
- After drying, we open everything with varnish.
- We repeat all the above steps with the surface on the reverse side.
- We make a bow from ribbon. We twist the lace into a loop and glue it with a glue gun along with a bow to the top of the craft.
Transformation of an old ball
It's a quick and easy way to update old christmas balls. For the craft you will need:
- Old New Year's toys.
- Glue gun.
- Computer disks.
- Scissors.
We cut the disks using scissors into small fragments, triangular and diamond-shaped. Glue the cut objects to the surface New Year's toys glue gun. The craft is ready.
To cut discs, you need to use only large, strong scissors; small ones can break and become dull quickly.
Candlestick
It's simple quick way making a candlestick.
You will need:
- CD.
- 5-6 fir cones.
- Glue or glitter nail polish.
- Aluminum candle stand.
- Candle, up to 3-4 centimeters in diameter.
- Rhinestones, decorative stones.
- Rubber glue.
Before making crafts, you need to immediately prepare the cones, cover their upper branches with silver or shiny varnish, sparkles that will imitate snow. If desired, you can also glue small pieces of cotton wool, New Year's rain.
We glue an aluminum candle tray into the center of the product with rubber glue. We attach the dried varnish to it in a circle using glue. fir cones. We decorate the free surface of the craft with rhinestones, sparkles, and decorative stones. The candlestick is ready, you can safely put a candle in it.
Underwater world from CDs
Children love to be creative; they can make a variety of things from CDs. simple crafts, decorate the children's room with them. They can make souvenirs on their own or with the help of their parents.
Goldfish
You will need:
- Glue gun.
- CDs.
- Colored paper.
- Gold leaf
- Scissors.
We cut out eyes for future fish from colored paper: a slightly smaller black circle for the pupil, a larger white circle that will become the main part of the eye. We glue them together. Cut out lips of any shape from red paper. We will also work on the fins and tail; we will make them from gold foil of any shape.
Now you can begin the final stage. We begin to glue all the previously made parts. First, glue on the eyes and lips, fins on top and bottom, and glue the tail to the back.
The goldfish is ready, all that remains is to attach a lace or thread to it; if desired, you can cover its surface with nail polish with gold glitter.
sea turtle
You will need:
- Plastic bottle.
- A simple pencil.
- CD.
- Stained glass paints and outline.
- Glue gun.
- Rhinestones, flat stones.
In addition, for work you will need comfortable small scissors.
- Cut a piece of plastic from the bottle. On it we draw with a pencil the outline of the head of the future turtle, its legs and tail. Carefully cut out the selection.
- Let's take a look at the disk - this is the future turtle shell. To begin, we outline the shell using a decorative outline in a circle. Then, we draw a contour of stained glass fragments along the entire circumference of the shell.
- After the outline has dried, fill the selected fragments with stained glass paint. Apply paint in several layers. Try to use different colors, it’s much more beautiful and colorful.
- Glue the shell, head, paws and tail of the turtle with a glue gun. We decorate the shell with rhinestones, small stones, and sparkles, securing them with glue. We glue two pebbles to the head as eyes. The turtle is ready.
Sea bottom
To make a craft you will need a minimum of time and materials:
- Paints.
- Seashells of different colors, sizes and shapes.
- Colored beads (preferably transparent).
- Old disk.
- Rubber glue.
- Transparent nail polish.
We paint the shells with paint, each in a different color. Leave them to dry, cover the surface clear varnish for nails. Grind the remaining shells into fine crumbs. Glue the shells to the disk, sprinkle it with shell crumbs, imitating the surface of the seabed. Additionally, we decorate the product with transparent stones and beads.
Decorating with fragments
This material shimmers colorfully in the sun and has a bright shiny surface. This property can be used for decoration various items: boxes, photo frames, vases, flower pots.
Picture frame
To make crafts you need:
- Rubber glue.
- Old CDs.
- Thick cardboard.
- Scissors.
- Gouache.
- Ruler.
- A simple pencil.
Before starting work, you need to measure the size of the desired photo for which the frame will be made. You can simply trace the photo on cardboard, and create the outline of the future frame around it.
- From cardboard we cut out a frame for photographs of the desired size. We paint it with gouache (you can use different colors) on both sides. We apply paint in several layers so that the cardboard does not show through.
- We cut the disks with scissors into fragments of different shapes and sizes. We glue them to the frame, after first attaching them to the surface and figuring out how they will look. If desired, use a thin brush to go over the cracks and crevices between the fragments, painting them with white gouache.
- Leave the frame for 30 minutes until completely dry. Cut out a stand from cardboard and glue it to the back of the frame.
Flower pot sparkling in the sun
Convert ordinary flower pot to magical - it’s as easy as shelling pears. You will need old CDs, scissors, a glue gun and a little imagination.
First, we wash the pot; if there are any particles of earth left on it, wipe it dry. We cut the disks with scissors into small fragments of different shapes. Glue them to the pot with a glue gun. The craft is ready.
From box to box
It's hard to believe, but it's common cardboard box from under shoes can turn into a beautiful and useful thing.
To make the box you will need:
- Shoe box (it must be intact, it is advisable to use a new box).
- Glue gun.
- Old CDs.
- Big scissors.
- Furniture stapler.
- A piece of fabric large enough to cover a box.
- Decorative elements: stones, rhinestones, beads, seed beads.

If you have already tried all the previous options, then it’s time to do unusual craft from old CDs. You probably have a dozen unnecessary disks lying around that you would hate to throw away and no longer need to use. Their finest hour has come! Use your imagination, take note of our master classes and go ahead to create new masterpieces!
Let's start with, perhaps, the simplest thing - decorating an old disk with ordinary stained glass paint. In terms of production, this craft is quite simple, but you can’t tell from the outside. You will need stained glass paints and imagination. You can draw both abstract ornaments or mandalas, and real ones story paintings. By the way, if you don’t have stained glass paints, a regular marker will do just fine. You can download templates for drawing mandalas from the link below.
A little more complicated will be a New Year's craft made from disks, decorated with appliqués. The simplest option is an applique made of colored paper.

If your children love the animated film “Smeshariki,” then it’s time to use their old CDs to make their favorite characters. All you need is to find out from your child which character he likes best, cut out Smesharik templates from paper and glue them onto the disk. New Year's craft Smeshariki is ready! You can draw templates for the application yourself, or you can download them from us for all the cartoon characters.

#4 Christmas tree decoration from old CDs: DIY Christmas crafts from CDs
From an ordinary disk you can make a rather unusual Christmas tree toy that looks like a ball, only this ball is flat. To make such a craft you will need: an old disk, dark acrylic paint(if not, gouache will do), pencil and a fountain pen or a flat screwdriver.

If there are a lot of disks, then you may well think about creating a New Year's garland. With the right lighting, the garland will shimmer with all the colors of the rainbow, reminiscent of snow glistening in the sun. By the way, such a garland makes the house warm and sunny!

Not enough disks for New Year's garland, but did you like the idea? Look more ideas:

New Year- the most favorite holiday, associated with miracles and magic. Celebrating the new year is characterized by folk festivals and joyful meetings. It is impossible not to love this time of year, when everything around is transformed, and every house or storefront becomes like the scenery of a fairy tale. Everyone wants to participate in this transformation, and therefore they try to decorate their homes […]
Perfect as could be round form suitable for snowmen. The technique for making snowmen from disks may be different, but you should be satisfied with the result. By the way, such a craft is quite suitable for a competition for school or kindergarten.

Want to make your own disco ball for decoration? Then you will need a blank for the ball (plastic, glass, foam), an old disk, scissors and glue.

Want more ideas Christmas balls? Then look:

Today on store shelves you can find a huge variety of different Christmas decorations, so turning an ordinary Christmas tree into a real holiday beauty will not be difficult. However, New Year is a special day! The day when old year remains behind, and new adventures, new events, new victories await ahead. But the old year did not pass without a trace, […]
You will need: an old CD, pine cones, glue, an aluminum candle stand, beads, glitter or varnish for decoration.

On a regular disc you can recreate New Year's landscapes using the decoupage technique. The disc decoupage process is standard, the result is amazing!

If, in addition to old disks, there are pieces of felt lying around the house, then you can make these cool snowmen. Well, will any of the guests guess that it is based on an ordinary unnecessary disk?

See more felt Christmas decoration ideas:

Approaching new year holidays, which means that very soon a forest guest will appear in almost every house in our country. Some people prefer to put up an artificial Christmas tree, some prefer to put up a real forest spruce from a Christmas market, and some even confine themselves to pine branches. However, this is not so important, because the most important feature of the New Year tree is the toys. Since ancient times, people in [...]
A great idea for a New Year's craft from old CDs would be to decorate an ordinary mirror or photo frame. The disk needs to be cut into pieces, and then the surface should be decorated with these pieces. You can keep it for yourself, or you can do it original gift someone close to you.

If you were once a big fan of CDs, and everyone was, now is the time to give them a second life. What good are discs that just sit on a shelf collecting dust? You can now find the song or movie you need on the Internet. But to do it unusual Christmas tree only once a year!

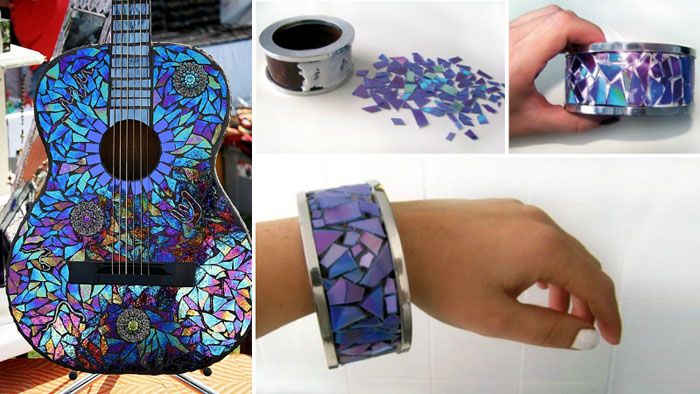
Still thinking about what to give your friend for New Year? Best gift one that is made by hand. Give to a loved one bracelet self made, which she will definitely appreciate! Well, if you have already chosen a gift for your friend, you can keep this decoration for yourself!

If you want to new year party shine the most dazzlingly, then it’s time to think about the New Year’s outfit. You can decorate a regular collar with pieces of an unnecessary disk. Looks very cool!

An owl would be a great idea for a New Year's craft made from old CDs. To create a night guard, you can use pieces of felt, colored paper, several disks and other available materials. Turn on your imagination and start creating.

Nowadays, information carriers such as CDs are gradually fading into the background. Don’t rush to throw away iridescent circles that have become unnecessary; they can become an excellent material for creativity.
Second life for discs?
There are many ways to give a second life to old CDs, in this article you will see some of them. Crafts made from CDs can be an excellent solution for the interior and garden, or simply help you have an interesting time while developing creative thinking.

Creative people have long invented a huge number of options beautiful crafts from discs for children and adults, you just have to reproduce their ideas, and maybe come up with your own.
Throw away such a wonderful and interesting material- a huge mistake. Using CDs you can make unique interior items, original and stylish gifts, decorations for your dacha and garden: whatever your heart desires and whatever your imagination and perseverance is enough for.

Check out some ideas for creative uses for old computer disks and create some wonderful new things with your own hands!

LED lamp
If you urgently need a new original lighting device, old disks will come to the rescue. This craft can be used both in home interior, and at the dacha.

You don’t need any special materials for this work: the main condition is just to use a little imagination and patience.

Be sure to follow our detailed step-by-step instructions:

You will need 12 scrap disks, a protractor, metal staples or paper clips, a lamp socket and a thin drill bit.

First, we divide one of the disks into five identical segments. For these purposes, use a protractor: the angle between the segments should be approximately 72 degrees. This disk will serve as a stencil for the rest.

On the segment line, approximately 3-4 millimeters from the edge, drill five small holes. Next step: put the remaining disks in a stack and using the first disk (placing it at the very top of the stack) make exactly the same holes in the others.

In order for the craft to be strong and hold well, you will need support rods. Ballpoint pen rods are ideal for this: insert the rods needed to act as guides into the holes you just made.
If you used a really thin, proper drill bit, you won't even need to fix the holes: they'll fit perfectly.

The lamp is almost ready, now we attach the remaining disks to the structure with brackets.

Now all that remains is to work with the light: the last step is to screw the desired lamp into the socket.

Flower
If you've been sorting out old boxes at your dacha and found a lot of unnecessary discs, there is a great way to use them to benefit the beauty of your yard. Crafts made from disks for the garden look very original and interesting, in addition, they are incredibly easy to make.
In this mini-lesson, I suggest making small flowers from discs to decorate a garden, vegetable garden or yard at the dacha.
Note!


The tools for this craft do not require anything unusual: the right number of disks (it all depends on how many flowers you are going to make), a candle, scissors and paints to make the flowers more vibrant.

The manufacturing process does not require special skills, it is very fast, but at the same time it will captivate you from the first second.

All you need to do is carefully melt the disks over a candle (remember safety precautions: it is best to do this indoors and have some water nearby to put out the fire in case of danger) so that the plastic goes into beautiful waves, similar to flower petals.

I suggest step by step instructions manufacturing beautiful rose from disks:
- First you need to cut the disk evenly along the entire length of the radius and heat one edge of the cut over a candle.
- Once the plastic has warmed up and become soft, take a pair of pliers and use them to turn the edge slightly to the side.
- Slowly turn the disc over the flame and continue bending the molten fragments.
- At the end you should end up with a small spiral, which will become a rose bud.
- You can paint it any color, attach a wire stem, cut leaves from other leaves and form a whole flower bed! It all depends on your imagination.

So, today you learned how to make some simple crafts from old CDs. I hope you found this lesson useful and learned a lot from it.
Note!


Photos of crafts made from disks


Note!


For some time I had fun with simple turning on centers. Over time, the need arose to process more diverse workpieces. I had to use my brains to make the appropriate equipment using improvised means, without access to a third-party lathe (for metal). One of the designs turned out to be very inexpensive, convenient and in demand.
The fastening equipment was often made up of two parts - a universal small metal faceplate and a specialized wooden part. The metal faceplate can also be used as usual - by fastening it to the workpiece with self-tapping screws.
What was used.
Tools.
The wood lathe itself, cutters for it, a set of metalworking tools. You can’t do without a cutting machine (grinder); it’s better to use a small one - it’s more convenient and safer. Headphones as for shooting and safety glasses or a shield. Also, you can’t get out without welding, so you need a small inverter and accessories. Electrodes 2.5mm. Hot melt adhesive is often used. What is needed is a drilling machine that is more convenient and accurate, of course.
Materials.
Actually, just the right number of nuts and washers. It’s better, of course, to paint the finished piece of hardware, then plus paint and paint. A little wood for “narrow specialization”; I often use dry birch firewood with even layers.
So. The spindle of my lathe ends with an M16 thread, which allows the use of standard hardware. IN in this case This is an “extension nut”. It is cut in half right on the machine, turned on, rotating. Angle grinder. Cutting should be done carefully. First, with the machine turned off and with the grinder not working, carefully try it on so that it is comfortable, your elbows are positioned somewhere and so as not to fit into anything rotating.
The machine turns on and, having taken a previously tested position, with the grinder turned on, we strike the felt-tip pen mark in the middle of the rotating nut. Be especially careful at first until the edges are sawn, then the sawing becomes smoother and the pressure can be increased a little.
After some time of our efforts, the wall of the nut is sawed through and the half falls off. The height of each half, taking into account the width of the cut, turns out to be slightly larger than its standard non-extension sister. The length of the thread on the spindle of my machine does not allow the use of a regular nut - it sticks out from under the finished faceplate and causes a lot of inconvenience later during work.
The next step will be welding. From the standard range of hardware, I take a “reinforced washer”, in some stores it is called a “body washer”, of a suitable diameter. Usually, this is almost the largest of those available in the offered assortment. You need to check if the nut is falling into it. The nut should be positioned with its edges in the center of the washer hole. The cut nut will stand better - there will be no chamfer on one side, this should be taken into account when trying on a new one in the store.
We weld the cut half to the washer. Neat. It’s very good to first tighten them with a clamp, but usually it works out well this way. The ribs are welded in the following order - any, then the opposite. The workpiece is rotated 90 degrees, again either of the two, then the opposite. This way there is less chance that the nut will slip off the washer. Actually, in the first copies, I tried using the same grinder to create a “groove” on the rotating half of the nut for a sure fit in the hole, but an angle grinder is not the tool that can do this job well - often, due to the not very smooth edge of the “groove” , the nut turned out to be very misaligned with the washer.

After the workpiece has cooled, as usual, we break the glass crust of slag and place the workpiece on the machine spindle, while rotating we evaluate the runout, if they are within reasonable limits, we correct it with the angle grinder turned on.

Possible, for aesthetics and with reverse side. Here, by scratching with a pencil in the desired place on the rotating workpiece, we mark the diameter along which the holes will be drilled. To use the future faceplate with relatively large objects, you can drill more of them, up to six, if for small things - three, four.

Afterwards, it would be good to paint it while there is no rust - a layer of zinc, partially burnt, partially worn off. Below, I sprayed “ocher” from a spray can, in two layers, although I’m usually lazy.

In the photo, the finished faceplate is mounted on a sanding disc made of thick plywood. Medium-sized sandpaper on a rag base is glued to the disc under pressure with PVA glue. Through a layer of newspaper so that the licked paper can then be torn off.

For sharpening tools, adjusting small pieces of wood before gluing.

A similar thing, but smaller in diameter and glued together from birch blocks in two overlapping layers. For sharpening turning tools. At the end there is the same sanding paper; a leather belt will be glued along the diameter of the circle for finishing with GOI paste.
And finally, the use of our faceplate for current work. Just like a regular one, our small one is convenient to use where you need to fasten a workpiece by one edge, without a rear center. In this case, it is very convenient to glue the workpiece to the intermediate block. A piece of board is attached with short self-tapping screws and ground to a convenient diameter, and the workpiece is glued to it. Hot melt adhesive.

In the photo there is such a “cartridge”, with the trim remaining from the workpiece. Before gluing the next one, the faceplate is placed in the machine, and it is “butted” with a cutting tool, cutting off the remnants of the glued one. At the same time, it is worth capturing part of the old adhesive layer so that it (the glue) does not accumulate too much.

The workpiece is marked, and, among other things, using a compass, a circle with a diameter slightly larger than the “block” on the faceplate is drawn. This allows you to orient it quite accurately when gluing.
I lubricate both surfaces to be glued with hot glue, not necessarily completely, a circle around the perimeter is enough, stepping back a centimeter from the edge.

Initially, until complete “dumbing”, it is better to press the workpiece with the rear center, then, when there are no shock loads, it is removed.
The beauty of such an installation is that through a block of wood, it is a much more economical use of workpiece material; moreover, when turning, you do not need to constantly remember how long the screws are, so as not to climb into their depth with a cutter.
And for dessert, there are several available options for more specialized equipment based on the manufactured faceplate.

For example, this one required something machined very precisely around an existing center - as easy as shelling pears.

Or, for example, a part of a candlestick made of 6mm plywood or a thin birch plate. To clamp and process it, the following equipment was made.


