Vytynanki is one of the most elegant areas of decorative and applied art. Traditions of decorating windows with beautiful openwork compositions made of paper and thin cardboard for many years. Vytynankas appear on windows for various reasons, and under New Year Almost everyone makes them.
The MAAM portal has accumulated, with the help of fellow teachers, considerable experience in this creative direction. Now all this experience is at your service in this section. Useful tips contained in his publications, as well as ready-made templates for openwork cutting will help create a real fairy tale on your windows.
Turn plain paper into lace magic!
Contained in sections:Includes sections:
- New Year's vytynanki. Cut out templates and decorate windows for the New Year
Showing publications 1-10 of 246.
All sections | Vytynanka. Openwork cutting made of paper, templates
Dear colleagues! The long-awaited SPRING has arrived. The first insects appeared. Very soon the beautiful butterflies will begin to fly from flower to flower. Although, in our group, they are already fluttering! How did it happen? Now I’ll tell you and show you everything. So, let's begin. Touch...
Presentation “Vytynanka - the art of paper cutting” Term « vytynanka» came from the Ukrainian word " pull out", defining the action cutting. Paper vytynanki– this is one of the areas of Ukrainian applied decorative arts, paper cutting beautiful patterns , ornaments, images, figures, landscapes and...
Vytynanka. Openwork paper cutting, templates - Modeling, cutting out paper patterns and folding paper figures develops the creative inclinations of a young child
Publication “Modeling, cutting out paper patterns and folding paper figures...” Take a look around - you'll be amazed how many exist simple toys, which have been used for centuries. This is clay, paper for cutting, colored paper for folding shapes. These materials have one general characteristics- they do not have a specific form or purpose....
 Image library "MAAM-pictures"
Consultation “How to teach a child to cut out paper?” How to teach a child paper cutting? Compiled by: Baybulatova A.N. The ability to confidently use scissors plays a special role in the development of manual skills. Working with scissors is an excellent workout for a child's hand to strengthen and develop small muscles. Can be used...
 In our kindergarten It has already become a tradition to decorate windows from protruding windows every year. This is one of the types of arts and crafts. And this year we decided to decorate the windows based on the fairy tale by G.Kh. Andersen" The Snow Queen"Many works were read during the year, but...
 Every year in our kindergarten there is a traditional vytynanka competition. This year these snowmen appeared on our windows. The children helped us with great pleasure. When they go out for a walk, they look at the images on the windows. What is vytynanka? Many of you on...
Vytynanka. Openwork paper cutting, templates - Master class “New Year's vytynanki”
 Traditional decoration There were always snowflakes for the New Year. They are cut out of paper and pasted on the windows. It turns out very cute. But not everyone knows that there is a whole direction in needlework, where the main task of the master is to correctly cut out complex parts...
 Unlike the New Year tree and holiday decorations(garlands, posters, tinsel, which are removed before leaving for the New Year and Christmas holidays, linings on the windows of the kindergarten remain for a longer period. The fairy tale continues, captivating the children with the silhouettes of animals,...
Having seen products made in the form of carved lace from plain paper, you would never say that such beauty is not difficult to create with your own hands. Anyone can master openwork paper cutting, diagrams of which are also provided. This type of needlework is also called paper graphics, silhouette cutting, but the essence is the same, it is always a solid cut-out design on a plain background. There are two main directions: cutting with a knife and scissors. For beginners, creating paper patterns will require great patience, perseverance and desire.
This interesting technique can be used not only to create postcards and panels, but also to decorate the interior. Products are usually made from white or black paper, but other shades will look good. Openwork paper cutting can be either flat or voluminous. So, using the silhouette cutting technique, you can make such fabulous things: window decorations, snowflakes, cards, napkins and much more.
What materials and tools will you need to master openwork paper cutting? In fact, nothing special or expensive is needed. You will need:
- printed diagrams (invented independently or ready-made);
- sheets of white (or other) colors;
- breadboard (stationery) knife;
- a tablet, a regular board or a piece of thick cardboard on which you will cut;
- nail scissors.
As you can see, you will need regular office stationery.


Let's consider a master class on openwork paper cutting, which will help you master this interesting art.
When all the tools and materials are prepared, you can begin work. Most often, patterns are cut out on a sheet of paper that is folded in a certain way. Intricately patterned New Year's snowflakes Almost everyone carved them as a child. But in this way you can still make a frame for a mirror or a napkin for a table. A napkin or frame made like the one in the photo below will look very nice:

Step-by-step description of the work:
- Take a sheet of white paper and fold it.
- Using tracing paper, we transfer the outline of the pattern onto the base, tracing it twice.
- Cut out the pattern with scissors or a knife.
- Unfold the product very carefully and iron the folds through another sheet.
- Place the openwork napkin on colored cardboard or paper and glue it. Make sure that the glue does not leave any traces.
- If desired, you can laminate the product to make it last longer.
Decorating the house for the holiday
Easter is one of the most favorite holidays for both Orthodox and Catholics. Many housewives traditionally prepare for it - they paint eggs, bake Easter cakes, and decorate their home. We will help you in this matter. Using special templates, you can make beautiful attributes and wonderful decorations for Easter. But you can show your imagination using the filigree cutting technique and come up with your own options.

One of the main symbols of this holiday is eggs. Housewives usually paint natural eggs or decorative ones, for example, made from wood. But you can easily make openwork eggs with your own hands. To do this, you just need to transfer the pattern using carbon paper or tracing paper onto drawing paper, cut it out and carefully glue it together. It is better to glue from the center, first to one end, then to the other. As you work, you need to let the glue dry before moving on to the next seam, otherwise it may come apart. Place the finished eggs in a patterned basket and you will get a fabulous composition!


In this way you can also do Greeting Cards for Easter, decorate gift bags and boxes, decorate the windows. Egg protrusions are even used as festive garland, connecting them together. Inspiration and imagination will help you create a unique Easter holiday.
For the New Year
Both children and adults love the New Year holiday. Everyone wants to create a home New Year's tale and plunge into the wonderful atmosphere of magic. In our time new Year decoration– these are not only balls for the Christmas tree and garlands, but also many other wonderful things for the festive decoration of your home. Our tips will help you prepare uniquely for this wonderful holiday. One of the most traditional ways decorating a room is decoration paper snowflakes. They can be made, for example, like this.

They are usually glued to windows, cabinet doors, shelves, and walls. Some people make garlands out of them and place them on the Christmas tree.
To make beautiful openwork paper snowflakes, it is better to take ready-made patterns for cutting.
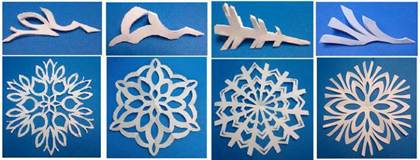
The main thing in the work is to correctly fold the sheet of paper to apply the template. Each snowflake consists of a pattern repeating around its circumference. The blanks are usually folded for 1/6 and 1/12 parts. You can fold the part based on an already cut circle or any sheet that first needs to be cut to a square and then folded, or, conversely, the folds are made first, and then the shape of a sector of the circle is cut out.
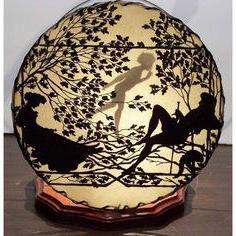
The amazingly delicate and delicate works of Marine Coutroutsios show how, using paper cutting, you can create works that are both so simple and so beautiful. When you look at them, you take your breath away and you want to make such beauty yourself. Crafts made from paper can be very diverse, from weaving to weaving.
Cutting out pictures from paper. Marine Coutroutsios technology
Today I would like to introduce you to the wonderful works of the French designer Marine Coutroutsios and tell you about a fairly simple technique for their implementation. Working with paper, she creates real paintings with her own hands, which are used in advertising campaigns and serious commercial projects.

Every element, every detail, every cut helps her create a holistic image that fascinates and amazes with its beauty and originality.

To perform work using the vytynanka technique, the author uses:
- dense white paper;
— colored paper for the base;
- scissors;
- pencil.
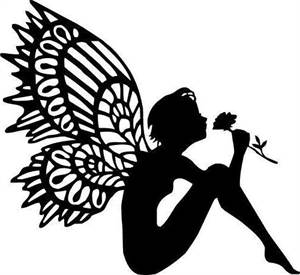
To cut through small elements, it is more convenient to use a thin blade or special knives for cutting paper. The process of creating a vytynanka itself is very simple and can become exciting activity not only for adults, but also for children. They love to cut something, and the result can be very interesting. A funny bee sat down on a beautiful flower with curved petals.

It all starts with thinking through the image of the future painting and creating a sketch. You can create a drawing yourself or take your favorite work as a basis. Next, the sketch is transferred to paper, markings and contours are made along which the cuts will be made. Once the design has been transferred, you can begin cutting. Cutting through every millimeter, every line in detail, we see how a pattern begins to emerge. After the design is cut out, it can be made three-dimensional by bending some of its details and applying the resulting openwork design to a sheet of colored paper.
The detailed process of how Marine Coutroutsios carves his work is shown in the video. Simplicity is fascinating.
As you can see, the author did an excellent thematic work for the year of the Snake Chinese calendar. In combination with a bright red background, such a painting will be an excellent decoration for the home, becoming a talisman for the holidays. whole year or a holiday gift. A garland of delicate paper flowers adds extra dimension to the work.

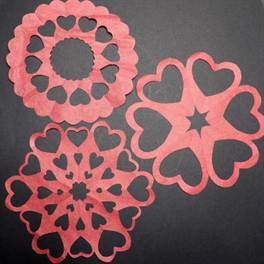
Using this technology, you can make other works with your own hands, which, like gifts, can be timed to coincide with a particular event. Handmade paper hearts are a great way to tell a person about your feelings. After cutting out the pattern, flowers, using reverse side scissors, add volume. The work is fixed on colored paper, fixing the sheets at a distance from each other. This move allows you to add depth to the work.

With a little effort and imagination, this wonderful material will help you convey emotions and attitude towards the person for whom the gift is being made.

The work will become memorable and pleasant surprise, revealing another creative side of your talent.

Just a few cuts and graceful bending of thin petals, and you get a magical heart with a sensual flower inside. Cutting allows your imagination to take flight, and creating exquisite paper flowers is as easy as pie. A few cuts and voila, you have a beautiful lotus!

And you don’t have to think that working with paper is difficult and not everyone can do it. Just try it, and this material will open up a horizon of possibilities for you. Cut out? What could be simpler! Even a child can make a creative craft himself, illustrating his favorite fairy tale, which will become the subject of his pride and joy.

Dear friends, today I continue the theme of decorating windows for the New Year. I will share with you the stencils that I especially like. I'll tell you how to make New Year's drawings on windows using them. Let's talk about whether it is possible to change the dimensions of a template in Word and Excel and what to do if you don’t have a printer at home, but you need to transfer the image to paper.
And, of course, we’ll look at the most painstaking work - cutting. Its result directly affects the beauty of the New Year's window. Well, let's understand all the intricacies of New Year's paper drawings, which are also called vytynankas.
Stencils of New Year's drawings for paper windows
How do you like this winter fairy tale made from plain paper? The result is a wonderful composition. As you can see, it consists of several stencils: a forest clearing, deer, snowflakes, the moon and other little things.

I really like this New Year’s scene on the window, it’s simply mesmerizing.


And another stencil of the New Year's city.

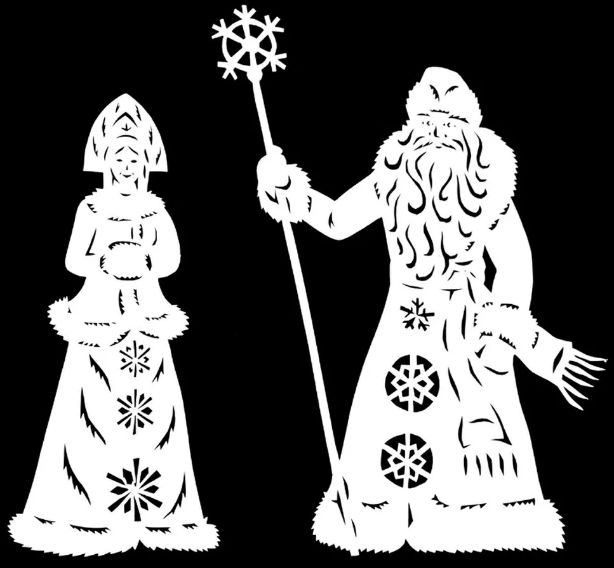
If you make Santa Claus like this on a paper window, although he looks more like Santa Claus, it will be fun.

Here is another stencil of the main wizard of the New Year.

If you want to decorate a window with a drawing of Father Frost and the Snow Maiden, familiar to us from childhood, then take this template.

You can decorate the window with a New Year tree and a sleigh with gifts. Look how wonderful they are.


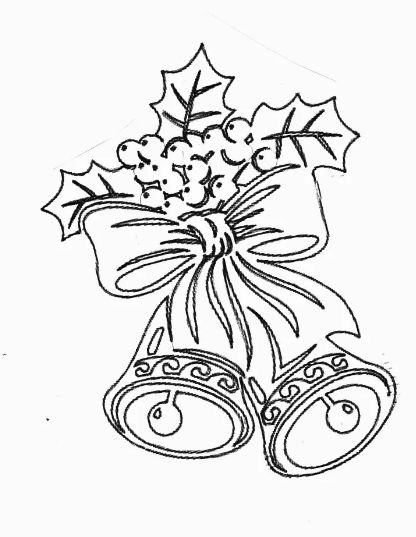
These patterns of festive balls, icicles and bells will look very elegant and gentle on the window.


I would like to present you with another template - this stencil, in my opinion, should turn out to be very interesting.

What do you think of this template? I think it will be the perfect New Year's drawing.


And, of course, what would it be without a Snowman and holiday candles. I think you will like these templates as much as I do.


New Year's stencils for windows made of paper
How to print
After you have decided on a template for a New Year's drawing, beginners may have a question: “How to print New Year's stencil and how to make it bigger if it turns out to be small.”
There's nothing complicated about it. I will offer you three options, and you give preference to the one that is convenient and easier for you.
Working in Word
In order to start working in Word, save the template you have chosen to your computer. Then open Word. Next, click “Insert” and “Drawing”. A window will appear in which you need to select your template.

As you can see, the drawing is small, it will be barely noticeable on the window. In Word you can stretch it to the size of a sheet. To do this, point the arrow at the picture and press the left mouse button. A frame will appear around it. By stretching it, the picture enlarges.
If the lines of your drawing come out pale, you can strengthen them. Again, move the arrow to the picture, press the left mouse button and when the frame appears, at the very top of the screen you will see the inscription “Format”. Click on it. We look for the word “Correction” in the same panel and click. A drop-down menu will open. In the “Sharpness Adjustment” section, select your template with an increase of 50%.

I've made the page smaller so you can see how I managed to stretch the image across the entire page.
Working in Excel
If you want to get a much larger picture, then you won't be able to do it without Excel. Let's go to this program. Just like in Word, click “Insert” and “Drawing”. In the window that appears, look for your template.

Move the arrow to the picture and click on the left mouse button. A frame will appear, with which you need to stretch the picture. In Excel, this can be done to very large scales, both downwards and to the side, only then the drawing will consist of several parts. The program itself will separate the drawing for printing. I got 8 sheets.

Translating the stencil using paper and pencil
If you don't have a printer at home, use the third method. By the way, it can be applied after working in Word and Excel, when the picture is enlarged.
We take any template that you like.
Point the arrow at the picture and press the right mouse button. A list appears from which you need to select “Open image”.

The image will open in a separate window. It will be small, but you can make it full screen. To do this, hold down the Ctrl button, and without releasing it, press “+” again until the picture fills the entire screen.

After this, take a blank sheet of paper and apply it to the screen. We arm ourselves with a pencil and redraw the picture. With the backlight from the monitor this will be easy to do.

How to cut paper stencils for windows
To cut out a stencil, you will need small scissors, a knife and some kind of wooden or plastic board so that the table does not get damaged while working with a sharp tool. The ideal knife for this is a wallpaper knife. It can be bought at any hardware store.
We cut out the main design with small scissors, but all the internal contours with a small knife. We do everything so that the black lines of the stencil are on the part that will be removed.
How to glue a paper stencil to a window
It seems that this is elementary, however, there are many but... Some glue plain water or soap solution, for others such stencils disappear. Why is this happening? It all depends on the window itself. If it is dry, then it is enough to moisten the stencil with a liquid soap composition or walk it over the glass and then stick it on. But the design will not always remain on glass that sweats. Therefore, to say: “Guys, stick like this and everything will be fine” is not entirely honest.
Each window requires an individual approach. It is necessary to take into account, as I already said, whether it is crying or not. What temperature is in the room - cold or warm - this also has an effect. Here everything is individual, as they say at random - it holds, it doesn’t hold. All I can offer you is to tell you about all the different methods used for gluing paper stencils. I think one of these versions will definitely suit you.
- Soap composition or simply rub with well-soaked laundry soap.
- Transparent tape, but it leaves an imprint on the glass.
- Diluted toothpaste, but not very rare.
- Kefir, as strange as it may seem, people use this drink too, but it will also cause stains on the window and if you have a cat, the decoration will not last long, as you understand.
- Flour paste, which is prepared on the basis of flour and water. The consistency should be like sour cream. But again, there is the issue of stains on the glass during washing in the spring.
- Starch paste is diluted starch.
- Dry glue stick.
- Another gluing option is with regular milk.
- Sugar syrup - boil and then glue.
- Prepare the gelatin liquid as usual, but add a little more water than indicated in the recipe.
- Double-sided tape, it is hardly noticeable on the glass, it can be easily removed, but then you need to carefully wash off the traces.
- Men's shaving cream, dissolve in small quantity water. The composition should not be liquid.
As you can see, everyone sticks differently, so make a choice, try it and then you will know exactly which method suits you.
My article about New Year's drawings on windows was quite lengthy. I hope you liked the cutting stencils and that the master class was interesting and understandable for you. I wish everyone good luck and, of course, patience, because in order to prepare such templates you need fortitude and inspiration.
I wish everyone happiness, Natalia Murga
Hi all! It's winter and cold outside, and we're in full swing preparing for New Year's holidays. I would like to decorate the house as colorfully as possible so that I can feel the upcoming events not only by looking at the calendar, but also internally. After all, it is during this period that some invisible onset of an upcoming miracle is felt!
Soon the children will be given tasks to bring some decoration to the class or group. For this case, you can do a lot, or cut out a stencil for the windows. It is the latter that we will talk about today.
You know, lately you’ve been walking down the street and you’ve been surprised. There are so many elegant windows around! I used to always think that only people who could draw could do this. And now I understand that with a computer and the Internet, everyone can become a little artist. After all, you don’t have to have any talents to decorate your home. Now it is enough to print out the finished drawing, cut out any fairy-tale plot from it using scissors and a stationery knife. Then we simply glue it onto the glass using water, milk or soap solution and that’s ALL!
I have selected wonderful stencils that can be printed by copying from the article. You can do this by simply right-clicking on the image and then “save image as” or “copy as”. Save it in Microsoft Word. Next, enlarge if necessary and print. It's so simple!
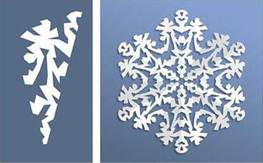
New Year's stencils of snowflakes for windows for cutting out paper (diagrams, templates)
What is there no New Year without? Of course, without snowflakes. How not to decorate the windows with such beauty? Of course, you can get creative and cut it yourself. But there is no less beautiful stencils. You can make the same ones or try all of the ones suggested below. The main thing is that your windows or classrooms will immediately be transformed!
Did you know that the art of paper cutting (vytynanka) originated in the 9th century in China. That's when paper appeared.


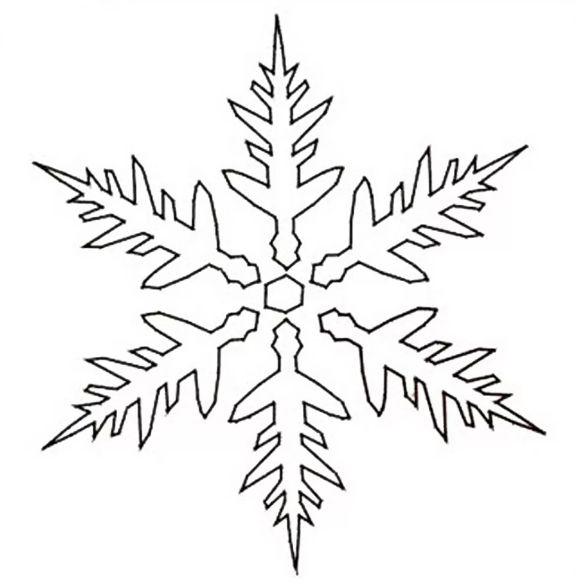


You can also print out these snowflakes. They have some character or object inside.
The level of complexity of the drawings is different. From easy to complex. Where to start is up to you!


You will get some interesting snowflakes. Now let's see what other samples there are.
Stencils of New Year's piglets for windows in A4 format to print
The coming year - a yellow earthen pig or wild boar. Therefore, how can we do without a New Year's symbol? No way, so you definitely need to decorate the windows with such little animals. They can be both small and large. Or maybe the window will be made entirely of them? The most important thing is that they are funny and very cute.


As you can see, the piglets are very cute. But even these can be in the form of cartoon characters that you certainly recognize. Now let's look at other stencils for windows.
Window decoration for the New Year 2019 in the form of New Year's houses
I can’t imagine a window that doesn’t have a house on it. They are so cozy that they immediately bring us closer to it family holiday. Looking at these, you immediately imagine how the whole family will gather for festive table near Christmas tree. So be sure to choose and print the one you like best. Or maybe this is the home of Father Frost and the Snow Maiden? Or some fairy tale hero?


You see, even a bird's house can be cut out along with the birds. The most important thing is how warm and cozy these pictures exude.
How to decorate windows for the New Year
From what you saw above it is quite possible to create some kind of plot. But how to do this without the main characters of the holiday. Of course, we also need Father Frost and his granddaughter Snegurochka. Or forest animals. Let's not forget about them either. In addition, children are always waiting for them in kindergarten, schools, and home is no exception.


And here is a snowman with bunnies. Their joy will soon certainly spread to us.


New Year's decorations for windows - templates, pictures for cutting
You definitely need to add some balls or bells to the windows. You can use a month or candles. After all, the more colorful the window, the more passers-by will glance at it. It's always nice to hear praise addressed to you. And the children’s joy will be simply enormous.


Let's not forget about the New Year's beauty.


Now you can safely print out everything and decorate the windows. Imagine how beautiful it will be. All that remains is to decorate the Christmas tree, live or artificial. Be sure to do this all together with your children. Of course, you don’t have to trust them with a knife, but they can easily stick them on the windows. And now I say goodbye to you, see you soon!


