Halloween is not a scary holiday at all. This is a fun and mystical masquerade, a lot of sweets and various scarecrows that children love so much. You can also make some crafts for Halloween with your children, decorate your home, classroom or office so that it immediately becomes clear that they will definitely scare you here!
Halloween pumpkins are an indispensable attribute of the horror holiday!
Pumpkin is perhaps the brightest and coolest attribute of the Halloween holiday. Real pumpkins are carved and made into lanterns, or simply painted beautifully and used as room decor.
Recently, it has become very fashionable to carve sculptures from pumpkins. The pulp of these vegetables is quite dense and the figures are simply charming.

Making your own pumpkin lantern or decoration is very easy. Use your imagination and you will get a great decoration.
.jpg)
You can even fold a pumpkin out of paper using the origami technique.
DIY web and spiders
A large web with a fat, fluffy spider is a very impressive decoration for Halloween. Such fun crafts you can decorate the room or cafe where the party is going to be. Guests will be very surprised and scared! And the figures of furry insects will create an indescribable atmosphere of darkness and horror))

A web can be made from threads, film or paper. It all depends on the size of the creation. To secure the web on the wall, you can use pushpins (matching the color of the material) or tape.

Spider nests suspended from the ceiling also look good. All they need is white nylon stockings or tights, filling - cotton wool or padding polyester and figures of spiders. This decoration will amaze the most demanding guests.

Spiders are also easy to make. Black chenille wire, shaggy yarn, plastic eyes different sizes- the collection of spiders is ready!

You can buy ready-made spiders for Halloween, especially if you need a lot of figures. A string of spiders running along a wall or door looks very beautiful.

As gifts and surprises for children, you can turn lollipops and lollipops into spiders for Halloween. For children, you can also have a master class on how to make a spider from foam balls and black chenille.

Black cats for Halloween
Like the pumpkin, the black cat - main character holiday. On Halloween, these black tailed creatures can be seen everywhere. Cats are easy to make with your own hands. The easiest way is to make it from cardboard - as a decoration for windows or from felt.

Some craftsmen make cats out of pumpkins for Halloween. It turns out pretty cute.
.jpg)
The bats
Charming and cute vampire bats will perfectly decorate your holiday. There are many options for creating this craft. From simple cutting silhouettes of mice made of cardboard, to complex origami figures. The bats from pumpkins, from cylinders toilet paper, felt, fabric and any other materials.
Bats can become packaging for sweet gifts,

wall decoration,

door or a scary mobile under the ceiling.

To create your own unique look for a masquerade, you can make a hoop with bats or spiders.

Candlesticks and flying candles for Halloween
Original decoration For the Halloween room there will be crafts in the form of candlesticks, lanterns and candles. Making them is not difficult at all.
.jpg)
Glass jars paint with black paint so that the glass in the form of figurines of a witch, cat or bat remains clean. Place a candle inside and light it - in a dark room they will create a sensation. Boo!
.jpg)
The same lanterns can be made from cardboard or black paper. Cut out the desired figures according to the templates, fold them and place a glass with a candle inside. The effect will be amazing!
Long cardboard sleeves Paper towels can be easily converted into flying candles. Make beads of wax out of hot glue, paint the grommets and hang them from the ceiling on a fishing line.
.jpg)
Children can be encouraged to make mummy lanterns. Regular jars need to be wrapped in gauze and eyes glued on them. Even little ones can do it great!

Garlands for Halloween
There are a lot of options for creating a garland for a horror holiday. Paper ghosts, spider dances, skeletons, pumpkins made of yarn, ghosts made of wire and many others no less scary decorations.


Wreaths on the door
Decorations in the form of wreaths on doors are not as popular in Russia as in the West. But this tradition comes to us too. Scary wreaths made of branches, cobwebs, and spiders will be a terrifying prelude to your holiday.

You can use a circle of cardboard or foam as the basis for the wreath. Additional details from threads, tulle, ready-made figurines of bats, pumpkins, etc. are attached to this base.

A wreath can also be made from flexible willow branches, pine cones, and feathers. The simplest wreath will be cardboard wrapped in gauze and decorated with spiders or plastic eyes. This craft will not leave anyone indifferent!


Ghosts and ghosts

Excellent ghosts are made from ordinary balloons and gauze. You can also make ghosts from foam balls with tulle.

Excellent outdoor ghosts are made from thin wire mesh that can be easily painted with white paint.

Whatever Halloween craft you choose, the main thing is to approach creative process with imagination, and then you will get great decorations!
Hello, dear readers! Halloween is coming very soon, which means... themed parties Should you slowly begin preparing for it, this article will help you make decent decorations for any room with your own hands. It is impossible not to note the fact that this Western holiday in Russia does not carry any specific subtext, but rather is another reason for holding an unusual costume party!
This article is constantly updated with new ideas!
For the party to be a success, you need to create the appropriate atmosphere; with costumes, everything is generally clear, but what about the decor of the room? It is Halloween decor that will be discussed in this review.
By the way, we have already published reviews on Halloween decorations on our website, you can read them, and also Well, today I will present to your attention some fresh and easy-to-implement ideas regarding thematic decoration of your home for October 31st, the day of Halloween.

How to Make Halloween Decorations
✔ Bats
You need to prepare: black paper, scissors, double-sided tape, thread, printer or pencil.
How would this holiday be complete without flying vampires!? We print bats on black paper (using the templates below) or draw them by hand. We cut it out and attach it to walls, doors and windows using double-sided tape. Mice can be hung by their wings on threads from a chandelier or door handles.


✔ Ghost shadow or dark silhouette
You need to prepare: black paper, pencil, scissors, double-sided tape.
If there are steps in the house, you can create the effect of a frozen ghost. To do this, we take sheets of black paper, and on each of them we draw a part of an ominous shadow, then we cut out the elements of the future ghost and attach them to the end parts of the steps (see photo). I think you won’t have any problems with the body when drawing (just draw a shapeless robe), but the profile of the head may not work out, so below is the silhouette of a female and male head. 

✔ Mummies from the crypt
You need to prepare: mannequins in full height, bandages, strong tea.
We soak the bandages in strong tea, then dry them, and wrap the mannequins, not forgetting to leave the ends of the bandages hanging carelessly (as if they had been frayed by time). Mummy mannequins can be laid down or placed near the wall. 
✔ Halloween decorations - garden wheelbarrow with bones
You need to prepare: garden wheelbarrow, soil or sand, plastic bones.
If you plan to celebrate Halloween in a country house, then in addition to the house, you can also decorate the garden plot. We go to a prank store, buy a bag of plastic dice, fill a garden wheelbarrow with soil or sand, into which we casually bury the plastic dice.

✔ Zombies buried in the ground
You need to prepare: old trousers, jeans or trousers, socks, thread, sand.
Another interesting element for courtyard decor. We sew up each trouser leg with thread from the bottom, fill them with sand, sew them up at the top, put socks on the resulting legs, and place them upside down on the lawn.

✔ Zombie pumpkins for the plot
Need to find: pumpkins, knife, spoon, street candles.
Using a knife, we cut off the lid on top of the pumpkin, scoop out the pulp with a spoon, use a knife to cut out creepy faces on the side of the pumpkin, place street candles inside, close the lid, and find a suitable place for them near the house!

✔ Ominous pumpkins for the home
Need to buy: pumpkins, black spray paint or marker, face templates and tape.
Using tape, we attach a template-face to the side of the pumpkin, and paint the template part with black spray paint. The resulting pumpkins can be placed around the house - on the floor, tables, window sills, mantelpieces.


✔ Glamorous pumpkins
Transparent glue moment or glue gun, rhinestones of different sizes, a small plastic spider.
Using glue, we attach rhinestones in the form of a web to the pumpkin, and somewhere on top we attach a plastic or rubber spider.

✔ Mummy pumpkin
You need to prepare in advance: pumpkin, bandages, toy eyes, glue moment.
We wrap the pumpkin in bandages, not forgetting to secure the toy eyes on the penultimate layer using instant glue. You can partially cover the bandages with red gouache, then the pumpkin will turn out a little more scary!  Halloween photo decoration
✔ Faces on toilet paper
Need to purchase: toilet paper rolls, black paper, scissors, glue.
We cut out interesting faces from black paper (see photo below), and attach the resulting elements to toilet paper rolls with glue.

✔ Witch hat for cocktails
You need to prepare: black paper, a compass or two round glasses of different diameters, scissors, paper glue, a toothpick.
On black paper, we draw with a compass two circles of different diameters, leave the larger one as the base of the hat, cut the smaller one in half and roll it into a cone (coat the side line of the cone with glue), after which we turn the lower part of the cone inward, and also coat it with glue, then glue the cap to the base of the hat. Finally, we pierce the base of the cap with a toothpick and decorate cocktails, snacks or just plates with the resulting product.

✔ Skull masks
You must first prepare: white paper, pencil, scissors, tape, long wooden skewer.
Using a pencil, draw the outline of the skull (see photo below), cut it out with scissors, and glue a skewer to the base of the mask with tape. It turns out a mask with a handle. By the way, anyone can paint such masks with colored markers to their liking. You can even hold a competition for the most spectacular mask!

✔ Decorative broom
You need to stock up: scissors, coarse rope, thin branch.
We take a coarse rope, fold it in half, cut it with scissors, apply the resulting bristles to a thin stick, and tie it with the same coarse rope. Such miniature decorations can be placed around the house or to decorate plates for the table.

✔ Footprints around the house
You should prepare: black paper, printer, scissors, double-sided tape.
We print out the footprints on a printer (template below), cut them out and distribute them throughout the house - the floor, walls, furniture.


✔ Witch table or putting shoes on the table legs
You should prepare: shoes with pointed toes, striped knee socks.
We pull striped knee socks onto the table legs, and put old boots on them. That's it, the witch's table is ready!

✔ Templates for home decor
We print or redraw the templates, cut them out and glue them wherever we can stick something with double-sided tape (windows, doors, walls, refrigerator, beds, chairs, tables). Examples of patterns are presented below (black cats, witches hats, spiders and ghosts).


✔ Ghosts
How can we do without ghosts? After all, they add a special flavor. I present to your attention several simple ideas for making ghosts.
A ghost from a book. We cut out the silhouette of a ghost on a book page (we don’t cut it all the way, we leave the sheet intact at the base), and bend it up.

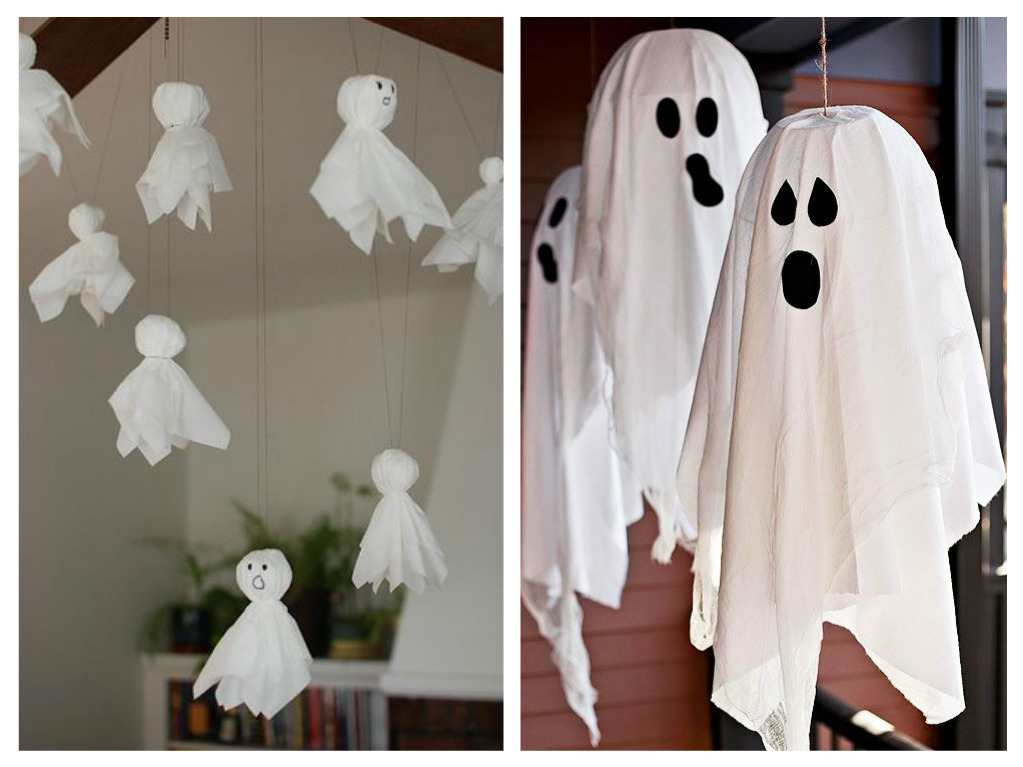
Napkin ghost. We take a napkin, put something round inside - a large bead or a small nut, wrap a thread around the improvised head, draw eyes and a mouth with a marker, and hang the ghost from the chandelier.

Ghost from whatman paper. We take whatman paper, draw the outline of a ghost, cut it out with scissors, draw eyes, nose and mouth with a marker, attach the product to the wall with tape.

✔ Witch's supplies
Need to prepare: glass jars of different sizes, paper, pen or pencil, scissors, lighter, toy fingers or dried grass, dyes, water, glue.
Here, in general, everything is very simple, colored water is poured into the jars, and a label with the name of the potion is glued to the end of the glass container. It could be a potion of oblivion, a love potion, a potion of good luck. You can also pour crushed dried herbs into jars and label the labels according to its name.


✔ Black spiders
Should be prepared: cones, black spray paint, white beads, moment crystal glue, pom-poms, black chenille wire.
First you need to paint the pine cone black, glue a pom-pom head to it, glue beaded eyes here, and paws made from beads to the body. chenille wire.


✔ Egyptian mummies
You need to prepare: ready-made doll toys or wire, rag tape or bandage.
In the case of a doll, you just need to wrap the toy with a bandage. You can also make a mummy from wire - creating a frame with legs, arms and a head, and then wrapping it all in several layers of bandage or white textile tape.


✔ Spider webs (web)
You need to prepare: disposable plate, hole puncher, wool threads, scissors.
We cut out the central part of the plate with scissors, use a hole punch to create many holes along the edges, into which we then thread a woolen thread, intertwining the threads with each other.


✔ Wreaths on the door with snakes
You should prepare: willow vine, toy snakes, hot glue gun, black spray paint.
We form a ring from the branches, then glue many small snakes to its end part, and finally paint the product with black paint.


✔ Ominous predictions (exclusively for decoration)
You need to prepare: cups for tea or coffee, brewing tea or ground coffee, PVA glue, skewer, brush.
You can make a prediction from Harry Potter with makeup; to do this, draw an outline of the makeup in a cup of tea with a brush, and immediately sprinkle it with tea leaves and leave it to dry. You can do the same with ground coffee.


10 more cool Halloween themed decor ideas (video):
Many more decoration ideas (photos):


There are very few holidays for which you can decorate your home thematically. But luckily, Halloween is one of them. Today it is very popular all over the world, so there is a wide range of products on the market. various decorations. But it’s much more interesting to start the holiday even before it arrives, i.e. start preparing home decorations with your own hands.
Below are detailed MKs of 10 types of decor, which are quite enough to turn your home into a real castle of sinister power.
Bright lanterns
As you probably know, pumpkin is the main attribute of Halloween. In the article “How to make a festive pumpkin for Halloween,” we already told you how to make a Jack-o-lantern yourself. If you read this material, you must have noticed that this process is quite labor-intensive. That's why today we offer you an alternative - paper lanterns that resemble Jack-o'-lanterns.
You will need:
- orange and black paper;
- glue;
- scissors;
- stationery knife;
- a simple pencil;
- ruler;
- transparent glass;
- candle.
First, we will make the larger flashlight. Cut out a rectangle measuring 20x15 cm from orange paper. Now, using a knife, make strips along the length of the flashlight (=15 cm), leaving 1.5 cm at the top and bottom. The width of the strip is 1 cm. Cut strips 3 mm wide from black paper. Now decorate the top and bottom of the lantern with three black stripes using the weaving method. Making the decoration for the middle will be a little more difficult. Take black strips that are two to three times longer than the length of the flashlight. As you weave, push the orange stripes apart at the same time. This way you can make the flashlight convex as in the photo.
Now it's time to work on the small lamps. First you need to measure the diameter and height of the cup. Cut out a rectangle from orange paper: the width should be equal to the height, and the length should be equal to the diameter of the cup. WITH reverse side Draw funny faces with a simple pencil and cut them out using a stationery knife. Glue the cylinder together.
Now you can insert transparent glasses with candles into the blanks and enjoy your work. Such lanterns will fill good mood your home.
Fairy lights

Garlands are one of the most popular Halloween decorations: firstly, because they are easy to make, and secondly, they look very impressive.
You will need:
- paper in black, orange, white, gray, coffee colors;
- a thread;
- needle;
- scissors or stationery knife;
- glue;
- templates
If you know how and love to draw, then creating such a decoration for your home will be a mere trifle for you. If you are unlucky and don’t have this skill, it doesn’t matter - templates that can be found on the Internet will come to the rescue. They should depict various Halloween symbols: pumpkins, bats, witches, black cats, ghosts, ravens. You can also make a garland from ordinary isosceles triangles in holiday colors. When the templates are prepared, it’s time to start making the decor.
Fold the paper of the required color like an accordion and use a regular pencil to transfer the image onto it. Now cut out the shapes along the contour. If necessary, draw eyes or mouths for the characters with pens or markers.
*Helpful advice: If you are cutting out complex figures, for example, a Jack-o-lantern, then cut out the pumpkins themselves from the accordion, and use a stationery knife to make the faces separately on each copy.
After this, thread the needle and thread the cut out figures onto it. Distribute the cutouts evenly on the string.
If you are making a garland consisting of triangles, then you need to cut out double figures, i.e. the two triangles must be connected to each other. Take one pair and put a thread between them, then glue the triangles together.
This cute decoration can be made in just a few minutes.
“Mouse” staircase decor and more

If you have a staircase in your house, then you can decorate it in a very original and unusual way.
You will need:
- black paper;
- scissors;
- pencil;
- Double-sided tape.
One of the most popular types of staircase decor is mice. To make such a decoration, you need to find on the Internet or draw yourself templates of mice in different poses. You can also make minks. Fold the paper like an accordion and trace the template with a pencil. After this, cut out the figures. Using double-sided tape, glue the mice on the steps; you can decorate the baseboards in the same way.
Another option for a similar decor is the shadow of a woman or man. Cut out a shape on black paper and divide it into pieces, the length of which is equal to the height of the steps. Just as in the previous case, glue the image using double-sided tape.
You can further decorate the staircase black curtains, tying them to the railing. This will make the decor look even darker.

What would Halloween be without bats? These small creatures are one of the main symbols of the holiday. And today we will decorate our home with these small animals made from pumpkins.
You will need:
- small real or artificial pumpkin;
- matte black acrylic paint;
- a fluffy brush or sponge for paint;
- glue;
- black and white cardboard;
- scissors;
- hole punch (optional).
Wash and dry the pumpkin well. After this, apply paint with a brush or sponge. Try to paint so that natural color the vegetable was not visible. If you didn’t manage to do it right the first time, then wait until the paint dries well, and then apply another layer. While the pumpkin is drying, make the remaining elements. Find on the Internet or make your own a template for the wings. Their length should be about 15 cm. Cut out two identical wings from black cardboard, leaving 0.5-1 cm on the fold for fastening. Cut out ears from the same cardboard, and eyes from white cardboard. There is no need to cut out the pupils separately - just pierce them with a hole punch or cut holes with sharp thin scissors - these will be the pupils. Now all that remains is to put all the parts together. To do this, use good glue.
These pumpkin bats make great Halloween decorations. For example, you can plant it in a flower pot or draw a moon and plant it against the background of this poster of our mice.
Mummies
Making a mummy is very simple, so even children can be involved in the process.
You will need:
- aluminum wire;
- white bandage or cloth.
Cut the fabric or bandage into strips 1-1.5 cm wide. Make the frame of our future mummy from wire. Now start wrapping it tightly around the “skeleton”. Try not to leave empty spaces - the wire should not be visible. When the strip is finished, tie it tightly to the wire to secure the end. Secure the bandage in the same way at the beginning. Do this in several layers and tie the end tightly.
Once made, mummies can be planted in various poses or create entire compositions.
Spider

Black spiders are an essential attribute of Halloween. Therefore, today we will make such beauty.
You will need:
- foam ball;
- black acrylic paint;
- brush or sponge for paint;
- glue;
- black decorative wire;
- eyes for toys;
- half a toothpick (optional);
- thread (optional);
- scissors.
Apply paint to the ball and let it dry thoroughly. Now cut eight pieces of wire of the same size and bend them into the shape of spider legs. Pierce the ball with wire and put the legs in place. Glue on the spider's eyes.
This toy can also be made in the form of a pendant. To do this, fold the thread in half and tie it tightly at the blunt end of the toothpick. With the other side, pierce the ball from above.
*Helpful tip: For more believability, choose light-colored threads.
Aerial web

A spider web will decorate any home for Halloween. So beautiful and unusual decor it's not difficult to do. But there are certain tricks that we will tell you about today.
You will need:
- woolen threads, most similar to a cobweb;
- skillful hands.
The whole secret is to stretch the thread as believably as possible. One layer should go along, and the second should, as it were, cross the previous one. But try to give the web a natural look.
This creative accessory can be used to decorate chandeliers, tables, lamps, etc. If you do everything right, your guests will not be able to distinguish an artificial web from a real one.
Ghost

A large, spectacular ghost will decorate any interior and create an unforgettable holiday atmosphere.
You will need:
- large gauze;
- balloon;
- PVA glue or starch;
- wire;
- circles of paper, fabric or marker.
Inflate the balloon to the size you want the head of the future ghost to be. Place the ball on the bottle. Also attach the ghost’s “hands” to the latter using wire.
Also place a dry towel on the bottle, which will absorb excess liquid. Make a solution of water and starch or glue. After this, soak the gauze in it. Now hang the workpiece on the previously prepared frame. The ghost should dry well, after which you need to pull out the ball and bottle with wire. Glue, sew or simply draw eyes with a marker. That's all, our decoration is ready. Thanks to this decor you can make very beautiful compositions.
Intimidating wreath

A spooky wreath makes a great Halloween door decoration. This decor is very easy to make with your own hands.
You will need:
- thin branches of willow or other tree (they should be flexible enough);
- spray black paint;
- Halloween accessories (spiders, cobwebs, yellow leaves, cut-outs, etc.);
- scissors;
- glue;
- Double-sided tape.
Take one fairly dense branch and roll it into a ring, wrap the remaining branches around it, forming a circle. When you have made the base of the required size, excess branches must be trimmed. Spray the paint evenly over the branches and leave for 2-3 hours until completely dry.
Now all that remains is to decorate the wreath with accessories using glue or double-sided tape. We leave the finished decoration for a couple of hours so that all the elements stick well (if glue is used). All is ready! Hang it on the door and admire the result. Believe me, such a wreath will scare away even the most evil forces.
Witch's Potion

What could be more thematic and interesting than decorating your “shelter” with real bottles of a wonderful potion. Anyone can make such a decoration, and we will prove it to you today.
You will need:
- glass containers of different types;
- spray matte black paint;
- wine corks;
- kraft bag or kraft paper;
- glue pencil;
- black or brown pen or felt-tip pen;
- a spoonful of ground or instant coffee or a bag of black tea;
- scissors.
Various bottles are suitable as glass containers: wine, oil, vinegar, syrups, etc. Remove the labels and wash them in water with detergent. Dry well and treat with medical alcohol so that the bottle is clean and grease-free. Apply paint over the entire surface and leave for a couple of hours until completely dry.
While the bottles are drying, let's prepare the labels. Make a strong brew of tea or coffee. Cut a large rectangular sheet of paper or bag and make a not too dense ball out of it. Now dip the ball into the solution and leave for 1-2 minutes. After this, take out the paper and straighten the sheet. Leave it for a while to dry. Write the names of the potions, for example, “Vampire Blood”, “Witch Spit”, “Eyeballs”, “Grave Dust”, “Virgin Tears”, etc. Very carefully tear off each label, trying to make it look as natural as possible. Using a glue stick, glue the names onto the bottles and seal them with corks.
Now you can make a whole composition using the prepared vials with the “potion” and the artificial web that we talked about above.
We wish you an interesting preparation and a happy Halloween :)
Just around the corner most interesting holiday- Halloween. Surely you are concerned about the question of how to decorate the house yourself. The decor of the house should correspond to the style of the holiday: be bright, original and a little sinister. There are many ideas for creating unique Halloween decorations. We want to offer you some interesting ideas that will definitely make your holiday fun and a little “creepy.”
Halloween Decor: The Coolest Ideas
Do you know how it is celebrated? Then it's time to decorate the house!
The main thing at the holiday will be, of course, pumpkin! Choose an even pumpkin and cut out funny or scary faces from it. For an example, see the video from YouTube:
To make a vase or stand for champagne from a pumpkin, you need to remove the pulp and seeds. That's it, our decor item is ready! Fill with ice or treats. Be sure to make festive celebrations with champagne - where would we be without snacks! 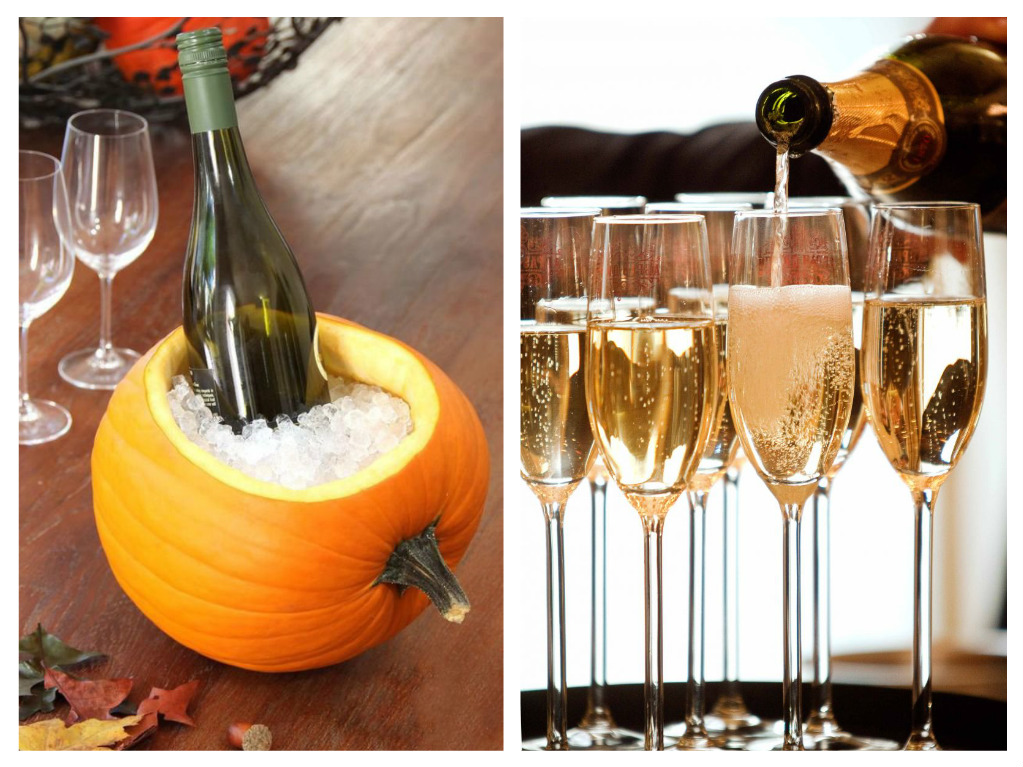
Make a jack-o-lantern, for example, like in the photo of Halloween decor ideas below: 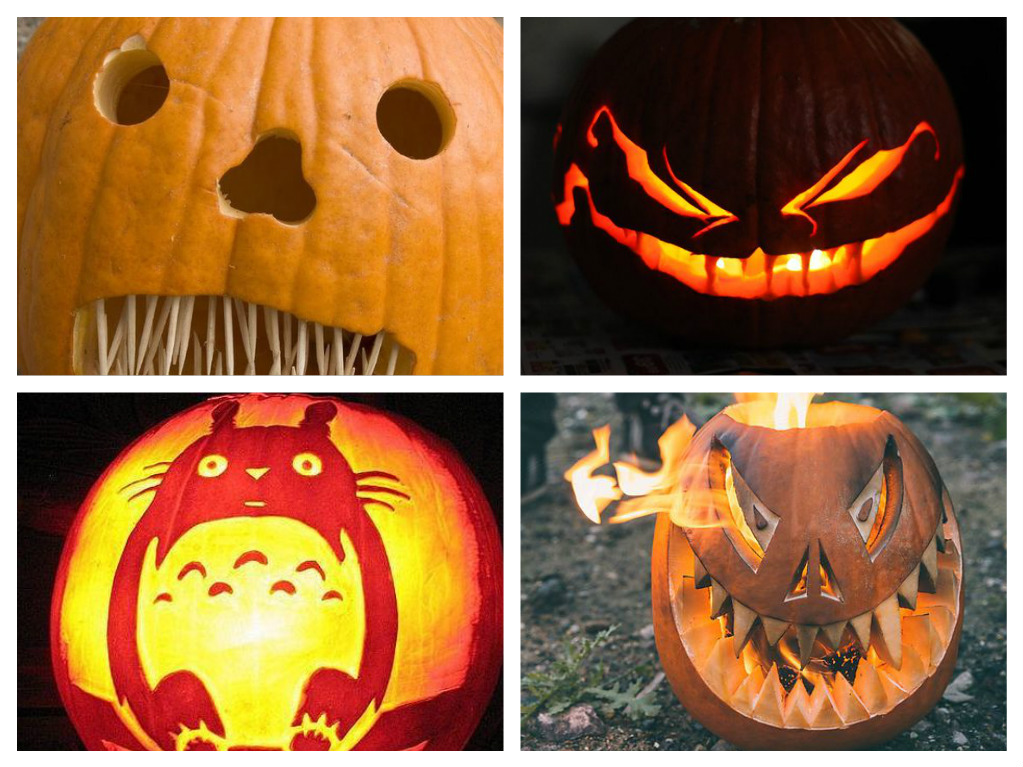 But the decoration of the pumpkin lantern is non-standard, without a “face”, but with ordinary round holes:
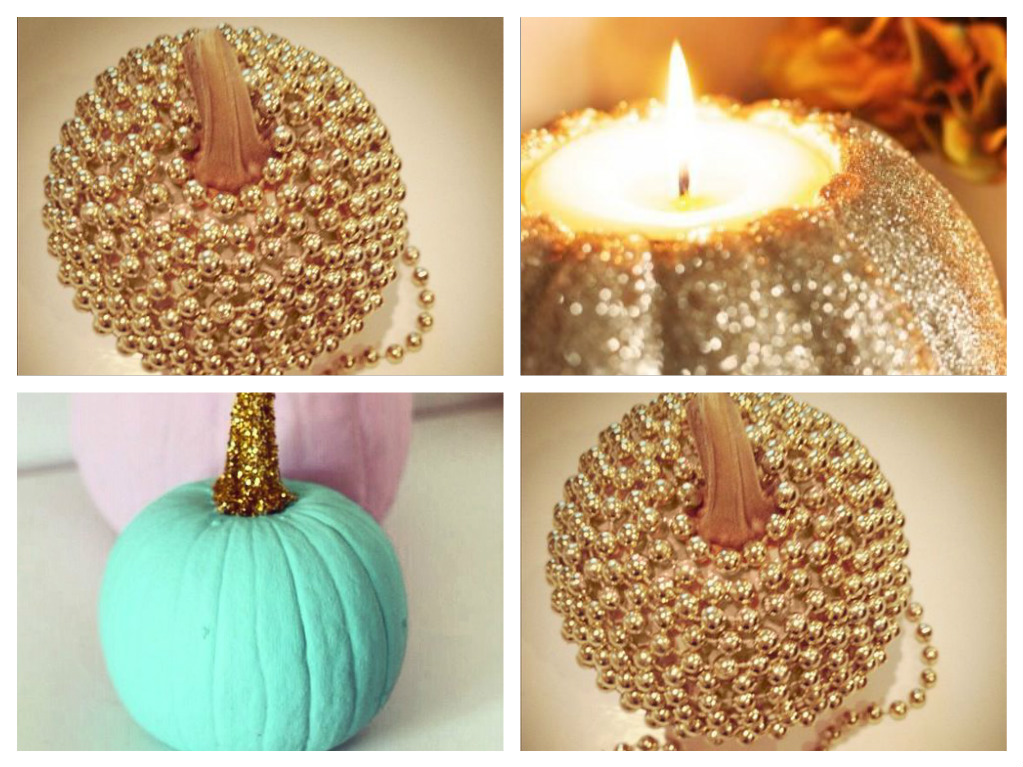
Add decorations to the pumpkin with paints, ribbons, sparkles, sequins, and beads. 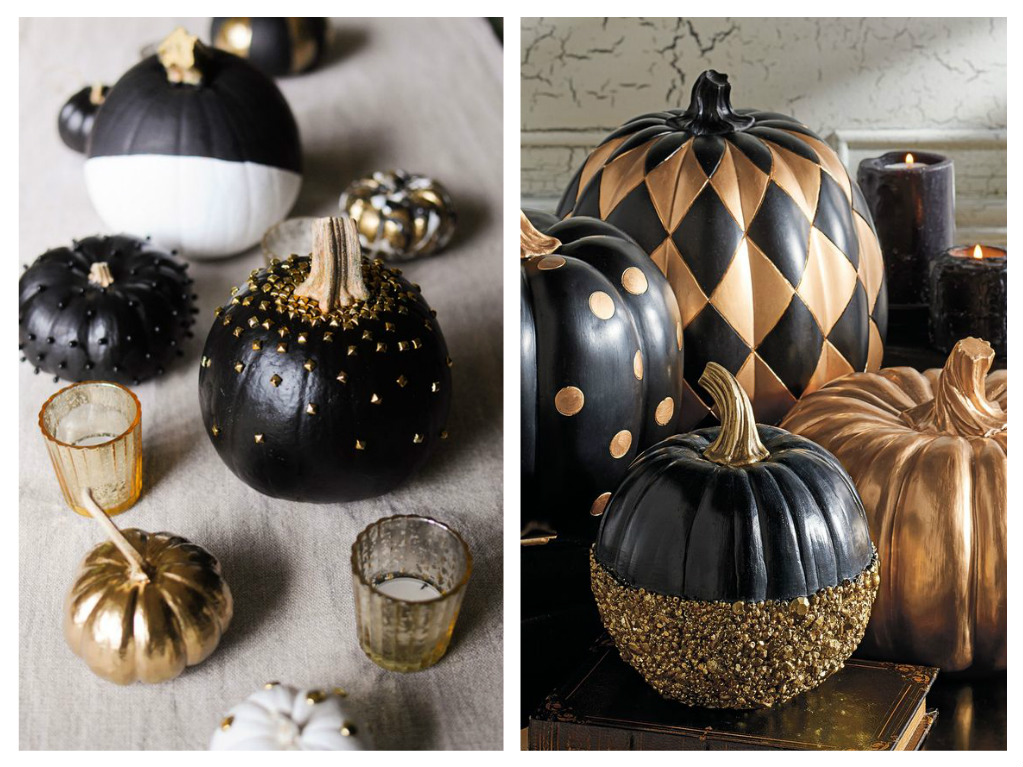
You can also make a pumpkin from scrap materials: thread, paper, canvas. How to make a pumpkin from rubber bands, watch the video from YouTube:
And in this video you can see how to make a ghost with your own hands for Halloween:
“Witches feet” can be a great decor idea. They will require an old pair of shoes, as well as thick tights. It is necessary to fill the tights and put them “feet” into the shoes. Then they can be hidden under a bed, table or chair so that they “peek out”. 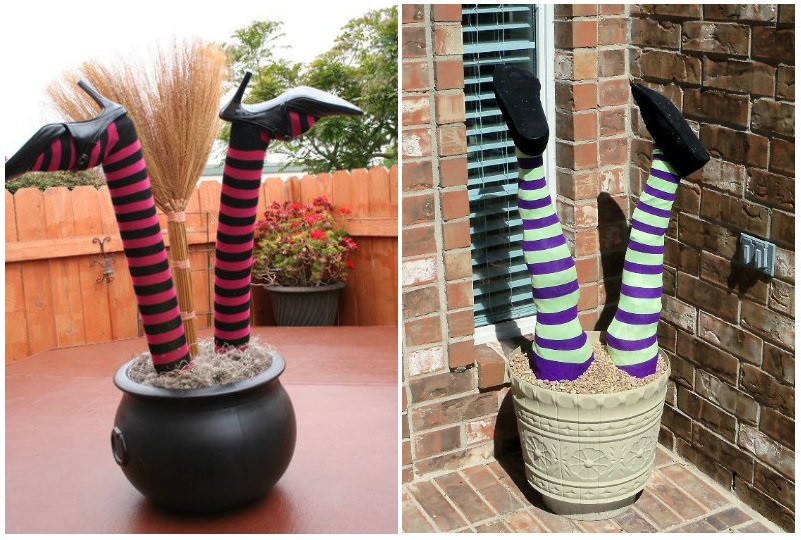
From twigs collected in the park you can build a real broom and place it at the entrance to your house. The witches have come to you! 
Another idea for how to decorate your home for Halloween is with ghosts. Place large “horror stories” throughout the rooms, hang them on chandeliers and in doorways. For more details, watch the video from YouTube:
You can cut out small ghosts from scrap materials and hang them on houseplants and curtains, as in the photo of Halloween decor: 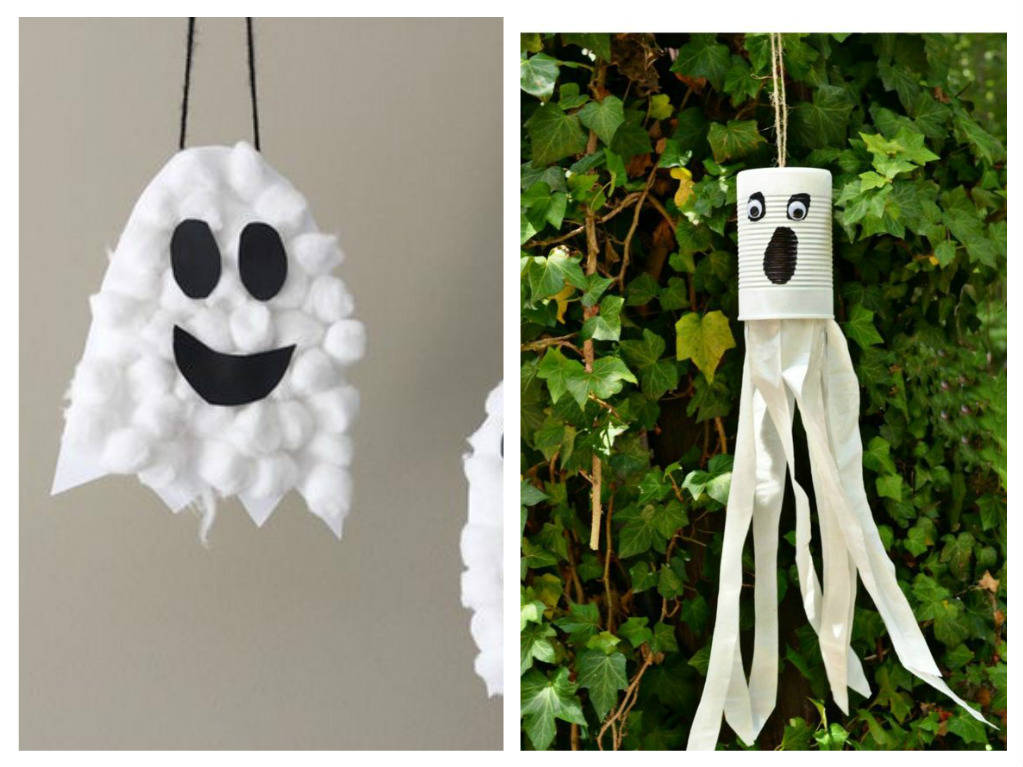
Skeletons painted on glasses, plates, doors, and windows will make you feel creepy. If you find inflatable balls with “knuckles”, that will be great. By the way, keychains are made from almost “real” bones - carelessly thrown on the coffee table, they will help create the right mood. 
A “spooky” garland is a great decoration for Halloween. By making it bright and hanging it around the rooms, you will add atmosphere to the holiday. To create such a thing, just cut out figures from paper and glue them together. 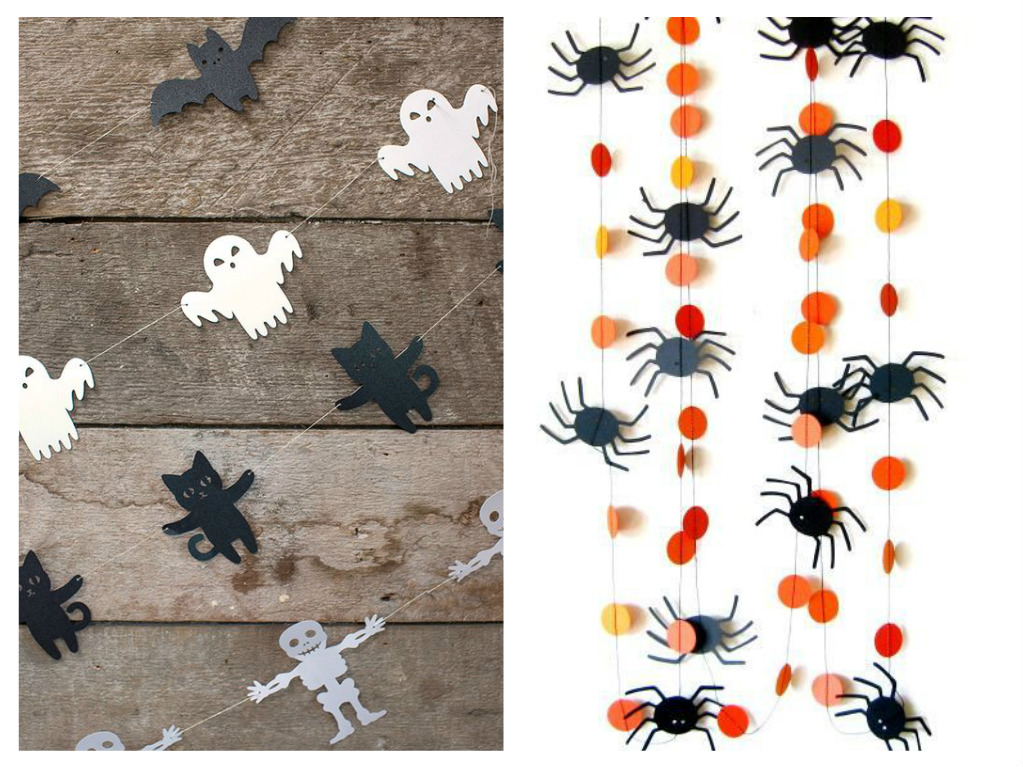
The garland can also be textile, as in the photo of DIY Halloween decor below: 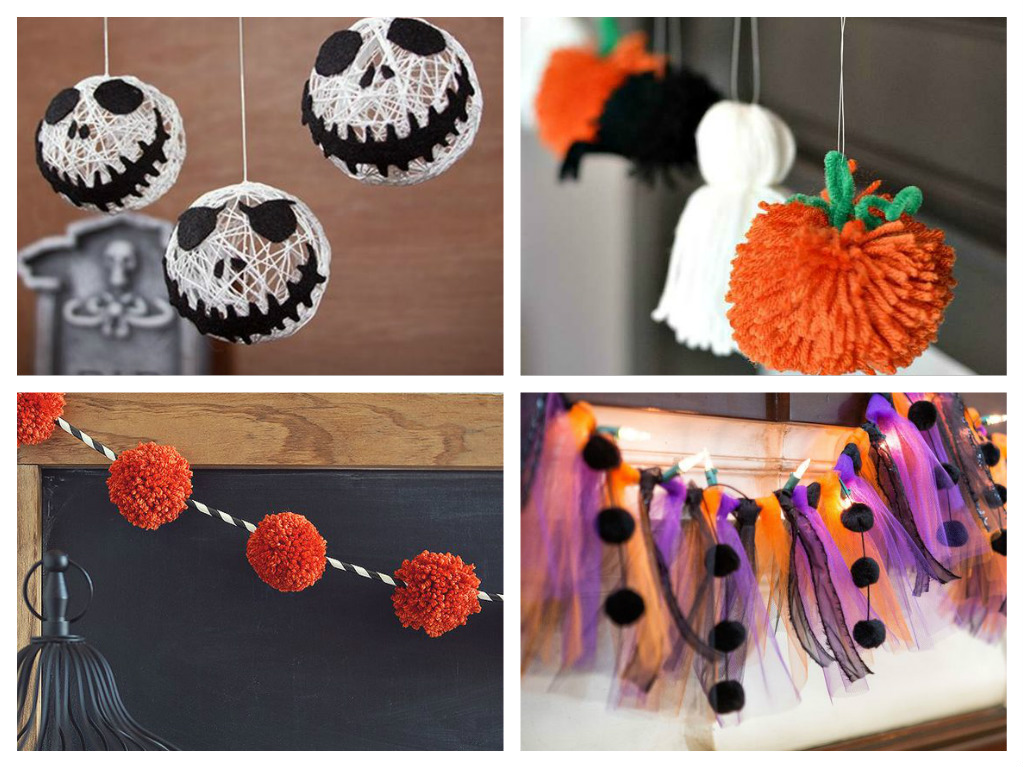
Cut out ominous bats from paper and hang them on strings from the chandelier - they will cast shadows on the floor, table, and walls. Decorate the walls with them to add authenticity to the room! 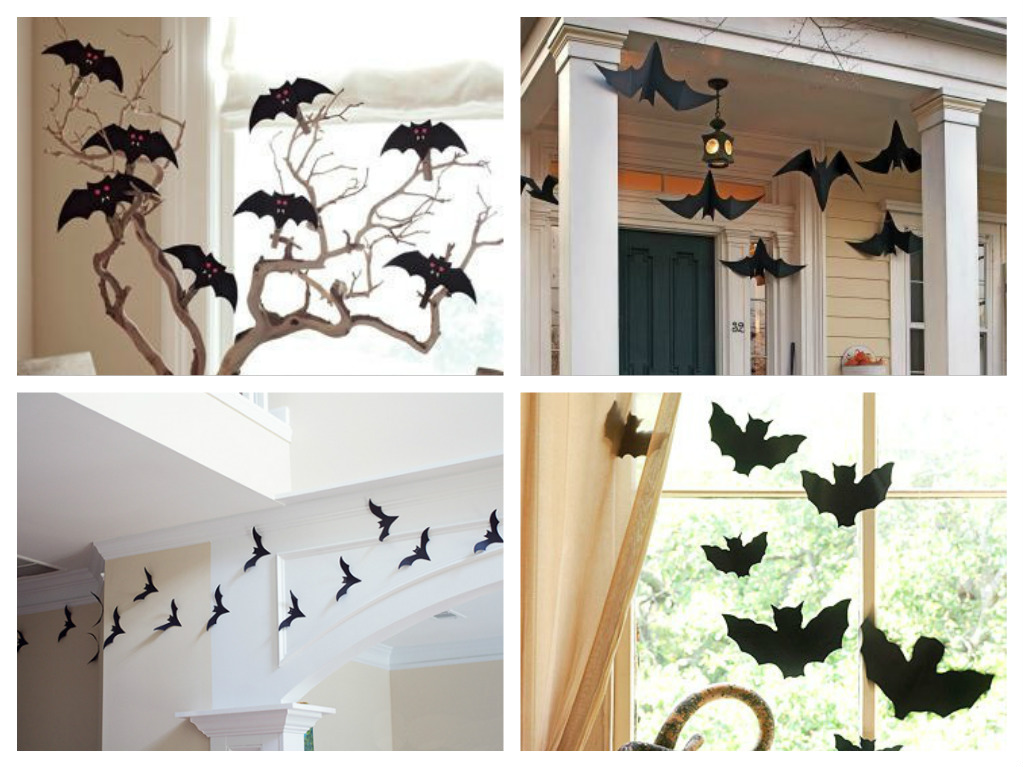
Owls are a wonderful decoration for Halloween! Watch the lesson on video from YouTube:
Use appropriate tableware and table decorations - glasses in the shape of skulls, coasters made of “hands”, a black tablecloth with white cobwebs, themed napkins.
The bats. Draw on black paper and cut out with scissors. You can hang them everywhere - they will be appropriate for such a holiday. You can also use a whole flock of bats in your home decor. To do this, you will need to cut out several silhouettes from paper and attach them to the wall. Watch how to do it on YouTube video:
The web will look great. It is made using a package. Watch detailed video from YouTube:
Make hats for pumpkins, and you can easily create such a hat for yourself! Find out about this in the video from YouTube:
Candles are also a necessary decoration for Halloween. To create an attractive look, in addition to the wax base, you will need cups, jars, paper, glue, scissors and pencils. Decorate to your liking!
How interesting it is to decorate a room with candlesticks for Halloween can be seen in the video from YouTube:
An excellent option would be to use two candles: white and red; if you place them side by side, the wax of the red candle will drip onto the white one, and as a result we will get a bloody candle.
A wreath on the head will perfectly complement the image of a ghost or an “animated” pumpkin. How to make such decor for Halloween, watch the video from YouTube:
And the wreath option shown in the YouTube video will perfectly decorate your door:
If you have paintings and portraits at home, make masks for them - this will create a certain mysterious and frightening atmosphere. You can and should make them for yourself and for your Halloween pumpkin, of course! And simply hanging a mask on a lantern or light bulb is already a great idea for Halloween decor. 
Autumn is the time when there are a lot of fallen dry leaves on the street. They can be placed near the door of the house, or collected in a basket and placed in a visible place. Emphasize the holiday atmosphere with this and experiment!  You see, making Halloween decor with your own hands is not at all difficult. The main thing is to show desire and turn on your imagination. Now you know how to make Halloween a real holiday! And if the previous ideas for decorating your home for Halloween are not enough, the photos below will help you get more inspiration and create a unique and amazing atmosphere for this holiday!
So, watch, use, bookmark and don’t forget to read other articles on the My Tips portal. For example, it’s very important for creating a cool holiday table! 


 Here are some cool ideas for cheap Halloween decorations:


Celebrate with My Advice and be happy!
Useful tips
Despite the fact that this holiday is not official in Russia and the CIS countries, they still like to celebrate it, because it is not only unusual, but also quite colorful and original.
Many people throw parties on Halloween. They can take place both in clubs, cafes and restaurants, and at home.
To beautifully decorate the room and cook original crafts on Halloween,we provide several interesting ideas, many of which you will definitely like.
DIY Halloween: Little Ghosts

You will need:
Styrofoam balls (found at an office supply store)
White cloth or gauze
Black pins
Thick thread.
1. Wrap each foam ball in fabric and tie a thick thread at the neck to secure the fabric.

2. Insert black pins to become eyes.

3. To hang the ghost, you can make a small loop of thread on the top of the head.
DIY Halloween Crafts: Spider Garland

You will need:
Thin brushes
Strong thread
Needle and thread or tape.

1. Prepare 4 pipe cleaners, gather them into a bunch and bend them in half.

2. Take the top of the head where the pipe cleaners fold, bend it slightly and twist the pipe cleaners to form the body of the spider.

3. Start straightening the spider's legs.

4. Using a thread and a needle or tape, attach the spider to the thread.

5. Make a few more spiders to create a larger garland.

DIY Halloween decor

For this project, you can use your imagination and use any objects (things, toys) to create an original Halloween corner.

IN in this case The witch's locker was created. A large wooden box was used for this, but you can use it instead cardboard box, to which you can attach several shelves and decorate with paints (gouache) and/or black adhesive tape (or electrical tape).

As decorations you can add:
Toy skulls
Bats cut from black paper
Artificial web (buy in cans or make your own from threads)
Antique books and unwanted keys
Jars and cones, painted with gouache in the desired colors.

DIY Halloween at home: bloody candles

You will need:
Food parchment (baking paper)
White thick and thin candles
1 red candle
Pins and nails

1. To begin, cover your work surface with parchment paper and remove all stickers (if any) from the candles.
2. Light the red candle and get ready to drip red paraffin onto the thick white candle. You can insert pins and nails into the white candle in advance. Be careful, remember - paraffin is hot.
3. The same can be done with thin candles and then insert them into the candlestick.
How to make flying candles for Halloween


How to Decorate Your Home for Halloween: Glow in the Dark Ghosts


Halloween Crafts: Hand


DIY Halloween Crafts: Cardboard Anti-Zombie Barricades


DIY Halloween Decorations: Eyes in the Dark


Halloween door decoration

How to make a big Halloween ghost with your own hands

You will need:
Transparent trash bags
Transparent wide and thin tape
Mannequin or volunteer
* you can use part of a mannequin (without the head) or something that has the shape of a torso, as well as a ball for the head.
Fishing line (for hanging).
1. Torso
1.1. Place a large clear bag over the mannequin. If you have a volunteer as a mannequin, make holes in the bag for the head and arms and then put it on it.
1.2. Start wrapping thick tape around the bag. Please pay attention Special attention the most complex parts of the body. Wrap around your waist, neck and shoulders. Add some tape to connect all the already wrapped parts - a couple of pieces from the neck to the shoulders and a couple from the waist to the neck.


* For more difficult places, you can use thin tape.
In the picture you can see strips of blue tape - this is so that you can better understand what to do next.
1.3. Continue wrapping the tape, varying from horizontal to vertical strips. The main thing is that the entire torso is covered.


1.4. To make the shape stronger, add another layer of tape. You can add a couple more layers if desired, but the more tape, the less transparent the ghost will be.
1.5. Using scissors (preferably with rounded ends), cut the shape from the back from the neck to the waist in a straight line. The dark tape in the picture shows exactly where this needs to be done.

1.6. Carefully remove the form from the mannequin and set it aside.
7. Nowhead.
If you don't have a head model, you can use a regular ball of the appropriate size.
*Under no circumstances use a real person for this.
7.1. Place a transparent bag over the mold.

7.2. Wrap thin tape around the neck to secure the bag at the bottom. And to secure the bag on top, wrap tape around it in the forehead area. If you are using balls, simply place some tape on the bottom and then start wrapping it around the entire ball.


