What the New Year without snow and snowflakes? But if suddenly the weather failed and the snow did not fall, then good mood You can make your own using paper snowflakes. DIY snowflakes — traditional decoration For New Year's interior during the winter holidays.
Required tools and materials:
- 2 sheets white office paper A4 format,
- scissors,
- white threads
Procedure:
- The ballerina's skirt is made from ordinary paper in the shape of a snowflake. To do this, take an A4 sheet and fold any one corner to make a square. Trim the rest
- Then fold the square in half to make a triangle.
- Now fold the right corner in half so that the tip of the corner extends beyond the edge of the sheet
- Fold the left corner in the same way and fold it in half again.
- Use a pencil to draw patterns for the future snowflake.
- Cut out the drawn patterns along the contour
- A beautiful snowflake for a ballerina's skirt is ready
- Print the template and cut out the ballerina figurine
- Insert the ballerina figurine into the center of the snowflake. Straighten your skirt. Snowflake ballerina is ready.

Volumetric paper snowflakes from Tifani Lyn will create a special fairy-tale charm in your home.

To create these snowflakes you will need:
- Old book,
- glue gun,
- fishing line or thread,
- glitter paint or glue
- acrylic lacquer.
From book sheets we cut out strips approximately 2 cm wide.

In total you need to cut 140 strips. We cut the first 20 strips to the length of the page, cut the next 40 by 1 cm, cut the next 40 by 2 cm, and cut the last 40 by 3 cm.

Now fold each petal using 5 strips of each size. We take the longest strips, for the central ray of the snowflake, once, the rest twice (once on each side).

Glue and place under a press for gluing.

To be safe, you can temporarily tie the tip of the petal.

Additionally, we cut out more stripes for the central part of the future snowflake. We also glue this ring and fix it so that the glue sets successfully.

When the petals are glued, glue gun we process the end of the workpiece.


Then we glue the petal blank to the central ring.

In this way we glue four petals, gluing them together to form a cross.

Then we glue the remaining petals. This method allows you to symmetrically glue all the blanks.

Then we glue the petals together so that the snowflake does not fall apart.

Decorate the snowflake with sparkles.

Your snowflake is ready! Let's hang it on the Christmas tree!

- 8 strips of paper (1 cm wide and approximately 11 cm long)
- toothpick
Sequencing:
- Fold each strip of paper so that one end is about 2cm longer than the other
- Use a toothpick to twist the ends of the strips
- Glue the strips of paper first in pairs, and then all 4 pairs together. You will get a beautiful quilling snowflake
- You can attach a silver thread to it and hang it on the tree as an original New Year's decoration

To make quilling snowflakes, cut thick paper into strips. Using a rod from ballpoint pen or use knitting needles to twist each strip of paper into a tight spiral. Let the paper unwind a little, then glue the ring together. You can secure the ring with a paper clip while the glue dries.
You can slightly squeeze the resulting spiral ring on one side, and then you will get a “droplet”. Or on both sides, then you get an “eye”.
Make more blanks for future snowflakes using the quilling technique, and then glue them together.

You can decorate your home for the New Year with the help of very beautiful snowflakes grown from a solution of borax crystals in water. Borax can be purchased at a pharmacy, hardware store, or in the laundry detergent section of the supermarket.
Required tools and materials:
- special brushes for cleaning smoking pipes (sold in tobacco stores)
- food coloring (optional)
If you were unable to buy brushes for cleaning smoking pipes, you can replace them with wire wrapped in thick woolen thread.

Sequencing:
— First you need to get a supersaturated solution of borax in water. To do this, gradually add borax to hot water, stirring. The approximate proportion is 3 full tablespoons per glass of water. Only after achieving complete dissolution of the last portion, add the next one. You need to add enough borax so that the water becomes cloudy, almost opaque. As you add, if you clearly see undissolved borax crystals in the water, you should not add more: undissolved crystals in the mixture will act as a “distracting” element, and the crystals will begin to grow around these particles, and not around your snowflake. Therefore, it is better to strain the solution.
- Pour the mixture into a glass glass, bowl, jar or jug (depending on the size of the crystal you want to grow). Glass containers must have a fairly wide neck.
- Make a snowflake out of a pipe cleaner. Tie a rope or attach a wire to it. Wind the other end of the rope (wire) around a pencil (stick) 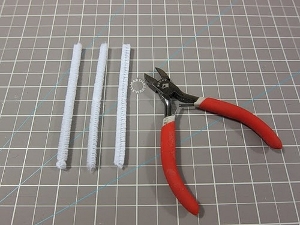

— Immerse the snowflake in the borax solution 
— Place the container with the suspended structure where no one will disturb it for a long time. In about a day the snowflake will be ready! 
1. If you want to get colored snowflakes, add dye to the borax solution, or use colored pipe cleaners to clean smoking pipes. 
2. The borax solution can be reused by preheating it in the microwave. But the crystallization process will take a little longer.
3. If the borax begins to crystallize when you pour the mixture from the pan into a glass container, try preheating the container with clean hot water.
4. Make sure that borax and borax crystals do not fall into the hands of small children! If borax is ingested in large enough quantities, it will become toxic to the body. All materials that have come into contact with borax must be thoroughly rinsed. Materials contaminated with borax should not be used for preparing or eating food.
5. Growing a crystal snowflake from borax is not only exciting, but also useful activity- a fun science experiment on growing crystals at home.

Required tools and materials:
- matches,
- cardboard,
- scissors,
- PVA glue,
- a little imagination.
Sequencing:

- Draw the silhouette of a snowflake on paper.
- We burn the matches from the head side.
- We lay out a pattern of matches on cardboard and glue the matches.
There are many methods for making paper snowflakes. In this material, you will find information on how to make paper snowflakes, regular and voluminous. Well, let's get started. You can easily repeat all the instructions.
How to make your own paper snowflake
Take a paper square and fold it in half along the diagonal.
The resulting triangular piece of paper should also be folded in half.

Next, you should feel the moment of bending the new triangle. You should perform this action intuitively. The main point here is that one side of the triangle repeats its opposite fold.

Now, you should trim the lower part of the workpiece, after which you can begin drawing the outline along which the trimming will be carried out.
Below are some of the possible patterns.


How to make paper snowflakes video
How to make a voluminous snowflake - the easiest way

To perform this operation, you will need to use the following tools and materials:
- Colored or white paper (it is best to use something that is not too thin);
- scissors;
- stapler (if desired, it can be replaced with glue or tape);
- regular pencil;
- ruler.
To begin, take six square pieces of paper. The sheets of paper must be the same size. Now you need to bend these squares twice along the diagonal. To make a small snowflake, you should use squares whose sides are approximately 100 mm, and for a large snowflake, the side of the square should be 250 mm.
To make big snowflake, use thick paper. It is best that your first snowflake is small, it will be easier.
Use a ruler and pencil to mark three parallel lines. One line from the other should be at the same distance. If you are making a larger snowflake, you can make more stripes.

In the picture, the lines were drawn using a red felt-tip pen to make them more clearly visible.
The next step in the tutorial on how to make paper snowflakes is to cut the paper using scissors. You should cut so that there is some distance left to the center (from 3 to 5 mm).
Now you should unfold the piece of paper, after which you should roll the initial row of strips into a tube (see photo). Fastening the strips can be done using a stapler or glue.
- Next, the leaf should be turned over and the next two strips should be fastened. For this we also use a stapler, glue or tape.
- We turn the snowflake over again and connect the last strips.
- The described actions should be performed with each of the six paper squares.
After you have six blanks, you should connect them to the center using a stapler. First, we connect three blanks together, and then the remaining three pieces, so that we get two halves of a snowflake.

Now you should attach one half of the snowflake to the other using a stapler, and also fasten it in those places where the snowflakes touch. This will allow the snowflake not to lose its shape.
Well, at the final stage we decorate the snowflakes to our liking. It can be decorated with stickers, glitter, etc.
Yours beautiful craft It will look great on a window, wall, or Christmas tree.
How to make a snowflake from paper strips - instructions

To do this you will have to use:
- thick paper;
- scissors;
- glue.
First you need to cut out strips of paper, the width of which is 10 mm and the length is 200 mm (12 pieces). The strips can be slightly larger: 15 mm wide and 30 mm long.
Now you need to add a pair of strips in the vertical and horizontal planes, intertwine them and attach one to the other.

After this, you need to glue the corner strips, as shown in the photo. After performing these actions, we will get a blank that is half a snowflake. The second half of the snowflake is made in the same way as the first.

Well, at the final stage of manufacturing, you need to glue the halves. To do this, you need to rotate the halves so that the angle between them is 45°. Glue the free strips to the corresponding corners on the petals (see photo). Gluing the halves can also be done in the center, in which case the snowflake will resemble a flower.
That's all, now you know how to make paper snowflakes with your own hands different ways. If you don’t want to bother, then stores will always provide you with a variety of ready-made dense snowflakes, the material for which is cardboard or felt, and all you have to do is decorate them to your liking using sparkles, beads or other decorative elements.
Useful tips
Many have already learned how to make snowflakes from paper.
You can decorate windows, a house and a Christmas tree with such snowflakes, and snowflakes can come in a variety of colors and sizes.
But there are difficult snowflakes that look very beautiful and are made a little differently.
Some of these original snowflakes are not easy to make, but if you succeed, you will see that your efforts were not in vain, since complex snowflakes are sometimes very beautiful and unusual.
Unusual snowflakes for the New Year: a simple three-dimensional snowflake

You will need:
Paper of any color
Scissors
Glue (if necessary)
Stapler.
1. Prepare 6 squares of paper.
* If the snowflake is small, use plain paper, and if it is large, use thick paper or cardboard.

2. Each square must be folded in half diagonally.
3. Place the resulting triangle in front of you, draw stripes with a pencil and ruler as shown in the image (not reaching the fold) and make several cuts along the lines.
4. Lay out the square and bend the first row of strips into tubes. You can secure them with glue or a stapler.
5. Turn the square over and fold the second row.
6. Repeat this process (remembering to rotate the square) until all the strips are bent into tubes.
7. Repeat steps 3-6 for the remaining squares.
8. Using a stapler, first connect 3 pieces into one half volumetric snowflakes, and then 3 more. After that, connect both halves. You need to connect in places where the workpieces touch.
* The stripes can be made wavy, then the snowflake will turn out even more original.
Making a three-dimensional snowflake (video)
How else can you make a 3D snowflake (video)
Unusual paper snowflakes

You will need:
White or colored paper
Stapler
Double-sided tape or glue
Scissors.
1. Take a sheet of paper and start folding it like an accordion. If there is a little sheet left after the last fold, cut off the unnecessary piece.

2. Secure with a stapler paper accordion in the center.

3. Draw a simple pattern on the accordion and use scissors to cut it out.

4. Open your accordion and connect the ends using double-sided tape, creating half a snowflake.

5. Repeat the entire process to create the other half and connect both parts into one beautiful snowflake using double-sided tape or glue.

Unusual DIY snowflakes for the New Year: snowflakes in the shape of Star Wars movie characters
Here you will find the necessary templates for Star Wars snowflakes.

You will need:
Printer
Scissors
Stationery knife
Print them out, cut out a circle, fold (preferably like an accordion) and cut out the gray area from a snowflake (you can use a utility knife).
The entire set of Star Wars themed snowflakes can be found .


How to create an unusual snowflake (video instructions):
Unusual DIY paper snowflakes: spirograph snowflake

What does the diagram mean:
- - - (dash-dash-dash) bend the ends of the paper upward. It's called a valley fold.

- . – (dash-dot-dash) bend the ends of the paper down. It's called a mountain bend.

You will need:
Square sheet of paper
Scissors
Protractor
Pencil.
* The paper must be either very thin or large in size, as it will have to be folded many times.
1. Fold in half diagonally to form a triangle.


2. Fold the triangle in half again.

3. Rotate the shape 45 degrees (see image).
4. Use a protractor to make marks at every 18 degrees.

5. Starting from the open side, fold upper layer following the markings, maneuvering between the mountain bend and the valley bend. It should look like an accordion.


6. Turn the figure over so that the accordion is on the bottom. Fold the end of the figure in the same way as in step 5, using the already folded accordion as a template.


7. Press down the entire structure well.

8. Using scissors, cut off the top and some of the bottom of the folded accordion.


9. Cut a small triangle as shown in the picture.


10. Expand the shape and you should have a very unusual and beautiful snowflake.

Complex snowflakes with characters from the series "Doctor Who"

You will need:
Pencil and eraser
Scissors
Stationery knife.
1. Take a square piece of paper and fold it in half diagonally. Next, fold the resulting triangle again and then again.


2. Draw one of the suggested designs on the side and carefully cut it out.


* Use a utility knife to cut out the inner parts of the workpiece.

* Since everything that is drawn will be mirrored on the other side of the paper, it is worth drawing only half of the drawing (half of the face or half of the building).
* Cutting out small parts is not easy, so be patient and carefully cut out the paper with a utility knife or scalpel.

A few more options:


My dear readers, I want to warn you right away: In order to look at this message, you will need time! There are a lot of options for snowflakes! All of them are very, very beautiful!
In order to learn how to make such snowflakes, you only need one thing! Your great wish! Decorating your home for the New Year holidays is a good tradition. There should be a lot of decorations! Patterned snowflakes should be in every room. Different in size, color, execution technique, they will decorate not only your Christmas tree, windows, but also your life. Let holidays will go great! I wish you happy holidays!
Master classes.

Beautiful paper snowflakes will become good decoration at home for the New Year. They will create an atmosphere of a snow-white, winter fairy tale in the apartment. And just by cutting out snowflakes of various shapes from paper, you can have fun, because it exciting activity and they should get their children involved too. If you don’t know how to cut snowflakes out of paper, or have forgotten how to do it, then this is not a problem. Next you will see that everything is very simple. Even a child can handle this. For the New Year's holiday, we invite you to make a lot of snowflakes and, moreover, in different shapes.
How to cut a snowflake from paper?
How to cut a snowflake from paper?
It's surprisingly easy to create a beautiful snowflake from an ordinary piece of paper. To do this, you just need to use scissors, paper, pencil, beautiful diagrams, your inspiration and some free time.
First, we fold the blank for the snowflake from a square sheet of paper, as shown in the picture below. Using different beautiful patterns, you can cut hundreds, and sometimes thousands, of snowflakes of various, beautiful and unpredictable shapes from the created triangular base.

Using a simple pencil, we transfer the drawings shown in the diagrams onto the base, and then cut out the snowflakes. 
How to make a 3D paper snowflake?

A voluminous snowflake looks much more impressive than a regular one, and creating it is also simple (a little more difficult). Similar fabulous 3D snowflakes can be hung in rooms, as well as on the tree itself to create an atmosphere New Year's holiday. You will need: 6 square sheets of paper, glue, scissors, stapler, inspiration and free time(15 minutes will be enough). A voluminous snowflake, if desired, can be made multi-colored, using individual elements to create it colored paper. But before you learn how to create voluminous snowflakes without instructions, it is better to use a regular one. white paper(practice on it first). And a snow-white voluminous snowflake will always be in fashion.
1. First we make 6 such square blanks for the future snowflake. You can download these blanks for small or large snowfields, and then print them on a printer. If you are creating a large snowflake, it is better to use high-density paper - this is necessary so that the snowflake can keep its shape. Fold each square in half diagonally and use scissors to make cuts, moving from the fold to the center line.

2. Open the square with the cuts, which was folded diagonally, and place it in front of us as shown in the picture. We twist the first row of strips into a tube and fasten them with glue. 
3. We turn the snowflake over to the other side and begin to work with the next two strips: we also connect them and fasten them with glue. We continue to work in the same spirit: we turn the snowflake over and fasten the remaining strips together. As a result of these actions, we should have a twisted, fancy element like this. 
4. We have created one of the rays for our volumetric snowflake, and we need to make six of them! Therefore, we do the same with the other 5 blanks. We connect three rays of a snowflake in the middle with a stapler. Similarly, we connect the remaining three rays of the snowflake. Next, we connect these two large parts together. 
5. Our beautiful three-dimensional snowflake is almost ready! You just need to use glue to connect the snowflake in those places where the rays touch each other. This is necessary so that the snowflake holds its shape properly. 
So we made a three-dimensional snowflake out of paper! What great fellows we are! Now you can make it in color!

How to make a three-dimensional snowflake using origami technology?
Here it will not be so simple and it is possible that you will spend at least one hour creating your first snowflake using the origami technique. Well, in the future, when you understand the algorithm for creating such snowflakes, things will go much faster. One nuance - the thinner the paper, the more elegant the snowflakes will turn out. Translucent snowflakes that transmit light will look great on the window. Well, at first you can practice on plain office paper.

Before creating a snowflake using the origami technique, you need to turn a rectangular or square sheet of paper into a hexagon. This is one of the most important points, which will then influence whether our venture will be successful. 
1. Fold the paper in half twice so that clear fold lines are visible. 
2. Fold one corner with the top towards the center. Bend the top flap towards the edge. Now we have 2 more fold lines. 
3. We bend the paper in half again as shown in the picture on the left. To make the shape from the right picture, use two X marks as a reference point and bend flap A along the dotted line. 
4. Combining the blue and red lines, bend the valve. As a result of these actions, you should get a shape that looks like a heart. 
5. Focusing on the X points, use scissors to cut off part of the workpiece along the blue line. In the future, we will only need the hexagon - part A. 
If you have any difficulties with the hexagon, you can find tips and answers in the video:
6. Bend one of the sides of the hexagon towards the center to form a fold line. We do the same with all 6 sides. Now we have many lines inside our hexagon that form small triangles. 
7. Again, bend the edge of the hexagon towards the center. Using the fold lines made in the previous step, we bend flap A to B, as shown in the left picture. Fold the other two sides of the hexagon in the same way until you create a shape resembling a pinwheel. The last valve can easily cause difficulty, since it will be hidden under the fold. It needs to be pulled out so that we have six valves sticking out, as shown in the picture on the right. 
8. Lightly press the fold of each pocket with your finger to create something similar to the picture in the center. It does not matter which valve is on top. 
9. Bend two blue corners on each unfolded pocket towards the central part of the dotted line. This must be done to prepare the fold lines for the next step. The resulting figure should be externally similar to the image on the right. 
10. Carefully unfold the folds made in step 8 to open the fold lines. In each pocket we combine the blue and red X dots. The fold lines obtained in step 9 will help us with this. When we perform this operation with all 6 pockets, our figure will look like the image on the right. 
11. Turn the workpiece over and bend each corner of the hexagon towards the center. A small flap should form each adjacent fold. Do not hide the small flap under the fold. Let him remain on top. You have done everything correctly if you have a workpiece that looks similar in appearance to the picture on the right. 
12. For all small flaps, press the fold line to create new fold lines, which will be needed in the next step. 
13. We turn out the folds made in the previous step, hiding the valves from below. 
14. We turn the figure over, turn each corner out from the center as far as possible and bend it. We should have 12 valves - 6 large and 6 small. 
15. Turn the workpiece over. Between the two large valves you see small valves. We push each small valve forward. Now we have six diamonds. 
16. For each half of the diamond, we pull the blue edge to the center of the diamond and press the fold to the edge. As a result, we get a figure like the image on the right. All that remains is to repeat this action 12 times and the origami snowflake will be ready! 
How to fold an origami snowflake (video tutorial):
How to make a kirigami snowflake out of paper?
Kirigami is a type of origami in which, in the process of making a figure, you are allowed to use scissors and cut paper with them. The method of cutting out kirigami snowflakes is not very different from making simple paper snowflakes, but the result is much more interesting and creative.

First, you create this template, using which anyone, even a child, can make a six-pointed kirigami snowflake. To do this, we construct an angle of 60 degrees on a piece of paper. In constructing the angle we need help will come protractor.

We fold a square sheet of paper in half diagonally and place the blank on the template as follows:

We bend the corners of the triangle as shown in the picture:


You can draw the lines of future cuts on the workpiece with a simple pencil, and then use an eraser to erase these lines, or attach a pre-printed and prepared template to the workpiece and cut out according to it. If at this stage the workpiece is folded in half again, then to cut out a snowflake you can use simple nail scissors rather than a stationery knife. In this case, even a child can be entrusted with the work of cutting out snowflakes.

Schemes for creating kirigami snowflakes:

To make the snowflakes created using the origami technique even more wonderful, colorful and original, you can decorate them with sparkles, cute pompoms, rhinestones, wool balls, and color them with felt-tip pens and pencils.

Our paper snowflakes are ready! Unlike ordinary snowflakes they will not melt, but will decorate our houses and Christmas trees for a long time!
Schemes for paper snowflakes
In nature, there are no identical snowflakes. In order to ensure that our New Year’s snowflakes are not all twins, we need to use different schemes (templates) when creating them. Try to apply as much as possible more schemes. Experiment! Maybe you’ll even come up with your own scheme. You can use the following patterns for cutting out snowflakes from paper:


You can find many videos on how to make a paper snowflake on YouTube. Well, or you can go to YouTube yourself and type in the search: “How to make a snowflake” or “How to cut a snowflake.”
Happy paper snowflake crafts!
DIY snowflakes are the most affordable and simple New Year’s decoration for your home, school or workplace. You can make them from the most ordinary paper, cutting them out according to ready-made templates and diagrams, which large quantities can be found on the Internet. You can also make a beautiful snowflake, large and voluminous, or using quilling or origami techniques. Moreover, as a source material, in addition to white paper, newspaper sheets, pages of an old book or an unnecessary music notebook are also suitable. Such non-standard material, especially if it is artificially aged with coffee, will give the finished craft a special charm. As for the manufacturing technique, most master classes for New Year's snowflakes are quite simple and can be reproduced even by children, for example, as part of a labor lesson at school. In our article today we have put together a whole selection for you original templates and patterns for cutting out beautiful paper snowflakes for adults and children. In addition, here you will find interesting step-by-step master classes with photos of snowflakes, as well as videos with lessons on how to make them yourself.
Simple DIY paper Christmas snowflake 2017 for children, master class
First, we invite you to master a very simple DIY paper Christmas snowflake master class for children. It is so affordable that it is suitable even for kindergarten. To make this simple DIY paper Christmas snowflake for kids, you can use either plain white paper or colored sheets. Thin corrugated paper also works great.

Necessary materials for a simple DIY paper snowflake for children
- sheet A4
- scissors
- felt-tip pens
- scotch
- stapler
- decor (sequins, rhinestones, buttons)
Instructions for a DIY New Year's snowflake master class for children
- We cut the sheet into strips 2-3 cm wide and about 15-20 cm long. The number of strips will determine how voluminous the craft will be in the end.

- We wrap each strip on a felt-tip pen or marker, securing the edges with paper tape.

- Leave the pieces for at least an hour so that they take on a wave-like shape.

- Filming paper strips from felt-tip pens and connect them together using a star-shaped stapler.

- We decorate the ugly junction with bright sequins, beads or rhinestones. Also, if desired, you can add pieces of New Year's rain or glue confetti. Ready!


Do-it-yourself volumetric snowflake 2017 made of paper, master class with photo
Do-it-yourself voluminous paper snowflakes are considered one of the most complex in terms of technique. However, if you have it on hand detailed instructions With step by step photos, as in our next master class, you shouldn’t be afraid of difficulties. We assure you that after the first self-made voluminous snowflake made from paper with your own hands, the remaining copies will “go like clockwork.” See for yourself by following the instructions below.

Necessary materials for making a voluminous paper snowflake with your own hands
- sheet A4
- scissors
- tape or glue
Instructions for a master class on DIY 3D paper snowflakes
- For the next craft you will need a rectangular sheet with the following parameters: length - 25 centimeters, width - 18 centimeters.

- We bend the lower left corner of the sheet inward, as in the photo below.

- Trim off the excess edge to create an isosceles triangle.

- Fold the triangle in half.


- Using scissors, make two shallow cuts on the tight side of the fold, as in the next photo.

- We unfold the workpiece so that we get a diamond with cuts. We connect the inner corners of the central cut together using tape or glue.

On a note! If you use glue, be sure to additionally secure the workpiece, for example, with a clothespin until it dries completely.
- We repeat the procedure with the next edges of the cut, fixing them in the opposite direction with the first workpiece.

- We will also fasten the edges of the last cut together, but in the opposite direction.

- The result should be the following design.

- For one volumetric snowflake you will need from 6 to 8 such blanks. They can be made in different colors to add color to the craft.

- Using tape or glue, secure all the blanks according to the template below.

Beautiful large snowflakes 2017 made from paper yourself - step by step with photos
Make it beautiful paper snowflake with your own hands for decoration you can and quite large sizes. Such decor will certainly attract everyone's attention and will become an interesting interior solution on the eve of the New Year. Learn how to make a beautiful large snowflake out of paper with your own hands step by step from our next master class.
Necessary materials for a large DIY paper snowflake
- sheet A4
- Ruler and pencil
- clothespins
- New Year's garland, glitter
Instructions for a step-by-step master class on a large beautiful snowflake with your own hands
- First you need to cut thin paper strips in the amount of 20 pieces, 10 strips on each side. The longer they are, the larger they will be. finished craft. Then we lay out five strips in a row at small intervals, and lay out five others on top using the braided principle.

- We turn the resulting workpiece so that it lies in front of us in the form of the letter “X”. Now we connect first the adjacent and then the outer strips and glue them. Secure the top with clothespins until completely dry.

- Repeat on each side. As a result, there should be one strip on each side, forming a thin cross.

- Leave the workpiece to dry completely for about half an hour. Then we remove the clothespins and move on to the second identical part of the craft.

- We connect both parts together by rotating the bottom part of the snowflake 45 degrees. Now the free strips can be fixed with the ready-made beams.

- We glue them with glue and secure them with clothespins, leaving them to dry completely.
- All that remains is to decorate finished snowflake. This can be done using pieces New Year's garland and glitter.
On a note! Instead of store-bought glitter, you can use broken ones. Christmas decorations. To do this, carefully crush the glass toy wrapped in thick fabric with a rolling pin. The resulting crumbs must be mixed with transparent glue and then used to decorate crafts.
DIY snowflake 2017 from a book for the New Year, step-by-step master class
In the next step-by-step master class, we will make snowflakes for the New Year with our own hands from an old book. It's a great way to breathe new life into its yellowed pages. You can’t call a snowflake from a book for the New Year with your own hands (step-by-step master class below) a simple children’s craft. Small children definitely cannot handle it. This is more of a master class for creative adults who don't appreciate making New Year's decorations purely as children's fun. On the contrary, they are happy to create beautiful and exclusive decorative elements.

Necessary materials for a snowflake from a book for the New Year
- book sheets
- glitter
- ruler and pencil
- scissors
- fishing line or thick thread
Instructions for a step-by-step master class on snowflakes from a book for the New Year
- First you need to draw book sheets into strips 2 centimeters wide.

- For one side you will need 7 such strips: 1 the full length of the page, two 2 centimeters shorter, two more 2 cm shorter than the previous ones, and two strips 6 centimeters shorter than the first.

- The longest strip should be folded in half to form a loop, gluing the bottom edges together. On the sides you need to fold the strips shorter, also gluing their lower parts, as in the photo below.

- Repeat similar manipulations with the remaining strips and fix them under heavy pressure, for example, a table lamp.

- When the workpiece dries, you should additionally secure its edges with thin fishing line. In general, you will need 6-8 such blanks for one snowflake.

- Again, cut the book sheet into strips of equal length. Cut and roll into a tight ring, tie with fishing line. The ring can also be additionally coated with transparent glue.

- After complete drying, you should proceed to joining the craft. To do this, coat the end of the workpiece tightly with glue and connect it to the ring.


- Repeat with each workpiece.

- To better fasten the snowflake, coat the outer loops of the adjacent rays of the snowflake with glue.

- Small sparkles are suitable as decoration and should be applied to the side edges of the snowflake. You can also use pieces of garland, sequins, and small beads.

- Then you need to make a loop from the fishing line so that you can attach the snowflake, for example, to a Christmas tree. Ready!

DIY paper snowflake for children using origami technique, master class
The art of origami is multifaceted and complex, but correct instructions using this technique you can do it yourself and it’s enough simple craft, for example, a children's snowflake. True, to be completely frank, the following master class with photos cannot be called made exclusively using the origami technique. In it, for a children's DIY paper snowflake, in addition to the origami technique, you will also use threads and scissors.

Necessary materials for origami children's snowflakes for the New Year
- thick colored sheet
- pencil and ruler
- needle and thread
- scissors
Instructions for a master class on children's snowflakes using the origami technique
- To begin, we cut out a strip 5-7 cm wide and about 20 cm long. Using a pencil and ruler, we make notes on every centimeter along the length. We cut out an imitation of a “fence” on top, as shown in the photo. In the middle of the resulting columns we draw small diamonds. Then we mark the middle of each centimeter with dots and pierce them with a thin needle.

- Now we take a ruler and place it on top of the first line dividing our “fence” section in half. Carefully bend the workpiece inward, and then remove the ruler and bend it in the opposite direction. We repeat the same with each section. The result should be an accordion, as in the photo below.

- We hold the accordion tightly with the fingers of one hand and use scissors to cut out the previously marked diamond shapes in the middle of each section.

- We take a needle and thread and carefully thread it through the small holes that we already pierced with the needle two steps ago.

On a note! The thread needs to be thick so that it holds the finished structure tightly!
- When the thread has already passed through all the points, we reinsert it into the first hole to close the structure.

- We remove the needle and begin to gradually tighten the thread until a tight ring is formed. We tie the thread into a knot, and place a spool on top of the snowflake to straighten it.

- We form a loop from the remaining thread and our children's snowflake is ready! And for those who want to master the pure origami technique for creating snowflakes, we have selected a video tutorial with step by step diagram below.
Do-it-yourself openwork snowflake using the quilling technique, master class with photos
Quilling is the real art of weaving amazingly beautiful crafts and cards from simple strips of paper. Using the quilling technique, you can create truly unique openwork snowflakes with your own hands, a direct confirmation of which is our next master class with step-by-step photos. But the most amazing thing is that by swapping individual parts and adding new elements, you can create several different openwork snowflakes with your own hands using the quilling technique according to one general pattern.

Necessary materials for an openwork snowflake using the quilling technique
- pencil and ruler
- scissors
- glue and brush

Instructions for a master class on openwork snowflakes using quilling techniques
- Using a ruler and a simple pencil, you need to draw a sheet. To do this, make 0.5 cm marks along the width of the sheet and draw lines along the entire length. Then we cut out the strips with scissors.

- To form the rolls you will need an awl. We wind the strip onto it quite tightly, and then let the roll unravel a little and glue the edge to its base.

- The snowflake will be based on one round element and six drop-shaped rolls. To get an element in the form of a drop, you need to lightly squeeze one edge of the round roll with your fingers. We connect the structure with glue.

- Now add six eye-shaped rolls to the base. We will also make them from round rolls, but by flattening both edges with our fingers. Glue the “eyes” between the drops according to the template below.

- Now we need small rolls, so we fold the standard strip in half and cut it into two parts. From each small strip we twist a small round roll. To begin with, you will need six of these elements.

- We glue small rolls along the edges of the elements in the form of a cat's eye.

- We roll six standard large rolls.

- We glue them to the drop-shaped elements, as shown in the diagram below.

- Now we need six square rolls. We will form them from standard round ones, slightly flattening the sides into a square shape.

- We glue the squares to the large round elements, having first turned them into the shape of rhombuses.

- All that remains is to twist a large round roll according to the standard pattern and glue it to the top of our craft. Let the snowflake dry completely and thread the thread through the large roll. Ready!

How to cut a New Year's snowflake 2017 from paper with your own hands, diagrams and templates
The easiest way to make a New Year's snowflake with your own hands is to cut it out of paper according to ready-made template or diagram. So simple, but at the same time very beautiful snowflake with your own hands are available primarily for children's creativity. However, there is quite complex circuits, with the help of which you can make even large and voluminous decorative snowflakes, which in their originality will not be inferior to crafts using the origami or quilling technique. Do you want to know how to cut a beautiful New Year's snowflake out of paper with your own hands? Then you will find a selection of photo templates and patterns for adults and children, as well as video tutorials below.


