Many mistakenly believe that Sunglasses needed only in summer. This is not so, sometimes, in winter, sunlight reflected from snow can cause serious damage to the retina, and squinting is not very pleasant, agree? But in order for the glasses to last for a long time, they need a good case that will protect them from damage. However, you don't have to spend money on it. Just make it with your own hands.
Materials:
- Leather or artificial leather
- 2 wooden beads
- Ribbon
- Super glue
- Scissors and knife
Scheme:

Cut out a piece of leather measuring 20 by 25 centimeters.
Fold a piece of leather into three equal parts. Glue the edges of the two pieces together to make a pocket. Super glue works very fast, be careful not to stick your fingers together.

Trim the corners of the flap. you can use right size circle.

Cut out a leather circle and glue it inside on top. Try to position it exactly in the center.

Make a hole in the middle of the circle to pass the ribbon through. You can use a knife or a hole punch.

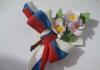
Pass the tape through the hole and secure it. Place a bead on each end of the ribbon and make a knot.
And your new glasses case is ready! To close it, you just need to wrap the ribbon around the case and slide the beads underneath. Now you can enjoy the sun with a stylish new accessory!

The article was prepared based on www.dreamalittlebigger.com.
Nowadays, there is a huge variety of glasses cases, but sometimes you want something special or for a gift. , made by hand, will always please loved ones. The glasses case is a great idea! In it, the glasses will always be safe and in sight.
To make an eyeglass case, we need:
binding cardboard (thickness 2 mm);
whatman;
cotton;
2 types of glue: PVA and "Moment" (Crystal or Universal);
masking tape;
magnet for bags;
pencil, stack, ruler, clerical or circular knife, glue brush, thread, needle, scissors.
First, cut out the necessary parts of the cardboard case with a clerical knife.
Here simple circuit what the box will look like. Below are the options for each side. Also, the diagram shows a sketch of the lock for the case, which will be discussed later.

Options for the sides of the glasses case:
a = 16.6 x 7.6 cm
b = 17 x 8 cm
c = 16.6 x 6 cm
d = 6 (at the base) x 7.8 x 7.8 cm
h = 7.5 cm
Now we will cut out two copies of the drawing paper for each side according to its size. For external sides a and c, the length of the cut out specimen must be increased by 4 mm.

We make the edges of side a beveled with a circular knife or a clerical knife so that the corners of the sides do not interfere with each other.

Glue the sides (triangles) to the base, adjusting with a ruler with an acute angle so that they are perpendicular to the base.

We glue three edges of side a with glue and fix it well between the sides. At the same time, the beveled side looks inward.

Here we should get such a beautiful angle on both sides of the structure.

We glue all the internal and external corners of our workpiece with masking tape.

Glue on sides a and on both sides d cut out pieces of whatman paper from the outside. Glue also on b - the glued side will be the outside.

We cut the fabric with allowances in such a way as to completely glue sides a and both sides d.

We glue the fabric on a very thin layer of glue, leveling the surface with a stack. Carefully cut off unnecessary fabric along the edges and glue the corners.


We cut out a “hole” on the inside of side b and slots for the first part of the magnet. You can use magnets without a lock.

Cut the fabric so as to glue side c and b at the same time. Glue the prepared piece of drawing paper for side c, gluing only three sides.

Glue this part to the base (side c). We prepare a spine 16.6 cm long (the extreme sides must be bent).

According to the layout for the lock, we sew it and insert the layout itself from whatman paper, attaching the second part of the magnet to it.

We glue the lock (Moment glue), side b (distance from side c = 7 mm) and only then the spine (PVA glue, gluing along all bends) to the parts of the case. We insert a part of the magnet from the outside, fixing it from the inside.
I really like to sew different cosmetic bags with clasps (they are also called "kisses"). And with such clasps, wonderful eyeglass cases are obtained. Before March 8, I sewed several pieces of eyeglass cases as a gift to teachers at school. The process was photographed and described. Hope you find it interesting.
So let's start We need: 
The base fabric is jeans and “wild silk” for me. I was going to make 2 eyeglass cases, with a semicircular and rectangular clasp.
Clasp 7-9 cm wide.
Lining - I took felt. It is soft and will not scratch glasses. And quite dense.
Adhesive interlining - the thinner and softer fabric bases, the more dense interlining must be taken.

Threads for sewing on the clasp - I take a thick nylon that matches the color, a thick needle.
Threads for sewing.

First we make a pattern. Draw two perpendicular lines on a sheet of paper. We put the clasp on the sheet and circle it along the outer contour. The pencil should be sharpened sharply, hold it slightly at an inclination inward towards the upper edge of the clasp. The middle of the clasp is at the intersection of our lines.

We get the sewing line of our eyeglass case to the clasp. To measure the length of this line, you can divide it into conventionally straight segments. And count them overall length. Or you can use a flexible ruler.
We build a pattern. If we want to get a more “chubby” case, then we make the sewing line more gentle, if it is flat, the sewing line repeats the shape of our clasp. The figure shows that the length of the sewing line should be equal to the length of the outer side of the clasp.


Pattern for a eyeglass case with a rectangular clasp

The bottom can be made simply rounded, or you can give it volume. The width of the bottom is equal to the width of our clasp. For my eyeglass case, I chose a medium volume and a rounded bottom.
The pattern turned out like this:

We strengthen the main fabric with adhesive interlining. This is done so that our case keeps its shape well. We give free rein to imagination and decorate our blanks. I did machine embroidery on them.

Cut out the front and lining. We make the seam allowance on the lining 1-1.5 mm less than on the main parts. In the process of work, the red lining was replaced with a green one.

We chop off and cut off our details in pairs. At the same time, we make the seam allowances the same on the main part and on the lining. Those. the lining should be slightly smaller than the main part.

Trim the interlining if possible. Lay out and steam the seam allowances. Probably for this there are some special devices from professionals. I came up with the idea of inserting a roll with the rest of paper towels inside the parts. You just have to be very careful. It's easy to burn your hands.
 Unfold and straighten the lining. We insert it inside the main part, align the sections. We chip off. It is convenient to stick the pins perpendicular to the future seam. Then they do not interfere with sewing.

We sew the parts together, leaving a hole through which we turn the eyeglass case.
We cut the seam allowance, do not cut the interlining, the edge that is inserted into the clasp should be thicker.

We turn it out, sew up the hole. We straighten. We draw along the contour, stepping back half a centimeter from the edge.


We mark the middle of the details.
We fix the frame on one half of our eyeglass case. I use needles for this sewing machine. They are thicker than pins and hold the frame and base well. We fix the middle and two edges. Then, if necessary, seating, we fix the fabric between them.

We sew the frame, starting from the edge, with a “needle forward” seam. We tighten the thread well. We make sure that the edge fits exactly into the groove of the frame. Having reached the end of the half of the frame, we turn the work and sew in the other direction, in a checkerboard pattern.

We fix the thread and go to the second half of the frame. All operations are repeated.

We fix and hide the threads. Threads for sewing frames should be taken thick enough and durable. For example lavsan or kapron. Here's what I got

Inside the seam looks almost invisible.

If desired, it can be decorated with a gathered ribbon or lace. For example so.

The eyeglass case with a rectangular frame is sewn similarly. I took a pattern for him like this.

I tried to leave a hole for eversion in the side seam of the lining.


Turned it out, straightened it, sewed up the hole.

I liked the way it turned out even more than the first option. Didn't even pull away. Just steamed well.

Here's what I got.


I'm sure you can do the same! Good luck!
How to sew a pouch
source:
At the request of one girl, I decided to write a master class on assembling a case. For those who are interested, read on.

The size of the finished product is 18 x 8 cm.
1) It is necessary to cut out 6 parts in size, taking into account seam allowances of 19 x 9 cm: A - front part, B - back, C and D - internal, D and E - padding polyester. Place parts A, B, C and D on adhesive interlining.

2) Fold parts A, B and D with lightning in the following sequence:
Part A is placed face up, on it with the zipper open, with the lock down, as shown in the photo:

Then detail C face down and detail D. All three layers + the enclosed zipper are fastened with a pin and sewn. You can use a typewriter, you can use your hands - as you like. This time I sewed with my hands, sewing the needle back.

At this point it should look like this:

3) We add parts B, D and E with lightning in the following sequence:
- put part B face up, zipper down on it, as shown in the photo:

- then detail G face down and detail E:
Glasses are not only a fashionable accessory at all times, but also one of the essentials for many people. High-quality and beautiful sunglasses or glasses for vision correction are an expensive pleasure by modern standards, so this fragile accessory requires a very careful attitude. Naturally, manufacturers care about their customers, so in any specialized store you can see a fairly wide range of covers and cases for glasses. But despite the high functionality, they are all made according to the same standard and cannot boast of a special originality of the idea. It will be much more interesting to make a case for glasses with your own hands, especially since with the master classes presented in this article, this will not take much time.
Floral applications
A master class on making such a felt glasses case will be very useful for those who want to make original gift elderly family members, because it often happens that they have to search for their fetters throughout the house. The bright colors of the case are visible from afar, and this will help you keep your glasses in sight.
To create a product you will need:
- a small piece of dense felt fabric of a bright red hue;
- pieces of felt in green and yellow shades for leaves and flowers;
- threads of two colors - green and red;
- sewing needles and scissors.
The shape of flowers and leaves can be created according to patterns by copying the drawing of the picture you like, or you can draw these minimalistic flowers yourself:

After that, we measure the length and width of the glasses themselves. Cut out a piece of red felt. Its length is equal to the length of the glasses plus an increase in the seam, and the width is twice the width of the glasses, to which we also add a little freedom.

From green felt we cut out the leaves - two single and one triple, with the help of a thread with a needle with green stitches we form veins on the leaves.

From the remnants of the red felt, cut out small circles and sew them into the middle of the yellow flowers.

In total, for the application you will need two flowers, three leaves and three berries made from yellow and red circles superimposed one on top of the other.

We place all the decor elements on one half of a large red piece of felt.
Flowers and leaves should not be placed close to each other, but at the same time they should not be scattered around the edges of the case.

We sew yellow flowers with stitches with a red thread at some distance from the edge or with a sewing stitch over the edge.

You need to try to ensure that all stitches come out the same size. We attach the leaves with green threads.

We outline the location and shape of the stems, then we lay chains of stitches along the marked lines with green thread. We fill all the ends of the threads and fix them on the wrong side of the product.

Lastly, we connect the sides of the case with a stitch over the edge. If you have the skills, you can speed up the stitching process by using a sewing machine.
The original present is ready!

Also a great option for a gift to a grandma or grandpa would be an owl-shaped glasses case, as in these photos:


For discreet and stylish
This classic black leather case looks great. Even novice needlewomen can make it in a maximum of one hour with the help of step by step photos. Thanks to the universal color, it will suit any style, and both women and men can use it.

The case will require the following materials:
- a piece of thick black leather;
- kapron or reinforced thread in color;
- scissors;
- lighter or matches.

To begin with, we cut out a rectangle of leather of such dimensions that, folded in half, it matches the size of the glasses and there is still a small margin for ease of use.
Stepping back a little from the edges, with an awl we make holes at regular intervals.

Then we pass a needle with a thread into the holes, connecting the edges with stitches.


We leave the upper edge open, fasten the end of the thread with a knot, cut off and melt the tail with a lighter so that it does not fray.

All is ready!

With magnetic closure
This wonderful case can be made with your own hands from cardboard as a gift for a gentle and romantic girl or a woman.


To make such a case, you will need:
- hard cardboard with a thickness of at least 2 millimeters;
- white sheet of thick paper size A1;
- a piece of colored cotton fabric;
- several types of glue - ordinary PVA and universal Moment;
- construction (painting) adhesive tape;
- magnetic fastener for the bag;
- pencil, ruler, stationery knife, brush, thread with a needle, scissors.
First you need to cut out the components of the future cardboard case with a clerical knife.

This diagram shows in detail the design of the case and the dimensions of each part.

According to this scheme:
- a = 16.6 x 7.6 cm;
- b = 17 x 8 cm;
- c = 16.6 x 6 cm;
- d = 6 (at the base) x 7.8 x 7.8 cm;
- h = 7.5 cm.
After that, you need to duplicate each detail twice, cutting out the same shapes from white paper. For sides "a" and "c", the length of the paper parts on the outside should be four millimeters longer.

The sides of the parts are cut at an angle so that in finished product there were straight lines.

Triangles need to be attached with glue at a right angle to the base.

Coat three sections of part “a” with glue and securely fix it between the side parts, with the cut side inward.

When assembled, you should get an external right angle.


On part "a", two sides "d" and one side "b" we glue white paper parts.

We cut out pieces of fabric in order to cover the sides of the parts "a" and both "d" with them. We glue the case with a cloth, leveling it with a stack, cut off the excess, glue the corners.


On the inside of part “b”, we cut out a recess for a magnetic fastener.
Cut out a single piece of fabric for parts "c" and "b". For the “c” side, glue a separate piece of white drawing paper, glue three of its sides with a cloth. We fasten it all to the base from the “c” side.


We fix the clasp on the case with glue Moment. We glue the inner sides with a fabric of a contrasting color, having previously placed paper details.

Case can be used!

Video on the topic of the article
Here is also a video on creating cases from fabric and crocheted: