Cutting out three-dimensional multilayer paintings from plain paper is a fascinating hobby. If you decide to try your hand at this type of art, start with simple paper paintings, the creation of which will allow you to become familiar with the intricacies of this type of needlework.
We offer simple and step-by-step master class, familiarization with which will allow you to create a three-dimensional picture cut out of paper with your own hands. This will not take much time, and the materials necessary for the work will always be found in any home.
We will need:
- wooden frame;
- paper blue, white, golden colors;
- liquid glitter;
- Styrofoam;
- wire;
- stationery knife;
- double sided tape;
- glue.

- Before making a picture out of paper, treat the wooden frame with white paint. It is more convenient to use aerosol paints. Please note that the front part of our fake will be the back side of the frame. While the paint dries, you can proceed to preparing the background. To do this, cut out a rectangle from paper. blue color. It must fully correspond in size to the internal dimensions of the frame.
- On a piece of white paper, draw several trees with intersecting branches. To make cutting easier, shade several intersections with a simple pencil. Place the second one under the first sheet. Start cutting out the shaded areas. After this, separate the sheets and trim the cuts with a knife.
- Carefully fold the edges of both sheets to give them volume. Also tuck the tree trunks by making small cuts and fixing them with glue. It is more convenient to do this work with an awl. Glue a few pieces of foam onto the bottom sheet and then attach the second sheet onto it. Space is formed between the paper snowdrifts, which creates the effect of layering and volume.
- Now, using a stationery figured perforation knife, make several dozen round “snowflakes”. Similarly, cut out several circles of different sizes from colored paper. If you don't have one, use liquid gloss.
- On the third sheet of white paper, draw a tall tree with thin and long branches, carefully cut it out. After all the parts are ready, you can begin assembling the “cuttings,” as paper paintings are also called. To do this, alternately glue layers of paper on top of each other. Step by step diagram The assembly picture is shown below.
- Our multi-layer paper painting is ready, it’s time to frame it. Measure the center at the top of the frame, screw the wire twisted into a loop. Then thread a wire or rope through the loop so that the picture can be hung on the wall. Glue several strips of double-sided tape inside the frame and carefully place the picture.
- The craft is ready! Now you can safely decorate your home with a paper painting made by yourself.
 |
 |
 |
 |
 |
 |
 |
 |
 |
 |
 |
 |

As you can see, with a little effort and a little patience, you can create unusual paintings. The principle of their manufacture remains unchanged: pre-prepared layers of paper with cut-out elements are alternately applied to the prepared background. Pieces of foam plastic are most often used as a separator. This material is practically weightless and adheres well to paper. If cutting out pictures fascinates you, feel free to try creating more complex crafts. Imagination, patience, accuracy - this is what you will need.
Are you looking for fresh and unusual idea for interior decoration? Familiar pictures are good, but the soul is looking for something new. On the Internet you can find more than one master class on creating three-dimensional paintings with your own hands from paper, fabric or leather. These are 3D canvases that are amazing in their liveliness, which are fun to create and pleasant to contemplate.
DIY paintings
A three-dimensional painting can be called a 3D sculpture in a frame, made from scrap materials. It can be anything in the full sense of the word: paper, dried flowers, polymer clay, leather, fabrics and other creative materials. For example, plaster is used to create magnificent three-dimensional drawings right on the kitchen wall. Plaster modeling is, of course, beautiful, but this article will talk about simpler techniques.
Anyone can make an original masterpiece of art with their own hands. Why don't you try your hand at it? The master class will help you learn the basic principles to get started with an idea and start creating.

Master class “3d paper painting”
For the first test of the pen, take the simplest version of a three-dimensional painting - a paper appliqué.
Set of materials for work:
- frame with deep sides;
- stationery knife;
- pencil;
- colored cardboard with a bright print;
- white watercolor paper or thin cardboard;
- ruler, scissors;
- PVA glue.
Instead of a frame, you can take a candy box.

Step-by-step description of a three-dimensional paper painting:
- cut out a rectangle from a white sheet of paper to fit the selected frame;
- draw by hand or print a heart of such a size that it fits freely in the frame 9 times in three rows. The approximate size of the heart is 4x5 cm;
- the heart needs to be cut out and circled with a simple pencil, placing it on white paper, prepared earlier. You should get 3 rows of three hearts or more (less) as you wish;
- Now the important step has come - carefully, using a stationery knife, we cut out the “wings” of the hearts. To do this, you need to make cuts along the contour of the hearts, without touching the lower and upper parts;
- bend the cut parts of the hearts up and towards the center, making them voluminous;
- The blank with hearts must be glued onto colored cardboard. It is desirable that it be special scrap paper with a small pattern. It will be visible through the bent wings of the hearts;
- the final step is to place the picture in a frame and fix it with reverse side stapler or glue.
The presented master class is simple, but based on it you can make your own 3D plot - fluttering butterflies, tiles, people and other interesting templates.

Master class “multilayer 3d paper painting”
Making an interesting painting out of paper using the multi-layer technique is very simple - you just need to find a design and print many copies. The finished product, hung on the wall, looks interesting from different angles - a real 3D painting.
Set of materials for work:
- sufficiently deep frame;
- cardboard;
- laminate backing;
- thick album sheets and printer;
- craft glue;
- acrylic paint;
- acrylic lacquer;
- scissors;

Step-by-step description of a multilayer paper painting:
- choose a beautiful and bright picture with a clear image. It is desirable that there are many parts on it that will be convenient to cut out. We format or select the picture to fit the frame size. We print 10-12 copies on thick paper;
- Depending on what kind of printer you have, we determine whether the pictures need varnishing. Thus, images printed on an inkjet printer must be sprayed and varnished, otherwise the colors will run. Laser images can be left as is;
- We simply glue the first image onto cardboard cut to the size of the frame plus gaps for mounting;
- We cut out all other images, but in a special way. For example, if you are creating a flower, then let several whole flowers be cut out with a stem and leaves, a couple more layers of leaves, and even more of the inflorescence itself. It sounds complicated, but as you go along it will become clear;
- Now we are preparing the basis for the parts from a thin backing for the laminate, which looks like a thin layer of polyethylene foam. The cut-out backing should be slightly smaller than the details so that it is not visible in finished product on the wall;
- we glue the parts onto the substrate, but not all of them, but selectively - only those layers that should protrude forward. In some small parts, a substrate may not be needed;
- We place the prepared parts on the base in a frame with glue. First we place big pictures with many details, and then individual parts that should be more voluminous;
- the side parts should not remain white, otherwise they will reveal the presence of a substrate - they need to be painted over to match the image;
- We cover the picture with acrylic varnish in several layers. Each layer is applied after the previous one has dried;
Now you will have a three-dimensional painting with your own hands - now you can place it on the wall in this form or add glass. Such canvases can be made from fabric, then you will get a picture with a beautiful terry surface. 
Master class “3d painting made of leather”
Set of materials for work:
- frame;
- the base of the picture is made of leather, suede or fabric;
- pieces of leather of any color;
- acrylic paints;
- rectangular sheet of chipboard or plywood;
- furniture stapler;
- craft glue or superglue;
- scissors;
- paper (for sketches);
- soap or chalk (for contours on the skin).

The first question that arises about creating such a work is where to get the leather? Firstly, it must be natural, and therefore it is not cheap. But you probably have a jacket, bag, gloves and other used products from genuine leather. Feel free to chop them up - you will have a lot of fun and can make a gorgeous picture.
Step-by-step description of creating a painting “bouquet of leather”:
- Make sketches of leaves and petals on paper and cut them out - these will be templates for work;
- transfer the contours to the skin and cut out how many flowers with petals you want to have in the finished painting;
- If the materials at hand do not contain colored leather of a suitable shade for the colors, then use acrylic paints. Color the petals with burgundy or pink flowers, leaves - green. You can choose paints of any colors you like;
- to make the petals round and voluminous, you need to hold the skin over a candle flame - it will begin to take on an interesting natural shape;
- we collect buds from the petals; you can place a ball of leather or fabric in the center as the center of the flower;
- we stretch a base made of any fabric, suede, leather or other material onto a sheet of plywood and fasten it with staples from the wrong side. The fabric can be pulled tightly or draped. We insert the resulting base into the frame;
- Place the finished flowers and leaves on the base - evaluate their location by stepping aside;
- complement the composition with leather curls, natural materials– shells, dried flowers, etc.;
- Now you can glue all the elements to the intended places using a glue gun or a tube of superglue.

We clean the finished picture from traces of handicraft and hang it on the wall - that’s the whole master class. Similar creations can be made from fabric - decorating the drawn silhouettes of girls with dresses made of fabric and lace.
To repeat the master class and create three-dimensional paintings with your own hands, you do not need to have the ability to draw. But what you really need is perseverance and accuracy.

For beginners, we can recommend paper techniques, and for more experienced craftsmen, magnificent 3D paintings made of leather, polymer clay or plaster. Interesting paintings for the kitchen are framed vegetables and fruits sculpted from clay or made from plaster.
Video gallery
Photo gallery


It has always been quite popular. And if earlier it was more of a necessity than a way of entertainment, since many things were simply unavailable, today it is, for the most part, a pleasant way of spending leisure time.
That is why craftsmen strive to find more and more original ways realizing yourself and your talents. , or is no longer enough. As a result, such an unusual trend as the creation of jewelry from plastic appeared, however, this type of needlework quickly became boring and lost its originality.
Therefore, today another type of painting has found its followers - three-dimensional paper paintings, which are truly capable of capturing the imagination of any average person.
By the way, I have always loved working with paper. After all, this type of material is quite accessible and quite cheap. In addition, paper has a number of properties that are not found in other materials, so it opens up enormous possibilities for creativity.
Methods for creating three-dimensional paper paintings
There are several techniques in which you can make three-dimensional paintings made of paper. You have the right to independently choose the one that will be closest to you and will give you maximum pleasure. In any case, it should be noted that working with paper requires considerable patience and accuracy, as well as perseverance.
- First technique, which we would like to describe is papier mache. In order to make a painting in this way, it is necessary to prepare the material. To do this, the paper needs to be soaked until it forms a mass that is characterized by uniformity. By the way, the most convenient would be to use special watercolor paper, because, on the one hand, it is quite dense and has an interesting texture, and on the other hand, it bends quite easily from moisture. You need to add glue to the mass that forms after soaking, then you will get something similar to dough. It is from this “dough” that miniatures are cut out with a scalpel or a thin knife; of course, no one forbids helping oneself with one’s hands. I would like to note that three-dimensional paintings made of paper , created by real professionals, they are simply amazing. It's hard to believe that all this is made from such a familiar material to everyone.


Another popular way, which creates three-dimensional paintings from paper , - This quilling, or paper rolling. Its essence boils down to the fact that thin strips are cut out of paper of different colors; by the way, ready-made ribbons for quilling can be purchased at an artist’s shop or a handicraft store. Afterwards they are rolled into cylinders or take on a different shape and pasted onto the prepared canvas in a certain order. In this way, a real masterpiece, like a lace one, is created.
Such paper paintings look very elegant and unusual.


- Also paper paintings can be created in technology, which is somewhat similar to Japanese art origami, however, is slightly different from it. Need to cut out a lot of pieces of paper various forms, depending on what the final idea is, and then glue them together. In this way it can be produced as very simple three-dimensional paper paintings, and incredibly complex, for example, an animal, each hair of which is a separate thin strip of paper.


As you can see, there are no ways to create masterpieces from such simple material, like paper, a lot. You can show your imagination or turn to master classes widely presented on the Internet. Be that as it may, go for it, and you will certainly succeed!
I would be grateful for a retweet of the article and/or
Making interior paintings with your own hands is very exciting. In this case, the most accessible materials are used, such as: buttons, paper, lemon, feathers, balloon, cupcake packaging.
DIY interior paintings
Feather painting
Feel like real modern artists by creating an amazing canvas. It will be light and airy, as it is created from feathers.

Here's what you'll need to make these interior paintings:
- feathers;
- spray paint;
- frame;
- large bead;
- glue;
- sheet of cardboard.

Then on another surface you need to paint the feathers using spray paint.

As you can see, shades of the same color look great. Therefore, you can take dark and light blue paint. Glue the feathers first on the outside of the circle, and then make rows closer and closer to the center.

When this entire surface is filled, glue a large bead in the middle.

After the glue has dried, you can frame the finished work and hang it in the bedroom or living room or present it dear person as a souvenir.

This picture looks great in the interior, like the following ones.
Paper painting
Floating butterflies will certainly lift your spirits.

To create such beauty, you don't need a lot of materials. You will only need:
- colored paper in pink and white shades;
- sheet of polystyrene foam or expanded polystyrene;
- glue;
- whatman;
- scissors.

- Cut strips of pink colored paper to the desired width. The distance between the sides should be what you want the wingspan of this insect to be.
- Attach the butterfly to the beginning paper strip, roll the tape several times so that the insect has enough space in the square allocated to it. Outline the butterfly and cut out along the contours. You will get not one, but several insects at once.
- In the same way, folding the paper sheets into a stack of squares, cut out the remaining butterflies. Use dark pink, pink and light pink paper for this.
- Using double-sided tape, you need to cover a sheet of foam or polystyrene foam with whatman paper. Draw the outline of the future figure on it using a washable marker or chalk. Start gluing butterflies, filling them this figure. When the work is completed, you can use it for its intended purpose.
Just like in the presented photo, make the left outline of the picture fuzzy, as if it were hovering butterflies that were gradually landing here.
Such works look especially beautiful in sunlight. You can not glue the foam, but tint it using a sponge and paint. Then glue the butterflies using double-sided tape.

You can create interior paintings by making cardboard frames with your own hands. And so that butterflies are visible on the canvas, draw their outlines on a sheet of cardboard and cut them out using a stationery knife. But the lower part of the base should be a more contrasting color so that the butterflies are clearly visible.

You can leave them snow-white or paint them.
Try this fun craft with your kids. After all, they can also create original paintings with you. Each butterfly can be painted and glued to the canvas.

To make a wall panel, use heart-shaped figures. For the next work you don’t even need a frame, you only need:
- double-sided cardboard;
- scissors;
- fishing line;
- bar;
- dye;
- awl.
You should have several rows of hearts. Paint the block and tie the top parts of the fishing lines to it.
Now you can hang such a beautiful panel above the bed in the bedroom or on the wall in another room.

The creative impulse should not be restrained by the lack of some material, for example, paper. If you don't have one, use newspapers you read. Cut out hearts from them and glue them to a paper base, make a frame for your work.

If you still have ceiling tiles, this material will make wonderful interior paintings.

For these you will need leftover colored paper. By using the template presented above or creating your own, you will make such a cheerful panel.
Pictures made from buttons and corks
The following design solutions will suggest waste material. After all wine corks usually thrown away, but you can make a lot of interesting things out of them. This is the kind of work created based on this material.

For the first picture, you need to cut each cork in half, and if you have a lot of such material, then use whole elements. First draw the outline of the future masterpiece onto the base, and then fill it with blanks. If you want the picture to take on a rainbow tone, then pre-paint them.
To get such beautiful interior paintings, you can only use:
- bottle caps;
- rope;
- awl.
The next picture doesn't need a frame. You simply glue the corks in rows onto the main surface and you can attach a card here to congratulate your loved one.
If you have a lot of unnecessary buttons accumulated in your household, then you can also make interior paintings from them.

For the next one we will use:
- buttons in green and brown shades;
- glue;
- wooden plank;
- pencil.
The following will also decorate the interior.

You can put the first letter of your loved one’s name with buttons, glue them to the base and give the masterpiece to him. The motive can be very different. Make the outline of an animal or an anchor out of buttons; such works will also certainly be appreciated.
You can confess your love in the most unexpected way. Paint the wooden surface, when dry, glue pink heart-shaped buttons here. Seeing such a sign of attention, the person dear to you will certainly be happy.

Paintings in the interior can be very different. If you want to capture the dark time of day, then pre-paint the background with brown paint. It is not necessary to make it even. Spread the paint with a sponge, then it will turn out like this mysterious.

A black marker will help highlight the contours of the branches and trunk, and a rainbow crown can be made from buttons of a wide variety of colors.
If you prefer bright hues, when you take the white base, draw a trunk here with a marker or brown pencil. You can give free rein to your creative imagination and lay out this part of the tree using threads of this color. Glue buttons that will turn into colorful leaves.

Nature itself will help you paint interior pictures. Check out the following interesting ways their creation.
Method of printing interior paintings
Just dip a daisy or other flower in paint and it will turn into a wonderful printing tool. You will lean the plant against a white sheet of paper and create original designs.

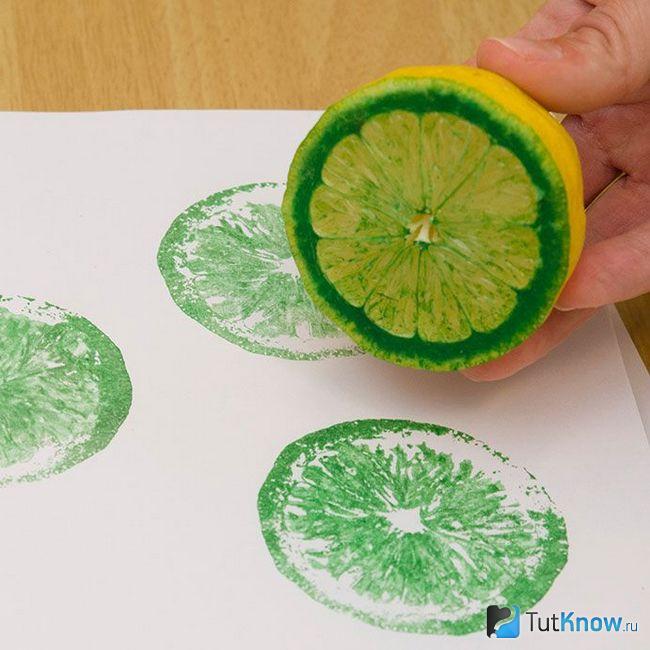
Lemon can be used for more than just its intended purpose. Dip half of this fruit into paint and print on paper.
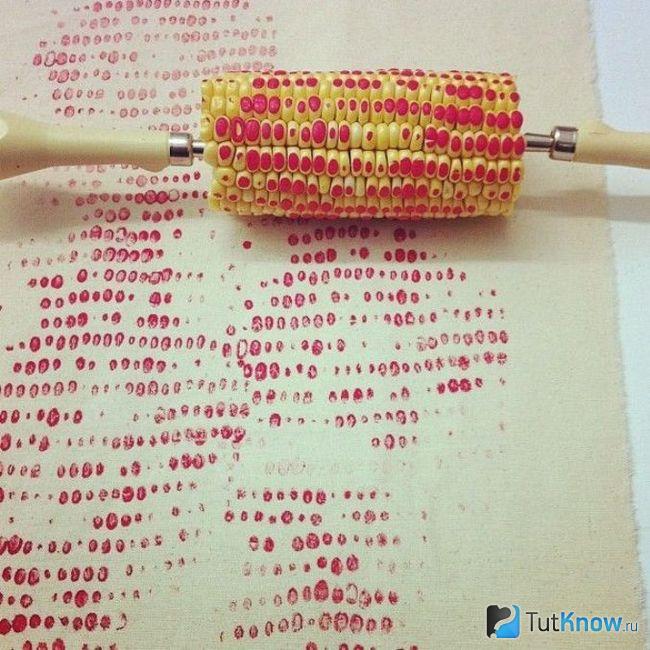
This kind of art therapy will certainly lift your spirits. You can use a wide variety of fruits and vegetables to create interior paintings. If you have an ear of corn, then cut a fragment of the required length from it, prick it on both sides with forks or other sharp objects and print to your health.
If you don’t have fruits and vegetables or don’t want to use them to create pictures, then you can take a balloon.
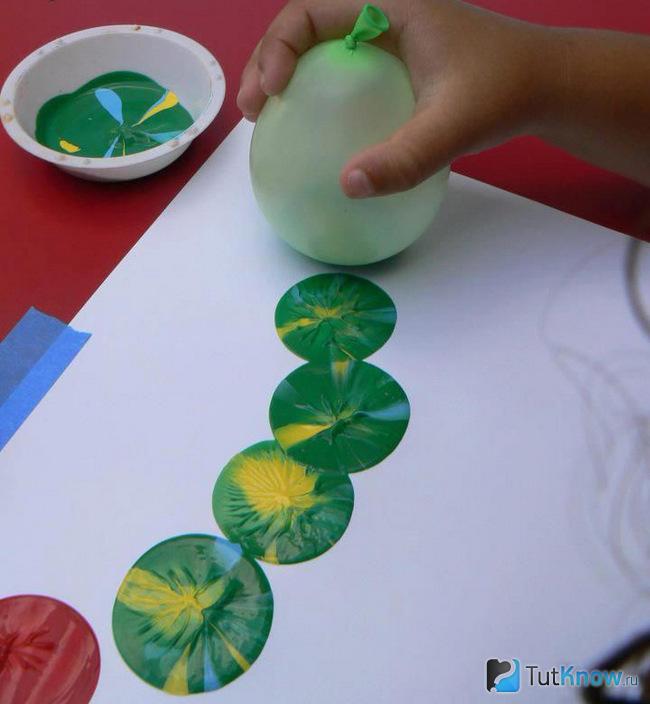
Pour paint into a bowl. And if you want the prints to be more interesting, then add paint in other shades. Dip the ball into this mass, then lift it and print patterns that you yourself come up with on a sheet of paper.
If you want to draw your loved one Teddy bear, but you can’t do it, then you can make an impression. To avoid damaging the toy, use water-washable paint. Dip the bear here and place it on a piece of contrasting paper.

If there are no such consumables, then you can even use your own palm. Dip it into a bowl of paint and press it against the paper base.
If you want to make a picture as a keepsake, then invite all family members to do similar manipulations. In this case, the largest palm should be printed first, and then the next ones are arranged in decreasing order. Use different colors of paint so that each print is clearly visible.

It remains to look at a few more ways that will allow you to create interior paintings. To make such masterpieces, you will need very little time.
Interior paintings on the wall in 15 minutes - master class
That's how long it will take to create your next masterpiece.
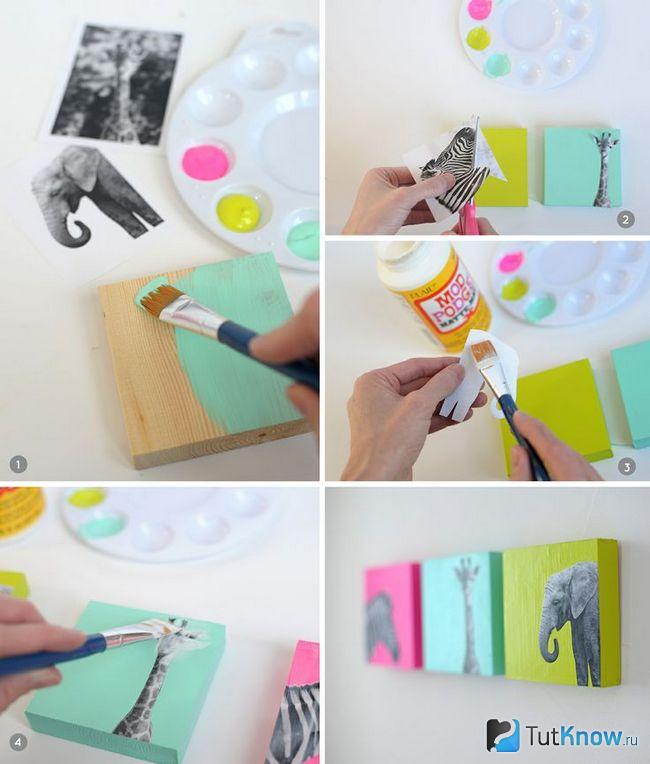
Also for the interior painting you will need:
- planks;
- dye;
- brush;
- glue;
- Pictures.
You will create the next painting just as quickly. Such works will appeal to lovers of glamor.
Step-by-step master class, detailed photos will help you quickly understand interesting idea. First you need to prepare:
- a simple pencil;
- scotch;
- glue;
- sparkles.
If you don't have glitter, then you can grind the broken one Christmas ball. To do this, cover it with a cloth and gently knock on top with a hammer.
Remove the tape after the glue has dried. Where there was adhesive tape, you need to paint it using a brush. After some time, the work can be glued to the wall using double-sided tape.
If you liked these interior paintings, then create the next one using almost the same principle.
To do this you will need to take:
- picture;
- self-adhesive letters;
- white acrylic paint.
If you have even less time, then you can make a panel in the same minimalist traditions as Malevich’s black square.

To do this, cover a white sheet of cardboard with black paint using a rough brush. All you have to do is hang your masterpiece on the wall and wait for approving responses from home and visiting guests.
Even leftover fabric will give you interesting ideas.

Wrap rectangles and squares pre-cut from cardboard with such flaps. Fold the fabric over from the other side and secure it here. Make a loop and hang your masterpiece using it or double-sided tape. You can create interior paintings so that you have a whole exhibition or make one or two. It all depends on the amount of free time and availability of material.
If you have small scraps left, then you can make a voluminous flower like this.

Using the template, cut out the petals for it. Slightly bending the edge of each, glue it to the prepared surface. This can be a sheet of polystyrene foam or cardboard with non-woven material, wrapped in fabric. First create the outer circle of petals, then the next one, arranging them in a checkerboard pattern. As you move toward the center, complete your work. In the middle the petals are slightly smaller and point upward.
If there is some braid left over from needlework, you can also use it. See what kind of interior paintings you can create with it.

To do this, you need to cut these tapes into strips of the same size and glue the end and beginning of each. Then you need to pull the resulting circles from 4 sides to the center, and you will get four-petal flowers. You can also quickly make a panel from cupcake and cookie packaging. Glue these paper molds to the prepared surface, see what a delicate and airy picture you get.

By applying a template of leaves to paper, you can cut out such blanks of the same size quite quickly.

All that remains is to glue them next to the paper branches and frame the finished work.
Here are some interesting works of art that can be created in a matter of minutes from available materials. If you want to see how others make interior paintings, then your wish will be granted right now.
Do not deny yourself the pleasure and see how you can make a picture whose surface will resemble marble:
Cutting out large multi-layered paintings from plain paper - interesting hobby . If you decide to try your skills in this part of the art, start with simple paper paintings, the production of which will allow you to become familiar with the details of this type of craft.
We offer lightweight and detailed master class, familiarization with which will help you make a large picture cut out of paper with your own hands. This requires very little time, and the materials needed for the work can always be found at home.
For work, we will need:
- Wooden frame.
- Paper blue, white, gold.
- Glitter in liquid form.
- Styrofoam.
- Wire.
- Stationery knife.
- Large tape.
- Glue, three different ones.
Process description
 Before creating the picture, we will treat the wooden frame with white paint. It is easier to use aerosol paints. Remember that the front part of our product there will be a back side of the frame. While the paint dries, you can move on to creating the background. To do this, cut out a rectangle from blue material. It must completely fit the internal dimensions of the frame.
On a leaf white, let's depict several trees with different intersecting branches. To make cutting easier, let's shade a couple of intersections with our pencil. Under the first leaf put a second sheet. Let's move on to cutting out the marked areas. After this, separate the leaves and trim the cuts with a knife.
Slowly fold the edges of both sheets to increase their volume. We will also tuck the tree trunks, creating small cuts and fixing them with our glue. This work is easier to do with an awl. Glue a couple of pieces of foam onto the bottom sheet, and then attach the second sheet to it. Space begins to appear between the paper snowdrifts, which gives the effect of layers and volume.
Now, using our stationery perforation knife, we make a couple of dozen round “snowflakes”. In the same way, cut out a couple of circles (circles) of different sizes from multi-colored paper. If we don’t have it, let’s start working with liquid glitter and make circles.
Let's cut out the moon from the material in the form of a circle and animal figures, from yellow we make stars.
On the third leaf of our white material, we depict a tall tree with thin and long branches, and slowly cut it out. When all the details are done, you can move on to assembling the “cut-outs,” as paper paintings are also called. To do this, you need to glue the layers of paper on top of each other one by one.
Our three-dimensional fake is done, it’s time to frame it. Measure the center at the top of the frame and screw the wire into the loop. Then we will pass a wire or rope through the loop so that the product can be hung on the wall. Glue a couple of strips of large tape inside the frame and place the picture evenly.
Craft completed! Now you can safely decorate your home with a paper painting you created yourself.
As you can see, with a little effort and patience, you can create unique paintings.
Gallery: paper paintings (25 photos)


3D paper painting, master class and diagram
 For making 3D paintings we will need the following materials and certain simple tools:
- A large frame or a nice box of chocolates.
- A special knife or knife for decoupage.
- A simple pencil.
- Sharp scissors.
- Leaf with print.
- A sheet of white specialty paper or small cardboard.
- Ruler.
- PVA glue.
- First stage. We start by making white special paper or thin cardboard We make a blank in accordance with the dimensions of the selected frame.
- Second phase. Separately, on a piece of strong paper, draw by hand or print using a printer. small heart, measuring four cm high and five cm wide. We calmly cut out the sketch we have made along the contour and get the template needed for making a 3D painting from paper.
- Third stage. Next, the created template apply it to our paper blank and draw it in a row a couple of times horizontally and vertically. In the end we will have an image with nine identical hearts. You may get more or fewer hearts it all depends on the size of the picture frame and the base, according to which we cut everything out.
- Fourth stage. Then taking stationery knife or decoupage knife, we create cuts on both sides of each heart made, leaving only the upper and lower middle of each image untouched.
- Fifth stage. After this, slowly bend both halves of each cut out heart to one side, so that it looks voluminous in appearance.
- Sixth stage. We will paste the created blank with large hearts onto scrap paper with a small print, so that it is visible through the holes made.
- Seventh stage. We insert the finished 3D paper painting into a frame and complete the work on its creation. In approximately the same way, you can make a picture from an accordion, the main thing in this work is that a person knows how to correctly assemble and cut out parts from paper.
Conclusion. Don't be afraid to start making paper crafts, after simple products, you can start making paintings of flowers, and then you can also sell them.


