Necessary materials:
Scissors
- a set of colored paper
- box
- PVA glue
Stages of work:
Prepare boxes of various sizes. Cut off the part that covers the box from the box, make cuts along the fold lines (they should be ½ the height of the box itself). Bend the parts of the box along the cuts. The two opposite parts will be the wings, and the rest will be the tail and head. Round the wings. Cut the tail down to the very base. Cut the head, moving from the top to the very base, to create a triangle shape. Decorate the craft: make earrings and a comb.
DIY cockerel craft
You will need:Plastic bottle – 3 pcs.
- ball yellow color from a dry pool
- red and yellow plates
- red and yellow disposable cups
- black marker
- stapler
- simple tape
- double sided tape
Work process:
Cut off the top parts of 3 bottles and fasten them together with tape. Cut disposable cups along the edge. They must be attached to the rooster's neck using tape. Colors must be alternated. Cut off the edge of disposable plates and make cuts on the inside. As a result, you have feathers. Gather the tail and feathers with a stapler. Insert the tail into the cut. Cover the connection point wrapping paper. The wings also need to be cut from disposable plates. Attach the head with double-sided tape. Cut out the comb, beak and beard from red disposable plates. Insert the cut pieces into the cuts on the head. Eyes are also created from disposable plates.
DIY Cockerel 2017
You will need:Beads for eyes
- hot glue
- egg cartons
- primer
- acrylic paints
- balloon
- old newspapers
- scissors
- 2 beads
- PVA glue
How to do:
Two cones from a tray from egg eggs cut, cut one side of each cone. Connect the cut cones with the cuts facing down. You will end up with one large cone with 4 petals. To create the neck and head, connect 5 cones together. Towards the top they will expand and become larger in size. Cut a comb from the side of the tray. Cut out a beak from the lid, which will consist of two parts. Feathers are also created from cones. They are fixed on top of the cardboard with hot glue. The length of one wing is 15 cm. Make blanks for the tail in a similar way.
The next stage is creating the paws. From copper wire bend the shape of the paws. In order to give the desired effect, twist the corrugated tube. Insert the remaining tail between the corrugated and metal tube. For strength, fill the lower part with glue. Cut the claws from the bottom. They should be long and narrow. They need to be secured with glue. Paint the legs and torso with spray paint.

Prepare a utility knife and construction foam. All cuts should be neat and even. You can cut out the parts separately. Finally, glue them together with glue. Bring to the desired shape You can use sandpaper. Additionally, treat with acrylic putty, wait until it dries completely, plaster again and treat with PVA glue. This will allow the paint to adhere better.
Start coloring from the head. Glue the eyes on the head. To create a beautiful scallop, make a pattern on paper, transfer it to polystyrene foam, cut it out, and glue it to a suitable place. Start preparing the mold for the wings. Leave the back open. Cover the upper part of the wings with feathers made from corrugated bottles. Fold the last row inside the wing. Paint over it, leave to dry, attach with perforated tape and a self-tapping screw. Make a tail. Take the mesh and bend it. Cut feathers from bottles. Paint them separately on both sides. Apply black first, and then a little blue. Attach the feathers with wire to the mesh. Once the paint has dried, cut the feathers into two more pieces to make the tail appear even fuller.

You will like it too.
For the back, cut feathers from a clear bottle. The width of one feather should be approximately 2-2.5 cm. Attach them to the back, 3-4 pieces at a time. Use self-tapping screws for fastening. When you fix the feathers on the neck, cut off the top part. Glue the last row of feathers to hide the screw heads. Glue smaller feathers in the back of the head and on the side of the crest. Cover all parts that you painted with construction tape and bags. First apply the yellow paint and let it dry. Add a few orange stripes.
The finishing touch is blinders. Cut 2 strips, make a cut with a stationery knife. Insert them between the metal-plastic and corrugated pipe. Paint the craft with yacht varnish.
How to sew a cockerel with your own hands
You will need:Cardboard
- threads, scissors
- orange, blue-green, black and white fabric
- tweezers
- cotton wool
- scotch
- glue
- colored paper

Stages of work:
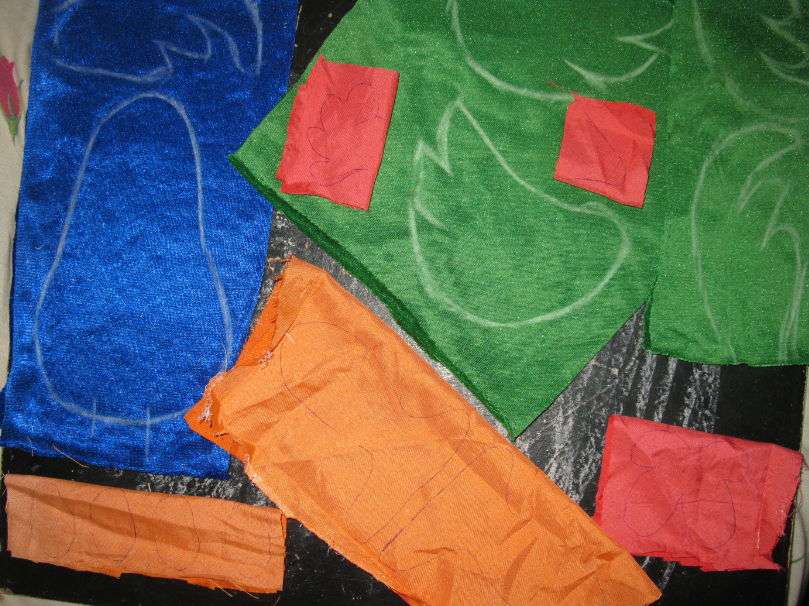
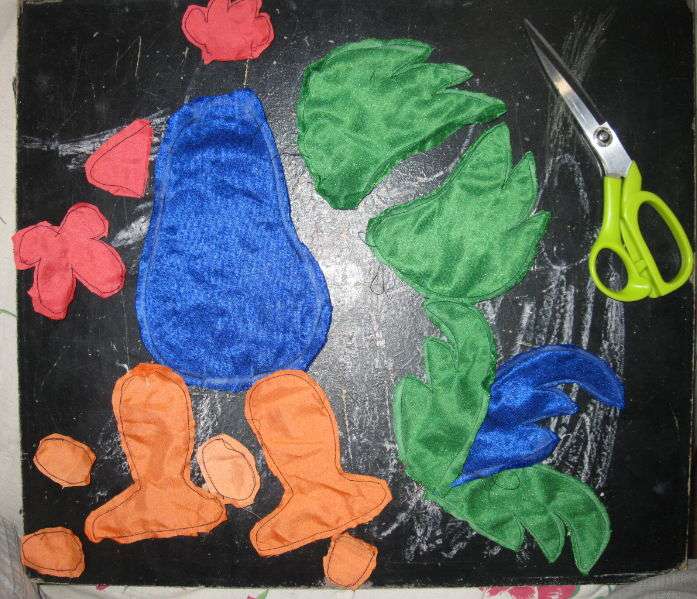
Draw a sample of the toy on a piece of cardboard and cut it out. Draw the wing separately, cut it out, and see how they look. Cut the sample into separate parts so that it is more convenient for you to work further. Match each piece of the sample with a separate piece of fabric, cut out each piece in turn from the fabric. There should be 2 of each part. Cut out the head from white fabric, the upper part of the wing and body from blue-green fabric, and the lower part of the wing and tail from black fabric. Make the beard, paw, beak, comb and eyes from colored paper. Sew all the details for the head. Sewing the comb can be a little difficult. The fact is that it is wider than the head. It is better to sew it on the outside. Glue the eyes from colored paper.
DIY cockerel costume:
For the body, make allowances of 1.5 cm. Connect the parts from the inside. Sew the tip of the foot inside. Sew the wings on the outside, put soft filling inside. If you don't have it on hand, regular cardboard will do. Sew the bottom half from the outside, sew it to the body, and connect it through the cardboard with a seam. Try the torso to the head. Sew the neck to the body. Fill the connected parts with cotton wool. You need to fill it through the hole in the tail. The hole is very small, so you need to fill the craft with cotton wool in small portions. You may need to use tweezers. Sew the tail parts using an outer seam and fill it with cotton wool.
The paws can be made from cardboard or a piece of fabric. Choose your fabric the right size and colors, make some square pieces. Trim the ends and sew the oblong legs. Fill with cotton wool. Sew the legs, wings, and tail to the body. Cut without touching the seams. The do-it-yourself cockerel toy is ready.
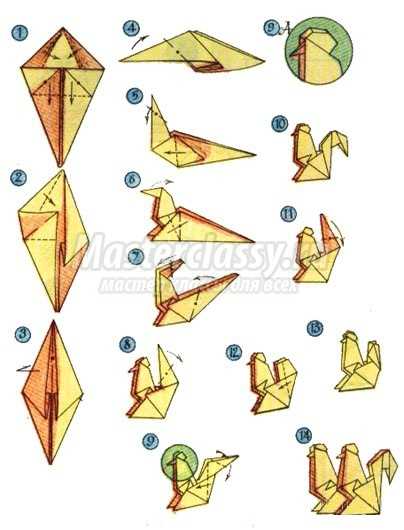

This is the easiest way to create crafts. There are several ways. You can use the techniques of origami, quilling, cutting with scissors, etc. Paper craft can be placed or hung on the Christmas tree, glued to the window, decorated festive table. An excellent solution is the decor of napkins. It will look quite restrained and at the same time original. If you use origami, then the napkin can be immediately folded into the shape of a cockerel. We will provide you with the diagrams.
DIY cockerel patterns.
2017 is already upon us with snowballs. New Year's festivities will begin soon and naturally we are waiting for gifts. We are ready to tell all craftswomen how to sew a rooster out of fabric with their own hands. We are sewing this particular bird because next year will protect precisely Fire Rooster or Red Rooster, as follows from the Chinese calendar. Sewing will not be difficult for a beginning needlewoman; we have amazing fabric rooster patterns that will make a cute symbol of 2017.
What material to choose and how to sew a rooster with your own hands at home
The rooster is the bright leader in any yard, so our bird will be colorful. Therefore, the material for the toy will be appropriate. We recommend using the site for the “Crooster made of fabric” toy:
- fleece,
- brocade,
- colored cotton,
- any fabric that looks rich.
For stuffing we take padding polyester (from old jacket or pillows), ordinary cotton wool will do. If you want to make the cockerel “stand confidently on its feet,” prepare an elastic wire for the frame inserted into the legs and body.
DIY fabric rooster patterns
Choose the pattern you like according to your taste. We will sew according to 1 piece provided, it is simple and does not take much time.
DIY fabric rooster pattern
To enhance the effect and create a more “LIVE” betta, resort to using colored faux fur or feathers. Glue them on the wings and tail, the effect is amazing. Here is the pattern for a rooster with fur inserts.

Do-it-yourself fabric rooster with fur pattern
If the patterns are small, you can enlarge them in Photoshop or any other image editor. Then print enlarged copies and create roosters in real size. According to my pattern, the rooster will be 25 cm tall, quite enough for a souvenir.
Instructions on how to sew a rooster with your own hands:
- Glue the paper pattern onto thick cardboard, then trace the details onto the fabric. We make allowances of 2 cm, more or less is not necessary. Do not forget that the wings and paws must be made of the same fabric for symmetry. The second steam room will be mirrored, this is normal.

- We check and cut out the blanks.
- We sew the parts of the toy from the inside out, leaving 4 cm holes for stuffing. If you are doing it with a frame, insert wire. We turn the workpiece inside out, stuff it with padding polyester (in my case) and sew it up. Please note that we do not stuff the rooster's eye pads; they look more aesthetically thin.
- If you want to make the wings move, then do not sew them on, but fasten them with large buttons (from a coat).
- We don’t stuff the legs, then the cockerel will “sit” with its legs dangling. If the rooster is standing with a frame, form the desired position by bending the wire.

- The eyes - I made them from 4 buttons of different diameters - large on the bottom, small on top. As an option, eyes are drawn with gel pens. You can use a bright piece of fabric and sew or hot glue the eyes.

An extraordinary symbol of 2017 - step-by-step production of a cockerel from fabric - fur
No less magical is the second option for making a cockerel with your own hands from fabric-fur on a wire frame.
A set of materials will be needed as in the first case, only the fabric will be different. The manufacturing process is similar to a fabric cockerel, only it will be connected in a different sequence.
So, let's start making a rooster step by step:
- Having repeated the first steps from the above, we begin to connect the blanks. First, we sew the breast, abdomen and body from the inside out, and then turn it onto the face.
- We sew both halves and wings. Don't forget to leave a gap under the padding polyester.
- Insert a thick wire (I used copper 10) into the finished body, leaving the ends for the tail and wings. Choose your size.
- We stuff the future symbol of 2017 and sew it together, leaving the wings empty, you can only fill them a little. We sew the body with the wings.
- We sew on the beak in two parts and the beard.;
- We make the tail from strips of fabric, sew them on one side on the front part.
- We thread the tail onto the frame along the way, making it fluffy.
- We simply create the paws by tightening a wire blank.
- I wrote options above about creating eyes. After which the toy will be ready.
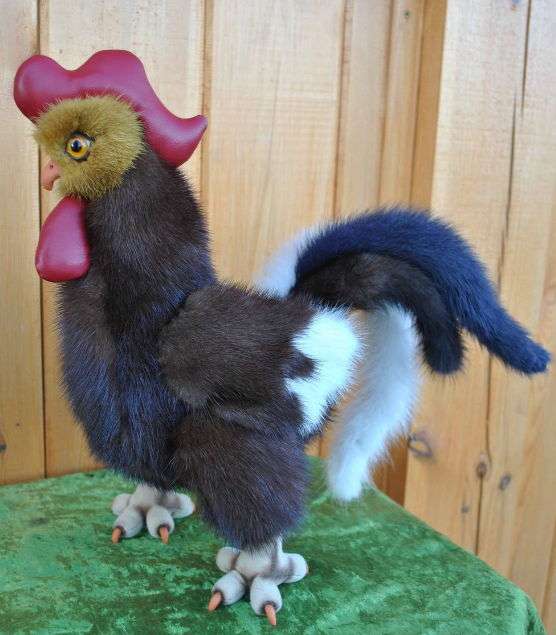
Mink cockerel
Felt cockerel patterns
When you want a bright bird, sew it from pieces of felt, additionally stitching along the indicated lines. Such a gift will look interesting and will be remembered for a long time.

Felt rooster pattern

Ready-made felt cockerels - for inspiration
The symbol of the coming year, 2017, is the rooster. Although there is still enough time before the New Year, you can practice making souvenirs for your loved ones with your own hands now. We offer a simple master class on sewing a cute rooster, as well as several patterns that make it very easy to sew a “chicken coop owner.”


Variegated fighting cock Raymond: making lesson
The patterns for this bright and easy-to-make toy were invented by one of the foreign craftsmen, and it quickly spread across the blogs of domestic sewing enthusiasts. This feathered fighter's name is Raymond. A special feature of the craft is the use of fabric of different textures:
- felt;
- fleece;
- cotton;
- calico;
- brocade, etc.

Any scraps of fabric you have at home will be suitable for making this toy. To decorate the rooster, we will need large buttons of different sizes, and the eyes can be borrowed from any old soft toy.
To sew Raymond's rooster, we will need
- textile;
- sewing machine or thread and needle;
- patterns;
- padding (cotton wool, padding polyester, etc.).
In our proposed version, the legs of the toy are made of fabric. Such a rooster can be placed on a windowsill, in a flowerpot, to decorate a work desk, etc. If desired, you can make it stand up - to do this, you need to insert a rigid wire frame into the leg parts.
Let's start sewing toys
- Print the patterns on a printer. All details are given in actual size, but you can enlarge or reduce them if desired.
- Transfer the patterns to thick paper and cut out. The number of parts is indicated on the patterns themselves.
- Attach the pieces to the scraps of fabric and cut out. We calculate the amount of material so that all paired parts are made of the same fabric (for example, the body is made of checkered felt, the wings are made of fleece, etc.). Don't forget to leave a seam allowance (1.5-2 cm).
- We sew the parts together by hand or sewing machine, leaving a small gap for stuffing.
- We fill all the parts with stuffing, except the legs and eyes, and sew up the gaps.
- We connect the parts of our toy. Handsome fighting cock Raymond is ready!

Soft toy “Peter the Cockerel”
This toy has fewer parts than the previous one and even a novice master can make it. The craft is made from any soft material: fleece, felt, flannel, etc. The number of parts is indicated on the pattern.

The operating algorithm is similar:
- print and cut out the pattern pieces;
- sew paired pieces together and fill with stuffing;
- connect the parts to each other;
- add decor - eyes, ribbon straws for the tail, etc.

Tilde roosters
Tildes are a whole trend in crafting, which was started by the master sewer from Norway Tori Finanger. Main features
It’s easy to sew a beautiful cockerel for the New Year and Easter. It can be given as a gift, used as an interior toy, or hung on a Christmas tree, on a wall, or on a bag. And for sewing, the craftswoman will need a rooster pattern from fabric.
Tilde toys are a charming home decoration
The things in this technique are easy to do. You just need to remember a few important rules.
- The toys are made from natural fabrics: linen, cotton, fleece.
- For the body and face (muzzle, head), it is best to use plain material.
- Clothes are made from fabric of any color, but it is preferable to use fabric with a small pattern.
- The seam of the halves of the product should run through the middle of the face or muzzle, crossing the nose.
- Tild dolls are traditionally made tanned using dry blush, powder, coffee, cocoa, and finely ground pencil lead to color the fabric. Sometimes masters even apply watercolor paint or gouache with a brush on already ready product. Animals that are made according to the canons of making dolls look original: tanned cockerels, hares, elephants touch with their resemblance to tildes-bathers.
Uncover the tilde rooster
The most important thing, without which a tilde rooster will not work, is the pattern. Having chosen the most suitable one, it should be transferred to paper, polyethylene or cardboard. Then you need to carefully cut out each piece separately with scissors.
If for some reason the size of a fabric rooster pattern does not suit the master, he can transfer the pattern to graph paper, and then, using a grid, draw the templates on a different scale.
Considered here interesting option interior toys. It should turn out tanned, as bathers are usually made, a tilde rooster. The pattern in the article is given in full size, but it can be enlarged if desired. The drawing shows patterns for cutting the clothes of the leader of a chicken flock.
It should be remembered that all parts must have an allowance of 2-3 millimeters for seams. You can sew either by hand or by machine. To stuff the toy, you need to leave a hole in the most inconspicuous place, which is then sewn up manually with a hidden seam.
Attic toy "cockerel"
If the fabric is boiled in coffee, tea or coated with a mixture of instant coffee with cocoa powder and PVA glue before cutting, it will not only acquire a pleasant tan color, but will also retain an amazing aroma. Additionally, you can add cinnamon or vanilla to this paste. A toy sewn from the resulting fabric will not only decorate the interior, but also exude nice smell coffee, similar to what happens with toys made using the attic technique.
For sewing, the same fabric from which it is made using the tilde toy technique, that is, close to the human figure, is suitable. You'll end up with this cool little guy with a bird's head and wings, but with wide hips and standing on long straight legs.
To give the toy stability, before sewing on the legs and feet, wooden kebabs are inserted into the legs from below, piercing the filling. The skewers should stick into the body of the rooster and go 4-5 cm inside. You can use them not just one for each leg, but two or even three. The excess is broken off, leaving protruding ends 5-6 millimeters long for attachment to the foot.
In order for the cockerel to stand firmly on its feet, the feet can not be sewn from fabric, but molded from polymer clay, salt dough or plaster. The not yet completely dry feet are pricked onto the protruding ends of the skewers and the toy is left in a warm place. Such a rooster will be able to stand. If the feet are made of fabric, then the cockerel will need support. It will need to be leaned against something.

Usually such cockerels are dressed up in clothes. Attached here is a pattern of a rooster made of fabric using the technique of sewing a tilde toy - it is shaded in blue.
Sitting cockerel - the easiest option
But you can make a bird that looks very much like a real one. The easiest way to sew is a soft toy in the shape of a sitting cockerel. Even an inexperienced craftswoman can end up with a rooster that looks very much like a living one. of this type in the drawing above it is shaded in red.
Cheerful cockerel sewn from felt
Stuffed soft toys have always been popular with children and delight adults. A patient craftsman who wields a needle and scissors may well end up with a funny creative rooster from felt.

The pattern is given in actual size. The first picture shows only part of the cutting templates, the next one shows the remaining patterns.

Master Class. Rooster pattern
Anyone can make toys with their own hands. This is a fun and rewarding activity. For those who like to dress up Christmas tree crafts made with your own hands, you will probably like the option - a felt rooster.
The pattern of a bright decoration can not only be taken from any sources, but also constructed independently. To create it you don’t even need to have the talent of an artist. Easy enough to do step-by-step recommendations of this master class.

- A circle is drawn with the same diameter as the head of the future toy rooster.
- An oval is located slightly lower and inclined. It will be the body of the bird.
- A little to the side of the body oval, another oval is drawn. The tail of the cockerel will be formed from it.
- Smooth concave lines connect the head and body, forming a neck.
- The oval of the tail is also connected to the body of the rooster.
- The lower part of the outer oval is decorated with several pointed corners - these are the ends of the tail feathers.
- Using an oval, draw a notch on the back of the bird.
- Another oval will help make the area under the tail rounder.
- The lower abdomen is drawn with a smooth line, making it lean. You can again use the oval, drawing it at the desired angle and selecting the required size so that the rooster’s chest protrudes forward - the keel.
- Anyone can easily draw a bird's beak and legs, even without drawing skills.
- The wing has the shape of an oval with pointed feather corners. It is drawn in the same way as the tail of a rooster.
- All that remains is to draw the patterns for the comb and beard.
That's all. The pattern for the felt toy is ready!


