There is no doubt that Santa Claus is main character New Year's celebrations. It is his miracles and gifts that children wait for, they send letters, postcards, and the fairy-tale wizard often hides a response under the tree. children's gift- New Year's craft. Santa Claus himself often becomes a character embodied in various types creativity.
DIY origami
A person who is interested in origami will have no questions about how to make small paper figurines in the form of Santa Claus. By choosing the simplest and most understandable option among the proposed schemes, even a person inexperienced in this type of creativity can make a New Year’s figurine out of paper. Santa Claus, created with your own hands from a small piece of colored paper, will be an excellent addition to the main gift or card, and will also be a wonderful sign of attention.


Felt crafts
Felt is a very practical and convenient material for creativity. Felt toys are not only colorful and pleasant to the touch: due to the fact that the pattern pieces can not only be sewn, but also glued to each other using hot glue or an adhesive stick, creating felt crafts is also suitable for children.
In order to make a felt Santa Claus with your own hands, you will need:
- red felt:
- felt flesh-colored;
- felt white;
- white floss;
- needle;
- padding polyester or cotton wool;
- pencil;
- scissors.

Work progress (step by step):
- Print or redraw the product pattern on paper, cut out the details.
- Bend the red felt in half, use a pencil to transfer the largest part of the pattern (in the form of a drop) onto it and cut it out. Sew both parts of the part together, leaving a centimeter section unstitched. Through the resulting hole, fill the product with padding polyester or cotton wool (for convenience, you can use a pencil), and then sew up the hole.
- From flesh-colored felt, cut out 1 piece in the form of an oval. This is the face of the future figure. Having placed the part in the desired place, place white felt parts on top of it: the beard and the frill of the hat. The frill should be sewn around the entire perimeter, and the beard should be sewn only at the point of contact with the figure’s face.
- Cut out the remaining parts from white felt: mustache and pompom of the hat (2 pcs.). Sew the mustache over the beard, stitching the piece only along the top edge.
- Cut a small circle (nose) from flesh felt and sew it on top of the mustache.
- Place the end of the Santa Claus hat between two pompom pieces and sew them together.
- Embroider or draw eyes. Fasten the thread in the form of a loop.


Various decorative elements decorate and diversify the craft. Santa Claus can be made not only in the traditional red and white color scheme, but also have a blue or green suit.
Bottle decoration
It's no secret that the most universal New Year's gift for people not in a close social circle is champagne (or other alcohol) and chocolate (or candy). The original Santa Claus, hand-sewn from colorful materials, will make the gift unique and memorable.

Making crafts from bottles is also suitable for junior groups kindergarten: to do this, just fill transparent bottles with red paper, glue a cotton wool beard and plastic eyes on top and complete the image of the main New Year's wizard with a red sock or paper cap, imitating the character's hat.


Crafts made from cotton pads
Cotton pads and cotton wool are the easiest materials to use in kindergarten. Children can glue cotton pads (or balls) onto templates prepared in advance by adults or make a craft entirely with their own hands, first painting it and then decorating it with cotton wool parts. These can be snowflakes cut out with a figured hole punch, the cotton beard of Santa Claus, as well as details of his costume.

Identical templates decorated with details from cotton pads and cotton wool, in accordance with the tastes and skills of each child, will become wonderful and unique gifts that children can take home and give to their loved ones.

For creativity in older groups of kindergarten, more painstaking and hard work- making crafts from cotton swabs. Sticks attached with glue will be a good building material for creating fabulous winter landscapes.


Santa Claus made of plasticine
For children in older groups of kindergarten, as well as for younger schoolchildren, modeling from plasticine will be easy. Depending on the child’s skills, you can choose step by step instructions products of varying degrees of complexity: from the simplest to figures with a large number of small details.
Santa Claus made of plasticine will become the main character of fabulous winter scenes and New Year's stories.


Figures made of threads
Creation of a fairy-tale character from wool threads- a labor-intensive process that requires not so much special handicraft skills as it takes a lot of time with painstaking work. However, the resulting figurines have a very “homey” look, evoking a feeling of coziness and warmth.


Santa Claus made of paper
Paper crafts are extremely diverse not only in type, but also in the types of techniques used in the process of their creation. Paper of only two colors (green and red), rolled and mounted in the form of cones and complemented by small details (a face with a beard, Christmas balls) will become the basis for creating a beautiful New Year's composition in the form of Christmas trees and Santa Claus. This idea is perfect for sharing creativity with a large number of children.
Everyone good day, today we will surprise you with new ideas for New Year's crafts in the form of Santa Claus. There will be a lot of non-standard New Year's resolutions - Santa Claus will appear before us in a variety of images. We will see that New Year's Santa Claus is not only a paper craft, we will make him from wood, from fabric, from boxes. You'll definitely find a craft here that will inspire your creativity and make you want to make it yourself.
New Year's Santa Claus
WITH CANDY.
Children in all countries know that the main supplier of sweets in New Year Holidays- This is Santa Claus. We always expect a sweet treat from him. And that means doing a craft with Santa Claus only on New Year’s Eve, when it smells like chocolate or tangerines.
Here's an idea for a sweet New Year's craft with Santa Claus. Santa Claus's belly is a sheet folded in half and in the front half of the fold we will cut a hole - an inspection hole where our candy will protrude.

The shape and design of the tummy can be different - triangular (as in the photo above) or round (as in the photo below). The main thing is general principle— bend the sheet in half and draw an oval in the front part for the hole.
The two edges of the bent part are fixed along the upper edge with a stapler or tape or glue. And then New Year's Santa Claus receives a face, hat, beard, arms and legs.

Your craft with Santa Claus can hide treats in another way. Here is another version of the craft with a pocket for sweets FLAT New Year's Santa Claus, made of cardboard.

Or here are options with a convex box, where you can pour a good handful of sweets into Santa Claus. These Santa Clauses are a great craft for kindergarten - they are very simple. We have a diagram of this craft and a master class on our website - here in this article

You can just go to flat craft lean against Santa Claus cut tea or biscuit box- cover it with a colored appliqué that imitates a brick pipe.

New Year's Santa Claus
FROM A CUP.
That's beautiful and very simple craft for children at school or in kindergarten. We take a red plastic cup as a basis. We cut out a face, a brood and a hat from paper. Glue this to the top of the glass. You can use a stand behind Santa Claus's head, a prop - which is glued to the bottom of the glass and leans against the back of Grandfather's head.

If you have white disposable cups and foam balls - you can make a beautiful ANGEL craft. But if you don't have styrofoam balls, you can make them a SUBSTITUTE - roll a larger ball out of plasticine. We tear white napkin in pieces. We coat the plasticine ball with PVA glue and place a napkin on it, layer by layer... until all the plasticine is hidden and the ball turns white. Here you have the angel's head - simply and quickly enough. We wait for the napkin layer to dry and draw eyes on it or glue them from colored paper.

New Year's Santa Claus
in a pyramid box.
A triangular gift box can be designed in the shape of Santa Claus. Such a box opens at its lower part - at the bottom. Or the box can open like a tulip bud - the triangular walls fall apart and we see a gift.


New Year's Santa Claus
FROM A ROLL BUSH.
From used toilet paper What remains is a cardboard roll - a sleeve. You can make beautiful New Year's crafts from such bushings. Santa Clauses grow a cotton beard, they are covered in glitter, or wrapped in felt clothes. You can make friends for them, also from bushings.


The bushings can be painted or covered with colored paper. Decorate with rhinestones, buttons, and wrap with elegant ribbons or ropes.

If the sleeve is shortened by half, cut it in half. Then a short cut of a roll can become New Year's pendant with Santa Claus to decorate the Christmas tree.

Children's crafts
TO GARDEN AND SCHOOL
with New Year's Santa Claus.
If you need a beautiful bright craft for an exhibition in a kindergarten, or a competition work for a school - then you can quickly and easily do New Year's wreath with Santa Claus made of a cardboard ring.
We take a large piece of cardboard - a pizza lid, for example - put a round plate on it, trace it with a pencil. Cut out the resulting circle. We put a small plate on this circle - trace it and cut it out - we get a circle with a hole in the center - that is, a CARDBOARD RING.
We cover it with colored paper (to hide the letters from the pizza) and decorate it New Year's applique— Santa Claus and flowers. You will find templates for this craft in the article.

Suitable for kindergarten simple craft from plates — New Year's Santa Claus with treats. The cookies and gingerbread on the plate may not be real, but cut out of cardboard or felt, or better yet, made from salt dough.

Here's another one quick craft, where New Year's Santa Claus is made of a cone. To make the craft tall and large-scale, we take four sheets of paper and glue them along the edges together (with tape or a glue stick). From such an enlarged sheet we fold a cul-cone - we straighten it and cut off its lower edge. From the front of the cone at the top we glue the silhouette of the face of Santa Claus, a pompom on the hat, and hands with cuffs. We draw buttons and snowflakes on the fur coat.

Can be made FLAT cardboard craft with Santa Claus and so that she stands VERTICALLY at the exhibition, Let's make a selection for her, a cardboard pyramid with a slot. The diagram below shows the principle of gluing such a support from a strip of cardboard.


Here in the photo below we see a whole team of New Year's Santa Clauses on just such collection legs, made according to the diagram above.

New Year's Santa Claus
FROM WOOD.
Very beautiful and strong crafts for the New Year are made from wood. New Year's Santa Claus made of wood is a durable and elegant craft that will serve you, your children and your grandchildren. If you have boards and know how to saw and sand, then this is your craft. Let your New Year's Santa Claus be wooden, warm and pleasant to the touch. A tree always retains the living force of nature.

You can also cut out silhouettes of fir trees, the silhouette of a snow-covered house and other elements of a winter landscape from wood.

You can cut out Santa Claus, who is holding a sign with a New Year's wish in his hands.

You decide for yourself what the shape of Santa Claus will be - elongated and tall, or plump and short.

With a wooden Santa Claus, you can make New Year's compositions by adding other wooden characters to it.


You can buy ready-made wooden figures of Santa Claus and decorate them into New Year's compositions. Just create a piece of New Year's decorations - from spruce branches, artificial snow.

For such compositions, you can make Christmas trees from cones cut from a carton of eggs.

You can fold Christmas trees out of paper as in the photo below. For this purpose, in the New Year section we also have a large article about DIY paper Christmas trees.

New Year's Santa Claus.
from bottles.
If you cover wine bottles with red spray paint, you will get an excellent preparation for a New Year's Santa Claus craft. Note: choose a color marked GLOSS because matte will look dull and will require varnishing the craft.

If you are interested in crafts made from thermomosaics, then you can put the craft on christmas tree from mosaic bottles.


Here is a beautiful panel in the form of Santa Claus. This elegant New Year's craft is made from special decorative tape, which gathers into wavy ruffle ties. But we can make a similar craft without ribbon - simply using the very idea of a round design and fluffy decor. You can make an imitation of beard curls from a regular office paper, from yarn, cotton wool. If you don't do a craft big size- and a small one about the size of a plate, then it’s good to make a beard from round cotton pads.

New Year's Santa Claus
ON PACKAGES for gifts.
You can make your own gift wrappings from thick felt or flexible plastic.

Below, I have drawn a figurative diagram of this New Year's box with Santa Claus - so you see that everything is simple. There is a bottom (narrow rectangular) - there are rounded walls and sides, with areas for gluing them to the front and back sides of the box bag.

You can use this principle to create your own designs for boxes with Santa Claus. The scheme is the same, but the styles are different. In the photo below is the SAME SCHEME... but here is the front and back wall already have a ready-made silhouette of Santa Claus. The diagram in the picture below is cropped - you need to continue it down (mirroring from the top) and to the sides (extending the sides).

But first, you will learn how to make simple rectangular boxes with straight walls and simply decorate them with an applique of New Year's Santa Claus.

Here's another beautiful craft, where New Year's Santa Claus is made of lace paper napkin, on which cakes are placed. The face of Santa Claus is cut out of white paper tinted beige. This applique can also decorate your New Year's gift box.

And here are examples and diagrams of SQUARE BOXES with Santa Claus - New Year's designs can be very different.


New Year's Santa Claus
from threads and wool.
Santa Clauses look beautiful crocheted. Here you can fantasize as you please. Make them long, tall or round and thick. You yourself give the shape to a figurine made of red yarn - and then attach a face and beard to it and it becomes a typical Santa Claus.


You can felt New Year's Santa Claus from felt - combed wool. Felting is like modeling from plasticine, only with constant backcombing of your figures. we scratch with a needle until the lump thickens under our hands.


Like these ones beautiful ideas with New Year's Santa Claus you can implement in this New Year. I wish you creative insights, happy coincidences, flexibility of working material and dexterous hands. May you succeed both with crafts and with life in this new year.
Olga Klishevskaya, especially for the site ""
If you like our site, you can support the enthusiasm of those who work for you.
Happy New Year to the author of this article, Olga Klishevskaya.
Master class with step-by-step photos "The Birth of Santa Claus" (making Santa Claus for the Christmas tree)
Repeshko Lyudmila Petrovna, primary school teacher, Municipal Educational Institution "Olenovskaya School No. 1 of the Volnovakha District", Ptg. Olenovka, Donetsk region.
Description of material: master class for teachers and parents.
Purpose: This souvenir is a New Year's gift.
Target: make a souvenir for the New Year.
Tasks: create a festive mood; interest in participating in the making of a souvenir; develop ingenuity, Creative skills, fine motor skills hands; cultivate aesthetic qualities, love of beauty.
Materials:
- wooden beam 60 cm high,
- wooden stand shaped like a square 18x18 cm,
- screw, hammer, nails No. 25;
- waste material(rags of knitted, synthetic items)
- braid, laces, threads;
- cotton wool;
- starch, water;
- gouache;
- scissors;
- PVA glue;
- New Year's "rain";
- brushes
- glazing bead;
Progress of the master class:
Preliminary work: conversation "Holiday is coming" New Year and everyone needs Santa Claus. Santa Claus with a bag, and there's a surprise in the bag"After the participants are familiar with the information, they proceed to making a New Year's souvenir for Santa Claus. Choose workplace and prepare the necessary material and tools.
1. We connect the stand and the beam with a screw, placing the beam in the center of the stand. We put the head on the beam and nail it.


2. We wrap waste material onto the timber and secure it with braid, lace or knitting threads.


3. We apply cotton strips on the front and back to create a robe. We secure it at the head with sewing threads. From below the height of Santa Claus we cut off the excess cotton wool. On the front of the robe, from the neck to the bottom, we attach another cotton strip, but narrower. And at the bottom of the robe, on the hem of the robe, to the right, we put a cotton strip.


4. We make a belt from cotton wool. Take a cotton strip 4 cm wide and twist the edges in opposite directions.

5. Prepare the head for the hat. We apply a cotton strip from ear to ear (depending on the size of the head). Glue on the eyebrows. Prepare a cotton strip for the beard, try it on, and secure it with a little glue. Glue on the mustache.

6. Apply a small layer of cotton wool to the top of the head and cover it from the forehead to the neck with a cotton strip. From left to right, we wrap the head with a cotton strip to get a hat. We cut off the excess length at the back and secure it a little with PVA glue (at the end of our work everything will be fixed with starch)


8. We make hands: 2 hands, 2 fingers from thin cotton strips and 2 sleeves from cotton strips wider than on the hand. We wrap a wide strip of cotton wool (i.e. the sleeve) around the finished hand, cut off the excess cotton along the length of the arm and make a cuff for the sleeve.


9. Raise the beard and secure the cotton strip - collar. We cut off the excess.

10. Insert a stick-staff (a bead of the required length) into Santa Claus’s hand, secure it with PVA glue, and nail the staff to the stand at the bottom.

11. Liquid starch is ready (like rare jelly). For a glass of cold water – 1 level tablespoon of starch, stir well. In a separate bowl, boil 1 more glass of water. Gradually pour the prepared starch mixture into the boiling water, stirring with a spoon.
12. Prepare the equipment (long brush, glazing bead) for coating the product with liquid starch. We wrap it around a brush (glazing bead), wind it with cotton wool, dip it in liquid starch and apply it with twisting movements to all parts of the product. Grind the rain and sprinkle it immediately onto the product you have just treated with the mixture.


13. Let our Santa Claus dry in a warm place.
14. Prepare yellow gouache (for the staff) and red (for the hat, mittens, belt). Add a little PVA glue to the paint, mix and paint.


Santa Claus is "born"! We wrap, tie and the gift is ready!
Competitions for the best have begun in schools and kindergartens creative works among pupils and parents. The New Year theme is quite extensive. In some groups it was decided to make a mitten from scrap materials, in others - a Christmas tree, in others - New Year's toys. My daughter and I have already knitted a mitten with fairy-tale characters (a scratching mouse, a jumping frog, etc.). There are up to a dozen different paper Christmas trees at home. So, today we’ll make a simple one New Year's toy. It will be Santa Claus.
Junior children can handle a craft made from colored paper without any help. school age. Children are not yet able to do this kind of work.
So, let's prepare:
- scissors
- white and colored paper
- pencils.

Next you need to make a fur trim for the hat and fur coat. We will need two white stripes approximately 10 mm wide. Let's bend the strip in half lengthwise, and use scissors along the edge opposite to the fold, cutting a narrow short fringe.

Glue the fur trim to the bottom of the fur coat. We immediately decide on the height of the hat and mark the edge of the headdress with a white border.

Next, cut out an elongated trapezoid from a landscape sheet and carefully round all four corners. Immediately cut thin long strips into the resulting figure - a beard. At the end of the work, we will go through each hair with the blade of the scissors to fluff up the snow-white beard.

Using gouache, watercolors, felt-tip pens or pencils, we draw the face of Santa Claus. A distinctive feature of the hero's appearance is thick eyebrows and a mustache.

We will also cut out the hair for our craft from paper. No difficulties.

All that remains is to glue all the parts into place. Santa Claus made from colored paper is ready. Of course, if you wish, you can continue the work, in particular, design the hero’s arms and legs. However, the craft also looks great in its presented form.

Let's put Santa Claus next to paper Christmas tree. The tree is made of multi-colored (white and green) palms. We will place tinsel next to the children's crafts. It's a pity that there were no silver items at home. We will correct any misunderstanding this coming weekend. You still have to prepare for the matinee.
A toy Santa Claus with his own hands will bring a holiday to any home. Whether you believe or not in a magical old man with a bunch of gifts in a bag, every interior is full of his images. But children believe in him unconditionally, therefore, when making a craft in the form of Santa Claus, they are probably expecting a real one, bringing them a whole mountain of long-awaited gifts. Give to your children a real fairy tale and make with them a doll, paper, plasticine - any Santa Claus that your imagination can draw. And if our photographs from interesting ideas, then even better.
DIY Santa Claus
We will devote our entire article to how to make Santa Claus with your own hands. After all, in fact, crafts can be very diverse: sewing, felting, knitting, appliqué, painting and modeling. Well, we'll start with decoupage.
This plate with the image of Santa Claus is made using the decoupage technique. A beautiful napkin with the pattern you need to divide it into layers, you will only need the top one, the one on which the pattern is applied.
If you are decorating a plate or any object whose surface you will not use, you can use PVA glue for the work. But in this work, the reverse decoupage technique was used, that is, a transparent glass plate is taken and a napkin is glued with reverse side, and from the front it will shine through.
So, put a napkin on the back surface, degreased with alcohol, and moisten it with water. Make sure that the napkin is well soaked, but does not come apart. Be sure to remove excess water with a cotton swab. While the paper is still damp, coat the surface of the napkin with acrylic varnish in a thin layer. It should be applied with a narrow brush, moving from the center. The varnish should dry for quite a long time, about twelve hours. If desired, you can apply another layer, also allowing sufficient drying time. Patterns and ornaments are applied to the clean surface of the plate using acrylic paint, you can paint over the entire surface of the plate. Another layer of acrylic varnish will complete the craft.
DIY felt Santa Claus
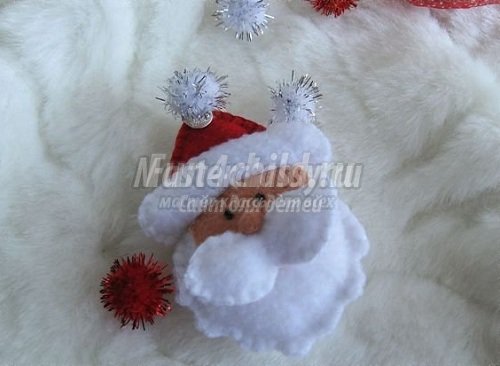
And such a Grandfather Frost can decorate your New Year tree with his own hands. It is made from felt, and you and I already know that it is completely simple to make.
To sew a toy you will need small pieces of felt in white, beige and red. Of course, it’s a pity to buy large pieces to make such crumbs out of them, but you can make a lot of these Santa Clauses and give them to all your friends and acquaintances.
- On paper, draw a pattern for your craft; you will need five elements - head and beard, face, edge, hat, mustache.
- From beige felt we cut out one element - the face, from red felt - two elements of the hat.
- From white we cut out two elements of the head with a beard, the edges and a mustache.
- Now we create a mustache and a hat, sew the elements together not completely, and fill them with filler.
- We glue a beige face onto one part of the head using Moment glue, sew the two parts of the head together, and fill them with silicone filler.
- We put the hat on the top of the head, secure the bottom with a pin, put the edge along the bottom and sew it on hand stitches. At the same time fixing the hat.
- You need to sew the edge on both the front side and the back side; we cut out two elements for you.
- A voluminous mustache, beaded eyes and a nose made from rolled felt with silicone are sewn onto beige felt.
- The end of the hat is crowned with an elegant bell with braid for hanging the toy.
There's more you can do the simplest postcard made of felt with Santa Claus. You don't even need a pattern - just use your imagination and creativity. For beginners, we recommend that you first make a paper sketch of the craft, and only then transfer it to felt fabric. Use glue to connect pieces of fabric together.

DIY Santa Claus made from plywood


DIY Santa Claus made from paper

New Year is a wonderful occasion to make an applique on greeting card. And who can decorate our applique better than Santa Claus with his own hands made of paper? You can glue either simple pieces of colored paper or strips folded using the quilling technique. In the second case it will be more effective. If everything is more or less clear with the figure of Santa Claus, then we will tell you in more detail how to make a Christmas tree. You will need sheets of double-sided colored paper. Cut out strips from it, but not even, but with small sides of two centimeters and a centimeter. Using scissors, cut the fringe strips on one side and use a wooden skewer to roll them into a roll, starting from the narrow edge. When you have rolled up the entire strip, secure the straight edge with glue and carefully straighten the fringe so that the element becomes as flat as possible. You will need a lot of such patterns; you will need to lay them out and glue them onto paper in the shape of a Christmas tree. Decorate the centers of the elements with folded multi-colored stripes.

Using thick paper or cardboard, you can make other important attributes, for example, make Santa Claus's sleigh with your own hands. These can be, or you can use a rolled one for the base newspaper tubes, and we suggest you make a sleigh based on old typewriter, from which the body has already been removed. You need to cut out four elements from cardboard - the sides of the sleigh, the back and the front. You can color the sleigh with pencils and paints, and rhinestones or shiny stickers will add a snowy winter texture. You can put not only Father Frost and the Snow Maiden on your sleigh, but also put a bag or box with a gift in them.
Sew Santa Claus with your own hands
Using fabric you can make toys that you would never buy in a store. You can sew Santa Claus with your own hands and your child will simply be delighted with this toy. Santa Claus tilde has gained enormous popularity.

A distinctive feature of these wonderful dolls is a sweet facial expression, but at the same time very small facial features, as if simply outlined, rosy cheeks, plump tummy shapes, long legs and arms, Natural, soft fabrics, which are always used for sewing tildes, are welcomed by all mothers, since the child will both enjoy playing with such toys and be safe.

You can not only sew a figure or Santa Claus costume with your own hands, but also knit it. A knitted figurine will be a favorite toy, and if it is not stuffed with stuffing, then such dolls can be used for a homemade puppet theater.
How to sew Santa Claus with your own hands

But Santa Claus can be not only a toy, but also a decoration for a bag of gifts. We'll tell you how to sew Santa Claus with your own hands and place him on the packaging for New Year's souvenirs, which we can then give to our relatives or friends. You can embroider the face of Santa Claus using satin stitch or cross stitch, you can make a fabric one using glue, or you can make a crocheted element, which you will then sew on a bag. It is done quite simply - the first row of loops is closed into a ring and tied with single crochets. When the circle is already of sufficient size, tie it with several circles of snow-white threads, then change the thread to red and knit a hat. Thread long white threads into loops into the bottom row, and then trim the resulting beard with scissors. Also make a red nose, like the real Santa Claus, from threads knitted in a circle. The resulting element is sewn to the finished bag quite tightly. It is better to tie the top of the bag with an elegant ribbon.

For the simplest Santa Claus, do-it-yourself patterns will also be the simplest. These are two large balls - one for the body, one for the head. Having cut out the circles, fold each of them in half, baste the bottom with thread not all the way, and when we have already filled the fabric with padding polyester, tighten the thread so that we get a ball. Santa Claus will also need an elegant hat with a pompom, made from fabric swatches. We connect all the elements together, sew the eyes onto the face, outline the mouth with red threads, and make a nose from a small ball. We create a beard and mustache from padding polyester, and we also use it to make the edges of a hat and a fur coat. You have Santa Claus ready for your New Year's composition.
Making a real Santa Claus doll with your own hands will be more difficult, because this is an entire art. ? For such crafts, a combination of modeling and sewing is most often used. With the help of skillful stitches, you can “sculpt” a face for a toy, and a fur coat, hat, and boots are simply sewn from fabric. This combination is called sculptural textiles.

For Santa Morse, you need to create a frame using the technique of sculptural textiles. For these purposes, we need a small plastic bottle, into which the wire is inserted in a loop, into the place where the head will be attached. The same loops will serve as hands; they will not be visible at all under the mittens. We paint a face made of fabric, glue on eyes, and attach a beard made of artificial fiber. A fur coat, felt boots, an elegant sash - we make everything, even Santa Claus’ staff, with our own hands.

If you are familiar with the technique of felting wool, otherwise called felting, then you can make this variation of the fairy tale wizard. This technique is very difficult, but at the same time, dolls created using the felting technique always look original and complex. The base material is wool, which is repeatedly pierced with a special needle until the material becomes dense and the fibers tangle together, forming a dense structure. Since such a craft is hollow inside, it will not require much material from you, but if you put such a Santa Claus under your Christmas tree, then the delight of everyone you know is simply guaranteed.
We hope that we have provided you with enough options on how to make Santa Claus with your own hands. Don't forget to please the New Year's old man by making his granddaughter - the Snow Maiden!
Key news tags: ,
Other news


