The article will tell you how you can make it yourself and use a cardboard box. Here you will find templates and master classes on making boxes of different shapes.
A box is the easiest way to pack or hide something. The box can serve as an excellent means of storing things: jewelry, cards, small items and cosmetics. Of course, modern stores will provide you with a lot of options for boxes: large, small, curly, square, with lids, decorated and simple cardboard.
It is much more pleasant to create something with your own hands and decorate it the way you would like it and the way the product itself will correspond to the style of the holiday, room, or occasion. You can make a craft from absolutely any cardboard. The material can be purchased at a craft store (you will find big choice colors and textures of cardboard), or you can use the one in which household appliances are often packaged (refrigerators, for example, or washing machines).
For work you will need:
- Cardboard (as much as needed for your preferred size product).
- Hot glue (you can, of course, use any other glue, but hot glue is preferable due to its quick drying and strong bonding of the material).
- Template (with the help of it you can understand exactly how you should cut, bend and glue the material).
- Scissors and pencil - for marking and cutting. This is necessary to ensure that your product looks neat and aesthetically pleasing.
Flip lid box templateIMPORTANT: There are two main types of cardboard boxes with lids. One assumes the presence of a lid that covers the top of the box, the other - a lid that folds back, but is part of the box.

 Box template with cover lid
 How to make a box with a lid step by step:
- Prepare all the supplies, print the template for the box on a printer or draw it in the exact proportions on cardboard.
- Cut out two elements from cardboard
- Start folding the dotted lines and gluing them carefully.
- Press the edges firmly to hold the material together.
- Let the product dry a little
- After drying, you can decorate the box to your liking.
Video: “Box: master class”
How to make a round cardboard box: diagram, template
A round cardboard box is a very beautiful and practical product that will always find its use. Having decorated it to your liking, you can store jewelry and jewelry, sewing and embroidery kits inside, cosmetical tools, clippings and more.
Making a round cardboard box is a little more difficult than, for example, a square one. However, it is quite possible to “figure it out” with your own hands, without spending a lot of money on materials. Use thick cardboard and follow the template provided exactly; you can only change the size, but not the shape of the parts.
How to make a round cardboard box, templates:

 Round pattern cardboard box № 1

 What parts does a round cardboard box consist of: template No. 2
  In what order should the parts of a round box be glued together: template No. 3
  Round cardboard box with handle: finished product
 Video: “Gift box or casket made of cardboard: detailed master class”
How to make a heart box from cardboard?
A heart-shaped box is much more difficult to make than a round or square box. However, if you follow the tips and templates, you can easily create this beautiful piece.
A heart-shaped box is not only a storage box, it is an ideal packaging for giving a gift to a loved one. Such a box can be filled with many surprises: sweets, souvenirs, trinkets, gifts, keychains, flower petals, even butterflies can fit in it.
IMPORTANT: The heart box is in many ways similar to a round box, but here everything depends on the bottom: if it is proportional, then the whole product can look neat and even. The box has two bottoms: internal and external, the walls of the box are attached according to the principle of a round box.
Different templates for making a heart-shaped cardboard box:

 Heart-shaped box template from one piece: template No. 1
 Heart-shaped box template from one piece: template No. 2
 Step-by-step work in photos:
 Prepare identical hearts: two bottoms and a lid
 Cover the bottom with the side of the box
 Fix and wait until completely dry, make a lid
 Video: “Heart-shaped box: master class”
How to make boxes from paper and cardboard?
Giving gifts in bags, cellophane wrappers and paper wrappers is no longer attractive and is considered a sign of “bad taste.” Your gift will look much more impressive in a paper or cardboard package that you glue and decorate yourself.
IMPORTANT: The size and shape of your box depends only on what exactly you will be giving. Heavier gifts require thick cardboard, but for small and light ones you can even glue a paper box together.
Boxes made of cardboard and paper, different templates:

 Simple Rectangular Box: Template
 Hinged Lid Box: Template
 Triangular box: template
 Simple square box: template
 Box-pouch: template
 How to make a box from colored cardboard?
In a modern creativity store you will find a huge selection of cardboard:
- Kraft cardboard (solid sand-colored material)
- Colored cardboard
- Velvet cardboard
- Holographic cardboard
- Glitter Cardboard
- Cardboard with prints, drawings and inscriptions
- Textured cardboard and much more
IMPORTANT: All this variety of choice allows you to create cardboard boxes incredible beauty and use them for any purpose.

 Cardboard for creativity
 Video: “How to make a cardboard box?”
How to make a cardboard box without a lid?
If you need to make a cardboard box without a lid, you should also use a template. This product is perfect for storing personal items: pencils, cosmetic brushes, hair accessories and much more.

 Box template without lid
 Video: “Do-it-yourself box without a lid using origami technique”
How to make a cardboard box for candy?
Boxes of chocolates don’t have to be bought in a store; you never know exactly what will be inside. It’s always nicer to make a box with your own hands, fill it with candies to your liking and give it as a gift. to a loved one. This will not only be a “delicious” gift, but also very original and special.

 Box with handles: template
 Box with a butterfly: template
 Triangle box: pattern
 How to make a jewelry box from cardboard?
It is very convenient to store jewelry, jewelry and watches in a cardboard box. You can buy it or make it yourself, decorating it to your liking. If desired, you can make one or several sections inside the box.
A few tips and templates for making a flat cardboard box will help you make your own packaging of any size.

 Template for flat box
 Video: “DIY Flat Storage Box”
How to make a square box from cardboard?
A small square box can be used as a bomboniere or packaging for small surprises for your loved ones.
 Simple square box template
 How to make a triangular box from cardboard?
A triangular box can exist as a separate unusual package, or it can be part of a cake-shaped package.
 Triangular box template
 Do we decorate cardboard boxes with our own hands?
Decorating a homemade box depends only on how original and great your imagination is. The box should also be decorated based on the occasion (a holiday, for example, or the decor in the room).
How and with what you can decorate any cardboard box:
- Lace and fabric
- Satin ribbons
- Scoop and burlap
- Stickers and stickers
- Buttons and other accessories
- Sequins and stones
- Colored paper
- Kraft paper
- Drawings and inscriptions
Video: “5 ideas for decorating a box”
IN creative activities great potential hidden. Besides the beautiful appearance products, satisfaction and pride in the work done, such crafts can also be useful. For example, an origami paper box. It can have a unique shape: with or without a lid.
You can make an origami box out of paper with your own hands either in a simple or more complex scheme, which is suitable for those who have skills in this technique. The main advantage of Japanese art is that in most cases the work does not require auxiliary elements in the form of scissors, glue and other attributes.
The paper can be thick or not very thick, have a square or rectangular shape. If the product is intended large sizes, then it is better to take paper in A1, A2 or A3 format. If the sheet is thin, then it can be folded in half.
- Fold the paper base three times to form an accordion.
- Then fold the sides towards the middle and bend into reverse side in half.
- Fold the corners so that on one side one corner becomes double, and on the other - single. The result should be 8 corners - the same number on both sides.
- Straighten the resulting structure at an equidistant distance from the center.
- It turns out to be a pocket that needs to be shaped like a box. The last stage is to give rigidity to the structure by bending the corners of the product.

Practical designs
At their core, these boxes are all functional, but they make more sense if they have a lid. There are a lot of origami schemes on the Internet made from paper boxes with lids. In addition, it can be done in several ways.
Simple and step by step
Paper size may vary, but prerequisite is that the shape should be square, and the bottom of the future product will be 3 millimeters smaller than its lid.
- First you need to make a lid. The sheet is drawn diagonally, connecting the ends.
- Then bend one of the corners towards the center so that its end touches the point of intersection of the diagonal lines. Next, fold the curved end in half again so that its fold line coincides with the diagonal line. Unfold the corner. You will get fold lines that will come in handy later.
- Do the same with the other three remaining corners.
- Make two cuts on both sides of the corner to the middle of the sheet. Then assemble the structure according to the specified diagram.
- The base of the future structure is assembled in the same way as the lid. In this case, the size of the sides of the base should be 3 millimeters smaller than the top part.
This was one of the easiest ways to make origami paper boxes, and by choosing required colors, you can use it as a gift.

Ideal gift
Before Valentine's Day, many people are wondering how to make origami gift boxes out of paper. The ideal packaging option is a heart shape.
For it you will need:
- thick multi-colored cardboard;
- glue;
- scissors;
- compass for drawing an even circle;
- pencil.
Having the circuit that is needed in this case, paper heart It's very easy to do. As in previous cases, we must not forget that the upper part of the product should be 3 millimeters larger than the base.
Design with a surprise
Origami paper box with a surprise is very popular. This design shows that paper products can serve not only as great decorative element, but also act as a toy for a child.
The whole highlight of this craft is the changing faces. The cube with a funny face drawn is hidden in another box, with a diameter slightly larger than the cube itself, made from one piece of paper.
By slightly opening the box, the funny face can be replaced with a gloomy face. By the way, you can draw the eyes yourself, download ready-made templates from the Internet. Not only children, but also adults can play with such cubes

IN Japanese art There are not only boxes, flowers and other products. You can even make a doll out of several multi-colored sheets.
Japanese art
Another type of origami paper box is a sunboy. Initially, the Japanese made it as a container for sweets. Nowadays, many craftsmen store various small items in it.
- First you need to create the base - “damn”. Take a square sheet and fold it diagonally. Then you need to fold all the corners towards the center and unfold.
- Assemble the slide and fold the resulting figure again into a “mountain” in the form of a triangle.
- Then bend the right side and turn it over.
- Next, a “valley” fold is made, when the fold is obtained from the person, that is, into the distance. Then the “mountain” fold. In this case, the fold will protrude like the top of a mountain.
- It is necessary in this position to straighten the craft and bend it right side to the left.
- To uncover upper layer future packaging, and the “mountain” fold will help with this.
- Repeat the above steps, but on the other side. Only in this case left-hand side bends to the right.
- Fold all sides along the center line and repeat on the other side.
- The top layer is bent from the second so that the angle between them is 90 degrees. This part is revealed. The same must be done with the second side.
If you follow the instructions, it may seem that this mission is impossible, so a diagram is attached to any description.

Another original way make a paper box with your own hands using the described technique - zunako. It's still the same box, but it has a slightly different shape. In the Russian version the name of this is “star”.
- The basis is taken as a “double square” or in other words “pancake”.
- Fold the figure into a triangle, spread the sides and bend the edges so that the bottom lines are in the same plane with the surface of the table.
- Push the folded edges apart and make two folds.
- Then, push the layers apart again and make four folds in a “slide” when the fold is at the top.
- Next, you need to bend and unbend the lower base of the box so that you get a flat triangle.
- Spread the layers of paper apart again and fold the tops of the triangles down.
- Repeat this action three times.
- The last step is to push the layers of paper apart again, make two folds and press on the bottom of the figure.
Conclusion
Even a beginner can master this type of art.
These crafts are quite easy to make, so these exciting manipulations can be done with children. Crafts will come in handy both in kindergarten, and at school. These can be stylish boxes, themed decorations and much more.
Simple origami that only requires a simple piece of paper and nothing else! Even children can make such a box, so together with them you can decorate your home with simple and beautiful things.
How to make a box from a sheet of paper with your own hands?
There are many in different ways, we will introduce you to some of the simplest and most convenient ones.
First way. How to make a simple box?
For this method we need a piece of paper. It is better to take thick paper, or even cardboard, so the box will be more stable.
1. We make markings on the sheet. It should be divided into 9 rectangular parts.
2. Using scissors, we make cuts in the right places (see photo).
3. We make folds along all the drawn lines and fold the box.
Second way. How to make a square box with a lid?

To make one like this beautiful box, we will have to put in more effort.
1. First of all we need to make a template. It can be printed on a computer or drawn on paper by hand. We’ll immediately think about the size, what paper we’ll draw on and other issues.
SCHEME.


2. We cut out our shape and make cuts and folds according to the diagram. The dotted lines in the diagram indicate the place for folds, the places sketched with lines indicate the places for gluing. For gluing, prepare double-sided tape. If the paper is too thick, for better bending, you can make a creasing (applying a straight groove on a sheet of paper).

3. We apply double-sided tape to the gluing areas (see photo).

4. Before assembling the box, you can decorate it with different elements. Then you can glue it.

The box is ready!
Third way. How to make a box case?

IN in this case It is also better to use thick paper or cardboard.
1. Print the box template or draw it by hand on a piece of paper.
SCHEME.
2. Cut out a piece of paper according to the template.
3 . Fold the workpiece in half and glue it with glue or tape.
4. We wrap the sides and our box is ready!

We can decorate it with different elements.
VIDEO. How to make a box from a sheet of paper at home?
A paper box is a very valuable item because it can be used as a place to put a gift. And give a person a gift not openly, but in gift packaging, that is, in a box. This is even more interesting, since any secret intrigues and arouses interest. Or you can store some of your things in it, for example, shoes. Almost anyone can create a box out of paper. There is nothing complicated in its creation.
How to make a box out of paper (1 method)
You will need: paper, decorations, scissors.
1. First we make the lid of the box. To do this, take paper measuring 21.5 cm by 21.5 cm and draw it diagonally. Lines connect opposite corners.

2. Bend one of the corners so that it looks towards the center (at the intersection of our diagonal lines). Then we bend it one more time so that the edge of this fold is flush with the strip drawn in the center. Then we unravel the figure and see that folds have formed, which we will need later.


3. We do the same thing that we did in point two with all other angles.

4. We make cuts on both sides as shown in the picture.

5. And we begin to fold our craft step by step.


6. After creating the lid of the box, we proceed to creating the bottom for it. To do this, take a piece of paper measuring slightly less than 21.2 cm by 21.2 cm. The bottom is made in the same way as the lid. When creating it, you take plain paper, unlike the cover, when it is best to use something colorful, containing several colors, perhaps even some kind of picture.


So you have made a paper box using our simple instructions. You can take other sizes for the box, but do not forget to make the bottom of the box 3 mm smaller than its lid.

How to make a box out of paper (method 2)
You will need a little patience and time, as well as thick paper of any color (you can use it with patterns, or you can use plain paper).
1. Since we are making a box square shape, then the sheet of paper, before you start creating the craft, also needs to be shaped into a square.
2. It is necessary to bend the paper square in half crosswise and carefully smooth the fold line so that it is clearly visible. Unfold the square and repeat the same thing, this time bending the sheet vertically. Unbend the workpiece. You should have a square with two intersecting lines.

3. Bend the square in half diagonally. Then straighten it and repeat the same for the other diagonal.

4. Fold each of the 4 corners of the square towards its center to form a diamond shape.

5. Bend back the two opposite corners of the diamond so that the figure looks somewhat like a “candy”.

6. We bend the side parts of the “candy” vertically (that is, those that do not have sharp tops) to form a right angle. We bend its sharp edges vertically in the same way.

7. We bend both tops of the “candy” inside the box (first one, and then the second).

8. So you have made a box. True, without a lid. The lid will also have to be made in a similar way, but to create it you need to take a square of paper a couple of millimeters larger so that it can cover the box. To decorate the box in the future, you can use paints, ribbons, pieces of fabric or glitter. Here you can show your imagination to the fullest.

How to make a box out of paper (3rd method)
Such a box looks quite stylish and can become a real decoration for your room. To create it, it is better to use either colored or textured paper.
1. Fold a square sheet of paper in half.

2. Fold the resulting triangle in half again.

3. Unfold the edge as shown below in the figure.


4. We do the same on the other side. The result is a double square.

5. We bend the corners in the same way as in the figure below. We do the same on the reverse side.

6. At this stage you should have a figure like this (see picture).

7. Unbend the bent corner along the marked lines.


8. We do the same on the other side.

9. We turn the figure over.

10. We bend the edges in the same way as shown in the picture.

11. When you do these actions from all sides, you should end up with a figure like the one in the picture below.

12. Bend the corners.

13. You should get a similar figure. A little more and the craft will be completely done.

14. Rotate the figure and begin to unbend it, creating volume.


15. It’s very easy for the box to unbend and become stylish model, which is called an origami star box.
By the way, if you round the corners with a pencil or make a double bend at the corners, you can get a wonderful box, for example, like this picture below.

Watch also the video on how to make a paper box!
Now you know how simple and easy it is to create a paper box! Happy crafting!
What is a holiday? - they ask you one day. And you immediately answer with a smile: - This is when everyone is happy, they say nice wishes, they give gifts... And in response to you: - So, if today you give someone a gift and wish something wonderful, then there will be a holiday? And it’s true... And you can even give a handful of sweets. The main thing is how to do it. Perhaps we should start with unusual packaging. A DIY paper box is a great idea for original gift or a surprise. Even clean symbolic gift will be admirable if you present it in its own packaging.
Materials and tools
So, what may be needed when making all kinds of boxes.
- Paper. It is best to take paper for scrapbooking - it is good because it can be double-sided, with a different design on each side. Thick designer paper, colored paper for pastels, cardboard (density 200-300 g/m2), a simple sheet of whatman paper or watercolor paper, which you can paint or tint yourself, are also suitable. You can also use “yellow” note paper (or an envelope made from it), wrapping paper... and any other that you can use for decoration.
- Corrugated cardboard
- Napkins (preferably thicker)
- Ribbons, ribbons, laces
- Beads, buttons
- Ready-made labels
- Scissors, stationery knife
- Double-sided tape, glue stick
- Superglue or “Moment” universal glue (transparent gel) for attaching beads and other things
- Ruler, pencil
- Compass
- Hole puncher
- Nail file (for creasing)
Useful advice. Before you directly take on the paper that will make up your box, try assembling it from plain paper. You will understand where to cut, how to make folds more conveniently, how to assemble the box. Plus, you can estimate what size box you need. Often the first pancake is lumpy - so let this lumpy be made of simple cheap paper. Decor. As for the elements for decoration, you don’t have to limit yourself here: make flowers from fabric and paper, combine ribbons and raffia, lace, whatever you can think of. The main rule is not to overdo it. And now about the boxes themselves. There are a huge number of options, models and schemes for their manufacture. We offer you the most popular ones - from classic round and square boxes at the base to unusual bonbonnieres. But first things first.
Square box
You can give anything in it. From candies and cookies to soap self made and decorations. Naturally, each gift must have an appropriate box decor. In this case, the packaging is stylized as a postal parcel. This gives it a special romanticism, because the services of traditional mail for sending letters and gifts are used less and less today. If you use colored paper with a picture - the box will have a completely different mood. Choose yours!

Redraw the diagram of the box onto paper. We think about it in advance right size. Cut it out.

Carefully bend the workpiece along the dotted lines that are drawn in the diagram. If the paper is thick enough, you can crease it first to make bending easier. To do this, attach a ruler to the fold lines and run a nail file (the tip of a compass, the tip of scissors) along them. There should be a groove - a depression along the line. Now all the folds will be clear.

We glue strips of double-sided tape as shown in the figure. Instead of tape, you can use a glue stick, but tape is still more reliable and more convenient.

We decorate the walls of the box from the outside while the box itself is still disassembled. And then we glue it together. All that’s left is to insert the gift and bandage the packaging!
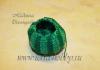
With round base
The box of this model is more suitable for gifts for women. Although everything again depends on the gift and decor. In it you can present both beads and a tie (if you twist it like a snail), as well as a scented candle, New Year's ball or even a cupcake! Such a DIY paper box can later serve as an excellent box for small items (buttons, beads, etc.).

So let's get started.

Select the desired radius of the circle at the base. Using a compass, draw 4 such circles on thick paper and 2 on corrugated cardboard. We measure out 3 strips on paper. Their length will be equal to the circumference of our circles (yes, we’ll have to remember our favorite formula 2πR). The widest strip will be the height of the box, another will be 1 cm narrower, and the third strip will be the narrowest - for the height of the future lid. It’s difficult - only while you’re reading this, you should start doing it - and everything will become simple and clear!


Glue the circles from corrugated cardboard paper We have the bottom and base of the lid.

Glue the first and second strips together as shown in the figure (the vertical shift is approximately the thickness of the bottom of the box, the horizontal shift is 1 cm). The front side of the paper should be facing out. We decorate the future wall of the box.

We cover the bottom of the box with a double strip of paper in a circle. Then we paste the remaining narrowest strip around the base of the lid. The box is ready! We place the gift inside and close it with a decorated lid. You don’t have to decorate the lid separately, but tie the entire box with ribbon. For example, like this:

Elegant boxes and not a drop of glue!
Is it possible to make a paper box with your own hands quickly and without any glue? Voila! There are more examples of such packaging than you can imagine. Everything is made from one sheet of paper. The main thing is to carefully cut the workpiece and bend it correctly. At first glance, the diagrams of some boxes are complicated, but in reality everything is much simpler. Each subsequent box will become easier to assemble. We recommend that you practice on plain paper first! When working with thick paper, creasing will again be of great help. Let's try!
1. Strict box – male version.
Although if you make it larger, from paper with a delicate print and decorate it with a flower, it will be just right for giving women’s lingerie.


Ideal for sweets and anything fluffy and airy. In order to thread a ribbon or lace, make holes in the workpiece in advance with a hole punch.

Suitable, for example, for loose aromatic tea. Or for some bottles, candlesticks.

It looks very laconic, perfect for a men's gift.


And with brighter decor, it would be a good option for a gift for a woman.

Cute bonbonnieres
Bonbonnieres are a special type of boxes. Bonbon in French means candy, and the name of the boxes comes from the word “candy bowl”. It is the bonbonnieres with candies or sweet dragees that the newlyweds give to their guests at the wedding - in response to congratulations. Ordering a bonbonniere to be made for each guest is not a cheap pleasure. But it won’t be difficult for the bride and her bridesmaids to make bonbonnieres in the style and tone of the wedding.
1. One of the simplest options

2. Elegant.
They resemble a box or a small chest. Just a little more difficult than the first ones. We make slits in them with a stationery knife, holes, if we want to pull in a ribbon or lace, with a hole punch.


3. Unusual and tasty.
As a rule, bonbonnieres are located on a special separate table and often on a dish or tray. You can beautifully play with this situation and make bonbonnieres in the form of pieces of cake. And you need to place them together, as if it were a paper cake.

First, we draw a large circle (the plane of the cake) and divide it into sectors in order to know the parameters of our pieces. Then, according to the dimensions, we draw a diagram of the development of the piece. We make the required number of developments, cut them out and glue them together. You can decorate before gluing, or after - it all depends on the idea of your decor.
A beautiful paper box is a wonderful opportunity to give our loved ones a smile and good mood. How to make a box out of paper - you will definitely find the required gift packaging master class on this page. Our whole life consists of little things. And we have the power to tell a person how dear he is to you by giving him an exclusive handmade item. Below are cutting templates and tutorials. beautiful packaging from paper.
If you don’t have much time for decor, you can simply wrap the box beautifully in gift paper.
Very beautiful box for wrapping a gift in the shape of a heart. Decorations for it can be completely different, it all depends on your desire. In order to decorate such a box with your own hands, you can take a colored sheet wrapping paper or print on a printer music paper- drawing is attached. If you can’t buy lace, you can crochet it yourself.
To work you will need:
- Any cardboard.
- 2 pieces of lace.
- PVA glue or glue gun.
- Pencil, ruler, scissors.
- A small piece of tape to secure the lid.
- Colored paper - packaging or printed on a printer.
- Beads, ribbons for decoration.
First we need to make two hearts out of cardboard. To keep the workpieces neat, it is better to do this with a compass and ruler. These are blanks for the bottom of the box and for the lid. The size can be whatever you need. You can make a box 15/15 cm, or you can make it smaller. You should end up with 2 larger hearts made from cardboard and 2 hearts made from colored paper to decorate the inside.


Next, bend the strips 2 cm and draw a line with your fingernail. Then, on the curved part, cut out the teeth with scissors. This is necessary so that the strip can be glued to the bottom of the box. Apply glue to a strip on the bottom, stepping back a little from the edge.

Then we apply a strip to the bottom with the teeth facing inward. Please note that we are retreating 0.5 cm from the edge. It may be convenient for someone to apply glue directly to the cloves - this is also an option.

This is how we glue the second strip of cardboard.

Then, glue 2 pieces of tape to the sides of the box. The tape will connect the box to the lid.

We also glue the tape to the lid of the box.

We cover the sides with colored paper on the outside and inside.


Colored paper for boxes and gifts can be made using a printer:


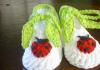
You can make an amazing box decorated with a flower made of chiffon or nylon with your own hands in a couple of hours. The box must be covered with colored paper or paper printed on a printer. The main decoration of this packaging is a handmade chiffon flower. The master class will help you understand the work.

To work you will need:
- Cardboard for the box (you can use a juice or milk box).
- Chiffon or nylon ribbon 25-30 cm long.
- Satin ribbon (optional).
- A few beads or buttons.
- Nail polish.
- Glitter.
- Glue or glue gun.
- Ruler, pencil, scissors.
We take cardboard and draw a diagram of the box. The sides must be equal, choose the size yourself.


pay attention to details E, C, D, B and A - here the drawing increases by 1 cm, these segments must be coated with glue and a box must be formed. Draw on cardboard and cut it out. We apply this stencil to colored or printed paper. We trace and cut out too. Bend the cardboard along the lines. Glue cardboard and colored paper together. We bend our workpiece and glue it together. To avoid gluing the parts together, you can print the design directly on cardboard.

Cut the chiffon into circles of different sizes.

We singe the edges of the chiffon over a candle or lighter.

We glue the petals together, or stitch them through with thread. Sew a button or bead into the center.

Glue on glitter. You can take Christmas tree toy and scrape off the glitter with a knife.

We treat the edges of the flower with nail polish or decoupage glue.

You can also hang a tag on a cord. There is no shame in giving such a handmade box.
Box templates
We hope you find the templates useful for folding gift wrapping.