If you want to surprise your guests on a festive evening or please your children with an unusual and very beautiful dessert - here interesting option! Bright fruit bouquet can become a real hit and signature dish if you know the intricacies of its preparation and are not afraid to experiment. Here you will find step by step wizard class with videos and photos of healthy treats, so making such a miracle with your own hands will not be difficult!
Today we will consider an option where the bouquet will contain not only freshly cut fruits, but also slices and chocolate-covered berries. This will require additional ingredients and “equipment.”
This is, of course, more energy-consuming and takes longer to prepare, but certainly more impressive and tasty! In addition, you don’t have to use dark chocolate; you can take milk or even white chocolate and sprinkle it with coconut flakes. Just imagine how beautiful such “snow-covered” fruits and berries will look in a bouquet!
Ingredients
- A small head of iceberg lettuce – 1 pc.
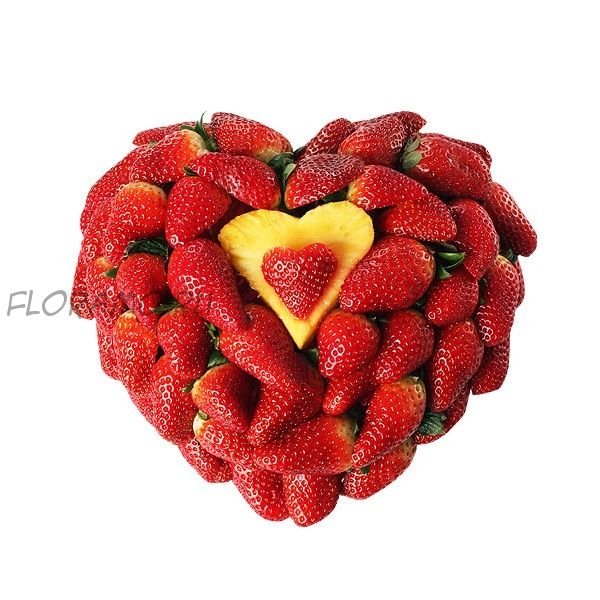
- Fresh strawberries – 400 g
- Fresh pineapple – 1 pc.
- Apple – 2 pcs.
- White and red grapes – 300 g
- Banana – 2 pcs.
- Chocolate – 200 g

Equipment
- Sharp knife
- Stand for drying fruits in chocolate
- Fruit cutting machine
- A wide vase or bowl the size of a head of cabbage
- Wooden skewers
- Metal shortbread cutters with sharp edges for cutting out pineapple shapes
Preparation
1. Wash the strawberries and lay them out to dry on a towel. As soon as it drains completely, remove the stalks from it.

2. Wash the apples and cut them using a machine into several small slices at once. You can also do this manually - the main thing is to remove the middle with the seeds and make approximately equal longitudinal eighths.


4. Melt the chocolate in a water bath and, while it softens, prepare the stand and skewers.


5. Prick the selected fruit or berry on them and dip them in liquid chocolate. By the way, you can only include a banana in a bouquet if it is glazed, otherwise it will darken and look ugly.

If desired, you can sprinkle the chocolate-covered fruits with coconut, but you need to do this quickly, as the glaze hardens quickly.
If we use white chocolate, then it will need to be diluted a little with cream or milk, since it is the most refractory of all types and it will not be possible to make it completely liquid.
6. Stick a skewer into the stand with each slice so that the chocolate hardens.
7. Then, using molds, cut out figures from pineapple rings: stars, flowers, hearts. If the pulp is too hard, we help ourselves with a wooden cutting board, pressing the shape.

8. We put a head of lettuce in a vase and begin to collect our fruit bouquet. It is unlikely that you will be able to use white cabbage, since it is too tough and skewers simply will not pierce it.

We stick the skewers of the bottom row at the same distance and put strawberries on them, alternating them with slices of chocolate-covered fruit. We make the alternation symmetrical, for example, 2 through 2 or through 1. This will make the bouquet more harmonious.

The second row will be pineapple flowers. Don't be alarmed by the skewers sticking out, we'll close them up later!
On the third level, alternate a chocolate slice with strawberries or fresh fruit. The fourth one again arranges pineapple flowers.
Cover the tips of the skewers with strawberries or grapes. The latter are good to use in different colors: green - red.

Our fruit bouquet is ready!
As you can see, to create such extraordinary beauty, all you need is your imagination! Absolutely any combination is possible - try it, treat yourself to some fruit and make your loved ones happy! After all, this can be a great idea not only for table decoration, but also as a gift for the holidays!
Fruit bouquet. Master Class
So many new things appear every day! It's even hard to imagine what will happen tomorrow. Our planet, with its huge number of creative and talented people, is simply teeming with interesting and amazing ideas. One of these ideas is bouquets of apples, oranges, onions, and garlic, which appear every now and then in information columns, striking in their originality.
Straight from the garden
This whole trend began relatively recently, but has already amazed the whole world so much that the expression “fruit bouquet” will no longer surprise anyone. Why did they become so popular? The fact is that, thanks to the composition of the bouquet, it can be useful not only in a glass vase: from all the components you can make any dish, be it a salad or a delicious soup.
In addition, the choice of ingredients is so huge that such a gift will be able to please everyone, from lovers of berries and fruits to connoisseurs of overseas exotics.
What's on our list?
And in fact, to make such a miracle yourself, it’s worth visiting a regular hypermarket: in our case, apples of any color and size will be used. If you want to receive a small and neat gift, then a bouquet of small apples will simply fit perfectly into this setting. This option will also look good at a wedding, like a fruit bouquet for the bride, with which she can surprise all the guests.
Thanks to the efforts of breeders, o color palette There is also no need to worry, because the choice is not limited to green harvest from the garden. In addition, bouquets of red apples look very good at any celebration.
Vegetable garden on a shelf
Before we tell you how to make a bouquet of apples, you should carefully prepare all the components. You can find most of it in a regular grocery store or market, and the rest of the materials should be looked for in craft or florist stores.

Apples. It’s worth taking a little longer to choose them, as they will be the main part of the bouquet. The variety of varieties is so great that it is difficult to decide on just one, and it is worth studying the properties of each variety separately. So, the perfect bouquet of apples with your own hands can be made only from hard and juicy apples, which will definitely last for some time as a gift without losing their attractive appearance. It is also worth paying attention to the external qualities of the fruit, since bouquets of apples that have seen the world are unlikely to please anyone.
Other vegetables and fruits. But it should be noted that it is best to opt for fruits, since apples in combination, for example, with potatoes will look, at least, strange. Pomegranates, oranges, tangerines and other foods that have bright color, eye-catching.
In addition, if you want to make a bouquet of apples and flowers together, you will have to purchase green plant species. More than ever, they are combined with the fruit components of the bouquet. Persistent species, such as spruce or coniferous, do the best job, as they not only add elegance to the bouquet, but also give it a wonderful aroma.
What does the world rest on?
It is clear that we are unlikely to cope without strong reinforcement, so it is also worth stocking up on gluing and fastening materials that any florist has.

Skewers. Their selection in stores is not limited, but only thick and strong options intended for kebabs or something like that are suitable for us. It is best if they are made of wood, since they come into direct contact with products that will subsequently be consumed.
Scotch. We will need a little of it, but its thin version is definitely not suitable for this case, as it will pull the pile of skewers together.
Good scissors or knife. We will use them when we have to trim the tips of skewers, branches and flowers.
Packaging paper. IN in this case There is enormous scope for your imagination, since the choice of packaging has long been not limited to newspapers. You can skillfully combine the idea of a gift, the color of the bouquet filler and its wrapping. We, nevertheless, will opt for vintage craft paper, which still remains popular.
Thread, ribbon or cord for tying a bouquet.
Precautions
Since bouquets of apples imply their further use, it is worth following small rules that will protect you from accidental surprises. Of course, be sure to wash your hands before starting the process, thereby protecting yourself from germs.
In addition, thoroughly wash all fruits, vegetables, skewers and twigs that will become the base for the gift. So, you will simply protect yourself from unexpected troubles. Also be careful when working with skewers and cutting tools, which can cause harm to you and others due to sudden movement.
Bouquet of apples: master class
Let's get down to the manufacturing process itself. Since this article is aimed not only at experienced craftsmen, but also for beginners in this matter, we will carefully consider the entire process, paying great attention to all the important points.

First, let's take living components: apples and pomegranates, in our case. Gently holding the fruit in your hand, we stick a skewer into it, inserting it until it sits tightly. So, you need to insert about 3-4 skewers into one object, slightly intertwining their bases, giving the object stability. In this way we “process” all the fruits that are included in our homemade bouquet. Carefully place the prepared components for further work.
We begin to connect the fruit and berry parts of the bouquet, alternately replacing them with each other. For example, we take one apple and tightly match a pomegranate to it, securing their skewers with several layers of tape. Then, you can add a couple of pine branches, another layer of pomegranates and apples. Do not forget that as soon as you form a new level, you need to carefully wrap it with tape to make it strong and immovable.
It is most convenient to hold the bouquet in your left hand, and with your right hand continuously wrap the bases with adhesive tape, without stopping for unnecessary cutting and searching for the beginning of the tape. In addition, a clean surface with neatly laid out bouquet components will make the work a little easier, reducing the time spent on confusion and searching for necessary items.
Wrapped in beautiful paper
When all the pomegranate apples have already been collected in the bouquet, you can move on to its external decoration - packaging. It is also easy to make, but thanks to it, bouquets of apples become many times more beautiful, since all the flaws in the work process are hidden under the rustling packaging.

First, cut off all protruding branches. So, if the skewers have approximately the same length, then the branches and flowers can have long stems. Gently holding the gift itself with your hand, we shorten the stems, putting as little pressure on the bouquet itself as possible. This means that you should not, in fits of perfectionism, press the bouquet to the table surface, shake it and wrinkle it, thereby spoiling its appearance.
When the top item is ready, you can proceed to paper decoration. To do this, take the paper, giving it the shape of an elongated rectangle, and attach it to one side of the bouquet. Then, as if stretching the paper, wrap the entire base of the bouquet. And there’s nothing to worry about if it doesn’t work out the first time: it’s absolutely normal. You just have to unfold the whole paper and start over. Also, don’t worry about dents in the paper that form every now and then when trying to wrap a bouquet. All these details will only emphasize the originality and individuality of your gift.
Decoration options
Now that the entire bouquet is ready, you can slightly decorate it. To do this, take a string or satin ribbon and carefully tie it to the base of our homemade gift. In addition, you can tie a tag to the thread where wishes, your names or something else will be written.

A tag or card can also be placed between the delicious filling of the bouquet, as florists usually do with real flower bouquets.
Why him?
And now main question, which is probably of interest to many adherents of ordinary bouquets of bright flower arrangements. Why a bouquet of apples? In fact, the answer is simple: it has many advantages, pushing the classics of past centuries back.
The fact is that it is easier to maintain, since such a gift does not need to be placed in a vase with water, into which it is necessary to add some special additives so that the flowers retain their color and aroma longer. Then, you don’t need to clean up after it, like a bouquet of roses that sheds a couple of leaves every day, hinting at its expiring life. And in the final result, in the case of a delicious bouquet, only the wrapper and skewers will go into the trash. Another thing is flowers, which even in dried form are a pity to throw away.

And if you remember the variety of food supplies that a person has, then this question quickly disappears. After all, when choosing colors, you often don’t even know what would be better suited in this situation, what preferences does a person have, or maybe he is generally allergic to plant pollen.
Then a bouquet of apples with your own hands is what is ideal for any celebration, for a person of any age and income. Your job is only to skillfully combine products, using them wisely, because the impression of the gift will last for a long time.
A bouquet of flowers, even a very large one, will surprise few people. Therefore, craftswomen figure out how to create a composition from unusual objects. We present to you a master class on a bouquet of vegetables with your own hands. Both beautiful and useful.
Simple option
We will need:
- vegetables;
- wooden skewers;
- green floral ribbon;
- wrapping paper, ribbon or twine.
Everything is very simple. Thread each vegetable onto a skewer.
The skewer must be wooden, since the material does not allow the product used to oxidize.
We collect it in a bouquet. In this case, you can leave the skewers undecorated, or you can cover them with floral tape.

If necessary, trim the ends of the skewers.
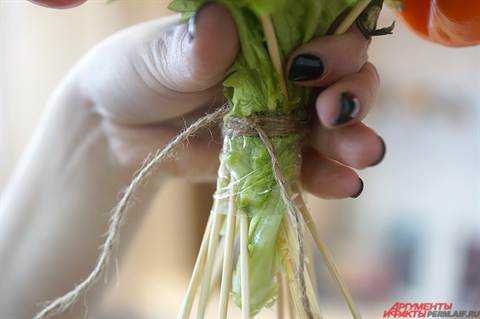
We can decorate the bouquet with lettuce leaves and secure it with twine, but then such a bouquet should be given quickly, because the lettuce may wither. Or you can classically pack the bouquet in paper by tying a ribbon.

The bouquet can consist not only of vegetables, but also, for example, of fragrant herbs.
You can add mushrooms to this vitamin complex.

Such a variety of colors is certainly pleasing to the eye. But a bouquet in two or three harmonizing shades looks very elegant.

You can include fruits in the vegetable composition, for example, lime, avocado, kiwi, etc., as shown in the photo. Also add a bunch of cinnamon sticks.

The video master class below describes step by step the entire process of creating a bouquet, in which red hot pepper plays the main role.
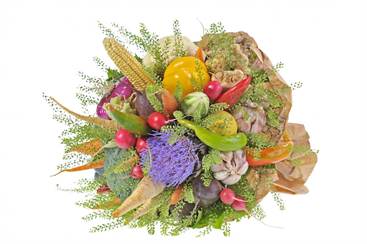
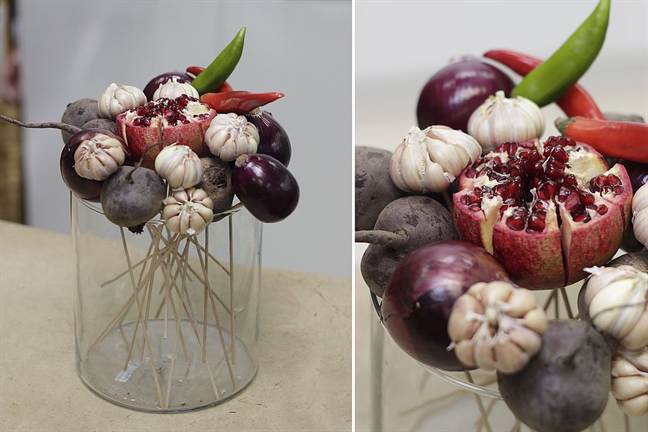
Bouquet with pomegranate

Material and tools:
- firm vegetables of your choice. This master class uses garlic, beets, onions, bell pepper, and, of course, pomegranate;
- fresh flowers: roses white, dahlias, leucodendron and eucalyptus branches, you can take green lettuce leaves;
- floral or tape tape;
- wrapping paper;
- wooden skewers;
- pruner;
- scissors.

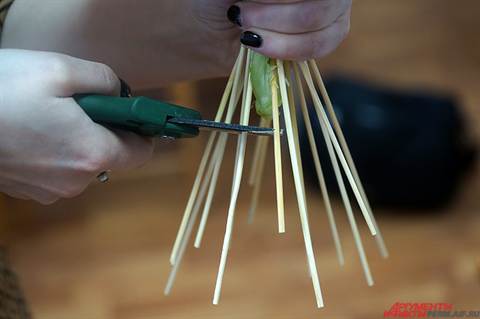
It is necessary to wash and thread the vegetables onto skewers, as described in the first example. Let's design the pomegranate a little unusually. Cut off the top and open it slightly so that it resembles a blossoming bud.

If this is your first time making a bouquet, you can purchase a frame at a florist shop that makes the work easier. We place the salad on its inner side.
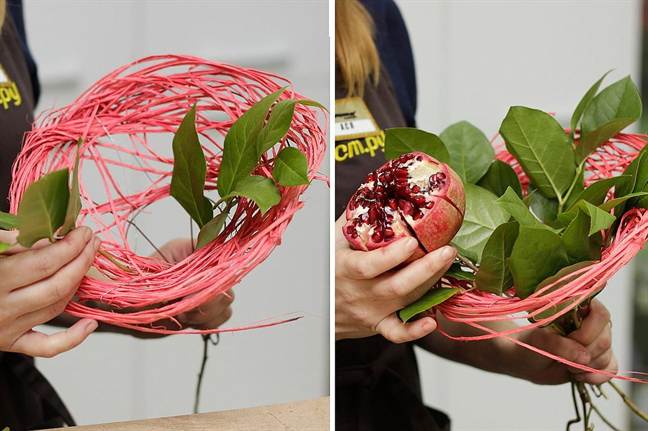
Gaps in the frame will allow you to insert skewers with vegetables very easily, but at the same time fix the element.

In order for the bouquet to look harmonious, use the triangle rule, i.e., each type of vegetable or decoration should make up this very figure.
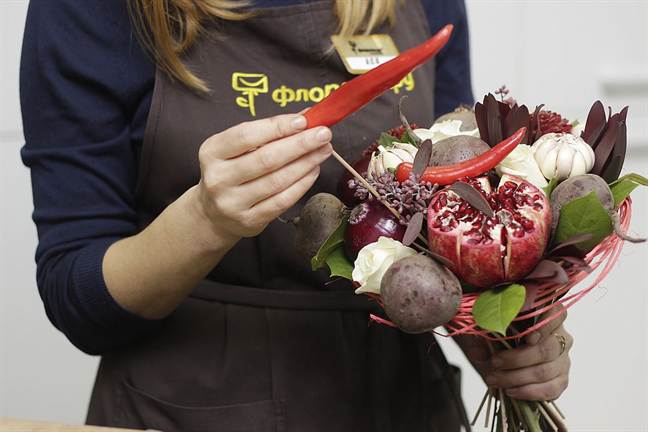
We add fresh flowers and sprigs of herbs to the vegetables. Wrap with wrapping paper. We will tie a ribbon at the base.


Composition using carving technique
Carving is the art of artistic cutting of vegetables and fruits. This technique requires skill, but with practice you can master the basic knowledge. For a trial run, there is no need to purchase special tools.

We will need:
- vegetables (onions, carrots, zucchini, beets, pumpkin, bell peppers);
- skewers;
- foam base;
- twigs with leaves, either live or artificial;
- sharp knife.
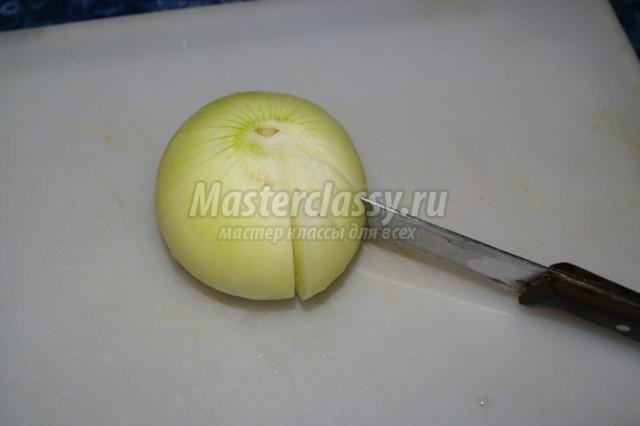
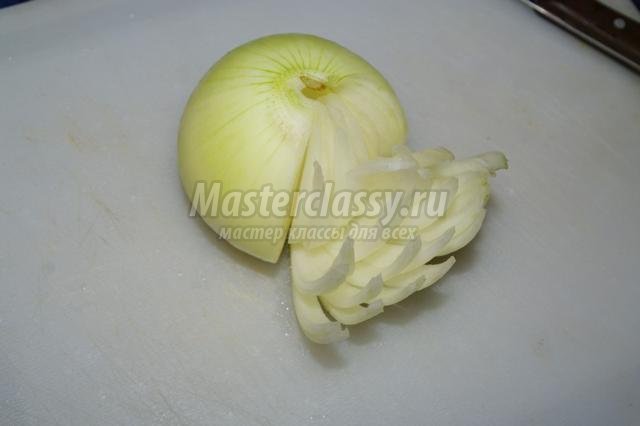
Take a pumpkin, cut off the top and remove the pulp from the pit. We place a foam base at the bottom. If you feel sorry for a vegetable, you can take a basket. We begin to cut flowers from the onion. We cut it into thin slices, not reaching the base. Open the “petals” slightly.
Cut the carrots into thin slices; you can use a vegetable peeler or a food processor with an appropriate attachment. We connect the circles into a rose, as shown in the photo below.

We form a flower from beets in the same way.

Cut lilies from zucchini. To do this, divide the vegetable in half and cut it on the sides, simulating petals.

We collect a bouquet. We can decorate with greenery. From a red pepper, for example, by analogy with a zucchini, you can cut out bells and hang them on the handle of a basket.
Do you want to surprise your loved ones with an original bouquet of sweets, paper or tea? The article presents simple and accessible master classes on creating bouquets from scrap materials.
Bouquets of flowers have been and will always remain the most relevant and pleasant gift. They can be given for any occasion: on a date, birthday, teachers and girlfriends, at a wedding and just for any pleasant occasion. But it is not necessary that these are bouquets of fresh flowers. There are many options for bouquets made of paper and sweets, soft toys and fruits.
Thanks to a riot of imagination and skill, you can come up with and make such a bouquet for any celebration. Moreover, such a bouquet will never wither and will delight its owner.
How to make a bouquet of money with your own hands?
Many people prefer to give money for the holiday. But to add originality to such a gift, you can make a bouquet of fake banknotes and put in it the amount you intend to give. Although if you are ready, you can make the same bouquet from real banknotes.
For creative process you will need:
- Certain banknotes
- You can use the stem from the flower as the base of the flower. artificial flower, wooden skewer or cardboard tube
- Scotch
- Rubber bands
- Glue gun
- Scissors
- A piece of foam
- Colored ribbon
- Oganza, feathers
To make petals, twist the ends of the bills onto a skewer.

 how to make a bouquet from banknotes?
 how to make a bouquet of banknotes?
 We wrap a paper tube that we prepared earlier or a wooden stick with a bent banknote and secure it with an elastic band.
 how to make a bouquet of banknotes?
 Other money is attached in the same way to make the flower as magnificent as possible.
 how to make a bouquet of banknotes?
 Now you can start forming buds on the stem:

 how to make a bouquet of banknotes?
 Take a skewer, wire or base from another artificial flower
We wrap a piece of foam rubber around the end of our leg and dab it with glue so that it is securely attached to it. The inside of the flower blank also needs to be greased with glue without touching the money. While the glue is not dry, you need to put the tube with the flower on the leg and let it dry.

 how to make a bouquet of banknotes?
 how to make a bouquet of banknotes?
 To form the shape of the bouquet, you can use polystyrene foam, insert sticks there and decorate with organza, beads, feathers and ribbons, or decorate a basket with them.
How to make a bouquet of corrugated paper with sweets with your own hands?
To prepare for a master class on making paper and candy tulips you need to prepare:
- corrugated paper white and green
- long wooden skewers
- scotch
- light threads
- green ribbon
- candies in foil
- paper for decoration
- pink organza
- green ribbon
- scissors
- glue gun


 DIY bouquet made from corrugated paper
 First of all, we attach each candy to the leg using tape. We put the candy on the leg and attach the skirt itself with tape along the entire length.

 DIY bouquet made from corrugated paper
 DIY bouquet made from corrugated paper
 We fold each piece in half and twist it in the middle. We fold the halves together, unbending the paper and forming a three-dimensional petal.

 DIY bouquet made from corrugated paper
 We take the candy on the stem and attach the petal with a white thread. We do this with each of the three blanks.
 DIY bouquet made from corrugated paper
 DIY bouquet made from corrugated paper
 Then you need to cut green paper to get leaves. The result is strips about 4 cm wide. We cut each of them into 4 pieces and form a leaf shape with scissors. Attach the leaves to the petals so that they are slightly higher.

 how to make a bouquet from corrugated paper and sweets?
 To cover all the unsightly attachment points, you need to cut strips of green paper and wrap them around the bud from the bottom to the very end of the stick.
 how to make a bouquet from corrugated paper and sweets?
 On top, just above the bud, you can attach a leaf of the same color.

 how to make a bouquet from corrugated paper and sweets?
 At the bottom we attach the paper with glue.

 how to make a bouquet from corrugated paper and sweets?
 This way you can make the number of flowers that was intended for the bouquet.

To decorate them, we wrap some of them in lilac organza.
 How to make a bouquet from paper and sweets?
 To do this, cut it into 10*10 cm squares and fold it in half diagonally.

 How to make a bouquet from paper and sweets?
 We fasten the organza at the base of the bud with a stapler.

 How to make a bouquet from paper and sweets?
 We do this with all the buds.

 How to make a bouquet from paper and sweets?
 Holding the entire bouquet with your hand, wrap the entire stem with tape.
 How to make a bouquet from paper and sweets?
 Then we use tape over the tape to hide all awkward places and give the bouquets a finished look.

 How to make a bouquet from paper and sweets?
 Wrap everything in wrapping paper for florals, turn the bouquet diagonally.

 How to make a bouquet from paper and sweets?
 How to make a bouquet from paper and sweets?
 Tie with ribbon in the middle desired color from organza. The bouquet is ready for congratulations.
How to make a bouquet of fruits with your own hands?
Fruit bouquets are very relevant at any time of the year and will delight any woman not only with their beauty, but also with their original taste.
Suitable for creating a bouquet: pineapples, strawberries, grapes, kiwi, oranges.
The main thing is that the fruits are not overripe and dense. Also, those fruits that tend to change color are not suitable. For example, apples or banana.


 How to make a bouquet of fruits?
 You will also need forms for cutting out figures from fruits, skewers different lengths, ribbons or chocolate if necessary foam and a basket.
You can cut the strawberries in half lengthwise and place them on a skewer, dip them in melted chocolate and sprinkle with coconut flakes, place them in the cold to set and then decorate the skewer with a ribbon.
 How to make a bouquet of fruits?
 Cut the pineapples with a flower-shaped cutter and also string them onto the stems. Place it between the skewers with the strawberries.

 How to make a bouquet of fruits?
 String several berries in the form of blueberries or grapes like beads and dilute the composition with them. Place polystyrene foam into the basket, attaching it with glue to the bottom and insert all the sticks with fruit in turn to make a composition. You can add a ribbon bow or wrap it in transparent film for flowers.
To really surprise a woman, you can make a very extravagant bouquet of vegetables. Moreover, given the developing trend of vegetarianism, this will be a very relevant and welcome gift for many.
For it we will need:
- Tape
- Skewers
- Any rope or tape
- Any vegetables are suitable: carrots, ginger, onions, garlic, decorative pumpkins, pepper, potatoes, radishes, beets, cucumber, eggplant, corn, cauliflower, lettuce leaves

 How to make a bouquet of vegetables?
 How to make a bouquet of vegetables?
 How to make a bouquet of vegetables?
 How to make a bouquet of vegetables?
 Next, we assemble our bouquet by placing each of the vegetables on a large kebab skewer. We decorate the attachment point with tape and wrap it around the leg.
You need to assemble using the spiral technique - first the most big vegetable and smaller ones gather around it in a spiral. We periodically add lettuce leaves to finish the composition until all the vegetables are gone. Wrap in craft paper and secure with ribbon.
How to make a bouquet of tea?

 How to make a bouquet of tea?
 For tea lovers, fragrant and healthy bouquets of tea and sweets are suitable. For that. To make this table decoration you will need:
- candy for flowers
- tea, coffee in individual bags
- corrugated and wrapping, foil
- wire
- scissors, stapler, glue
- electrical tape (or tape)
- ribbon
- additional decor (optional)
 How to make a bouquet of tea?
 How to make a bouquet of tea?
  How to make a bouquet of tea?
 As a basis, you can take any cardboard circle, which can be decorated with craft paper or sisal. Next, we attach the tea bags along the edges using glue. Glue sweets and artificial flowers in the middle. The bouquet is ready for tea!
How to make a bouquet from coffee?
To put together a bouquet similar to the previous one from coffee, you need to stock up on high-quality coffee bags and decor.

 How to make a bouquet from coffee?
 How to make a bouquet from coffee?
 Take corrugated paper and fold it into a basket. Fill the basket with coffee bags and secure it with glue. The void between coffee can be filled with artificial or fresh flowers.
You can dilute the decor with beads or ribbons. And finish by attaching a bow and wrapping it in transparent film.
Newspaper bouquets usually consist of paper roses. Which we will try to do today.
In order to make such roses, we need:
- old newspapers
- scissors
- pencil
- wire and beads

 How to make a bouquet from newspaper?
 We string a bead onto a 30 cm long wire and twist it in the middle. We cut out several petals of different sizes from six layers of newspaper. Templates can be downloaded on the Internet.

 How to make a bouquet from newspaper?
 How to make a bouquet from newspaper?
 How to make a bouquet from newspaper?
 We wrap these petals around the bead and secure them with glue at the base.
We straighten the petals outward, adding volume.

 How to make a bouquet from newspaper?
  How to make a bouquet from newspaper?
  How to make a bouquet from newspaper?
 The more petals are bent, the more realistic the rose looks. And so, from smaller petals to larger ones, the entire bud is built. Next, we cut out a strip from the newspaper and attach it with glue at the base of the bud, wind it around the entire trunk, coating it with glue so that the wire is not visible.
Perhaps very interesting and creative activity could be creating fruit bouquets. In order to create such a masterpiece, we use fresh fruits and vegetables. For decoration you can use various decorative elements and even fresh flowers. A bouquet of fruits will become an original gift, as well as delicious treats. However, we should not forget that it is better to eat this bouquet as soon as possible, before the sliced fruits begin to deteriorate. DIY delicious bouquet fruit will become a completely original dessert, as well as interesting activity which can be done with children.
Here in the photo you can see what fruit bouquets look like:
Master class on creating a fruit bouquet with your own hands
This article will help teach everyone how to make a bouquet of fruits as a gift to loved ones.
To create such a bouquet, you will need certain ingredients. You can use absolutely any fruit, berries and even chocolate. Any greenery is also suitable for decoration. Wooden skewers are used to skewer the fruit. To decorate a bouquet beautifully, it is worth preparing a container in which the bouquet will be located.
This master class uses certain fruits. Step by step description preparations and photos are attached.
First of all, cut the pineapple into slices about one and a half centimeters thick. After that, you can cut out absolutely anything you want from these circles. If there are special molds, then it is quite possible to use them.
Small pieces are cut out of the melon, which will become the middle of the flower. You can cut it out using an ice cream scoop. The finished flower is pricked onto a skewer. Strawberries and grapes are also skewered.
Next, a container is prepared in order to place the cooked fruits in it. A small piece of salt dough is placed in the vessel (can be replaced with clay). In order to prepare the dough, you need to mix flour, salt, water and a little vegetable oil together. Mix all ingredients thoroughly until you obtain a consistency similar to plasticine. If the container is transparent, then before placing the dough, it is better to place beautiful napkin so that the dough is not visible.


The second option for a gift flower and fruit bouquet
This article will give a master class on creating a bouquet of fruits and flowers. Step-by-step description and photos are attached.
Such floral composition can become good decoration any home in autumn. It's also not very difficult to make.
To create such a bouquet you will need certain materials:
- zucchini; any three large flowers;
- rowan or viburnum berries;
- apples;
- one sprig of grapes (wild grapes can be used);
- pears or other larger fruits;
- large leaves of horseradish or bergenia;
- long narrow leaves gladiolus onion;
- wire;
- knife;
- any cut plastic jar and water.
First of all, you need to take the zucchini and cut off a little of its bottom. The pots need to be checked for stability. Using a knife, cut through and select a location for the container. A part of the cut out zucchini is inserted into the cut place, and any wire, crumpled in advance, is inserted into this part. It is best to replace the wire with a sponge for flowers. First, large leaves must be inserted into the prepared wire, then flowers and successively all other materials. If the entire length of the petiole is not enough, it can be lengthened using wire.

Apples are put on wire, or on sticks. Next, the long leaves need to be bent into loops and all this must be inserted into the future composition. After this, water is poured in. It must be poured very carefully. The bouquet is ready.
The most common fruit bouquet for beginners with photos
The article describes a master class on making a bouquet of fruits for beginners. It doesn’t take much time to make such a bouquet. First of all you need to prepare salty dough, which is necessary in order to hold skewers with strung fruits. The dough needs to be made plastic.
Wrap the finished dough in a napkin and place it in a container; a napkin is necessary if the container is transparent. This way the dough will not be visible.
Strawberries are also put on skewers. Next, the bouquet itself is formed. First of all, strawberries are placed in the vessel, followed by kiwi on skewers. Also, cherries are placed on skewers, which will fill the empty spaces in the bouquet. You can disguise the visible dough and skewers with dill or parsley. We place the vessel with the finished bouquet on large napkin, lifting the edges of the napkin, tie a beautiful ribbon.


