Doll in a skirt with roses and candies. MK

I glue most of the skirt to the base, then insert the doll and glue the bottom. 
I glue the top of the skirt at the waist with tape end-to-end, slightly stretching the polyethylene foam around the doll so that the entire structure is stable. I place the seam in the back center, seal it completely with tape, also end-to-end, and trim off the excess to maintain the cone shape. 


For insurance, I also wrapped tape across the entire skirt so that the main decor would hold firmly. To decorate the bottom of the skirt, I gather a wide ribbon onto a thread, sew it into a ring and glue it 2 cm above the edge, and glue some folds to the very bottom. 

I cut the candy wrappers and glue one row directly onto the base, then roses around the entire circumference, then a row of candies by twisting the candy wrapper.


I lay out a triangle in front with roses of a different color, with pounds and candies between them.
To prevent the candies from falling between the roses, I lightly glue the “petals” of the roses together in one row. Next are beads, ribbons, hat decor in the color of the skirt. Sometimes you have to tear off the rose bows that came with the kit and sew on your own to match the overall color scheme. I do the same with an umbrella or handbag - I change the decor and add candy. 

You can buy anything in the store, but you know that receiving homemade gifts is a thousand times more pleasant. Here are 17 cozy, useful, simple and very budget options. Instructions included.
Thirstyfortea.comA great gift for tea lovers. “Tea connoisseurs don’t drink sawdust from tea bags!” - you say. But who’s stopping you from packaging good, expensive tea in envelopes?
You will need:
- a cone made of foam plastic or thick cardboard;
- round cardboard box and rice for stump;
- tea packed in small paper bags (the quantity depends on the height and diameter of the cone);
- glue gun;
- star, bows and other decorations of your choice.
Cover the cone with tea bags, applying glue to the top of them. Move from bottom to top in a checkerboard pattern. It is better to use bags of contrasting colors: the tree will look more elegant.


Glue the lid of the cardboard box to the bottom of the cone. Fill the box itself with rice to make the tree more stable, and then attach it to the lid. If you don’t have a ready-made box of the required diameter at hand, make it yourself. Take a tube from a roll of paper towels as a basis or glue it from cardboard according to this pattern.
Decorate the tree with bows, rhinestones and other decorative elements, and glue a star to the top of the head.
 Tara Aveilhe/Flickr.com
 Girls will highly appreciate such a gift. After all, this is an individual scent; no one in the city will have such a perfume.
Before you create, find out what smells the one you want to please prefers. For example, if a girl likes citrus scents, she will need lemon or orange. To add woody notes, you need sandalwood or cedar oils, powdery ones - roses or vanilla.
Ingredients:
- ½ cup almond oil;
- ½ cup grape oil;
- 100 g beeswax;
- 1 teaspoon vitamin E;
- 60 drops of lemon oil;
- 25 drops of eucalyptus oil;
- 20 drops of lavender oil;
- 20 drops rosemary oil.
Mix almond and grape oil with wax in a separate saucepan and place on steam bath. When the wax has completely dissolved, let the liquid cool slightly and add essential oils and vitamin E. Pour the future perfume into molds. A bottle of old hygienic lipstick, a jar of Vaseline, etc. will do.


Once the wax has hardened, the perfume is ready to use. All that remains is to package them beautifully.

A great gift for freezing girls. A pair of warm, fairly sturdy socks that you don't wear can be turned into fingerless gloves.
Additional materials:
- needle with thread;
- heart cut out of felt.
Trim and sew the sock as shown in the photos. Be sure to hem the edge to prevent fraying, and make all seams from the inside out.

Sew a felt heart on top. You can use any other decorative means. For example, embroider the inscription “Happy New Year!” or embroider mitts with rhinestones.
Another DIY gift for those who are always cold is. By heating it for 1-3 minutes in the microwave, you will get a great heating pad that also smells nice.
 GA-Kayaker/Flickr.com
 Paracord is a cord made of nylon. Initially used as a material for parachute lines, but then paracord began to be used wherever a lightweight and durable cable might be needed. For example, it is used to weave stylish Mens Bracelets. IN ordinary life- just a decoration, in an extreme situation - a life-saving rope.
Exist various techniques paracord weaving. Here is one of the most common.
You will need:
- 150 cm of paracord of one color and the same amount of another (it is desirable that the shades be contrasting);
- 75 cm of black paracord;
- scissors;
- ruler;
- needle and thread.
From paracord you can weave not only a bracelet, but also a keychain, or make a braid for a knife or a car steering wheel. You can easily find the diagrams on the Internet. It’s even easier - watch video tutorials on YouTube, there are many of them.
 Witandwhistle.com
 You can not only drink from such a mug. You can leave messages on it for your household or just draw.
Materials:
- white porcelain mug without relief;
- slate paint;
- masking tape;
- brush.
Chalkboard paint is most often used to renew the surfaces of school boards. Now big choice such colors. You need one that can work on ceramics. For example, like this one.
Choose an area of the mug that is comfortable to write on, but that will not come into contact with your lips when drinking. Cover the rest of the mug with masking tape.
Degrease the untaped area and apply paint to it in a thick layer. Remove the tape and leave the mug in a well-ventilated area for a day.
 Witandwhistle.com
 When the paint is dry, place the mug in an oven preheated to 150°C. After 30 minutes, turn off the stove, but remove the mug when it has cooled.
Now the mug can be washed in the dishwasher and put in the microwave.
 Heygorg.com
 If you are one of those who like to give experiences rather than material things, you will love this idea. After all, it’s not only a delicious warming drink, but also a reason to go or invite you to visit.
Take some pretty glass jars and fill them about a third full with hot chocolate or cocoa powder. Add a few candies or pieces of chocolate. Fill the remaining space with marshmallows.


Decorate the jars to your liking. For example, place a piece of fabric under the lid and attach a heart made from candy canes to the top. The label can serve as a postcard; write your wishes on it.
Another variation of this gift is a set for mulled wine. Take an orange, an apple, a clove and a cinnamon stick. Pack it all beautifully, make a label with your wishes and add a bottle of good red wine.

Candles - traditional New Year's gift. But glamorous store-bought ones are one thing, a personalized candle or a candle with a phrase understandable only to the giver and recipient, or even with a photograph, is another.
Take:
- white candles with a diameter of 5–7 cm;
- A4 size printing paper;
- parchment paper;
- scissors;
- glue stick;
Trim the parchment paper so that it is 1-2 cm wider than the A4 sheet. Glue the parchment to the printing paper, turning the edges over to the other side. Insert the sheet into the printer with the glossy side, that is, the side where the parchment is. Print out the image you would like to place on the candle.


The drawing will appear on parchment paper. Now you need to transfer it to a candle. Cut out the image, attach it to the candle, wrap it tightly with another layer of parchment on top and direct a stream of hot air onto the resulting structure. If the picture becomes lighter, it means it was imprinted on the candle. Remove carefully upper layer parchment and let the wax harden.
The gift is ready! If desired, you can decorate it with rhinestones or sparkles.

This cosmetic bag greatly simplifies the search for the necessary items, because any lock can be opened.
You will need:
- 10 zippers 15–20 cm long;
- safety pins;
- needle or sewing machine;
- threads
Sew the zippers to each other from the inside out; for convenience, you can first attach them with pins. Close the resulting fabric into a ring and sew. Also sew the zippers across in front of the dogs, and then turn the cosmetic bag inside out.


This is a gift for a person who cannot part with gadgets. Using the same principle, you can sew a phone case.
Materials:
- a piece of felt suitable for the size of the tablet;
- 2 buttons;
- sewn-in magnets;
- safety pins;
- dense thread in the color of the buttons;
- thread in the color of felt;
- needle;
- scissors.
Fold the fabric so that the bottom part is longer than the top: this is the future cover of the case. Sew along the edges and turn the product inside out.
Cut the lid into a wave or semicircle. Sew a button to the middle. Attach the second one below, to the case. Make a loop between them, as shown in the photo.
 Ohsolovelyvintage.blogspot.ru
 Sew a magnet to the base and lid of the case on the left and right. The fashionable case is ready!
You can also make a stylish organizer for headphones, flash drives, phones and other gadgets from an old book in a beautiful binding. Here's the detailed one.
 lePhotography/Flickr.com
 A gift that will delight not only children, but also adults with a sweet tooth. Making Santa Claus's sleigh is very simple.
You will need:
- glue gun;
- ribbons and other decor;
- sweets: chocolate, sweets, candy-shaped candies.
Here is a detailed video instruction.

A gift for a bosom friend or colleague. Beer can come in handy on January 1st, and brown bottles can easily be styled to resemble Rudolph and friends. (Rudolph is one of Santa's reindeer, distinguished by his red glowing nose.)
Materials:
- beer in dark glass bottles;
- decorative wire;
- toy eyes;
- red pom-poms;
- ribbon and bows;
- box;
- Super glue.
Remove labels from bottles. Make antlers from wire for future deer.

Glue them to the back of the bottle. Attach the eyes and nose to the front. Tie a ribbon (to prevent it from slipping, you can fix it with glue).
 Craftysisters-nc.blogspot.ru
 Decorate the rest of the bottles in the same way. Put them in a box and decorate it.

A gift for economical women and men who love to cook.
You will need:
- cotton fabric with a New Year's pattern;
- batting for lining;
- threads;
- scissors;
- needle.
If you have a sewing machine, the work will not take much time. Detailed video instructions- from pattern to thread cutting - included.
Inside such a mitten you can put a spatula, a ladle and other little things useful for the kitchen.
A little more imagination, and a gift for New Year will become even more original. Attach a ring to the spatula and hang favorite family recipes printed on cards and laminated on it.
 Lilluna.com
 Glass snow... wine glass

Balloons with a miniature figure and artificial snow inside are very popular. Life hacker already shows how to make something similar from an ordinary glass jar. Today it's the turn of wine glasses.
Materials:
- transparent wine glass;
- thick cardboard;
- a figurine that can easily fit into a glass;
- artificial snow;
- bows and other decor;
- glue.
Cut a circle out of cardboard with the same diameter as the wine glass. Glue the figure to the cardboard. It could be a Christmas tree, fawns, or, for example, a car with a Christmas tree on the roof.

Place artificial snow, finely chopped white paper or polystyrene foam. Glue the cardboard base to the edge of the wine glass and turn it over. Decorate the leg with a bow or ribbon.
 belchonock/Depositphotos.com
 In the past year, blankets are very large knit incredibly popular. Finished products are quite expensive, so it’s more profitable to make a blanket yourself.
Merino wool is best suited for this, but other thick threads can be used. Video tutorial attached.
By hand, without knitting needles or a hook, you can also knit a beautiful Warm scarf. Lifehacker has already seen how this is done.
 Ourbestbites.com
 This gift will help you remember the best moments of the past year. Just choose the best photos and print them. Get some clear glass jars and vases. Round and cylindrical vessels work best.


Many people have flaky skin in winter. If there are such people among your friends, prepare them a sugar-lemon scrub as a gift..

According to Chinese calendar, the symbol of 2017 is the rooster. Therefore, gifts with the image of a rooster or in the shape of roosters and hens will be especially relevant. Universal option such a gift is a Christmas tree toy.
You will need:
- cardboard blank in the shape of a rooster;
- thick fabric;
- filler for toys;
- twine and lace ribbon;
- white outline;
- scissors;
- needle and thread;
- glue gun
The manufacturing process is shown in the following video.
You can sweeten such a gift with sweet cockerels on a stick. Many people still have their uniform from Soviet times.
Ingredients:
- ½ cup granulated sugar;
- 2-3 tablespoons of water (just to moisten the sugar);
- 1 tablespoon apple cider vinegar(in some recipes add regular table salt or a pinch of citric acid).
You need to boil syrup from sugar and pour it into a generously greased vegetable oil form. Then stick the sticks in and wait until everything hardens.

If you know other original DIY solutions, share them in the comments.
2 213 936
The anticipation of a holiday is often more pleasing than the holiday itself. Especially if you approach this matter responsibly and start preparing gifts in advance. And you don’t have to go on a shopping spree, buying all the little things that catch your eye. It’s much better, cheaper and more enjoyable to prepare cute gifts with your own hands.
Panel made of threads and nails
A stylish picture made of threads and carnations is a creative gift for all occasions. You can present it to both relatives and friends. Gorgeous panel self made will not leave anyone indifferent.
To work you will need:
- a piece of board or plywood of a suitable size;
- paper template of the desired image;
- thick threads (floss or yarn);
- thin cloves;
- masking tape;
- hammer.
Prepare a drawing template on paper in advance. Secure it to the base with masking tape and hammer nails along the contour at equal intervals. Their height should be the same - do not forget to control this.
Remove the paper pattern. Now the time has come creative stage work - wrapping nails with threads.
Tie the end of the thread to one of the nails and cut off the tail. Start in in no particular order wrap the nails with threads, there should be sharp corners between them - constantly change the direction and try to grab each nail at least once.
At the end of the work, tie a thread to one of the nails and cut off the tail.


Some ideas for inspiration:


If you still have questions, watch a step-by-step video master class on creating panels from threads. You will see that there is nothing complicated about it, and it can be made quite quickly and at minimal cost.
Edible bouquets
Edible bouquets of fruits, vegetables, sweets and snacks are a new fashion trend for unusual gifts. They are gaining more and more popularity for a variety of reasons:- it's unusual and cool;
- You can eat such a bouquet with pleasure; it will not be thrown away withered, unlike a traditional flower arrangement;
- To create them, it is enough to arm yourself with imagination and patience, having first visited the nearest supermarket.
Bouquet of vegetables and fruits
It is difficult to surprise anyone with a basket of vegetables or fruits, but an original composition assembled from them will be an excellent gift. Stock up on fresh gifts from nature, toothpicks and patience. Additionally, corrugated paper, ribbons, lettuce leaves, foil and other decorative elements will help decorate the bouquet.Tangerine tree
An unusual topiary made from tangerines is a wonderful winter gift idea. Such an interesting tree will create a festive atmosphere and fill the whole house with its aroma. Armed with your imagination, try to create decorative trees from small oranges or lemons, decorate them with pine needles and shiny ribbons and New Year's tinsel. The main thing is not to be afraid of experiments.
Men's bouquet of fish, beer and nuts
Even such banal products as beer and nuts can be presented beautifully and tastefully, using them as a heartfelt bouquet for men's company. Even a novice lover of DIY crafts can make it at home.
Bouquet of sweets
Flowers and sweets are an ideal gift option for all occasions. Do you want to surprise everyone with a non-standard approach? Feel free to visit with a unique one. It will be a wonderful surprise not only for those with a sweet tooth and will be remembered for a long time by everyone present. How to create an original present, watch the detailed video tutorial.And here you can see how to design a “Sweet tank made from Pepsi and candies” for boys:
Tank made of socks - an original gift for a man
Socks for your husband on February 23rd are the subject of many jokes. But they can also be presented in such a way that the loved one cannot even utter a word out of delight, not to mention jokes.
To make a gift you will need:
- 5 pairs of plain socks in dark and gray:
- a 0.3 liter bottle of your favorite drink, preferably with a high neck;
- colored paper;
- wine stopper;
- toothpick;
- 2 rubber bands for money;
- leg-split;
- glue;
- ribbon.

Roll gray socks into tight rolls and secure with elastic bands.
Connect them together by putting loops of twisted elastic on them. You should have one garland of 6 rollers.

Wrap the resulting structure with 2 dark socks. Tuck the toe of one into the elastic of the other.

Place the sock over the bottle, pulling it up to the twine. Fold the remaining part up and tuck it under the elastic band.

Wrap the bottle crosswise with the other sock, placing the heel inward. To make it clearer, look at the photo. Hide its ends under the fold of the first sock.

The design should look like this. It can be secured in the corners with sock staples or small paper clips for strength.

Wrap the wine cork in black paper. Place the tank turret on the tracks. Smooth out any rough edges. Make a flag from a rectangle of construction paper and a toothpick. Insert it under the twine and secure the entire structure with tape.

A cool gift for your favorite tanker is ready.


Candles of original shape
An unusual multifaceted candle will be a wonderful and useful souvenir. Despite the apparent complexity of the form, it can be made easily and quite quickly.
To work you will need:
- candle template printed on glossy photo paper;
- paraffin;
- wax crayons of the desired color;
- wicks;
- scissors;
- ruler;
- PVA glue.


Carefully cut out the template along the outline.

Using a ruler, bend all the edges.

Glue the edges of the template: they are numbered so that it is clear in what order to connect them.

Press the edges tightly to ensure good adhesion of the parts.

The glued workpiece can be covered with a layer acrylic paint to prevent possible paraffin leakage.

Melt the paraffin in a water bath, add crushed wax crayon of the desired color and aromatic oil (optional).

Place the wick in the center of the mold so that it reaches the bottom and carefully pour in the paraffin.

When it has completely hardened, remove the paper mold from the candle. Your creation is ready.


Want to more ideas for a flight of fancy? See another one step-by-step master class creating colorful scented candles.
Unusual candlesticks
Still wondering what gift you can make with your own hands? Make a beautiful candlestick. It will fill your home with comfort and will be an excellent gift for your family and friends.
To work you will need:
- small glass jar;
- matte black paint;
- masking tape;
- a simple pencil;
- sharp knife or blade;
- twine, braid or ribbons for decoration.

Cut it along the contour with a sharp knife. Carefully remove excess tape, leaving the heart still attached.

Paint the entire outside of the jar with black paint. To do this, it is convenient to use spray paint.

Let the piece dry completely and decorate it as you wish. You can tie the top of the candlestick with a ribbon or twine, draw a dotted line around the heart with white paint - use your ideas about beauty.

All that remains is to place a small candle inside the jar and light it - the house will immediately be filled with an atmosphere of warmth and comfort.

A picture of what was
Do you want to please your loved ones for a housewarming with a painting of your own, but you don’t know how to draw at all? No problem. You can easily create a spectacular panel from scrap materials, and you don’t even have to pick up a brush.
To work you will need:
- large wooden or plastic frame with base;
- white Whatman paper;
- two sheets of black or other contrasting color;
- glue gun;
- pencil;
- scissors;
- ruler;
- scrapbooking paper;
- braid, ribbons, rhinestones, beads and other decorative elements.

Glue scrap paper of any color with random patterns into each small frame. Elements of the picture can either harmonize with each other or contrast.

Decorate each blank of a large panel as desired: glue a lush bow from satin ribbon, interesting buttons, voluminous flowers from corrugated paper, decorative stones or large beads. The design of the painting and the flight of imagination at this stage are limited only by the available materials. You can supplement the work with inscriptions or photographs.


The main features of such a painting are that it is unique in its kind, exists in a single copy and was made with love for loved ones.
Mirror with frame made of branches
Mirrors with spectacular and unusual frames can completely transform even a dull room. The cost of such decor in stores is quite high. But why pay for something you can do with your own hands practically for free?
To work you will need:
- wall mirror with simple frame;
- willow twigs of the same thickness or wooden skewers;
- glue gun;
- masking tape;
- a can of spray paint in the desired color.

Glue the remaining rods tightly to each other, alternating their lengths. Let the glue dry.


Paint the bars and frame of the mirror with the desired color and leave until completely dry.

Attach to back side the mirror has a loop so that it can be hung on the wall.
Looking in such a mirror is pure pleasure. Don't believe me? See for yourself.

We give money in an original way
Are you completely tired of searching for the right gift? Give something that is always needed and invariably causes sincere delight - money.You can present them to the hero of the occasion in the most unusual ways. 
Ideas for original handmade gifts
Beautiful and cute souvenirs made with love cannot be compared with store-bought trinkets. They carry love and positive energy. This is also a great way to spend leisure time with the whole family, because even a child can be involved in creating various crafts.We are in social networks:
Original do-it-yourself gifts
Lately, many people have been asking the question: what to give to the person who has everything? Today, gifts that have practical value are increasingly valued, because they will remind of the giver for a long time. In this section of our website you will find interesting master classes creative gifts. Try to surprise your loved ones and give a gift made with your own hands.
Don't know how to make cards or are not yet familiar with the scrapbooking technique? Have you seen a topiary made from coffee beans from your friends, but don’t know how to make it? Read articles with photo descriptions and discover new handicraft techniques. We have collected manufacturing ideas for you useful gifts, as well as many crafts that not only adults, but also children can do.
The holiday is always associated with fun, feeling happy life. However, if you don’t know what gift to choose or how to present it correctly, our articles are for you. There is no doubt that giving gifts is much more pleasant than receiving them. However, the difficult task is to choose an original item from a variety of possible products. The most important thing is that the person likes the gift and that it is beneficial.
What's the best gift to give?
Certificates for purchases in stores. Everything is very simple here. For example, you can go to a store or fitness club to buy a subscription or a certificate for a certain amount. The person you give such a gift to will be happy. In addition, he himself will buy whatever he wants for the amount of the certificate.
In the end, loved one You can directly ask what he wants to receive. Of course, for the sake of decency, everyone will evade the answer, but only at first. Then a subtle hint will come. The most important thing is to understand the hint and buy the right thing.
To make the gift truly useful, you can give a souvenir made by yourself. For example, if a man has golden hands, then find an engraved hammer, and for a woman you can buy some kind of trinket for the kitchen. Car enthusiasts will accept key fobs, pens in original packaging. Such gifts always cheer people up and people like them.
The eternal gift is a book. But it should be given only when you know that the person is reading. If not, then decorate the book box and surprise an unusual souvenir a loved one or friend.
In some cases, you can afford useless gifts. For example, these could be T-shirts with photographs, CDs with common songs, congratulations, and so on. You need to take care of such gifts in advance. Only original gifts can be remembered for a lifetime.
Increasingly, people prefer to give handmade items. When deciding what gift to make with your own hands, you should take into account the preferences of the person to whom it will be addressed and the theme of the holiday. So, you can prepare symbolic souvenirs for colleagues or friends: these are postcards, sweets or themed refrigerator magnets. As a gift for a birthday, wedding, February 23, March 8, birth of a child or New Year for family and close friends, you should choose more significant ones.
A handmade postcard will be an original addition to the gift. It can also be the main one, for example, to congratulate colleagues at work or numerous acquaintances.
Making a postcard is a fascinating process, because in it you can show all your creative potential, and the variety of techniques and materials allows you to make a wide variety.
Before starting work, you should decide on the theme of the holiday, choose an idea and select materials. Everything you need can be found at a craft store.
For example, to congratulate everyone on Valentine's Day, you can make such a card.

To make it you will need:
- blank postcard with an envelope made of thick white cardboard;
- sheets of scrap paper of various colors;
- figured hole punch;
- scissors;
- white thread;
- glue;
- needle.

Use a hole punch to cut it out required amount, based on the fact that you will need two hearts of each color.

If you don't have a hole punch, then prepare a heart template and cut it out using it.
Place the prepared elements in two pieces of the same color on the front side of the card, secure with glue. This must be done so that they remain in place during the sewing process.

Using a machine, sew with white thread in the middle, without going beyond the borders of the hearts. Then make a few backstitches.
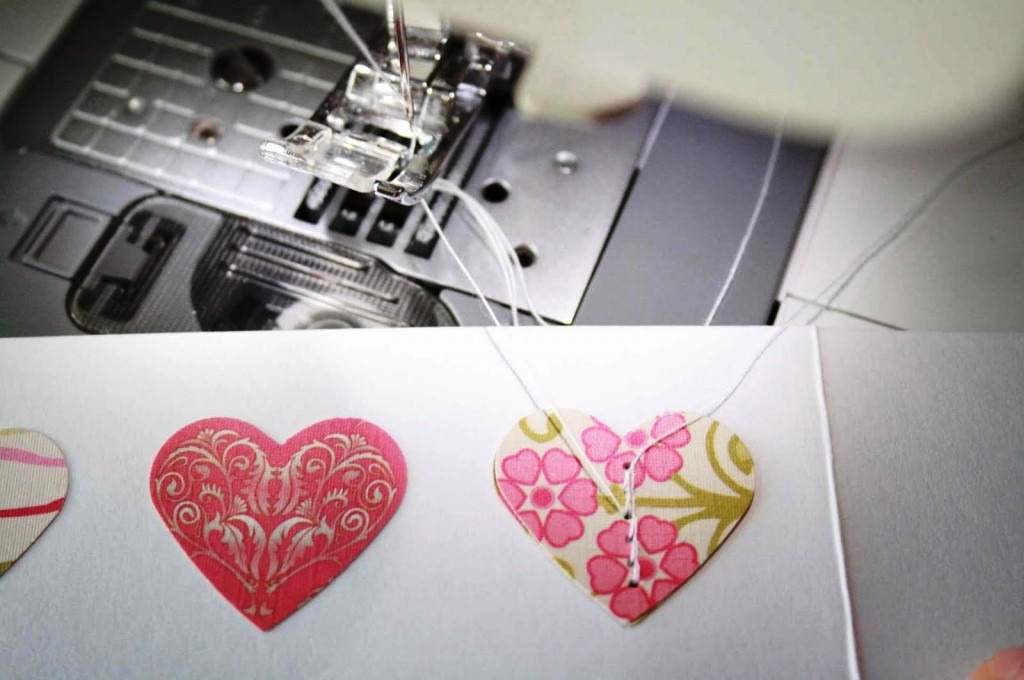
You can sew hearts on your hands. In this case, try to do this as carefully as possible so that the stitch “step” is the same.
Use scissors to trim off excess threads.
Bend the sewn hearts along the line.

The card is ready, you can write a few congratulatory lines and put it in an envelope.
Chocolate card
A chocolate box is a handmade card that has a place where you can put a chocolate bar or another souvenir, such as money. You can give it as a gift for any occasion.
In order to make a New Year's chocolate maker with your own hands you will need:
- kraft cardboard 30*30;
- PVA glue;
- scrap paper;
- decorative elements;
- pencil;
- scissors;
- ruler;
- hole puncher;
- ribbon.
The size of the chocolate bowl directly depends on the size of the chocolate bar. Having measured it, you can start working.
Draw the dimensions of the future postcard on cardboard. In our case: height – 21 cm, width – 10 cm+10 cm, gluing area – 1.5 cm (see photo 2). Cut out the workpiece, run a runner along the fold lines, and bend it carefully.

Glue the resulting card together and try placing chocolate there. It should fit freely inside.


Now you can start decorating. To do this, use 2 scraps of paper, flowers, a chipboard and a die cut. In this process, you can show your creativity and use any decorative elements.

Edible gifts
This category of products will appeal to any person, because they are not only tasty, but also originally designed. You can choose any sweets: chocolate bars, chocolate bars, sweets, cookies, dragees or handmade sweets.
Suitable for packaging sweets carton boxes, glass jars, wicker baskets, wooden boxes, tin boxes or other suitable containers. Their shape, size and color may vary.

Box of sweets
Making such a gift with your own hands is very simple. All you need is the original box and sweets. Choose any filling for the box.
Assembly will not take much time: the sweets need to be beautifully folded into a box, which can be decorated if desired. To do this, tie it with a ribbon or leave a small wish on the lid of the box.

Delicious gift for men
Prepare one original gift It is also possible for men on February 23 and on their birthday. The composition should be chosen based on the preferences of the person for whom it is intended. So, for filling you can choose: alcoholic or carbonated drinks, coffee, tea, chocolate candies, meat products, vegetables and other edible products.

Also include useful things in the gift: diaries, pens or items of clothing.
To design such a souvenir you will need:
- wooden box;
- edible filling;
- cigarette paper;
- filler.
For the latter, you can choose sisal fiber or tissue paper.
Decoration won’t take much time: line the bottom of the box with filler and carefully arrange the food items.
Features of filling and decorating a gift can be found in this video:
Men's bouquet
DIY gift for a man. How to make a bouquet for the stronger half of humanity
Sweet box with flowers
An edible gift can be complicated by slightly changing its composition. For your mother, sister or friend on March 8th or birthday, make a box with fresh flowers and sweets. Instead of the latter, you can put a bottle of wine, macaroon cookies or a can of coffee.
To make a box you will need:
- cardboard box (size depends on the components of the composition);
- flowers - 2 small branches;
- floral sponge (oasis);
- sweets;
- tissue paper matching the color of the composition;
- cellophane or mica sheet;
- wire cutters;
- stationery knife;
- container with water.

If you have small box, then it is better to use flowers with small buds, for example, spray chrysanthemums or roses, gypsophila or alstroemeria. For a large or medium-sized box, any will do. You can buy them and a sponge at a flower shop.
Before starting work, the floral sponge must be cut to the desired size and placed in a container with water for one hour so that it is completely saturated. Fulfilling this condition will allow the flowers to delight you with their fresh appearance for a long time.
If the height of the oasis coincides with the dimensions of the box, cut off 3-4 cm from the top with a knife, this is necessary for a harmonious appearance, and so that you can close the box.
First prepare the flower area. Attach cellophane or mica to the box to select the size of the required piece. The cut must exceed the dimensions of the sponge.
Place a sponge and wrap with tape. Mica protruding beyond the edges must be cut off. The oasis should be open at the top in order to insert flowers.
Now you can start assembling the composition. Using scissors, cut the flowers from the branch; determine the length of the stem based on the height of the box. Insert them into the sponge in any order.


DIY gift
Box with fresh flowers and sweets. How to make a gift with your own hands.
Bouquet of sweets
A sweet gift can also be given in the form of a bouquet. You can give it to your family or work colleague. You will like it for its appearance and will be a delicious addition to tea drinking. The undoubted advantage of such compositions is that they do not require additional care. And after all the candies are taken out, you can leave the bouquet as an interior decoration.

All necessary materials can be found in craft stores.
To work you will need:
- corrugated paper - 2 rolls of 2 different colors;
- candies;
- basket;
- wooden skewers - packaging;
- scissors;
- a thread;
- glue gun;
- glue sticks;
- green tape;
- organza – cut 70*70 cm;
- sisal fiber;
- stationery knife;
- decor;
- floral sponge or oasis.
Let's get started:
When choosing sweets, pay attention to their shape. It is better to choose a round shape; they will be convenient to work with and can be easily removed from ready-made flowers. Choose the quantity based on the size of the basket.
Having resolved all organizational issues, you can start working.
First, let's prepare the material for the buds. Cut the paper into strips about 5-6 cm long and then cut into rectangles. There should be about 6 pieces in one strip.
Cut rectangles of the same dimensions from green paper. Only the sepals need to be cut out from them (see photo 6). Use a skewer to slightly curl the ends. This will make the bud more life-like.
Then, round off the edges of each rectangle intended for flowers. Stretch the resulting blanks from the center. Before inserting the candy, tuck one “tail” so that it is not visible from the bud.
This action will not affect your ability to safely remove the candy from the flower.
Place the prepared candy in paper and twist it so that it is not visible, and the shape becomes similar to a real rosebud. Now use a thread to tie at the bottom to secure the candy.
In further work you will need a glue gun. It operates on mains power, so perform all steps carefully to avoid burns.
Let's continue to create
Let's start assembling the flower. Wrap the “sepal” around the bud and secure with thread. Using a glue gun, glue the skewer to the base of the bud, and before doing this, trim off the excess paper. Cover the joint and the skewer with tape.
The peculiarity of tape is that by slightly stretching it, it becomes flexible and can be used to give a neat look. In order to tear off a piece of tape, it is not necessary to use scissors; it is enough to sharply stretch it.
Do this with all the colors. And for now they can be postponed.

Cut the organza into squares measuring 5*5 cm. Roll it up, glue it to a skewer, and wrap it with tape (see photos 13,14,15). Using organza, you can close the spaces between flowers so that the bouquet does not look “empty”.
Let's start assembling the composition.
From a sponge you need to cut out the base of the bouquet, matching the size of the basket. Place sisal on top.
Carefully insert the finished flowers and skewers with organza into the sponge. Adjust the height of the skewer based on its location, shorten it if necessary with wire cutters. Try to place everything very tightly.

Collect a basket of “flowers”
The finished work can be decorated with pearls and other decorative elements, for example: artificial greenery, ribbons or rhinestones.
Corrugated paper is a unique material. You can make completely different compositions from it. Show your imagination and you will get a unique and delicious handmade gift.
Interior gifts
Handicrafts can be not only tasty, but also healthy. If you have been invited to a party or to a housewarming party, then you should make a small souvenir for the interior of the house with your own hands.
Topiary
This gift will be an interesting addition to the interior of any room. Its main feature is that it does not require additional care, which means it will be able to please the inhabitants of the house for many years.
Topiary- This decorative decoration tree view. The top may have different shapes, for example round or heart-shaped. And the following can be used as decoration: coffee beans, sisal fiber, fabric or natural materials.
To make topiary from artificial flowers and sisal you will need:
- blank in the form of a ball;
- sisal in a bundle;
- snag;
- artificial flowers and leaves;
- ceramic pot;
- gypsum;
- white thread;
- glue sticks;
- glue gun;
- decorative elements.
The process of creating topiary
In order for the topiary to turn out harmonious, you should first check the consistency of the pot and the workpiece. They should be almost identical in diameter and size.
If you have a workpiece, then you do not need to carry out any additional actions with it. If you don’t have one, you can make a ball out of paper. To do this, crumple up several sheets and shape them into a ball. Do this with all the sheets, increasing the volume. When the form is ready, wrap it with thread, pressing the protrusions of the paper, this will help you get an almost even ball.
It is better to use white sheets and white thread, so you will no longer need to do anything with it. If newspaper was used, you will have to additionally cover the ball with corrugated paper.
To make sisal balls, you need to pinch off a small piece from the bunch. Use your hands to roll it into a ball shape. They should turn out quite dense, if you succeed, take a little more sisal and continue rolling. As a result, you should get dense balls with a diameter of about 3-4 cm.

We continue to work
You can start decorating the workpiece. Use glue to attach the sisal balls and flowers. Glue leaves and decorative elements between them. All spaces should be filled, so the topiary will look more harmonious. Leave a small empty space at the bottom, where the snag will be attached.

When you finish decorating the workpiece, you can begin to secure the driftwood. To do this, make a small hole with scissors, pour glue and insert a piece of wood. Hold your hand strictly perpendicular to the workpiece until the glue hardens.
In order for the topiary to be stable, it must be placed in a bucket of plaster.

Gypsum can be immediately poured into the pot, filled with warm water and stirred. As it begins to harden, place a driftwood with flowers. Hold it vertically until the plaster hardens completely.
If you stain a piece of driftwood, the plaster can be easily cleaned off by hand or with a knife.
Decorate the top of the pot with sisal and flowers so that the hardened plaster is not visible.

Painting in string art style
This work will truly surprise you. Her appearance is completely unusual and colorful. And working on it will be interesting and exciting.
You can choose absolutely any image in the painting: it can be an inscription or a symbol.
To work you will need:
- a small sheet of plywood;
- 2 packs of small rounded nails;
- hammer;
- template paper;
- floss threads;
- scotch.
First you need to prepare a template. It can be found on the Internet or made in one of the photo processing programs. Print and cut out.
Before work, the plywood can be painted in a neutral beige shade or a decorative panel can be used instead.
Attach the workpiece to the plywood and secure it with tape so that it does not move. Now let's start hammering nails. For convenience, it is recommended to place something under the plywood so that the nail does not pierce the place where you will be doing this.

Nails should be driven along the contour of the letters and try to keep the distance between them the same. The optimal step is 1 – 1.5 cm. You need to punch along the entire contour of the word.
When you are finished hammering the nails, the template can be removed. Now everything is ready for registration.

Use a thread to connect the nails that are located side by side in a chaotic order, starting with the first letter. And do this until the end. Tie the end of the thread around the nail and carefully cut off the tail.


If handicrafts are not your thing
Handmade card? Florarium or bouquet of sweets? If handmade gifts are not your thing, then this is what you need! Just a few clarifications about the recipient of the gift and the guys from Ukhtybox will collect it for you perfect gift. Surprise the birthday boy with your creativity!

DIY florarium
Lovers of fresh flowers will love this gift. It differs from simple potted ones in appearance.
Florarium is a small glass aquarium in which plants are grown. Due to its original appearance, it will become a real living decoration of the room.
For a florarium it is better to use small and unpretentious plants: cacti or succulents.
To make it you will need:
- small round aquarium;
- live plants;
- priming;
- drainage - expanded clay;
- live moss;
- pebbles;
- decorative elements;
- fertilizer;
- plastic spoon;
- watering can with water.
Work process
To avoid getting your hands dirty, wear rubber gloves.
Wash and dry the aquarium.
Fill the bottom with drainage and add a few spoons of fertilizer. Then add soil.
Now you can start planting the plants. First, remove them from their pots and shake out the roots. Carefully plant them in the ground one at a time, helping with your hands and a spoon. Because space is limited, be careful not to damage the plants.

When you finish planting, cover with moss and water, and decorate with pebbles.
If the walls get dirty, wipe them with a damp cloth.
All additional information can be obtained from this video:
DIY florarium
How to make a florarium at home. detailed instructions.
Volumetric letters
Such a handmade gift can be made in the form of a word or one letter, for example, the first letter of a first or last name. Volumetric letters will become a bright decoration of the room and will remind you of your attention. They can be made from artificial flowers, paper, fabric or natural materials.
The proposed version of volumetric letters can be prepared for Mother’s Day or her birthday.

To make it you will need:
- artificial flowers;
- cardboard for letters;
- floral sponge;
- glue gun;
- glue sticks;
- a simple pencil;
- ruler;
- stationery knife.
In order for this gift to become a harmonious decoration of your home, you should choose the optimal size and suitable color scheme of the letters.
The frame of the letters will consist of glued pieces of cardboard. They must first be drawn and cut out. By using glue gun connect them.
Using a knife, cut the sponge into suitable pieces and insert into the recesses of the letters. It’s better to do this in small pieces, so it will take up all the space.

Once the letters are ready to be filled in, you can begin working with the colors. They should first be cut from the stems. Now you can insert them in a chaotic order, filling the entire space.

They can be attached to the wall using double-sided tape.
Accordion album
For photography lovers, you can make an original accordion photo album. In order to make it you will need
- wooden box;
- dark thick paper;
- satin ribbon;
- glue;
- photos.

First, decide on the number of photographs; the number of folds, and therefore the paper, will depend on this.
First you need to cut the paper correctly. To do this, measure the width of the photo and add 1 cm, this will give you the required width of the paper.
Now measure the height and also add 1 cm.
Transfer the resulting dimensions onto paper. Now cut lengthwise according to the resulting size.
You need to make several such strips and glue them together.
Draw a line according to the height of the photo. Photos will be located here, such places need to be taken in accordance with the number of photos.

Now use a running wheel to follow the lines to form an accordion. Glue the photos, glue a small ribbon under the first photo, you can use it to pull out the entire accordion.

Attach a loop


