How to make voluminous flowers, origami, lotus flower, large paper flower.
On the eve of any holiday, the issue of giving the room an appropriate atmosphere becomes relevant. You can purchase ready-made jewelry and not be bothered by the lack of originality.
- But if you prefer to do everything yourself, then creating crafts such as paper flowers will put you in the appropriate mood and bring positive emotions.
- As children, we all liked to cut things out of paper. We suggest you make flowers from napkins, following the instructions from the step-by-step photos. Be inspired by the creation flower arrangements A selection of photographs and master classes will help you.
DIY flowers from napkins: ideas, photos
- From paper napkins you can create real flower bouquets, the only drawback of which is the lack of an attractive fresh aroma. But a drop of your favorite perfume can easily solve this problem.

You can create real flower bouquets from paper napkins
- A bright bouquet that will retain its original appearance for a long time can be presented as unusual gift to a loved one, to please a friend or mother.
- A flower made from a paper napkin will turn into a decorative element for gift packaging or take up place of honor on a product made using scrapbooking technique.
- Creating flowers from napkins is not difficult. Therefore, you can attract children who are interested in all sorts of crafts to work.
- From an ordinary napkin or a multi-layered one you can make a rose, peony, carnation or dandelion. It all depends on what composition you decided to create, what patterns you liked. The available colors of napkins will also help you quickly decide what kind of flower to create.
- To make the flower lush, we take multi-layer napkins. We select the appropriate colors. The peony can be made bright red, burgundy, or take a white napkin.
- We carefully trim or tear off the edges of the napkins (they do not unfold) and put the cut strips aside (do not throw them away, we will use them later).
- To make one flower you will need several napkins. We take the napkins and unfold them so that we end up with a rectangle.
- Place napkins folded in rectangles on top of each other. Now we begin to fold it into an accordion shape.
- We wrap the central part of the structure folded like an accordion with wire. Cover the wire with a piece of napkin that we put aside.
- Straighten the edges of the napkins. To do this, we need to carefully lift each layer of the accordion so that as a result the structure turns into a three-dimensional flower.
Several of these peonies, mounted on a stable support, will decorate children's party, and will also become the main elements of topiary. - You can also make a full-fledged peony. Will need wooden stick or wire wrapped in thread suitable color and several green leaves cut from a napkin.

How to make a peony from napkins with a core of a different color
How to make a dandelion from a paper napkin?
- For lovers of delicate dandelions, another way of making spring flowers has been invented. We will also make them from multi-layer napkins.
- We select the appropriate one unpretentious flower yellow tint of napkin.
- Cut each napkin into squares of the same size. Whether the dandelions will be large or small is up to you, the main thing is that the future flower remains recognizable.
- We repeat the same manipulations as with the peony: we place the squares cut from napkins on top of each other. We secure the central part with two staples using a stapler.
- You need to do this in such a way that you get a right angle in the central part. This can be achieved by arranging the brackets crosswise.
- We trim the edges of the future dandelion, giving the flower a rounded shape. We cut the edges and carefully lift the edges of the napkins above the central part. That's it - we've made a dandelion! So that the flower does not look lonely, we will make a couple more voluminous flowers for company.
- If you attach each dandelion to a homemade stem, you will have a real spring applique.

- A rose can be made from napkins using the same principle. You just need to give the petals the required form.
- We take multi-layer napkins. Unroll completely and cut off one edge (the width of the cut strip is 3-5 cm). We should end up with a rectangle. We fold the workpiece in such a way that one part is located on the other, without completely covering it.
- Now we need to imagine a rose and try to give our blank a similar shape: we wrap a napkin around our finger, forming a bud.
- We twist it, leaving a tight tapered edge, which we will then attach to the stem. We will also make the stem of the rose from napkins. After twisting the bud, straighten its edges.
- We make a stem from wire and wrap it with strips of napkin of the corresponding color. We insert the edges of leaves pre-cut from a napkin and tightly wrap the paper around the wire. We fix the flower on the stem (you can simply stretch the edge of the wire inside the bud and secure it with glue).


You can make an original rose from lace napkins. There is no need to cut the edges in a circle when using these napkins, because they are already round in shape.
- The napkin needs to be cut, after which it will be possible to form a figure resembling a bud.
We twist the bottom part tightly so as to attach the second napkin. This will be the stem.

Second way:
- You can also make a rose by twisting a napkin onto a pencil or pen. Any napkins are suitable for this method. We apply the napkin to the pencil, twist it, and then move the future flower a little to the center.
- After this, the pencil can be removed. A bud is formed from the resulting blank. The flower is attached to the stem.


- If we have already started creating flowers from ordinary napkins, then we will not dwell on the most popular options. Rich imagination will allow you to turn ordinary paper into an original flower.
- And if you only have white napkins, then prepare paints or markers. At the final stage, when you lift the edges of the napkins, use a brush or felt-tip pen in these places. This simple technique will highlight a beautiful edging.

- How to use paper carnations? You can decorate a room with them or make a lot of preparations for topiary.


How to make voluminous flowers, origami, for beginners from paper napkins: diagrams, templates, photos
They will help you understand the intricacies of creating volumetric flowers. step by step photos. If the method seems too complicated to you, then use the instructions described above for creating flowers from paper napkins.


How to make voluminous flowers, origami


Video: DIY Roses from kitchen napkins
How to make flowers from napkins for volumetric figures?
From the video you will learn how to make flowers from paper napkins so that you can use them later to fill in a three-dimensional number.
Video: Flowers from napkins for volumetric figures. option 1
Flowers for topiary from napkins: diagrams, templates, photos


DIY poinsettia flower from napkins
- The poinsettia flower can be made in several ways. Let's look at the simplest one. To make a flower you will need corrugated paper that matches the color, a little free time and inspiration.
- Take corrugated paper in red, yellow, white or any other color that you like best (3 sheets of the main color). You will also need green paper (3 sheets). Cut out squares of paper with sides 10x10 cm.
- To decorate the poinsettia you will need a golden ribbon. We will knit the parts of the workpiece with rain.
We fold the squares like an accordion. We begin to fold the side diagonally from the central part of the sheet. - We collect three blanks of the same color and tie them into a bundle with a golden ribbon. We cut off the ends of the tape. Twist with scissors. This will be the core of the poinsettia. We straighten the petals and give the flower the desired shape. Glue small beads into the middle of the flower.


Video: Paper flowers - POINSETTIA
Large flower made from napkins
Large paper flowers are a great option holiday decor. By hanging several of these floral elements on the wall or ceiling, you will quickly solve the issue of decorating the room.


How to decorate a room with flowers from napkins

Large flowers can be made multi-colored or napkins of the same color can be selected so that they harmoniously complement the design of the room.
Video: Huge flower made of corrugated paper for decoration
Video: How to make FLOWERS FROM NAPKINS?
Flowers napkin applique
- The child begins to make applications from colored paper as early as kindergarten according to the teacher's instructions. Creating paintings, panels and simply postcards with appliqués is an activity that has a beneficial effect on the development of a child’s creative skills.
- Cutting out and assembling a picture from several elements develops imagination and imagination, and promotes speech development.

- In addition to the positive effect on the psyche, the baby enjoys working with colored paper, independently or with the help of adults, collecting three-dimensional elements of paper compositions.


- The teacher can make different flowers together with the children. Let the kids then guess riddles or tell where they saw a similar plant and what they know about it.
- You can cut out butterflies from colored paper and invite the children to make flowers for them so that the moths don’t feel sad. The main thing is to choose a motivating speech! Then the children will look forward to the opportunity to continue their favorite activity.
- Another option for creating applications from napkins is to roll the pieces cut into squares into a ball. The blanks are separated by color and glued onto the surface of a sheet with the contours of the picture drawn. This technique is called trimming. The finished picture turns out three-dimensional, and due to the fact that it is made of a soft napkin, the figures look fluffy.

Butterfly - applique from napkins

Fawn - applique made from napkins

Frog Princess - napkin applique

Toucan - napkin applique

Kitten - applique made from napkins

Bird - applique made from napkins
- Twisting pieces of napkins cut into strips or squares and then filling the contours of the design with thin strip tubes is also appliqué.
- If you are interested in scrapbooking, then the ability to make appliques will not be superfluous. And you can figure out how to use flowers from napkins yourself.
Lotus flower made from napkins
Video: How to make a lotus flower from corrugated paper?
Video: Lotus from napkins
Flowers made from openwork paper napkins
- Openwork napkins turn any craft into an elegant work of art. This is an excellent material for those who often work with paper. You can make beautiful roses from lace napkins.
- To make one flower you will need 1 napkin. As always when making flowers from paper, you need glue (it is better to use PVA so that there are no marks left on the surface of the napkin and the work looks neat).
- Scissors are also needed, because napkins are not only folded, but also cut so that the shape finished crafts maximally reflected the natural curves of rose buds.
Manufacturing process:
- Cut off the openwork edge of the napkin.
- We bend the corners and begin to twist the workpiece in a spiral. It is necessary to form a bud, and make the protruding petals more voluminous. This way we can easily imitate a blooming flower. In order for the blank to hold its shape, you need to fix the lower part of the flower with suitable glue.
- After the bud and petals are formed, you need to straighten the petals, giving them a slight bend in some places.
- You can decorate with roses from openwork napkins packing box or a box, postcard self made. These roses are perfect for creating topiary.


From the video you will learn how to make an original elegant heart topiary with your own hands using openwork napkins.
Video: Topiary heart made of openwork paper napkins
Flowers made from viscose napkins
You can find out how to make a beautiful rose from a viscose napkin by watching the video.
Video: Beautiful rose made of viscose napkin
Flowers from napkins - roses
Video: A rose made from a napkin is almost like it’s alive!
Flowers from napkins in pots Video: Pot of flowers. Paper crafts
Video: Flowers in a pot (DIY paper hydrangea)
DIY flowers made from sweets and napkins
Video: Master class. Candy stand. Rose
How to fold a flower from a napkin onto a table with your own hands?
Video: Beautiful flower made from a napkin with your own hands to decorate the festive table
Do not think that manufacturing flowers from napkins- this is the prerogative children's creativity, in fact, with the help of such crafts you can decorate your everyday and festive interior.
DIY flowers from napkins
Prepare for work:
Multi-colored napkins
Corrugated paper
yellow paper
Simple pencil
small basket
Fold the pink napkin in half, and then do this manipulation again. Draw a circle and then cut it out.
Draw a square with a side of 2 cm on yellow paper, draw a circle in it and cut it out, you will get the middle of the flower.
Place the yellow piece on top of the pink piece and connect them in the center using a stapler. Make a circular cut on the pink circle. Lift the first layer of material and scrunch it up a little. Do the same with all other layers. You will get a beautiful three-dimensional flower.
Make a few more like this beautiful crafts from other colors.
Cut the green corrugated paper into rectangles 8 by 3 cm, fold each in half, draw a leaf and cut it out. Unfold the sheet and stretch it slightly so that it gets the desired shape and size. Make 3 more leaves. Place them in the basket (glue them if necessary). Place one flower in the basket, place one more to the left and right of it, and then place all the others in a circle. Now you know, how to make a flower from a napkin with your own hands.
Flowers made from napkins - step by step instructions
Of course, schoolchildren also want to engage in similar creativity - and we recommend that you definitely create together with your children. The flowers from napkins master class Suitable for children 7-8 years old.
To make a beautiful bouquet you will need:
Napkins in two colors
Crepe paper
A few sheets of paper from an old catalog (thick paper)
Barbecue skewer or knitting needle
Glue stick
Empty jar or bottle
Fold the napkin according to the same principle that is used when cutting out a snowflake. For one flower you will need a couple of pink ones. Round off the wide part of the workpiece with scissors and unfold it carefully.

To make leaves, take the green one and fold it like the pink one, but only three times. Cut from corner to corner. Unfold, cut two along the fold lines and you will get four separate leaves.
To make a stem, cut several strips (according to the number of desired flowers) from catalog sheets, their width should be 2 cm. Also cut green napkin strips of the same width.
Lubricate the tip of the catalog strip with glue and screw it onto a knitting needle (barbecue skewer), finally glue the tip and remove the workpiece from the knitting needle. Cover the resulting tubes with napkin strips.
When you start assembling, place, by moving, a couple of green leaves, 8 pink ones on them, pierce them with a skewer or knitting needle. Insert the rod into the hole on the green side. From the pink side, drop a little PVA into the middle of the stem and knead it like plasticine. Make all the flowers, and while they dry, make a vase.

Cut out a rectangle crepe paper, which is longer than the jar. Glue the edge to create a cylinder with a diameter that matches the bottom of the jar. Pre-fold the bottom into one fold. Lubricate the bottom of the jar in a circle with a glue stick and put on the cylinder, carefully lower the bottom. Leave a couple of centimeters of paper on top - bend them inside the vessel, having previously coated them with glue. All that remains is to tie a bow or decorate in any other way.
After you make sure that the flowers are dry, you need to give them shape and straighten the petals. After this, all that remains is to glue the leaves onto the stems and you can make a bouquet.
DIY flowers from napkins - step-by-step description
A magnificent bouquet will become a real interior decoration, and it is quite simple to make.
Napkins
Ear stick
Take one white and a couple of colored napkins, cut them so that you get 4 and 8. Fold them in half twice and cut off the corner that ends up in the middle. String the material onto the ear stick, turn it over and make folds, and tie a flower with a ribbon.
Twist the green material along the stick, turn one corner up, and then scroll to the end. So I'm ready wonderful craft, and you can also make it.
DIY flowers made from napkins - photo
With the help of such creativity in children preschool age You can develop accuracy, perseverance, fine motor skills. To make a “tinkerer”, prepare:
Multi-colored napkins
Colored cardboard
Colored paper
Simple pencil
Vase stencil
Fold the napkin in half, and then repeat the manipulation again so that the result is a square. Click the stapler in the middle. Cut off the corners of the square piece to create a circle. Lift and press each tissue layer.

Fold construction paper of any color in half so that the colored side remains inside. Place the stencil and trace with a simple pencil. Cut out the piece and glue it onto cardboard. Then glue the napkin flowers. Cut strips of green paper and glue them as stems.
Flowers from napkins - step by step photos
Napkins in the shape of flowers look simply amazing on a holiday table - they can create the appropriate atmosphere, and are made very quickly.
To make a lily using the origami technique, you should take only one large napkin- it can consist of either two or three layers. No additional devices or materials are needed anymore.

Place the item with the wrong side facing you to create a diamond shape. Bring two opposite corners together so that a triangle lies in front of you. Lift its left and right corners up, but leave a gap in the middle.
Raise the bottom edge of the napkin up so that it is slightly above the middle. Conditionally divide this edge in half and bend the half down. Turn the item inside out and assemble it into a circle. If you did everything correctly, pockets should form in which you should secure the edges.

Turn the origami napkin over, straighten the edges and you will get an original lily. All that remains is to make a lot of these crafts, place the lilies on a plate for each guest, and the feast can begin.
Flowers from napkins - master class “Rose”
Here is another option for table decoration.
For work, prepare:
Napkins – two pink and one green (high-quality, thick and plain)
Pencil (pen)
Cut the pink material into 4 parts and start making rose petals. Wrap each napkin quarter onto a pencil approximately three-quarters of the way. This will leave a small “tail” with which the petals will be fastened to each other.
Squeeze the tube towards the middle so that the result is an accordion, and then remove it from the pencil. Prepare 7 more of these petals.

Twist the first petal very tightly, then apply the next ones to it, and hold the base with your fingers so that the entire structure does not fall apart.
There should be leaves at the base of the rose; to make them, take a green napkin and join its corners diagonally, then fold it in half again and cut off a tiny corner. Thread a rose into the resulting small hole (hold the base again so that the craft does not fall apart). Fold the green material into folds to form leaves.
Flowers made from paper napkins
You can make a rose in the second way - for it you don’t need any materials at all (except for thread). Cut each napkin into 4 parts along the folds, then take the napkin part and fold it almost in half - you have a base for the petals.
To form a petal edge, twist the workpiece a little in the middle, and then continue twisting to the very bottom along the edges. The next stage will be the manufacture of the core - here the part needs to be twisted simply in a straight line, no bends or roundings are needed.

To assemble a bud, you need to take the core and gradually bend its edge down, and then start wrapping the core with petals. Please note that each subsequent one should move slightly. Tie the assembled bud at the bottom with thread so that the entire structure does not fall apart; excess paper can be trimmed.
If you have any questions while making a particular craft, then flowers from napkins video will become a real assistant, you just need to repeat the movements of the master and, in the end, you will get very beautiful products.
If you liked our site, express your "thank you"
by clicking on the buttons below.
Typically, napkins are used to decorate a holiday table. But if you wish, you can make very original craft, which will decorate gift packaging for loved ones, diversify home interior or will decorate the same festive table, but in a slightly different capacity.
There are various crafts from napkins: flowers, little people, angels, animals, insects, birds, etc. Some are easy and quick to make, others require time and certain skills. We will tell you how to make flowers from the most ordinary napkins yourself with your own hands.
Such a bouquet will delight you for a long time; moreover, it does not require financial investments or a long production time. You can make flowers for every taste from napkins.
Master class on creating flowers from napkins with your own hands
We'll tell you about the in a simple way making such cute crafts.
To work you will need a paper napkin, scissors, thread, glue and a tube for the stem if necessary.
First, carefully align the edges of the napkin. Fold the napkin in half. Then we make an accordion out of it: we bend the edge of the napkin by one centimeter, then we bend the next centimeter of the napkin in the other direction, we bend the next centimeter in the same direction, then the first and so on until we get the accordion effect.
We flatten the accordion, determine the middle of the napkin and tie it with thread.

For more interesting looking Round the edges of the napkin with scissors.
Now let's fluff the flower. If you have small children, then this moment will give them a lot of pleasure. They are delighted by the transformation of a piece of paper into a fluffy flower. If you just created a flower, then place it on a stem (a cocktail tube or skewer) and glue it. You can glue it to paper box to register gift wrapping for a gift.

You can also make a rose from napkins:


The rose always looks beautiful and is made quite quickly. To work, you need a simple single-layer napkin. Divide the napkin into four parts, which will be rose petals. So that the napkins do not lose their decent appearance during operation, they must be dense and of high quality.
Fold the other napkins diagonally. The edges of the resulting triangles should be bent.
After this, we place the core on the triangle and wrap it with the free ends of the triangle. At the same time, we give the flower the required shape. Fix the resulting figure with thread.
We work in the same way with the rest of the blanks. Using this technique, you can make roses of various sizes and textures.
For the stem, you can use a wire wrapped in a napkin. You need to glue the napkins together with paper glue.
This flower can be used both in a composition and separately.
Trying to make your own flower bouquet for a gift
You can make a more complex version of flowers from napkins. To ensure you do everything right, we offer step by step instructions on how to make a flower like this.

This flower can look great in a flower pot and as an accessory in your interior. Such a flower will be irreplaceable when decorating a banquet hall.
You will need: stapler, glue, napkins, bouquet base, scissors.
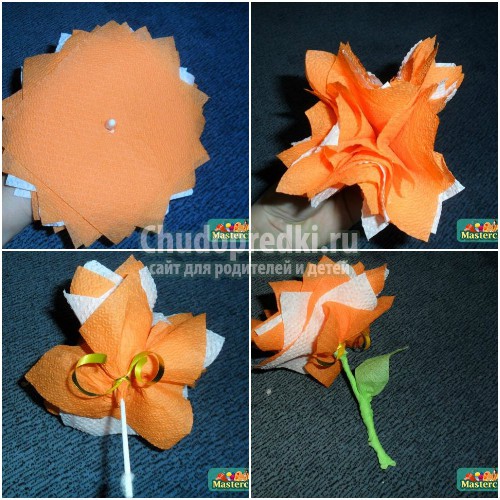
Draw a circle in the middle of the napkin and cut it out. Depending on the size of the base, flowers can be of different sizes. To give a more interesting look to our bouquet, we outline the edges of the cut out circle with a red felt-tip pen.


Then cut out the circle.

We staple the circle in the middle.

We received a flower blank. Now let's start designing it.
From the middle, lift each layer of napkin as shown in the photo.

By lifting all the layers of the napkin, you will get a flower like this.

You need to make several of these flowers. To make enough for a bouquet, you will need 16 pieces.

Next we work with the base of the bouquet. This could be a simple foam ball. You can make the base yourself. To do this, make a ball out of newspapers, crumple them, tie it with threads, and the base is ready. You can also use a foam base. If you plan to hang your ball as an interior decoration, then you need to make a ribbon at the base in advance.


This is what we got.

If you place such a ball in flower pot, then it can become a full-fledged element of your interior.

If you were unable to glue the flowers close enough to each other, then you can fill this space with napkins of a suitable color. For example, green ones that will look like leaves in your bouquet.

Don't miss the video we suggested, because... Only by seeing the process with your own eyes can you understand all the nuances of the work.
Video on the topic of the article
It can be an original and pleasant gift beautiful bouquet, made with your own hands from absolutely ordinary paper napkins. Choose the color and size of napkins as desired. IN in this case it will be yellow flowers with green leaves in a ready-made basket. Type of basket.
Instead of a basket, you can use a regular plastic flower pot or any other vase that is not used for its intended purpose.
1. Inflate a regular balloon to the size you need. Dilute PVA glue with water (about 1 teaspoon of glue per half glass of water). Dip the napkins into the resulting solution and cover the balloon with them. The more layers, the stronger the bouquet will be. The tail of the ball must be left free in order to later pull it out.

2. While the ball is completely dry, there is time to cut out flowers and leaves. To do this, take a four-layer napkin and fold it in half, then in half again.


3. Cut out a circle and make many cuts along the edge. If you want a lush flower, then the cuts need to be made thinner and wider. Leaves are cut in the same way. The only difference is the larger diameter of the circle. Green color could be much brighter. In the example, the color is not saturated enough.


5. The next step is collecting the inflorescence. To do this, press each layer of the napkin, starting from the top, towards the center. The main thing here is to be careful, as thin napkins can tear. The leaves can also be bent, but not necessary. This will make the flowers appear more luxuriant.


The number of colors depends on the size inflated balloon. Don’t be upset if there are a lot of flowers and it seems to you that there is not enough space for everyone. They will all fit in easily. To do this, the inflorescence must be pressed more tightly to the middle. If there are fewer flowers, then on the contrary, they need to be straightened out more and not glued tightly to each other, or additional new ones should be cut out.
6. When the napkins on the balloon are completely dry, carefully deflate the balloon and take it out. If desired, you can stick several more layers of napkins on the place where the ball was pulled out so that there is no hole. In this case, you will again have to wait until the napkins are completely dry. If the hole is small, you can leave it as is.
7. Using super glue, glue the ball to the basket and begin gluing the previously prepared flowers. You need to start from the highest point of the ball and gradually work your way down to the bottom. Try not to press too hard so as not to push through the ball, since there is emptiness inside. Of course, work on the bouquet can continue. It can be decorated with beads, various satin ribbons. In this example, red glitter is applied in the center of the flowers. To do this, apply a drop of glue with a thin brush, and then sprinkle with glitter with another brush. The final bouquet will look like this.
With a little imagination, you can decorate, for example, your holiday table with ordinary napkins. How? What if, instead of a square napkin, you put flowers made from napkins near the cutlery? Do you think it's too difficult and time-consuming? In vain. This flower is so easy to make that even a child can do it. Moreover, this work will captivate the children so much that while they are making flowers, you can calmly go about your business in the kitchen or get yourself in order... So, today we will conduct a lesson in which we will clearly show you how to make flowers from napkins with your own hands, with a minimum of available materials.
1) To make one finished flower from napkins we will need:
— 3-4 napkins, can be of different colors;
- scissors;
- any threads;
- optional markers or felt-tip pens (for coloring the flower), color - at your discretion.
2) In this master class, three white napkins are used to create a flower. Cut each one in half. This makes 6 rectangles. Carefully outline two rectangles with a green marker or felt-tip pen, two rectangles with yellow, two left white. But you can outline the edges with the colors you use for your markers, you can leave them completely white, or you can use colored napkins themselves. There can be many options. We stack all the rectangles on top of each other in the following order: two rectangles with a green edge, two with a white one, and put two rectangles with a yellow edge on top.

3) Make a fan out of these rectangles, as shown in the photo below.

4) We wrap the middle of this fan several times with thread. We tie the ends of the thread.

5) We make a circle out of the fan and begin, very carefully, so as not to tear the napkin, to separate the edges of the upper rectangle with the yellow edge and lift them up.

6) We continue to raise the next rectangle, and gradually the fan begins to take on the appearance of a flower.

7) The photo below shows the finished flower.

The final look of the craft. Photo 1.

The final look of the craft. Photo 2.
If you use 4 napkins to make one flower, the flower will turn out more magnificent. Accordingly, if the size of your napkins is larger, we recommend using 4 napkins. But this process is creative, so it’s up to the authors of the works to decide. Our website contains information on how to make a paper rose with your own hands. Visit our website and you will always be aware of new products in the field of needlework.


