Hand-knitted items are always in fashion. They are very durable to wear, and the quality is significantly superior to store-bought ones. Even an inexperienced needlewoman can easily understand how to learn how to knit simple things that are accessible to beginners.
Step-by-step instructions for knitting scarves, socks, booties for newborns on 2 knitting needles will help you learn new skills and add them to your creative treasury useful techniques handicrafts.
Types of yarn
Depending on the raw material, knitting yarn can be natural or artificial. In the production of natural yarn, animal wool or plant fibers are used - viscose, wool, silk, linen.
Artificial yarn is made from synthetic threads - acetate, polyester, polyvinyl chloride, polyamide, acrylic. In addition, there are different kinds mixed yarn, using both natural and artificial raw materials.
The most popular wool yarn:
- Regular wool- it is spun from sheep's wool, this yarn is of all natural species considered the cheapest and most accessible. It is coarser than other types of yarn, but at the same time lends itself well to dyeing, including natural paints. The price is always affordable.
- Alpaca- This is llama alpaca wool, which is bred in the mountains of South America. Alpaca has only 22 natural shades from white to black and is not usually dyed. It is very warm, soft and very expensive.
- Angora– the fur of the Angora rabbit is soft, fluffy, shiny, and lends itself well to dyeing in a variety of colors. When knitting and wearing, you need to take into account that short angora fibers can “crawl out” from the threads. Therefore, if handled incorrectly, the angora quickly loses its edge. This is a very expensive type of wool.
- Mohair– wool of Angora goats. These are long-haired animals with a very beautiful wavy coat. Mohair is a very light, fluffy and unusually warm material for knitting. Mohair fibers are very slippery and long; artificial thread or cotton thread is usually used to secure them. Therefore, mohair is never 100%.
Summer knitting yarn consists of plant fibers. The cheapest and most common is cotton. It is hygroscopic, lightweight, and lends itself well to coloring. Linen is a smooth, even yarn with a characteristic shine, more elastic and heavier than cotton.
In the production of silk yarn, defective silk cocoons, tangled and short fibers are used. After appropriate processing, silk yarn acquires a magnificent appearance, the threads are shiny, even, very tensile and elastic.
There is no pure silk yarn; cotton is usually used as the basis for spinning threads. Products made from silk yarn are easy to wash and do not wrinkle.
Artificial yarn is extremely diverse both in its quality and appearance. Particularly attractive are synthetic threads with various fancy additions - bumps, thickenings, painted in different colors, boucle, long fluffy threads, shiny lurex.
In general, yarn can be twisted from several threads, or it can consist of one. In some types of yarn, the fibers can be laid very tightly and tightly twisted. In others, on the contrary, the thread is lighter and looser. Yarn varies in thickness and length of pile.
Spoke sizes
The sizes of the spokes are determined by their diameter. There are standard spoke numbers from 1 to 10, which correspond to their thickness from 1 mm to 10 mm.
 You can determine the size of the knitting needles yourself using improvised means. If you attach a knitting needle to a centimeter ruler, you can measure its diameter by eye and determine the corresponding number.
For knitting thin, smooth yarn, small-diameter knitting needles are chosen. For fluffy yarn such as mohair, use at least number 5 knitting needles.
It all depends on what task the knitter sets for herself. If you plan to create a product with a dense knitting, then even for a thick thread you can take knitting needles one size smaller. When knitting an openwork, loose pattern, thicker knitting needles are used.
Determining which number of knitting needles will suit the selected yarn is easy. The thickness of the thread for normal knitting density should be at least twice as thin as the knitting needle.
Knitting for beginners on 2 needles
How to learn to knit - clear step-by-step instruction for beginners. You first need to master this type of needlework on 2 knitting needles. You should choose medium-sized knitting needles and a smooth thread of appropriate thickness.
Before you start creating a product, you need to master basic knitting techniques. Therefore, first of all, you need to try to knit a sample measuring 10 by 10 centimeters.
This way it will be clear what density the knitted fabric is, how smoothly the loops lie.
Set of loops
The thread should be placed on the left hand, stretched between the index and thumb. Hold it carefully with three others.
 The knitting needles need to be folded together, and then insert their ends under the thread from the side of the palm and slightly pull it towards you. The result will be a loop on thumb. Now you need to insert the ends of both knitting needles inside the resulting loop. Then pick up the thread from your index finger and pull it through.
Release your thumb and tighten the knot formed on the knitting needles. When casting on at the beginning of a row, there are always two loops on the knitting needles at once.
So, repeating these steps, cast on the required number of loops, as indicated in the diagram or by measuring the width of the future product using a centimeter ruler. Upon completion of the set, one needle is carefully pulled out. All resulting loops remain on the left knitting needle. Now you can knit the first row.
Face loop
The free knitting needle that is in right hand, you need to insert it into the loop from the front. Hook the thread and pull it onto the right needle. This knitting technique is called classic.
Another technique is to insert the needle into the loop from the back. It's called "grandmother's face." When knitting with knit stitches, you need to make sure that they do not twist in the fabric.
Purl loop
The thread is placed on top left knitting needle. Then you need to insert an empty knitting needle under it and push it into the loop. Then pull out the thread, which lies in a new loop on the knitting needle, which is in your right hand.
Yarn over
You just need to throw the thread onto the right knitting needle without knitting. In the next row, the yarn over is knitted as a regular knit or purl yarnover, depending on the pattern or design.
Yarn overs always increase the number of stitches on the needle. Therefore, the knitting fabric becomes wider.
How to complete the product?
They complete the work with a special non-blooming row. The first loop is removed onto a free knitting needle. The second one is simply passed through it, without tying. The entire canvas is processed in the same way. When the last loop is on the knitting needle, you need to cut the thread with scissors and pull it through it, tightening the knot.
English gum
English elastic is more elastic than regular elastic, so it is used in products that require greater elasticity.
 First, you should knit two rows with a regular elastic band, alternating two purl and one front loops along the front side of the product.
- In the first row, all the purl stitches are knitted according to the pattern, and the knit stitches are simply removed onto the right needle unknitted. In this case, the working thread is left, without tightening too much, behind the front loop.
- The second row is knitted according to the pattern, all knit stitches are knitted, and purl stitches are purled.
Openwork technique
Openwork knitting is always done according to a special pattern. Its peculiarity is that there are small holes in the knitted fabric.
You can make such a hole using a yarn over. At the same time, so that the number of loops does not increase on the knitting needles, the next or previous (before the yarn over) two loops are knitted together with a front or back loop, according to the pattern.
The next row is knitted according to the pattern, including the yarn over, it plays the role of independent loop. A hole in the fabric appears where the yarn over was made. It can be done anywhere on the row, regardless of where two stitches are knitted together.
It is imperative to ensure that the number of loops in a row does not increase due to yarn overs.
If you need to make a large hole, then make a double yarn over, wrapping the thread around the right knitting needle twice. In the next row, one turn is knitted around the needle, and the second is simply discarded.
Circuit designations
Patterns are always read from the bottom, the bottom row is knitted first. The designation of even rows goes from right to left, and odd rows on the contrary, from left to right. In some patterns there are no purl rows, odd ones. Because they are knitted according to the pattern.
In one pattern, only one repeat can be presented to create a pattern. This means that it needs to be done several times either along the height of the product or across the width. As a rule, the explanation of the icons is indicated next to the diagram of the picture.
If no explanation is provided:
- An empty square means no loop.
- Facial - indicated by a small vertical line.
- Purl - horizontal line.
- Yarn over - usually represented in the diagram by a circle.
- Triangle pointing towards right side- these are two loops knitted in front.
- Triangle pointing towards left side– two knit stitches at the back.
- An oblique line passing through several empty squares at once indicates that it is necessary to cross the loops among themselves. The number of loops is the number of squares. The top end of the line indicates the direction of the crossing.
Beginner knitters should avoid using fancy yarn and mohair, as they easily tangle when knitting. To learn how to knit an even fabric, you will have to unravel the knitted section of the product several times and do it again.
This is the only way to develop the necessary skills. It is almost impossible to safely unravel a fabric with tangled mohair fibers.
You should also avoid yarn that consists of several twisted threads. Because it is not always possible to pull out the loop correctly while keeping all the thin threads on the knitting needle.
The result is a tangle that will also be very difficult to dissolve, and it will also look ugly in the product.
You can't take on complex drawing or a big job. You need to start your creative journey as a knitter with small and very easy-to-make things.
Most suitable option For a person who is just mastering knitting needles, this is to knit the simplest scarf.
In the process of making it, all the necessary skills will be developed, your fingers will get used to holding the knitting needles correctly, the loops will begin to turn out smooth and neat. The speed will gradually increase.
How to knit a children's scarf
This is the simplest project, a completely inexperienced knitter can handle it. To knit a scarf, it is better to take smooth yarn of medium thickness and select the appropriate knitting needles for it. The width of the scarf should not be too large, 10 cm is enough. Length is optional.
 The number of loops cast on depends on the thickness of the thread. You can knit a children's scarf using garter stitch. All rows, both from the front and from the back, are knitted with facial loops.
You can decorate the ends of scarves with fringes. To do this, cut the threads 10 cm long and pull each one through the loop in the outer row. Fold the thread in half and tie it in a knot.
Classic men's scarf
It’s clear how to knit a men’s scarf for beginners. The previous step-by-step instructions for knitting on 2 knitting needles are taken as a basis. children's scarf. You just need to increase its length and width. A classic men's scarf should be at least a meter long.
 A scarf is a double-sided product, which means that the design on both the front and back sides should look the same. Therefore, it is best to knit it in garter stitch. The elastic band also looks good. It is performed by alternating two knit stitches and two purl stitches in an even row, and in an odd row it is knitted according to the pattern.
You can also decorate the ends of a man's scarf with fringe.
Snood scarf for beginners
The snood scarf is made both on two separate knitting needles and on circular knitting needles.
 You need to knit a rectangle on two separate knitting needles, 50 cm high and a length equal to the circumference of your head or a little more. Then sew its side parts together.
It is most convenient to knit such a product on circular knitting needles. Before knitting the second row, you need to pull out the plastic wire between the loops in the middle. Then close the circle by knitting the last stitch of the first row.
In this case, the entire snood scarf is knitted on the front side, which should be taken into account when creating the pattern.
Knitting socks for beginners
How to knit for beginners step by step on 2 knitting needles - the simplest and most accessible technology. Work begins with 22 stitches to knit the cuff for the back half of the sock. A 1x1 elastic band with a width of 4 cm is knitted. Next, the work is done in stockinette stitch to the same height.
 Begin to form the heel, decreasing 2 stitches in each row. In this case, two loops are knitted together in front of the edge loops with an inward slope. After 12 loops remain on the knitting needles, begin to expand the fabric.
Loops are added in each row by 2. New loops are knitted through the edge loops in the previous row. The result should be 22 loops on the knitting needles. The heel is ready, it's time to start making the sole.
 How to knit for beginners step by step on 2 knitting needles a simple sock
 The length of the sole depends on the size of the foot. For leg size 37 you need to knit 8 cm in stockinette stitch. Next, knit the sock. This stage of work is very similar to the previous one, when the heel was formed. You need to decrease the fabric until there are 12 loops left, and then the expansion begins again.
Now you need to make the top half of the sock. The length of this part is equal to the length of the sole.
The peculiarity is to pick up with knitting needles and knit the edge loops of the sole so that they do not need to be sewn.
Slippers for beginners
How to knit slippers for beginners by yourself easy pattern. This step-by-step master class allows you to make slippers on 2 knitting needles very quickly, in a couple of hours.
 The pattern for the slipper is a rectangle, one of the corners of which is cut out so that the slipper does not look like a gnome's shoe with a pointed toe. The slippers are sewn together along the sole.
For size thirty-seven, you need to cast on the knitting needles such a number of loops that it will correspond to 44 cm. Next, the fabric is knitted in stocking stitch with a height of 7 cm.
After that, a number of loops corresponding to 3 cm are closed on one edge. This is where the toe of the slipper will be. After which another three centimeters in height is knitted. The blank for the slipper is ready.
Now it needs to be sewn correctly. First we make the sock - the cut out corner is folded in half and stitched.
Accordingly, the triangular part of the finished canvas is bent. We align it along the bottom edge of the side of the rectangle where the tip of the sock was sewn.
From the opposite end, where the heel will be located, towards the toe we bend 17 cm of knitted fabric. The entire slipper is sewn together along the sole with one seam. There remains one more small seam that connects the bow and side.
Turn the slippers right side out. You can put a braid along the edge and the bias seam on the front or beautifully crochet it.
We knit footwear step by step
When knitting leotards, you need to adhere to the following steps:

Poncho for Beginners
How to knit a poncho for beginners with knitting needles, because this product is voluminous. The step-by-step principle of making it on 2 knitting needles is very simple.
 You need to knit two large rectangles, each measuring 40x80 cm. You can choose any thickness of yarn and knitting needles, any pattern. Even a simple stockinette stitch is suitable for inexperienced craftswomen.
The main secret is in stitching the two resulting canvases. Each one needs to be folded in half. The shoulders will be in the fold area. Then attach the narrow side of one rectangle to the wide side of the other so that you get a nice angle at the bottom of the poncho, and sew a seam.
We do the same on the other side.
Now you can work on the neckline by casting on loops along the edge. A collar with a large lapel, like a sweater, knitted in the round, would be perfect for this poncho.
Knitted booties for newborns
These booties are designed for a baby's foot length of 8 cm. They are made in garter stitch using needles number 3.
 Knitting starts from the part that is above the ankle and wraps around the shin. Then the toe is knitted, after which the middle part is knitted, connecting the sole and the top, then the sole itself and the back of the booties.
Progress:
- Cast on 27 loops and knit 12 rows. The last edge in each row is made purl.
- The next step is to make holes for the lace. The next 2 rows are knitted in stockinette stitch. Fifteenth row: 2 together, 1 yarn over, at the end of the row - 1 front and edge. The sixteenth row goes all purl.
- We knit a sock, divide the fabric into 3 parts of 9 loops. Knit 17 stitches. The eighteenth loop is made purl, after which the product must be turned over. And now only the middle part of 9 loops is knitted separately for 16 rows.
- Let's move on to the side part, here you need to lift the loops from the sock fabric. First of all, we do this on the left side. Therefore, we knit the row to the end, and insert the left knitting needle into the edge of the previous row, pull out the thread and purl it. Then we cast on 7 more loops in this way until the end of the fabric. Next comes the left side of the canvas, which is done with knit stitches. We turn the product inside out and do everything according to the drawing. Now we cast on 8 loops with knit stitches along the right edge. After which the remaining loops on the knitting needle are knitted according to the pattern. There are 43 stitches left, which are then knitted in garter stitch for 12 rows.
- We make the sole. In this case, only the middle part of 9 loops is knitted with the sides gradually attached. First, knit 25 stitches. Then the 26th loop with the 27th is performed together with the front one. We turn the product over, knit 8, the 9th goes with the 10th and purl together. The work is turned on the face, and the sole is knitted further using the same technique. The loops that are knitted together follow the pattern. At the end of the sole, 9 loops remain.
- Then the backdrop is knitted. The edge loops of the remaining parts are connected. After the first row of the backdrop, slip the last stitch onto the knitting needle, which is in your right hand. Then we pick up an additional stitch from the edge stitch, slip the last stitch from the right needle to the left one and knit them together. We turn the product, purl the row to the end. We remove the last unknitted loop onto the right knitting needle, insert the left knitting needle under the edge of the side part. Then drop a loose loop from the right knitting needle to the left one, and purl 2 stitches together. We continue to do this until we come to the place where we need to make holes for the lace. In the next front row, we alternate yarn overs and knit 2 together, while simultaneously lifting the loops on the side parts of the product. Next, we knit according to the pattern until the end of the product, until all the sides are attached to the back of the booties. We close the loops.
This step by step diagram Knitting booties on 2 knitting needles for beginners, as experience shows, is universal. On its basis you can knit booties. different models, adding new details. You just have to show your creative imagination.
 You can decorate hand-knitted items using multi-colored embroidery woolen threads, beads, braid. Some craftswomen use natural materials– buttons made of pieces of wood, stoppers for ties made of walnut shells, leather straps. Bold imagination allows even inexperienced needlewomen to create impressive, exclusive items.
How to knit for beginners step by step on 2 knitting needles:
Knitting socks on 2 knitting needles:
How to knit booties on 2 knitting needles:
How to knit slips on 2 knitting needles:
If you have never knitted socks on two needles, but would like to learn how to do it quickly, efficiently and beautifully, read our article, study master classes and watch video lessons. You will learn how to knit children's, men's, fishnet socks step by step, learn how to make seamless socks, discover the most easy way knitting socks, and also get detailed recommendations on how to knit the heel of a sock on knitting needles: detailed instructions will reveal all the secrets to you.
For some knitting needles, knitting cozy and warm socks on two needles is even easier than on five. We have already described to you in detail, and right now we want to tell you how to create with your own hands very beautiful socks without single seam . Women especially like to wear this accessory because it sits comfortably on the leg without pressing on the skin or tightening the veins.
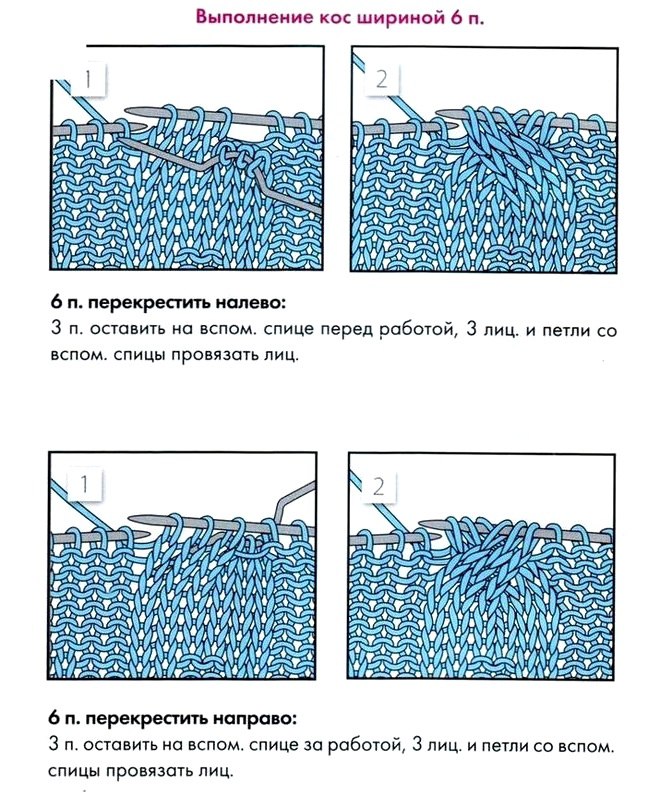
Seamless socks with braids: knitting pattern
To work, you will need any combined yarn, which includes both natural and synthetic fibers. Its quantity is approximately 110 grams. And d all knitting needles, size 2.5. We will knit these wonderful socks 2x2 elastic pattern, as well as a braid pattern, consisting of six loops. Probably every beginning craftswoman knows how to knit an elastic pattern.
  Knit the braid according to the pattern.
 And this – knitting pattern for the product itself, which you will use while working.
Cast on 50 stitches on the knitting needles and knit according to the pattern, checking the odd rows according to the pattern.
 Having knitted 38 rows according to the patterns presented above, cast on another 20 stitches and turn the knitting over. Knit according to the pattern, and then add another 20 loops, thus getting 90 loops to work with.
- 40 loops– for knitting with an elastic pattern;
- 10 loops– for a braid with two purls on each side;
- 40 loops- for elastic.
 Knit the central pattern without changes, and for the sides make decreases, knitting one loop at a time along with the edge. Knit in this way until you get 10 loops on the knitting needles.
  Cast on the knitting needles the loops you knitted , starting from row 39. There should be 50 of them.
  Decrease along the edges according to the previous instructions., until ten loops are formed on the knitting needles.


- On a free knitting needle cast on edge loops from rows 1 to 37- in the amount of 18 loops. Using the same knitting needle, knit 10 stitches according to the pattern.
- Turn the work and cast on 18 stitches on the other side. Your resulting combination: 18 loops+10 loops+18 loops. Together 46.
 Decrease stitches along the edges as indicated in the instructions above.


 We reduce until there are 10 loops left that need to be closed.
 Cut the thread, carefully securing the end.
 Wash finished socks in warm water.
Knitting socks on two knitting needles: new patterns and patterns
Continuing the theme of knitting socks, we want to show you new models with descriptions.
An absolute hit is short socks; this trend is also present in the world of knitting.


 Present to your attention: knitted short socks and detailed instructions for knitting them.
 Openwork patterns popular when creating any clothing, and socks are no exception. We talked in detail about patterns for knitting socks in our article

 A about knitting openwork socks we want to tell you right now.
 Men's socks are an indispensable accessory, Every woman knows about this. However, not every woman knows how to knit socks and at the same time surprise her loved one with her creativity and care.


 Read the detailed instructions and How to knit socks with two knitting needles.
Knitting children's socks on 2 knitting needles: step-by-step instructions
Child dressed in knitted socks, it is not only cute and beautiful, but also very warm. We talked about how to knit tiny ones in one of the previous materials. Booties are worn by the youngest children, and for older children, soft and warm children's socks are knitted with knitting needles. We'll tell you how easy it is to knit this cute accessory for your little one.

- This method knitting is also suitable for inexperienced knitters, you need to measure the length of the baby’s foot and dial required amount loops We start knitting from the cuff with an elastic pattern. We make the cuff 3-4 cm high from the child’s ankle.
- Next we move on to the front loops and knit about 8 cm(or as needed according to your foot size).
- The most crucial moment is the formation of the heel of the product. We divide the loops into 4 parts (excluding the edge ones).
- We knit the heel first from the first three parts, after which we turn the work and yarn over. We knit those loops that are in the middle (of the three parts that we are working with at the moment) and turn the knitting again. Don’t forget to yarn over before the last stitch. until we get 10 loops on the knitting needles.
- From now on we knit with an increase. The first loop from the side is knitted with a yarn over and together with the last loop in the middle. We knit until the loops run out.
- We continue to knit in stockinette stitch to the place where the thumb is located.
- To form the toe, we again divide the loops into 4 parts. In every second row we decrease the loops by knitting the last two loops together. We do this in each of the four parts in four rows. In the next rows we decrease the stitches.
- At the end we get 4 loops on the knitting needles and tie them together. We fasten the thread.
So we knitted socks on two knitting needles: a simple method for beginners that does not require a lot of time and resources. Warm and cozy socks for a baby can be knitted from leftovers, and if you took new yarn, then you will have enough for socks, and not on the list creative projects on our website.
How to knit the heel of a sock on knitting needles: detailed instructions
Heel toe is one of the the most important indicators product quality. The heel is rubbed first, so for knitting it you need to choose strong, high-quality and dense yarn. There are several ways to carefully knit a heel, we talked about some of them earlier in the article.
Knitting socks on two knitting needles differs from the method of knitting on five knitting needles in that we create the product in one continuous fabric using methods of decreasing and adding loops and carefully calculating their number.
To avoid losing your calculations, study the entire master class from start to finish
Knowing how to knit socks can help you out in many situations. To tie Original gifts to your loved ones for a holiday, surprise your friends with a stylish new thing - you never know the reasons! Even if you have very little experience as a knitter, don’t despair. We will tell you step by step how to knit socks on two knitting needles in a simple way.
We knit socks on two knitting needles without a seam
Size: 39, for foot length 25cm.
We will need:
- yarn of any composition (in our case - 100% acrylic, density 50g per 200m) - only 100g (we have two colors - light green and sand);
- knitting needles from the sock set No. 2.5 - 2 pieces.
What patterns will we knit:
- elastic band 1 knit x 1 purl;
- persons satin stitch - when knitting in straight rows, all stitches are knit, and in purl rows, all stitches are purl. Before starting work, you must knit a sample and use it to calculate the knitting density and the required number of loops.
Density on faces. Ch.: 30p.=10cm.
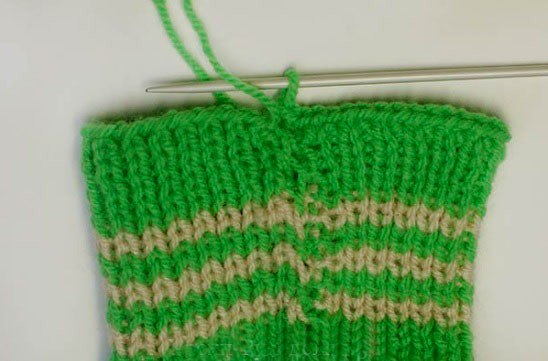
Description
1st: dial 30p. light green threads.

2p.: 1 cr., elastic to the end of the row. We will knit this further, alternating color stripes.

From the 3rd to the 8th p.m. – continue the elastic band with light green color.
9th and 10th r. – change the color of the thread to sand.

11th and 12th rows: light green;
13th and 14th rows: sand;
15th and 16th rows: light green;
17th and 18th rows: sand;
From the 19th to the 26th: green.

29r.: 1p. remove, 28l., 1p. on the sp., we do not knit it.

30r.: 1p. filmed in previous r., 1p. remove, p27, 1p. on the sp., we do not knit it.

This should look like this:

31r.: 1 p. left, 1 dc., 26 p., 2 p. left;
32r: 2 p. left, 1 dc, 25 p., 2 p. left;
33r.: 3 p. left., 1dc., 24l., 3p. left;

34r.: 3 sts left, 1dc. p., 23l., 3p. left;
35 rubles: 3 sts left, 1 dc. p., 22l., 4p. left;
36r.: 4 p. left, 1 dc. p., 21l., 4p. left;
37r.: 4 sts left, 1dc. p., 20l., 5p. left;
38r.: 5 sts left, 1dc. p., 19l., 5p. left;
39r.: 5 p. left, 1 dc. p., 18l., 6p. left;
40r.: 6 p. left., 1dc., 17l., 6p. left;
41r.: 6 p. left, 1 sn.p., 16l., 7p. left;
42r.: 7 p. left 1 st.p., 15l., 7p. left;
43r.: 7 p. left 1 st.p., 14l., 8p. left;
44r.: 8 p. ost-ykh, 1 sn.p., 13l., 8p. ost-yh;
45r.: 8 sts., 1 st.p., 12l., 9p. abandoned;
46r.: 9 p. ost-ykh, 1 sn.p., 11l., 9p. abandoned;

From the next R. we increase the number of knitted stitches due to the previously left ones. They will need to be knitted at the end of the r. 1 p.
47.: 1p. dn., 12 l., 8 p. left;
48r.: 8p. ost-ykh, 1p. sn., 13 p., 8 p. ost-yh;
49r.: 8p. ost-ykh, 1p. sc., purl 14, 7 p. ost-nyh;
50r.: 7p. abandoned, 1p. sc., purl 15, 7 p. abandoned;
51r.: 7p. abandoned, 1p. sn., 16 p., 6 p. abandoned;
52r.: 6p. abandoned, 1p. sc., purl 17, 6p. abandoned;
53r.: 6p. abandoned, 1p. sc., purl 18, 5 p. abandoned;
54 rubles: 5 p. remaining, 1 p. sn., purl 19, 5p. the rest.;
55r.: 5p. the rest, 1p. sc., 20 p., 4 p. the rest;
56r.: 4p. the rest, 1p. sc., purl 21, 4 p. the rest;
57r.: 4p. the rest, 1p. sc., purl 22, p. 3. the rest;
58r.: 3p. the rest, 1p. sn., 23p., 2p. rest;
59 rubles: 3 p. left, 1 p. sn., 24p., 2p. rest;
60 rub.: 2p.rest., 1p. sc., purl 25, 2p. rest;
61r.: 2p.rest., 1p. sn., 26 p., 1p. rest;
62r.: 1p.rest., 1p. sn., purl 27, 1p. rest;
63r.: 1p.rest., 1p. sn., purl 28;
64r.: 1. p.s., 29 p.
The heel is ready.

View from the other side.

Its depth is 5cm, the toe needs to be knitted to the same depth – 5cm. The calculated depth of the flat surface area: 25cm-5cm-5cm=15cm.
From the 65th to the 120th ruble: exactly green.

From the 125th to the 160th row: knit the toe, repeating from the 29th to the 64th row.

RUR 161: knitting the instep. Again we alternate the color stripes every two rows. At the same time we will connect the upper and lower parts. The method for this is very simple, accessible for beginners: we knit the outer loops of 2 parts together.
Raise the outermost st with the right knitting needle.

Then on it - remove the 1st stitch from the left sp.

Knit 29 faces.
162 rub.: raise 1 p. on the foot.

Remove from the left sp. on the right 1st st.

Knit 28 knits, two outer ones - in 1 p.

From 163 to 220 rubles: Remove 1 p. bottom, 1p. from above, 28p. - according to the pattern, 2p. in 1p.

221 rub. and 222 rub.: chul. Ch. light green yarn.
From 223r. for 228 rub.: light green color. an elastic band. Don't forget to connect both parts of the sock without a seam.
229 rub. and 230 rub.: sand;
231 rub. and 232 rub.: light green;
233 rub. and 234 rubles: sand;
235 rub. and 236 rub.: light green;
237 rub. and 238 rub.: sand;
from 239 rub. 245 rubles each: salads.

We close the row. We use the usual method. For beginner knitters - see explanation and photo:
Knit 2p. in 1p.

Return this st to the left sp.

Again 2p. knit in 1 p.

Repeat again - return st to left sp. Repeat the procedure up to 1 step.
Break the thread, fasten it, and carefully tuck the end in.

Knit the second sock without a seam using the same method.
A simple way to knit socks from the toe: video tutorial
Knitting socks with two knitting needles: the easiest way

Even a schoolgirl can knit socks on two knitting needles using this method without any problems. First you need to take measurements: ankle volume, instep length (for part a), foot length (for part b), heel height (for part c). After selecting the yarn and number of knitting needles, knit a sample and count the required number of stitches from it.
Description
For clarity, the direction of knitting - see photo.


We start knitting socks from part “a”. We cast on the required number of loops - half the volume of the ankle and knit the elastic band. Determine its height for yourself, on average it is 8-10 cm. After that, we switch to stocking stitch. If you want to knit not just warm, but also very beautiful socks, then choose any pattern you like for this area of work. The main thing is that it fits proportionally to the dimensions you need.
We knit part “a” to a height that covers the little finger. Now we make 1 stitch decreases on both sides. until there are 6-10 loops left on the working needle. And then – the reverse process – mirror increases. Returning to the original number of loops, we proceed to the sole - section “b”. Let's knit it equal to the length of the foot. You can try it on to be sure.
To design the heel, we repeat the decrease and increase according to the previous description. To strengthen the heel in the area of increase, you can add another thread to the work, preferably synthetic - this way the socks will last longer. When knitting section “b”, pay attention that the elastic band should be the same length and width as in section “a”.
Assembly
First sew the heel: parts “b” and “c”; then them - with part “a”.
The undoubted advantages of this method include the possibility of easy restoration of the worn heel of the sock: the seams are trimmed and the heel is bandaged.
Seamless socks

Very easy to knit. The only drawback is that the heel wears out quickly. But if you choose the right yarn, then this problem ceases to be such a problem. The calculation is made for foot size 40-41.
To knit socks without a seam, we will need for work:
- mixed yarn (100g per 260m) - about 110g;
- knitting needles No. 2.5.
What patterns will we knit:
- elastic band 2 knits x 2 purls;
- braid of 6 loops - see diagram:
Description

We dial 50p. and knit according to the pattern. Odd rows - according to the picture.
Having knitted 38p, we dial another 20p. Rotate the work. Knit according to the pattern, then dial on 20 stitches. In total there are 90p in work. They are distributed over 40p. elastic bands, 10 p. – braid with 2 – purl. p. on each side, 40 p. elastic. We knit the pattern in the center unchanged, and we make decreases along the edges: we knit 1 p. along with the edge. We continue until there are 10p left in the work.

Dial alternately on sp. additional dialed p. 39 r. We get 20p.+10p.+20p=50p.


For a free sleep cast on edge stitches from 1st to 37th p. - only 18p. Use it to knit 10 stitches. drawing. 


To tie socks with two knitting needles It is possible using a very simple technique. Since the work uses only two knitting needles, knitting socks is easier, so we recommend learning how to knit socks using this master class for those who are just learn to knit. The elastic pattern gently fits the leg; for decoration when knitting a sock, make colored stripes on the cuff and around the foot. First, the upper part of the sock is knitted, then the sole, and finally a seam is made from the heel to the top of the cuff.
To knit one pair of socks you will need 150-200 grams of medium-thick yarn, knitting needles No. 3.
Description of knitting socks on two knitting needles:
For a sock for size 39, cast on 61 stitches on a needle. Knit the sock cuff with a 1x1 rib, alternating 1 knit stitch and 1 purl stitch. In the next rows, knit the pattern according to the pattern, i.e. perform a knit stitch over the knit stitch, and a purl stitch over the purl stitch. Always slip the first stitch of a row as a knit stitch to create a looped edge along the edge.

Knit the cuff to a height of 12 cm; for colored stripes, work with a thread of a different color at an equal interval.
After knitting the sock cuff, mark the center 31st stitch. In the next row, knit 5 new loops from the selected loop. If the selected loop is purl, then knit from it purl, yarn over, purl, yarn over, purl, then knit a row of loops according to the elastic pattern. Turning the work over and reaching the new 5 loops, knit them including 1 knit stitch, purl stitch, knit stitch, purl stitch, knit stitch, then continue knitting the row to the end with an elastic band.

If the marked loop is a knit stitch, then knit 1 knit stitch, yarn over, 1 knit stitch, yarn over, 1 knit stitch. In the next row, include the new 5 loops in the pattern and knit purl, knit, purl, knit, purl. and then along the row with an elastic band.

From the added 5 loops, mark the central 3rd loop, from which a new addition is made through the row. Knit the upper part of the sock, adding 5 new loops through the row from the central loop.


When knitting with increases in the center, a wedge is formed, which from the end of the cuff in length should be equal to the length of the foot along the top from the leg to the toes.

In total, it was necessary to knit 14 rows with additions.

The upper part of the sock is ready, now knit the sole, which is also done in garter stitch, for this you need to knit only the front loops in each row.

For the sole select the central 20 loops. In the first row of knitting the sock sole from the beginning of the row, knit the side part and the central 19 loops, knit the 20th loop together with the loop of the next side part with one front loop.

*Turn the work, remove the 1st loop, knit 18 knit stitches, knit the 20th loop together with the loop on the side using a knit stitch. Repeat from *.

In the photo, for clarity, the central 20 loops and the loops of the side parts are divided into three knitting needles and the 4th knitting needle is used in the work. However, it is easier to knit the sole of a sock on two knitting needles, knitting only the central 20 loops and in each row decreasing the loop from one or the other side part along with the 20th loop.
ORIGINAL SLIPPERS WITH SPOKES. DESCRIPTION Cast on 51 stitches with dark thread, knit 8 rows in garter stitch. Then divide all the loops into three parts: 17+17+17, and knit only the middle part in stocking stitch. We temporarily remove the side loops using large pins. Having knitted 10-12 cm, we will get a rectangle. We don't close the loops. On the sides of the rectangle we cast on additional loops (approximately 23-25) with thread light color . We knit the “teeth” on three sides of the rectangle: knit 4 rows in stockinette stitch, 5th row - remove the edge loop, *2 stitches together in knit stitch, yarn over* - to the end of the row. We also knit 3 rows in stockinette stitch. We fold the knitting along the row where we have yarn overs and connect the initial row with the last knitting path: knit 1 loop from the first row and one loop from the last row together. Then we put the loops from the pins into work and knit in garter stitch the height of the slipper is 3-4 cm with a dark thread. We move on to knitting the sole. To do this, mark the middle 12 loops and knit them in short rows until we have closed all the side loops. To knit the heel along the edges, we gain the height of the slipper on both sides, 16-18 loops each. We knit the middle 12 stitches in short rows like the heel of a sock. Tie the top of the slippers with “teeth”. Hem with a needle. Ready-made slippers can be decorated as desired. We start knitting the teeth on top (with the first color), cast on 50 stitches and knit 5 rows in stocking stitch, 6th row - 1 edge. *yo, 2 knits*, 1 chrome. Then again 5 rows in stockinette stitch After hemming the teeth with a knitting needle Then 3 in garter stitch in the second color After dividing the loops into three parts and knitting only the middle part We switch to the first color and pick up the edge loops of the middle part to knit the teeth. We knit the teeth at the top: 4 rows - stocking stitch; 5 row - 1 chrome, * yarn over, 2 vm., * 1 chrome, then again 4 rows of stockings, knitting. After we hem the teeth with a knitting needle. Then with the second color on all loops of the shoe we knit in garter stitch 1.5-2 cm (fullness shoe). Again we knit the teeth with the first color - 4 rows of stocking stitch, 5th row - 1 crocheted, *yo, 2 knits*, 1 crocheted stitch, then again 4 rows of stockings. viscous. Then we hem the teeth with a knitting needle. We move on to the sole, which we knit with the second color in garter stitch when we start knitting the sole. you need to decrease the first two loops together in every second row...then two together before the central loop...knit the central loop and again two together and the last two together. Cast on 51 loops with dark thread, knit 8 rows in garter stitch. Then divide all the loops into three parts: 17+17+17, and knit only the middle part. We temporarily remove the side loops using large pins. The middle part can be decorated with any design. For example, "butterflies". Knitting butterfly pattern. For a butterfly pattern, the number of loops should be divided by five, plus two more loops. For the sample we cast on 27 loops. We knit the first row with facial loops. We knit the second and all even ones with purl loops. We knit the third row as follows: remove the first edge loop, take the thread towards you and remove five loops. The thread should lie across the removed loops along the left knitting needle, then we knit five facial loops and so on until the end of the row. We always knit the last edge stitch. We knit the fifth, seventh and ninth rows in the same way. In the eleventh row we knit a butterfly. We knit two front loops, then insert the right knitting needle under the threads lying on the loops, from the bottom up, grab the working thread, drag it under the threads, put the resulting loop on the left knitting needle and knit it together with the next loop at the back segments. Then we knit 9 facial loops. And we repeat this until the end of the row. In the 13th row we knit 5 knit stitches, take the thread to ourselves and remove 5 loops. We knit the 15th, 17th and 19th rows in the same way as 13. In the 21st row we knit 7 knit stitches once and make a butterfly, as in the 11th row, then we knit 9 knit stitches to the end of the row and knit a butterfly again. That is, we knit 21 rows - 7 levs make a butterfly, 9 levs. What we knit before the brackets once. We knit what is in brackets to the end of the row. Knitting butterfly pattern. Butterflies are arranged in a checkerboard pattern. Pattern repeat: kp: 5 +2; 1 - lv; 2 and all even - izv; 3 - nox, 5s, 5lv; 5, 7 and 9 - as z; 11 - 2lv, make a butterfly, 9 lv; 13 - 5lv, nox, 5s; 15, 17 and 19 - like 13; 21 - 7 lv, we make a butterfly, 9 lv / 23 - like 1. Knitting 10-12 cm, we will get a rectangle. We don't close the loops. On the sides of the rectangle we cast on additional loops (approximately 23-25) with a light-colored thread. We knit the “teeth” on three sides of the rectangle: knit 4 rows in stockinette stitch, 5th row - remove the edge loop, *2 knit stitches together, yarn over* - to the end of the row. We also knit 3 rows in stockinette stitch. We fold the knitting along the row where we have yarn overs and connect the initial row with the last knitting path: knit 1 loop from the first row and one loop from the last row together. Then we put the loops from the pins into work and knit in garter stitch the height of the slipper is 3-4 cm with a dark thread. Let's move on to knitting the soles. To do this, mark the middle 12 loops and knit them in short rows until we have closed all the side loops. To knit the heel along the edges, we gain the height of the slipper on both sides, 16-18 loops each. We knit the middle 12 stitches in short rows like the heel of a sock. Tie the top of the slippers with “teeth”. Hemming with a needle


