Many people do not realize that many beautiful crafts can be made from ordinary napkins. The material will help you create decorations for any holiday without extra costs.
The craft will take a few minutes to complete and even children can create it. younger age. Kids will love making appliqués from napkins, and they will help adults remember their childhood and colorfully decorate their room.

But how to make crafts from napkins with your own hands using scrap materials?

Special serving
Ordinary paper napkins can be found on every table anywhere in the world. A rich imagination will allow you to create many different shapes from a napkin.
Origami is popular, with which you can make many swans or wonderful flowers. You can find many ways to create jewelry from paper, which, thanks to the great possibilities, will allow you to create a wonderful craft.

On the Internet you can find many photographs of crafts made from napkins on any topic. Often there are figures made in the shape of flowers.

Examples of creating paper flowers
Step-by-step instructions for making crafts from a regular napkin:
- A green napkin is laid out in the shape of a triangle;
- Place it in the glass, leaving both ends outside the glass;
- The yellow napkin is folded in the same way and twisted to form a tube;
- The underside bends and the flower straightens;
- The resulting rose is dipped into a glass with a green napkin.

Pocket for various cutlery:
- The napkin is rolled into a tube from any angle to the center;
- The tube is bent into two equal parts so that the holes remain in front;
- On the opposite side, the edge is bent towards the front.
Children's crafts
Let's look at several crafts for children made from napkins.

Dandelion
Children will have fun creating different shapes together with their parents.

The following supplies are required for the dandelion:
- PVA glue;
- Paper;
- Napkins;
- Scissors;
- Dye;
- Stapler.

Making crafts from napkins is an easy task that even children can do. The stem of the future dandelion is drawn on the leaf. The ball is cut out the right size from a yellow napkin, which is secured in the middle with a stapler.
Using scissors, cuts are made along the edges towards the center, and the resulting flower is glued to the paper. The green napkin will be the dandelion leaves that stick to the stem.

After the glue has dried, you need to straighten the flower by bending and pressing all the cut edges on a yellow napkin. The result is a fluffy flower that will delight adults and children with its appearance.
Butterfly
To create a craft you need:
- Napkins;
- Scissors;
- Glue;
- White paper;
- Pencil.

A butterfly is drawn with a pencil on paper. The necessary pieces are cut out of the napkins so that they match the size of the drawn butterfly. This will help develop motor skills in children and will be to their liking.

The resulting parts are glued onto paper. The craft will be colorful, voluminous and will decorate the room.

Note!

Bird
For the craft you will need:
- Colored paper;
- Glue;
- Cardboard;
- Napkins;
- Pencil;
- Stapler.
Draw a branch on cardboard with a pencil. Using scissors, the body of the bird is cut out of paper of various colors, which is glued to the cardboard. The green napkin is cut into small pieces and rolled into small tubes.

The resulting tubes are glued to the outline of the branch. We cut out a ball from a red napkin, which we fix in the center using a stapler.

The edges are cut and the circle is glued to the body of the bird. The edges are straightened like a dandelion to create volume.

Decorating a room with napkins
You can create many different flowers using napkins and a stapler and scissors. To make a peony you need several napkins.
A short instruction for crafts made from a napkin:
- A circle is cut out with waves along the edges;
- Using scissors, a cut is made towards the center;
- The middle is secured with a stapler;
- The cuts along the edges can be straightened in any order.

Note!

Can be cut from cardboard beautiful numbers and decorate them with napkins. A number is created from cardboard and pasted over with paper. You can cover it with newspaper and coat it with primer. Next, corrugated paper is glued onto the figure.

We create flowers using the peony method or another method. For one flower you will need several colored napkins. You will have to spend some time on the activity, but it is worth it.

Circles are cut out of colored napkins, fastened in the middle and spread out along the edges. Flowers are pasted onto the number in random order.

The created craft will serve as an excellent decoration for any holiday.

Photos of crafts made from napkins


Note!


Natalia Gavrishko
Purpose master class: making crafts for the spring holiday, interior decoration, the desire to please loved ones with a composition.
Target master class:
1. Creating compositions in planar facing technique.
2. Teach how to work in paper cutting technique.
3. Strengthen the ability to correctly arrange the composition of a craft.
4. Development of fine motor skills of the hands, sense of taste, imagination, creative thinking.
5. Development of accuracy, creativity, aesthetic taste.
6. Cultivate interest in working with corrugated paper.
Required material:
The base is white Whatman paper.
Colored corrugated paper: blue, light blue, green, white, light brown;
Scissors, pencil.
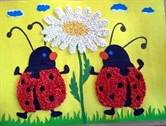
Trimming made of paper - it's quite new paper craft technique. But even despite her young age, this technology there are already a lot of fans. But paper crafts made in this technology, they turn out very beautiful and unusual.
This wonderful carpet-picture, the size of a Whatman sheet, evokes admiration and surprise among everyone who sees them. It seems incredible that children can perform such complex compositions. It turns out that anything is possible. If organized correctly collective creativity, then even preschoolers can cope with such work
To make a mosaic in trimming technique, you need colored corrugated paper, or colored napkins, scissors, pencil and glue.
To make one like this applique we went through the following stages:
1. Draw a sketch appliqués« spring landscape» on whatman paper.

2. From stripes corrugated paper Cut squares with a side of about 3 cm by eye.
3. Squares must be turned into colored balls by rolling them between your palms (children at this stage are the most best helpers) . Simultaneously developing fine motor skills children's hands.

4. Apply a thin strip of glue along the contour to a small area of the design. We attach the parts to the adhesive base. Every next trimming glue it next to the previous one. Try to bet the ends are close to each other so that there are no gaps.

5. Where it was necessary to highlight the transition of sky and air and give a more natural look, I used different shades blue color so that the composition does not merge.


6. Mosaic in trimming technique can be done along the contour or made solid.


7. It is necessary to fill in the background around the details of the picture. It turned out to be a small fluffy rug.

Working on such a carpet can be turned into an interesting game. The children really enjoyed this activity, especially when they saw "fluffy" result. The big advantage of this work is that we did it collectively. We worked as a group and completed a large mosaic the size of a piece of Whatman paper. The children even coped with a large picture; for this, each child was allocated his own area, which he filled in « end caps» . The places where the squares meet are practically invisible due to the fluffiness. Working with paper develops fine motor skills, attention, accuracy, and contributes to the emotional and aesthetic development of the child.

This is how it turned out applique made from napkins using the cutting technique.
How nice it is to do something interesting and useful with the kids. Classes with applications made from napkins are an ideal choice, needless to say about the availability of this material; paper napkins are sold in any store at more than affordable prices.
In this article you will be offered different techniques creating crafts from napkins that are very easy to make with your own hands. This activity will be useful for children, because such painstaking work develops fine motor skills, perseverance, and will seem very exciting.
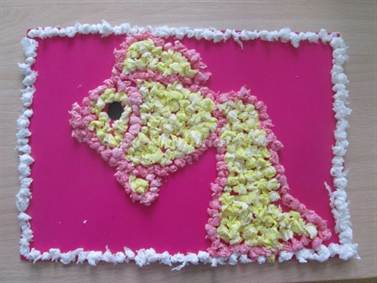
"Magic Lumps"
This type of activity is intended mainly for students. primary classes, but adults will not find this type of activity boring either.
We will make a cute little gnome. For work we will need:
- Paper napkins (white, blue, pink, burgundy and other colors as desired);
- Scissors;
- Paper glue (PVA or glue stick);
- Colored paper;
- Cardboard;
- A simple pencil.
Trace the gnome using a simple pencil according to the template (the template can be used from the photo below).
Now prepare the napkins themselves: cut each napkin into 4 parts, then each part into 4 more parts, and now the resulting pieces into 4 more parts. You should get something like the picture.

Roll the resulting small pieces into balls.

Now we move the resulting balls onto the paper. It is recommended to start with small details, such as the mouth, nose, eyes.

Now let's move on to the big details: beard, cap, hands, etc.

Here we have such a cute gnome.

You can hang the picture on the wall or make a stand so that it can stand on a table or shelf.
Craft stand
We cut out a strip of about 6 centimeters wide from a whole sheet of cardboard, stepping back 3 centimeters from the edge and bending the strip to form a leg.

Now we glue it to the back of our picture with glue or tape.

This technique is the most popular; it is what is most often used when making applications from paper napkins, because she looks very unusual, but at the same time simple in her execution. Below are other works made using the “magic lumps” technique.


This technique can be slightly modified: do not roll the small squares made from napkins into balls, but simply glue them onto the prepared template. This type of work is called trimming, it looks like this:

It also turns out very interesting and beautiful.
Twisted tube technique
Another very interesting view The work is an applique of napkins rolled into a tube. It is very simple to do: take a napkin, cut it into 4 parts so that you get stripes, then roll them into a tight tube. And with the resulting “sausages” we lay out a drawing, as shown in the photo below:

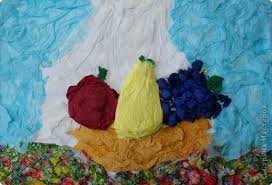
Now let’s try to make the “Flowers in a Vase” applique; it will be made using a completely different technique. The flower will be voluminous and will look very unusual.
To complete the craft we will need:
- Napkins (preferably pink or red);
- Stapler;
- Colored paper;
- A sheet of colored cardboard;
- Glue.
First, you should prepare the blanks: cut the napkin into squares in several layers, and connect the middle with a stapler. Cut out leaves, a stem and a vase from colored paper. Now transfer the blanks to the paper: fluff the napkin bud with your fingers and glue it to the cardboard, then glue the stems, leaves and lastly the vase.
The application is ready, this is how beautiful it turned out:

And finally, your attention will be presented to the work performed in the most complex technology, but she also looks very unusual. This type of work is best done with older children (grades 5-7).
We will need:
- Sheet of cardboard;
- Paper napkins of different colors;
- Scissors;
- Knitting needle;
- Threads;
- Glue.
Cut the napkins into 4 squares (cut along the fold lines). We wind the resulting square onto the knitting needle, starting from the corner.

We move the napkin from both sides to the middle.

Remove the workpiece from the knitting needle. Spread the resulting accordion a little and lower the ends down, while supporting it towards the middle, you have a petal.

Secure the petal at the bottom with thread. For a flower you need 8 petals in total, of which 4 are large and 4 are smaller. Prepare the center for the flower in the same way; it needs to be made even smaller.
This is what all the blanks for one flower look like (if you make more flowers, you need to make as many blanks for each flower).

Choose the number of flowers and the color of the petals as you wish. When all the pieces are ready, cut off their ends.


After you come up with a composition, start designing it.
Glue each element carefully, gradually: first the large petals, then the smaller ones, and at the very end - the middle.


After that, add the leaves.

Your work is ready, you can choose a beautiful frame for it and use it to decorate your interior or as a gift.

You can decorate a room with such crafts, and it’s also not a shame to give such beauty to your first teacher or mother for any holiday (March 8, Birthday, etc.)
Applications from napkins are a very interesting type of creativity, the techniques for making paper crafts are not at all complicated, but very exciting, and the result is very good. Create with your kids, let the kids show their imagination, maybe they will come up with something on their own interesting story for crafts, and you will teach them the technique.
Video on the topic of the article
Watch these videos, they show other options for napkin applications.
Napkin applications are a unique type of creativity that will definitely appeal not only to children, but also to adults. Interestingly, it will be possible to create real masterpieces even without the use of scissors. In general, appliqué refers to images that are made by gluing pieces of material of different colors and textures onto a base. These can be stones (including precious ones), fabric, sand, threads, shells and other options.
The most popular material for appliques is paper. After all, it is precisely this that every master has at hand, absolutely safe even for the smallest creators, is inexpensive, but at the same time allows you to create real works of art. And it’s most convenient to work with napkins. They tear well and knead into lumps, which fill the contours of the drawings of the future application.
Today you can find napkins on sale in a variety of colors, which makes the process of creativity with them even more interesting and exciting. By the way, napkins are used to create paintings in other ways. In some cases, they do not crumple into small balls, but simply cut into parts the desired shape or curl into flagella. Which option is better to choose, each master decides for himself. Often this depends on the desired pattern. So, with glomeruli and flagella, the craft turns out to be more voluminous.
The type of creativity under discussion has several advantages. Among them:
- development of fine motor skills when making appliqués from rolled napkins;
- large scope for creativity and creativity;
- the ability to work without scissors and other dangerous tools;
- development of tactile perception (if paper of different textures is used);
- the opportunity to start creating with a 2-year-old child.
In addition, do not forget that joint creation of any crafts unites children and their parents and helps family members become more closer friend to friend.
Gallery: applications made from paper napkins (25 photos)


Master classes on napkin applications
Make it bright today beautiful crafts Even a child can do it from the material under discussion without the help of adults. After all, there are detailed step-by-step master classes who will tell you how to easily and simply turn colored napkins into your favorite cartoon characters, lush bouquets or delicious fruits.
Rowan branch
 The “Rowan Branch” applique turns out to be very beautiful and original. Interestingly, this napkin craft for children includes two techniques at once. The first part of the drawing is created from paper blanks, and the second is made of lumps. Even a child over 5 years old will be able to cope with such an application. To create it you will need the following materials and tools:
- sheet of paper (base);
- green or orange leaf wipes;
- red napkins for berries;
- color pencil;
- scissors
- glue.
First of all, an image of a twig is drawn on the base. It should be clear so as not to get confused in the future about where to glue the various parts of the craft. From green or orange napkins leaves are cut out and attached to that part of the design where they should be located. Let such details be ribbed so that they resemble real leaves. By the way, at this stage you can use napkins of two colors at once. For example, among the bulk of orange leaves, stick a few green ones.
Berries are created from red napkins. You don't need scissors for this. You can simply tear off pieces from a napkin, form them into paper lumps and glue the parts in place of the intended bunch. The more berries there are on the craft, the more voluminous, realistic and interesting it will look. The formation of paper balls should be entrusted to the youngest craftsmen. After all, this procedure perfectly develops fine motor skills.
Apple tree
 There are many options for napkin applications for children, which allow you to create a beautiful lush tree on a sheet of paper. And thematic master classes will help them with this. The most interesting thing is to work on the apple tree. To create it you will need the following materials and tools:
- multi-colored napkins (green and red);
- a sheet of paper for the base;
- simple pencil;
- brown felt-tip pen or paints of the same color;
- scissors;
- glue.
To begin with, a tree outline is drawn on the base. If so 3D applique made from napkins is done together with the child, then you can simply circle his open palm. The area just below the wrist will become the trunk, and the fingers will become branches. Next, the future tree is completely painted over with a brown felt-tip pen or paints. It is also possible to use a colored pencil of the appropriate shade for this purpose.
When the base is dry, you can begin to form the leaves. To do this, green napkins are cut into small squares, after which each resulting part is twisted in the middle into a flagellum. The finished “bows” are glued to the crown area next to each other. Let there be enough of them so that the top of the applique turns out lush and voluminous.
All that remains is to decorate the resulting apple tree with fruits. To do this, you will need to make several lumps of red napkin. Its parts can be cut off with scissors or simply torn off by hand. Let the apples be large and bright. Such fruits will add beauty and originality to the craft. Fruits are glued on top of the “crown” in any selected places. As you can see, for such an applique of paper balls and flagella, 2 techniques for forming parts from napkins are also used at once.
To make the finished tree even more unusual, you can hide an owl in its crown. This surprise will definitely delight the youngest craftsmen. To create a funny bird no need to study a special master class. You can simply draw it on paper or cut out a suitable picture from an old magazine.
Squirrel
 Making a squirrel from rolled up napkins will be a little more difficult. This activity is more suitable for younger schoolchildren and older children. Can perform forgery together with adults for a fun and exciting time with the whole family. And a thematic master class will help those who decide to take on the creation of such an application.
To make a bright, beautiful squirrel you will need to use the following materials and tools:
- white and orange napkins;
- a sheet of paper for the base;
- simple pencil;
- glue.
First, you need to draw the outlines of the future squirrel on a white sheet of paper with a simple pencil. But this option is only suitable for craftsmen with artistic talent. For everyone else, you can simply print out a suitable picture. For example, using a drawing intended for coloring. They always have clear bright contour and snow-white base. If the squirrel in the picture is holding any object in its hands: a flower, a nut, a mushroom, then you will need to stock up on napkins of the appropriate colors to decorate them on the applique. Or simply color the corresponding part with colored markers or pencils.
After this, you just need to tear small pieces from the paper and roll them into tight balls. White details are suitable for decorating the lower part of the muzzle, tummy, tip of the tail and paws, and orange ones for the rest of the silhouette. All that remains is to paste them into the appropriate areas of the picture.. The larger the balls, the more voluminous and fluffy the squirrel will end up. The eyes and nose of the animal can be drawn with a black marker. What the squirrel will be like in the end depends only on the imagination and preferences of the masters themselves. By the way, such a red-haired beauty or any other character will be an excellent decoration for a homemade postcard.
Child development must begin as early as possible. You can interest your child and encourage him to be creative by inviting him to create an applique together. There are many options for choosing the material from which the applique will be made - textiles, natural materials(leaves, acorns, cereals, pebbles), various types of paper.
Table napkins in children's creativity
Pay attention to this type of applique, such as applique made from paper napkins. This affordable material makes very cute products.


In addition, an applique of rolled napkins develops fine motor skills of a child’s hands and stimulates artistic thinking and imagination.
In general, ordinary table napkins provide wide scope for creativity. The variety of colors, availability and ease of use of the material, combined with imagination, can ultimately give a truly magical result. Options for children's creativity mass using paper napkins. These are a variety of figures, delicate compositions from openwork napkins, as well as a lot of options for applications from napkins for children of all ages.


For the youngest children 2 - 2.5 years old, simple themes are suitable - a flower, beads. At this age, the main thing is to acquire initial skills in working with the material. But older children - from 3 years old - are already quite capable of coping with more difficult work - a rowan branch, a snowman.
For older children, aged 4–5 years, images of insects, animals, and more complex flower arrangements are suitable for creativity.
Application made from napkins for children “Sheep”
For work you will need: a stencil design (you can draw it yourself or find a ready-made one), white cardboard as a base, beige cardboard for the muzzle, some black paper for the hooves, white napkins, strings, ribbons for the legs, brown felt-tip pen, PVA glue.
Napkins must be cut into squares and each rolled into a ball. The smaller the squares, the more accurate the applique will be. To cover the animal's body you will need a lot of paper balls, so it is better to prepare them in advance. Transfer the stencil of the sheep's body onto cardboard and cut along the contour. Spread the cardboard with glue, glue the legs and cover the top with balls of napkins. Cut out a head from beige cardboard, draw a mouth and eyes with a felt-tip pen or pencil. The head can not be cut out separately, but made of white cardboard, like the body, and then simply painted with colored pencils, felt-tip pens or paints. Cut out hooves from black paper. They should be double-sided, glued in such a way that textile legs can be glued into the middle. The sheep can be decorated with a ribbon around the neck, a bell, or a flower behind the ear. You can attach a loop on top - it will look like a New Year's Christmas decorations. You can paste the finished applique onto cardboard folded in half and get a greeting card, or you can initially make the applique on solid A4 cardboard and decorate the picture with a frame.


It will be interesting for older preschoolers - 5-7 years old - to try their hand at creating a full-fledged picture-panel, where the entire space is filled with twisted pieces of colored napkins. Colorful undersea world, still life, landscape on the theme of autumn, winter - these are just a few ideas for creativity with children.


Applications made from napkins - simple, interesting and, most importantly, useful look creativity. Both the youngest and older children can make an applique from paper napkins with their own hands. The main thing is that it is accessible and entertaining, and preparation does not require a lot of time and financial costs.
Useful video collection of materials on this topic


