I decided to start with a small master class on making a wallet with a convenient compartment for small change.
The production time (3 hours) is indicated incorrectly, because we need to order punches and some other small items from the online store, and the speed of their delivery to your home depends on the efficiency of the Chinese and our postal service. After about a month and a half, you are ready to start!
The photo below shows the tools and materials we will need.
Leather will require a minimum of 10 square decimeters.

First, we make paper patterns on a scale of 1:1 and cut them out. We transfer it to the skin and cut it out again. We get this beauty.


While two parts are resting under the books, we waste no time punching out the remaining parts. I have punches with round holes with a diameter of 1 mm, the hole pitch is 5 mm. I retreat 5 mm from the edge of the workpiece and punch holes.

On the flap of the coins department, I round the corners at the same time; you can simply attach a coin of a suitable diameter and cut off the excess with a knife.

We remember about the strap and cut it out. I take a width of 2 cm, make the length longer, about 7 cm - then we cut it to fit. The parts have dried under the press, take them out, punch them, also retreating 5 mm from the edge.

That's it, we're great, we've prepared all the details for stitching, we can get started. We take the inner large part of the wallet and three pockets for cards, sew ONLY on top.

On the other side of the cards, according to the design, we have a pocket for small change, so we take all the parts needed for it and stitch it from the middle of the wallet clockwise to the upper right corner.


Along the way, we cut out a small piece for the strap (I think it’s clear in the picture), the width of the cutout is 2 cm, the length is 1 cm, we place the strap in the center. The cutout for the strap is needed in order to finished product it did not stick out from the back of the wallet.


Next, we apply the outer part of our wallet and sew all the parts on the side of the coin pocket with one seam, not forgetting to add a second bent insert and a strap. I got a little carried away here and didn’t take a photo at this point, sorry. After that, we finish the section for small items, I think it’s clear from the photographs.


This is how it turned out that the right side is almost ready, we take the left one, combine the holes and stitch left side with one seam, starting from the top left corner and ending in the “middle” of the wallet.

As you can see, the strap is sewn between layers of leather, no irregularities are observed.


We install the buttons, beat off the seams with a hammer, cut the strap to length, and proceed to align the ends. Since this leather is quite soft, I sand it with sandpaper, starting with quite coarse sandpaper (I don’t know its grit) and ending with 2500 grit. I don’t like the coloring of the ends, it looks kind of rubbery, so I chose this path for myself.


After half an hour of “sanding” the ends, we have a finished product, we are amazing!


Thank you for your attention. If you use my master class somewhere, please provide the link.
www.livemaster.ru
Making a wallet from genuine leather – Crafts Fair
In order to make a leather wallet, you will need the following tools and materials: hammer, 3 mm punch, rulers, utility knife, scissors (best for leather), marking pen, ballpoint pen, wood chisel with a rounded knife, thread, ruler with circles of different diameters, cardboard 0.5 mm, Genuine Leather 1.5-2 mm.
You will also need equipment: a sewing machine.

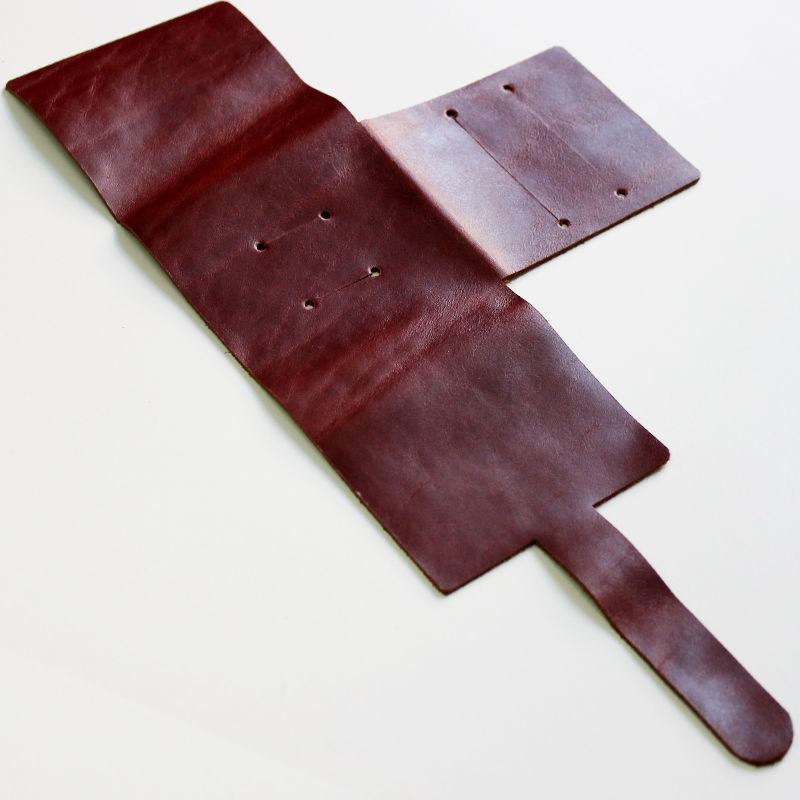
To do this, take 0.5 mm cardboard and, using rulers, build a T-shape with a strap, according to the dimensions indicated in the photograph. The overall size of the pattern is 321x173 mm.

After cutting out the shape, use a knife to make 4 slits according to the dimensions indicated in the photo. Where the slots end, use a 3 mm punch to make holes.
Using a ruler with circles of different diameters, you need to make a rounding on the strap. In our case, the diameter of the circle is 20 mm. Place a ruler on the edge of the strap and trace ballpoint pen and carefully trim with scissors.

Let's move on to cutting the leather. Take the skin and place the pattern on it.

Using a ruler and knife, cut the cut. Without removing the pattern from the skin, punch holes using a 3 mm punch along the pre-made holes and make slits.

Using a pattern marking pen, draw a curve on the strap, and use scissors to trim the leather. If you wish, you can take a piece of sandpaper and sand the rounded area.

Now you need to round the corners; to do this, take a wood chisel with a rounded knife and a hammer. Applying the chisel to the corner, use a hammer to make them round.


And now you have a ready-made wallet cut.
First, fold the card pocket and tap the fold with a hammer.

Secondly, bend the left side without the strap, and tap the fold in the same way.

Finally, bend right side with a strap, tap the bend and insert the strap into the hole for it.

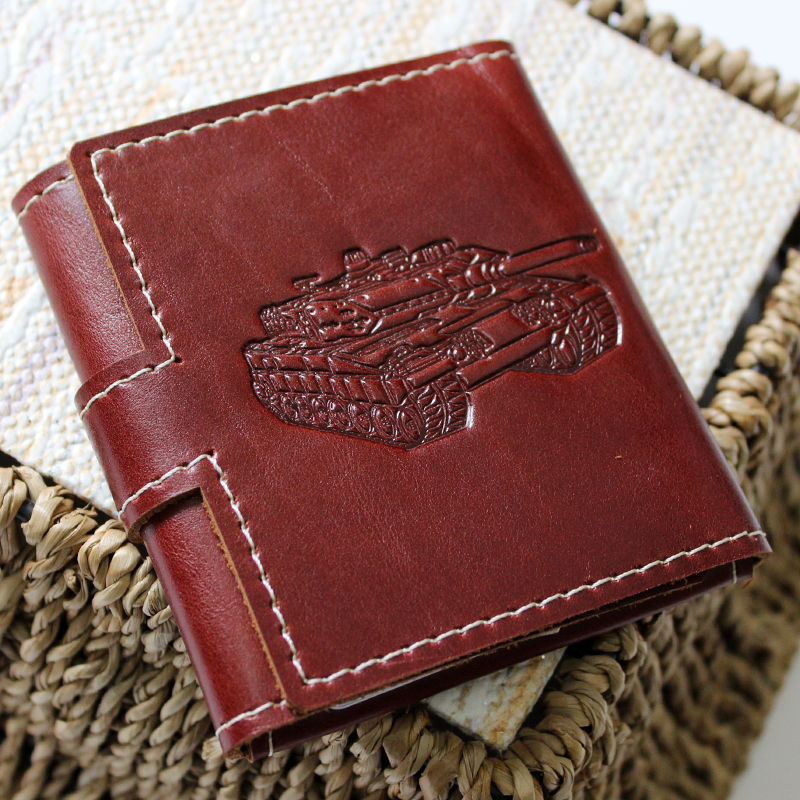
When folded, the size of the wallet is 85x80 mm.
And now, we can say your wallet is ready.

You can insert 1-3 cards into the slot in the inner pocket.


As decorative design You can apply hot stamping using a cliche and an embossing machine.


If you don't have of this equipment, then you can use punches, a burner, acrylic paints on the skin.


www.livemaster.ru
patterns and master class with step-by-step photos and video tutorials
A wallet is one of the most important accessories, both in men's wardrobe, and in women's, so it is advisable to buy or make it from natural materials, which are more practical to wear and look presentable. A DIY wallet is a great way to express yourself in handicrafts and do something new and interesting. We all know and understand that something made with your own hands is always dear to the heart and you want to wear it. A leather wallet can be an excellent gift for a birthday, Defender of the Fatherland Day or another holiday. In today's master class we will look at the option of creating a wallet made of leather - the most popular and practical material for a wallet.
Let's get to work. First of all, you need to prepare the patterns. Thick paper is perfect for these purposes. The pattern must fully correspond to the size of the wallet, and also reflect all the pockets and holes.

We take a piece of leather, attach patterns to it, outline them evenly and cut out all the details of the future wallet. To make the lines evener, it is better to use a ruler.
Experienced craftsmen who often deal with leather know that it must be treated with special chemicals so that the skin is smooth with a pleasant shade.
It's time to cut out all the pockets. This must be done with extreme caution so as not to tear or stretch the skin. Using a knife and a ruler, carefully make all the cuts.
Now let's take the lining fabric that is needed for the pockets and cut out 6 squares from it. On the underside of the leather, where the slits are marked, we glue the lining fabric. It is better to do this with glue rather than stitching with threads, so as not to get rough and very convex seams.

Now you need to glue the parts together. To do this, the edges that will be treated with glue need to be rubbed a little with sandpaper. Instead of a glue brush, you can use ear sticks. Glue and wait for the glue to set and dry. After that, let's go over the glued edges with a hammer. In order to check how evenly the pockets are located relative to each other, you can insert plastic cards.
Next, you need to glue the inner and outer parts of the wallet. We do this according to the principle described above. We round the edges of the purse and mark holes for the seams using a special device - a fork punch.
We select the threads and begin stitching - the most painstaking and monotonous, but very important process. In order to facilitate this process and reduce the time spent, we recommend purchasing or renting a special device for securing the workpiece - a saddler.

After the wallet has been stitched, you need to process the ends of the product, since without this the wallet will look unfinished. For this you will also need a special device - an engraver. With its help, the ends are easily polished and the glued layers are leveled.
Now you will need simple CMC wallpaper glue, which needs to be used to process the edges of the leather. It should be applied to the ends and rubbed using a special attachment on the engraver, then the edges will be perfectly smooth.
Once you have the tools, you can leave the embossing on your wallet. The result is such a chic wallet that no one can distinguish from a store-bought one.

If you liked the idea of creating such a leather wallet, then, of course, you will simply need special tools for the work. In order to first just familiarize yourself with them, and then purchase them, we present a list of everything you need.
- A roller knife is convenient for cutting leather, as it does not wrinkle it. You can buy it at any hardware store;
- Stationery knife – convenient for cutting corners;
- Metal ruler;
- Awl;
- Needles for sewing leather;
- Wooden trowel – convenient for rubbing edges with wax or by special means;
- Scissors for cutting threads - preferably small ones;
- Seam ripper - to correct the work if it was sewn wrong;
- Tortsbil - for cutting chamfers from the edges of the leather;
- Cutters for leather - used so that the seam does not stand out too much;
- The pliers are small - they are convenient for removing a stuck needle;
- Cutting mat - easy to mark and cut on;
- An unnecessary board to lay down while punching holes with an awl, so as not to damage the table or other surface on which you have to work.
In order to study in more detail the rather difficult topic of creating a leather wallet with your own hands, we invite you to watch several videos that will help you more clearly imagine the entire process of work.
Video
sdelala-sama.ru
Leather wallet and business card holder
Leather wallet
Diagram 1 shows a list of wallet parts with dimensions and quantity. All details are cut in the form of rectangles. The exceptions are parts numbered 4 and 5. Part 4 has a deep slot for a zipper 7 mm wide, which does not reach the opposite side by 1 cm. Part 5 is a polygon of complex shape.

1. First, let's cut out these parts from leather. This can be conveniently done using templates of parts that can be cut out of plain paper (Fig. 2). We place these templates on the skin and trace them with a silver helium pen (Fig. 3). This pen is convenient because it is easy to wash.
It is best to take shoe or haberdashery leather with a thickness of 1.2-1.4 mm or 1.4-1.6 mm of medium hardness, not soft.

2. Next, we begin gluing together the parts of the wallet with Moment glue, preparing them for joining on the machine. We glue a zipper into the slot of part 4 (Ill. 4), bend and glue the allowance of the bottom tape, as shown in Illustration 5a. This will be the entrance to your change pocket. Then we glue part 5 (ill. 5b). Next, we sew the resulting assembly on the machine from the front side of the parts as shown in Fig. 6 (red dotted line). Then we apply glue to the places shown by the blue arrow and glue them together, bending part 5 along the green arrows.

After this, we stitch the resulting structure on a machine, as shown in Fig. 7 (red dotted line), and glue it along the perimeter to the first part 3, aligning the upper left corners. Then we machine stitch along the red dotted line (Fig. 8). The knot with a pocket for small change is ready.

3. To the second part 3 we glue all three parts 6 in turn (Fig. 9). We cut the corners of the two internal parts 6 at a bevel (Fig. 9b) so that they do not stand out too much when the parts are applied.
Parts 6 are glued one above the other, offset relative to the longitudinal sections by 1 cm (Fig. 10). These will be pockets for plastic cards. Now you can machine stitch the parts together where we glued them. It should look like shown in illustration 11. The assembly with pockets for cards is ready.

5. All that remains is to glue and connect parts 1 and 2 with machine stitches. Glue them with the mesh sides inward (ill. 13). Please note that part 1 is larger than part 2 in both length and width. Therefore, a so-called “wave” is formed in the middle (Fig. 14), which is needed to make the wallet convenient to use.

After joining these parts with machine stitches, we get the finished product: a wallet with one main compartment for bills, two large pockets, three pockets for cards and a compartment for coins (Fig. 15).
Business card holder
1. List of parts - in diagram 2. Just as in the case of the wallet, cut out the templates from paper, apply them to the skin, trace them and cut them out with a knife along a metal ruler. For parts 3, it is advisable to choose a softer place on the skin, since in the finished product they will always be folded.

2. For part 1, make a cutout on top for the finger (Fig. 16). On the mesh side of part 1 we glue part 2 with the mesh side up (ill. 17 and 18). Then we adjust part 2 along the lower cut, as shown in illustration 19.

Now we glue (Fig. 20) onto the resulting structure and adjust (Fig. 21) the longitudinal sections of parts 3 (side inserts). Apply glue to the free longitudinal sections of parts 3 and the areas on the main part 1 where they will be adjusted (Fig. 22). To determine the location of the stitching areas on part 1, retreat 1.5 cm from the stitched part 2. Bending parts 3, glue their free longitudinal sections to part 1.

3. And finally, we glue part 2 onto the one-piece flap of the business card (part 1) and adjust it on three sides (ill. 23, 24). This pad, firstly, gives rigidity to the valve, and secondly, it is an additional flat pocket. The finished business card holder is shown in Fig. 1b.

For a finished look, all corners of both products can be trimmed slightly, no more than 1 mm, with a knife (ill. 25).
Source: Atelier magazine
pokroyka.ru
DIY leather wallet
As you know, a good leather wallet is not cheap. And, unfortunately, the high price of this accessory does not guarantee its durability at all. A handmade leather wallet will not only become a stylish addition to your look, but will also last a long time. And of course, there is no better gift for a loved one! Therefore, our today’s master class will be dedicated to the search for a solution on how to make a men’s leather wallet with your own hands.

Master class on making a leather wallet with your own hands -
For work we will need:
- a piece of thick leather about 0.2 m2 in size;
- strong threads suitable color;
- scissors;
- roller knife;
- metal ruler;
- awl;
- 2 needles.
Let's get started

 |  |
You can also sew a wallet from leather with your own hands.
womanadvice.ru
How to sew a wallet quickly and easily
The wallet is important, one might even say necessary thing V Everyday life. Wherever we go, it is almost always in our bag or pocket. It can be an unpleasant situation when, standing at the checkout, you realize that you forgot your wallet with money at home or in the car.
Wallet as an important thing in everyday life
We need a wallet not only to store money, it is also a container for bank cards, discount cards and numerous business cards.
There is a huge variety of wallets - both men's and female models. They differ in size, number of compartments and, most importantly, material. Some people prefer leather models, for example from pigskin, crocodile, snake or ostrich. Some people prefer artificial materials: dermantine or fabric. And some people prefer to get creative and sew the wallet of their dreams themselves. Why not? After all, it’s quite a useful skill to know how to sew a wallet without resorting to the services of a seamstress. The main thing is to decide on the pattern. 
How to choose a wallet
Nowadays, a wallet not only carries a functional load, but is also bright accessory. You can tell by your wallet taste preferences person, as well as his financial situation. Wallets from leading brands are made of genuine exotic leather and are often decorated with rhinestones or stones.
In any case, it is a generally accepted fact that men choose a model based on its quality characteristics, while the fair sex prefers a model to be beautiful and suit their style.
And many needlewomen are even interested in how to sew a wallet with their own hands at home, without having any special sewing skills. And once they figure it out, they make unique models.
How to make a fabric wallet at home

Let's figure out together how to sew a wallet without spending a lot of time and effort on it. First we need necessary materials and tools.
So, let's look at how to sew a wallet from fabric.

That's all. Now you know how to sew a wallet quickly and easily. You can use other patterns, then the model will be different.
DIY leather wallet
How to sew a leather wallet? Leather wallets are durable and long lasting. Therefore, take your choice of leather seriously; it is better to go to specialized stores.
You will need a sewing machine, since leather is a fairly dense material, and making an even seam by hand is quite problematic. The threads also need to be matched to the color of the main material. Having made the pattern, get to work.
It is advisable to make the seam small, then the wallet will look more neat. What to do if you don't have sewing machine? This will complicate the task somewhat, in the sense that you will need to practice making a nice, neat seam. You can work it on extra pieces of leather.
In addition, it will take a little more time, since your fingers will get tired from working with dense material.
Seamless wallet
As an option, we offer you this creative model, the creation of which does not require sewing at all. You can make such a wallet very quickly, and it will look very interesting.
Just imagine that you are making an envelope out of paper, and now do the same with leather and attach a button. 
Other materials
Materials can be combined, as leading brands often do. For example, make an insert from natural wool or fur on a leather base or combine different types skin. It will look very impressive.
remember, that natural materials are always more durable and hardy, unlike artificial ones.
Here's another example of a cute wallet.

Try, experiment and over time you will understand how to sew a wallet with your own hands. You can come up with patterns yourself, without limiting your flight of imagination, in which case you have every chance of becoming the owner of an unusual, original wallet.
fb.ru
making a leather wallet – Crafts Fair
Today we will tell you how to make a leather wallet.
This master class is made for those who have decided to start making leather goods, or try to make a small wallet with their own hands at home, which will require a minimum of equipment and tools.
In order to make a leather wallet, you will need the following tools and materials:

Hammer, 2 mm punch, rulers, stationery knife, ruler with circles of different diameters, blue pen, silver pen for marking, scissors (preferably for leather), cardboard 0.5 mm, genuine leather 1.5-2 mm.
You will also need equipment: a machine for installing accessories. If it is not possible to purchase such a machine, then you can try installing the fittings with a hammer (which can lead to their deformation), or buy a manual machine for installing fittings.
In order to cut the material, you need to build a pattern.

To do this, take 0.5 mm cardboard and, using rulers, build a figured pattern as in the photograph, according to the specified dimensions. The overall dimensions of the pattern are 208x160 mm, 198x75 mm, 43x34 mm.
After cutting out the shapes, use a knife to make 2 slots for cards on a 208x160mm pattern, according to the dimensions indicated in the photo. And 2 slots on the patterns 208x160 and 198x75 mm, for straps, according to the specified dimensions. Use a 2mm punch to make holes where the slots end. Also make holes using the same hole punch, according to the dimensions indicated in the photo. Make all the necessary cuts on the patterns, and round off the ends using a ruler with circles and a blue pen. In our case, the diameter of the circle is 14 mm. Then we cut off the curves with scissors.
Let's move on to cutting the leather. Take the leather and place the patterns on it.

Use a ruler and knife to cut the cut. Without removing the pattern from the skin, punch holes using a 2 mm punch along the pre-made holes and make slits. Using a marking pen, trace all the curves and use scissors on the leather to carefully trim.


You need to cut two parts measuring 43x34. The second should be a mirror image of the first, to cut out the skin, turn the pattern over, reverse side.
And now you have the finished details of the wallet cut.
The leather is thick and in order for the wallet to fold well, you need to form folds.

We bend the protruding internal parts and tap the bend points with a hammer.

We begin assembling the parts.
We connect the inner pocket 198x75mm using holniten to the base 208x160. Since the pocket is 10 mm smaller, after installation it is solid, the base will bend.


Then we bend two pockets with slots for cards, and also connect them using holniten.

We also attach both upper straps using holniten.


The final stage is to insert the straps into the slots of the pocket and the inner pocket for bills. We tighten it well, connecting the parts together.


When folded, the size of the wallet is 100x83 mm.

You can insert 4 cards into the wallet, 2 in one pocket.


All bills fit freely into the main compartment.
The wallet fits easily into a trouser pocket.

Thank you very much for your attention! The wallet is ready.
Sincerely, the team of the Russian Workshop company.

A wallet is an important, one might even say, necessary thing in everyday life. Wherever we go, it is almost always in our bag or pocket. It can be an unpleasant situation when, standing at the checkout, you realize that you forgot your wallet with money at home or in the car.
Wallet as an important thing in everyday life
We need a wallet not only to store money, it is also a container for bank cards, discount cards and numerous business cards.
There is a huge variety of wallets - both men's and women's models. They differ in size, number of compartments and, most importantly, material. Some people prefer leather models, for example, from a pig snake or ostrich. Some people prefer artificial materials: dermantine or fabric. And some people prefer to get creative and sew the wallet of their dreams themselves. Why not? After all, it’s quite a useful skill to know how to sew a wallet without resorting to the services of a seamstress. The main thing is to decide on the pattern.
How to choose a wallet
Nowadays, a wallet not only carries a functional load, but is also a striking accessory. By looking at a wallet, you can determine a person’s taste preferences, as well as his financial situation. Wallets from leading brands are made of genuine exotic leather and are often decorated with rhinestones or stones.
In any case, it is a generally accepted fact that men choose a model based on its quality characteristics, while the fair sex prefers a model to be beautiful and suit their style.
And many needlewomen are even interested in how to sew at home, without having any special sewing skills. And once they figure it out, they make unique models.
How to make a fabric wallet at home

Let's figure out together how to sew a wallet without spending a lot of time and effort on it. First we need the necessary materials and tools.
So, let's look at how to sew a wallet from fabric.

That's all. Now you know how to sew a wallet quickly and easily. You can use other patterns, then the model will be different.
DIY leather wallet
How to sew are distinguished by strength and durability. Therefore, take your choice of leather seriously; it is better to go to specialized stores.
You will need a sewing machine, since leather is a fairly dense material, and making an even seam by hand is quite problematic. The threads also need to be matched to the color of the main material. Having made the pattern, get to work.
It is advisable to make the seam small, then the wallet will look more neat. What to do if you don't have a sewing machine? This will complicate the task somewhat, in the sense that you will need to practice making a nice, neat seam. You can work it on extra pieces of leather.
In addition, it will take a little more time, since your fingers will get tired from working with dense material.
Seamless wallet
As an option, we offer you this creative model, the creation of which does not require sewing at all. You can make such a wallet very quickly, and it will look very interesting.
Just imagine what you are doing and now do the same with the skin and attach the button.

Other materials
Materials can be combined, as leading brands often do. For example, make an insert from natural wool or fur on a leather base or combine different types of leather. It will look very impressive.
Remember that natural materials are always stronger and more durable, unlike artificial ones.
Here's another example of a cute wallet.

Try, experiment and over time you will understand how to sew a wallet with your own hands. You can come up with patterns yourself, without limiting your flight of imagination, in which case you have every chance of becoming the owner of an unusual, original wallet.
Handmade goods attract with their exclusivity, originality and delicacy, but there is not always enough money to buy them. It’s not surprising, because to make a worthy accessory or interior item with your own hands appearance, you need to spend more than one hour of your free time, select and buy the appropriate materials, and even be able to apply them correctly on the first try.
All this is sometimes troublesome even for experienced craftsman, handmade, let alone novice craftsmen.
We offer you the most simple master classes, telling in detail how to make a wallet from scrap materials that have been lying idle in a chest of drawers for a long time. By following them, you can flaunt an exclusive item, or simply do something interesting with your child.
paper wallet
This option on how to make a paper wallet using the origami technique will help you build a beautiful and convenient storage for children's stickers, candy wrappers, and even the amount set aside for a gift. For it you will need only one sheet of colored double-sided A4 paper.
You will need to deal with it as follows:
This is how a simple sheet of paper turns into something like an envelope, while for little girls it can replace an “adult” clutch.
You can further decorate its outer sides with stickers or drawings, or initially take scrapbooking paper, for example.
rubber wallet
If in our childhood we had to weave jewelry and accessories for ourselves either from beads or threads using the macrame technique, now it’s a rare girl who doesn’t know how to make a wallet from rubber bands on a special machine. This cute and bright little thing will definitely attract the attention of her peers and will make any girl a trendsetter.
So what you need to do:
- Remove the middle row of the machine and use only the two outer rows;
- Lay a row of figure eights diagonally;
- Then lay a couple more of the same rows vertically and close them on the outer columns of the machine;
- Raise the bottom rubber layer to the top and make two more parallel rows;
- Again raise the row that ended up at the bottom;
- Gradually expand the semblance of a bracelet by adding new layers of elastic bands;
- When the elastic wallet reaches the desired height, the right row is removed from the loom, while the left one is woven further. This will then be used to make a cape to cover the accessory;
- Don't forget to make a hole for the loop into which you will thread the button;
- Before finishing the piece and removing it from the loom, chain braid the top last row.
leather wallet
We immediately warn you that the description of how to make a wallet from natural or artificial leather DIY, will require you to have certain sewing skills, accuracy and patience.
In general the process looks like this:
fabric wallet
Finally, how to make a wallet from an unnecessary piece of thick fabric with your own hands.
So let's get started:
The finished wallet can be decorated with applique, embroidery, ribbons and beads, for example.
You don't have to buy a wallet! It can be done with my own hands. For this, the diagrams and tips listed in this article will be useful to you.
How to sew a leather wallet with your own hands: patterns
It's no secret that a leather wallet is quite expensive. That's why it's worth trying make it yourself, thereby saving a lot of money. For this craft you will need a small piece of natural or artificial leather.
You can take this material from old bag, jacket, trousers or skirt. Perhaps you once had leather trim on your armchairs or sofa. There are many options. Besides, will need:
- Scissors
- Thick threads
- thick needle
- Ruler
- Thimble on finger
- Metal button or special magnet for bags, decorative elements as desired.
- A glue gun (or a tube of high-quality superglue).
Completing of the work:
- Think in advance about the desired size of the wallet: its length and width.
- Cut out the blank (see pattern), be careful: each side of the pattern must be equal to its opposite side. Measure all edges with a ruler.
- For fastening, you can use rivets and a clamp for them, but they can also be successfully replaced with hot glue, superglue or thick sewing thread.
- The cut out pattern should first be folded on the sides. These will be blanks for pockets for plastic cards.
- The next step is to fold the bottom part up.
- Secure the bottom part with the sides using rivets, glue, or sew them with thread (whichever is more convenient for you).
- Check the sides of the product, if you see holes from folds, the wallet should be stitched on the sides
- Attach the clasp to the top of the wallet. Use a button, a magnet, or a regular button as a clasp (for the button, sew a loop at the bottom of the wallet).
- If desired, you can decorate the product decorative elements: rhinestones, metal buttons, figures, chains, appliqués.
Wear a thimble on your finger while sewing. It will help protect you from needle pricks, because skin is a dense material and requires strong pressure when piercing.
 Pattern for a leather wallet
 How to sew a fabric wallet with your own hands: patterns
Each needlewoman can sew her own wallet from fabric. For this she will need:
- A piece of facial tissue measuring 21 by 30 centimeters.
- Soft lining material measuring 21 by 30 centimeters.
- A seal measuring 21 by 30 centimeters (non-woven fabric, for example)
- The inner part is fabric measuring 21 by 30 centimeters.
- Adhesive-based seal (fabric for bags). You need two pieces measuring 21 by 9 centimeters and one measuring 21 by 7 centimeters.
- Wallet clasp (rivet or magnet).
 Material required for a fabric wallet
 All main pieces of fabric should be folded together (see photo “step No. 1”).
 Step #1
 Each piece of material is sewn tightly together using a sewing machine or by hand. This must be done as carefully as possible so that you end up with a beautiful wallet.
 Step No. 2 - sewing the parts
 Do not immediately attach the outer edges of the product. It is necessary to make a mark for attaching the fastener. After this, attach the magnet or rivet. Sew the product on all edges.
 Step No. 3 - attaching the clasp
  Step No. 4 - stitching on the edges
 You will get a solid blank for the wallet, which will bend very well in the right places.
 Step No. 5 - blank for the wallet
 To make the product look neat, you should cut off the sharp corners on the front side of the wallet and stitch the product.
 Step #6 - Rounding Corners
 The inside of a fabric wallet. You will need:
- A rectangular piece of fabric that should be glued with non-woven fabric in advance. The fabric should measure 19 by 18 centimeters.
- A rectangular piece of fabric that should be glued with non-woven fabric in advance. The fabric should measure 19 by 17.5 centimeters.
- A rectangular piece of fabric to decorate the ends of the zipper. Size: 3 by 4 centimeters - 2 pieces.
- Zipper (needed for the coin compartment) - length 16 centimeters.
 Interior decoration wallet
  Pattern for the side of the wallet
  Design of a zipper for a wallet
 If you want to become the owner of an original and exclusive wallet, you don’t have to go shopping. If you wish and have some materials, you can make such an accessory with your own hands at home.
Options for making wallets
So, how to make an original wallet with your own hands? We offer several interesting ways.
Method one
You can make an interesting and simple wallet with your own hands from paper. Here's what you'll need:
- a sheet of thick colored paper (standard A4 format is suitable);
- scissors;
- decorative elements as desired.
Instructions:
- First you need to cut a square out of paper. It is advisable to take paper that is colored on both sides so that not only the outer part of the wallet, but also the inner one turns out beautiful.
- Fold the sheet in half vertically.
- Next, bend the corners inward on each side.
- Then also bend the corners formed on the sides towards the central part.
- Now fold the edges towards the center so that they are located next to each other.
- Next, turn the sheet over and bend the edges of the part at the top and bottom.
- Then the workpiece is bent in half vertically.
- You should have two pockets formed: each will have a triangle. One of them should be taken out so that it functions as a wallet flap.
- Next, you can decorate the wallet.
- An interesting accessory made using the origami technique, ready for use.
Method two

If you want to get a women's textile wallet, then you need to prepare the following devices and tools:
- dense textile material for exterior decoration;
- fabric for lining;
- soft material for the inside;
- sealing material for a kind of frame, for example, thick cardboard;
- scissors;
- ruler;
- marker or fabric chalk;
- sewing machine and thread;
- button or magnetic clasp;
- universal glue;
- any decorative elements (rhinestones, appliqués, sequins).
Description of the manufacturing process:
- First you need to make all the preparations. To do this, cut out the same piece of outer, lining and soft fabric measuring 23x30 centimeters. Also prepare three pieces of sealing material. The length of one will be 29 cm, and the width will be 8-9 cm. You will also need two of the same pieces of lining fabric.
- You can immediately divide all the pieces of fabric in width into three equal parts to prepare the markings for stitching.
- Next, fold all the parts: the outer material right side down, then the soft one, then the three sealing pieces according to the markings, and then the lining fabric. Sew all this together, preferably with an overlock stitch, so that there are no unsightly edges left.
- Next, cut out two equilateral triangles from the lining material with a length of one side equal to 9 cm.
- Fold the workpiece according to the markings: first, bend the lower part along the drawn line, and then place the upper part on top of it: it will be the valve of the accessory.
- Glue lining fabric between the main pieces on the sides to prevent the money from falling out.
- Next, cover the remaining piece of sealing material on both sides with lining fabric, and glue the part to the bottom of the wallet. This part will separate paper bills and change.
- Now all that remains is to fix the clasp and decorate the accessory with rhinestones, sequins and other elements.
Method three

Simple wallet for small quantity You can make money this way too. Here's what you need to prepare:
- any thick fabric;
- lining fabric (it must also be durable so that the accessory does not tear during active use);
- scissors;
- thread and needle;
- lock.
Instructions:
- First, decide on the dimensions of your future wallet and cut the blank according to them. Multiply the required width by two and add a couple of centimeters. You also need to add two centimeters to the length. Draw this rectangle on the main and back fabrics, cut out the blanks with scissors.
- Next, you need to connect the two materials with several stitches: the front side of the main fabric should remain outside.
- Fold the two-layer triangle in half with the right side inward, sew the side edges.
- You will end up with a kind of bag, and you need to turn it out.
- A fastener is sewn to the free edges.
Method four

A fashionable and stylish wallet will be made from suede. Here's what you'll need to make it:
- suede leather;
- thick needle;
- bright floss threads;
- scissors;
- chalk;
- clasp;
- applique or piece of felt.
Instructions:
- First make a blank. To do this, apply a simple drawing to the suede: a figure consisting of three equal rectangles (the dimensions of one will correspond to the desired dimensions of the future wallet).
- Cut out the part and fold it according to the markings: first fold the bottom rectangle, and the top one on top of it.
- The side edges of the middle and lower triangle need to be connected by stitching with threads. You can also use rivets or universal glue for fixation.
- Now fasten the clasp on the wrong side of the valve, immediately sewing an applique to its front side (you can make it yourself from felt).
- An interesting and very soft and pleasant to the touch wallet is ready!
Now you can make an exclusive wallet for yourself or to please original accessory a friend or relative.


