DIY paper rooster
This is Petya the bully,
He can't live a day without a fight.
Run away in all directions
Petya is angry in the morning!
Work progress
1. Carefully cut out all the details of the craft.
Templates for making a Cockerel
2. Glue the pants (2) by spreading glue on a large white stripe and carefully aligning the edges. Cut two white triangles on one side, coat them with glue and glue them inside. Bend the small white flaps inward, spread them with glue and carefully glue them to the stand (3) on the marked circle.
3. Fold the paws (4) like an accordion. Then stick them on the stand on the front of the panties, close to them. Look how it should look in the drawing of the finished craft.
4. Fold the back claws (5) along the dotted lines, spread glue on the inside of the green stripes and glue the claws behind them to the stand at the back of the panties.
5. Glue the body (1) in the shape of a cone. To do this, spread glue on the white stripe and carefully align the edges so that the white stripe is inside.
6. Glue the collar (6) in the same way as you glued the body (1). Place it on the body and glue it to it only from the seam side. The collar will lag behind the neck and stay only at the back, but this will give volume to our craft.
7. On the two parts of the tail (8), cut the feathers along the line to the places marked with a dash. Fold the white stripes on both parts inward, spread them with glue and glue them together. Also apply glue to the part of the tail that remains uncut. Glue the two parts together. Then smear glue on the white stripe on the tail of the cockerel and glue it to the body (1) at the back of the seam.
8. Glue the head (7) by the comb and beak. Put it on your neck (1), having previously smeared the upper part of the neck with glue.
9. Cut out the feathers on the wings (9), carefully cutting along the line, but not all the way. Glue them to the body (1) in the marked places.
10. Glue the spurs (10) behind the small white flaps and glue them on the bottom of the pants above the back claws.

11. For stability, glue the craft stand onto thick cardboard of a suitable size.
This funny cockerel can store various little things.
For the New Year 2017, it is customary to make a variety of crafts. But it’s best to make a symbol of the New Year from handy materials for this day. Indeed, if you have an unnecessary plastic bottle or egg carton at home, then you should not throw these things away. They will be useful to you for creating beautiful crafts- Rooster, which is very easy to make with your own hands. If you are interested in how to make a craft rooster from an egg carton, then this article was created especially for you. Here you will see the process of creating such a thing.
How to make a rooster craft from egg trays
Your rooster will have an odd shape. Therefore, it can be installed on a shelf. On the Internet you can find a huge number of crafts that you can easily make with your own hands. But you will like our craft for its originality. To make such a craft, prepare:
- the egg cartons themselves,
- newspapers and balloon,
- PVA glue,
- glue moment and acrylic paints.
Work progress:
From this article you can learn how to make a rooster from egg cartons. To create a craft, prepare cells with elongated cones. These will be used to feather the rooster.
The cones should be cut out. Cut out the corners between the petals. As a result, you will get petals. From the edges that remain, cut out double petals.

For the beak, immediately glue a couple of triangles together. The parts must be glued together using instant glue.


Next, start gluing the rooster from the egg trays. They start working from the head. Your first row of feathers should have 5 ends. The second row should have 6. The third will have 8. The fourth should have 10 rows. The fifth should consist of 12 rows. The last row should have 8 petals. It should cover the back of the neck.

The next step is to make the body of the rooster. It should be created from papier-mâché. To do this, cut newspapers into strips and soak them in water. These newspapers should be applied to the ball using PVA glue. The top of the craft should be covered with white paper.

Once the papier-mâché is dry, cut out an oval in the ball. The bottom part should look like a basket. The inside should be painted with white paints.
Now cut out the feathers that will be used for the rooster's tail. They are cut out of ordinary cardboard or cardboard boxes. The length of these feathers should be 15 cm.

It is worth cutting out an oval from ordinary cardboard that will look like a wing. Flowers and petals from cones are glued on top of this oval.

The next stage is the final one. In this case, it is worth starting to assemble the cockerel. You should cut out the strips and glue them into a circle. As a result, you will have a stand for the rooster. The body should be glued to it. After that, you should glue a short but dense strip to the body, which will serve as a holder. Attach your head to this strip. After this, glue the wings and tail to the craft.

DIY rooster painting
If you have finished creating the rooster, then you should start painting the product. For this purpose you should use acrylic paints. And all because your cockerel will stand on the table and serve as a basket for you. You will put something in this basket. Mother-of-pearl paints are best suited for painting a rooster. In this case, your rooster will look respectable.
For painting it is best to use 5 colors:
- yellow or gold,
- blue,
- green,
- red,
- orange.
If you want your craft to look more textured, then when painting, you should add other shades to the tips of the petals.

In conclusion
Roosters made from egg cartons can be varied. But in this article we described the creation of the most original craft. And if you show a little diligence and attention, then as a result you can get a beautiful product that will become a wonderful decor in your home. Also, such a craft can be a wonderful gift for anyone.
A little astrology.
The Rooster will try to test the strength of many, especially those who rely only on luck, and not on their own strengths and capabilities. The Fire Rooster will come into its own on January 28 and will reign until February 15, 2018. The Rooster himself is bright, sociable and elegant. In the coming year, the color of the Rooster and the element it represents will be reflected in all our endeavors and life moments. The color of 2017 is Red, and the element of fire suggests an incredible desire for perfection, the desire for high achievements and unsurpassed heights.
What awaits us bright year with a lot of impressions and events!
For needlewomen it is worth preparing for the coming year. In this article we have collected several interesting and useful master classes that will definitely help you prepare gifts for your loved ones and decorate your home for the coming 2017. So, what can we do to please you? Fire Rooster, win him over and make the coming year easier, more enjoyable and productive?
DIY red rooster
We invite you to organize a holiday - a party in the style of the Red Rooster. To do this, you need to decorate your home and prepare it for the party in an original and symbolic style. For such decor, small interior details are suitable, which will allow guests to immerse themselves in the holiday atmosphere, plunge into a fairy tale and enjoy the coming New Year.
To make it we will need:
3 plastic bottles, 2 plastic plates, 5-6 plastic glasses of red and yellow flowers, 2 disposable spoons.
Tops from plastic bottles must be cut and secured with tape as shown in the picture.
From disposable plates we make such a wonderful tail for our Red Fire Rooster.
From the remains of the plates we make wings and attach the head of the Rooster, made, for example, from a pool ball.
Sew a dress for a New Year's party
What else is important for holding such a party? Of course the costumes! You can simply dress in red - this color is a symbol of the coming year and the Fire Rooster will really like it. There is still time to sew yourself a beautiful red dress, so you will be original, and the Rooster will definitely appreciate your efforts.
Well, let’s give one of the master classes as an example. You will understand that sewing a Rooster to decorate your home, or as a gift to guests and loved ones, is not so difficult. A little love for handicrafts and a desire to please your loved ones with the originality of your gift.
Sew a rooster pillow.
This pillow will suit yours very well. New Year's party! Guests can comfortably sit on such pillows and then take them home as a souvenir of the 2017 meeting!
So, let's get started:
This is the kind of Cockerel we will sew, really handsome!
 |
For sewing we will need:
- Textile yellow(you can take any other color, or make several different ones) 25 by 56 cm
- Some fabric for decorative design(red and polka dots)
- Threads, needles
- Scissors
- Filler (Hollofiber)
- Sintepon
- 2 Large buttons

DIY rooster as a gift
You can use all of the above ideas both to decorate your holiday and for gifts. New Year.
By eastern horoscope, the “master” of the New Year 2017 will be the Fire Rooster. The wild temperament, cocky character and truly fiery temperament of this fighting bird will accompany us in next year. And in order to “appease” the bird and gain its favor and patronage, let’s try to make a New Year’s craft on a “rooster” theme. So, on the agenda is a do-it-yourself rooster made from simple and affordable materials. This craft can be used as a New Year's tree decoration, a surprise gift for mom or grandma. We have prepared interesting master classes With step by step photos and a video on making your own symbol of 2017 - the Fire Rooster. In our lessons you will find step-by-step description the process of creating cute roosters from cotton pads, paper, plasticine. True, the youngest handicrafts will require the help of adults, since not all children know how to operate scissors and other tools. The most successful rooster crafts made by children in kindergarten and school, can take part in a holiday exhibition or competition.
DIY New Year’s craft “Cockerel” for kindergarten – a simple master class with step-by-step photos
Decorating the Christmas tree for the New Year is one of many favorite holiday rituals. Shiny balls, stars, angels on fluffy branches look simply magical. However, homemade Christmas decorations no worse than store-bought ones, and even better - after all, a piece of the soul and the warmth of human hands are invested in their creation. We invite you to take our simple master class with step-by-step photos on how to make a paper cockerel. This lesson can be taught in kindergarten with pupils aged 5 years and older.
Do-it-yourself toy New Year's rooster for kindergarten - necessary materials and tools:
- paper
- knitting threads
- scissors
- double sided tape or glue
The procedure for making a toy rooster with your own hands for kindergarten:

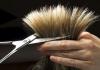
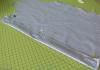
A touching DIY craft for the New Year at school - “Cockerel made from cotton pads” - a step-by-step master class with photos
Cotton pads are a simple and seemingly ordinary item. However, it’s just right for creating New Year’s crafts with your own hands! We invite you to take our step-by-step master class on how to make a touching DIY craft for the New Year - “Cockerel made from cotton pads.” This applique craft is quite feasible for both kindergarten students and school students. So let's get started! Finished product You can put it “under the Christmas tree” for your mother or keep it as a “talisman” for the whole of 2017.
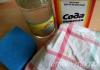
DIY rooster craft for children for school - list of materials and tools:
- cotton pads
- cardboard
- watercolor paints
- plasticine
- green napkin
Step-by-step master class for children at school on making a rooster from cotton pads with your own hands:

It turns out to be a very touching cockerel on a green background. Such an applique craft can be placed on a special stand or stand at school. Every time you look at this cute tiny chick, your mood immediately rises and the “spirit” of the New Year 2017 is felt.
Do-it-yourself original plasticine craft for the Year of the Rooster - step-by-step master class with photos
Plasticine is a truly universal material from which you can fashion anything. In kindergarten or school, children enjoy making crafts from plasticine on various topics - animal figurines, characters from their favorite fairy tales and cartoon characters. On the eve of the New Year 2017, you can often see plasticine cockerels in different variations and colors at handicraft lessons. So, the topic of our today step-by-step master class with photo - do-it-yourself rooster made from plasticine. Such original craft By the year of the Rooster it can become an exhibit at a school exhibition children's creativity– however, you need to try a little and show imagination.
List of materials for making crafts for the Year of the Rooster with your own hands:
- plasticine of different colors
- modeling knife
The procedure for making crafts for the Year of the Rooster with your own hands:
- First, take yellow plasticine and make three balls - small, medium and large. This is the head, neck and torso of the future cockerel.
- The resulting parts must be carefully connected to each other, smoothing the surface with your fingers and giving the product the appropriate shape.
- Now we make a cut on each side - for the wings of our “bird”.
- For the scallop you will need red plasticine, for the beak - orange. We make eyes from black plasticine.

The rooster's tail is the most “outstanding” part, so it must be done with special care. For the tail, choose the most bright colors palettes. We make the wings from red plasticine, giving the pieces of material an elongated teardrop shape. To better identify the feathers, you need to use a modeling knife to make shallow grooves on the wings and sides of the cockerel.
In the photo you can see a finished DIY rooster craft made from plasticine. As you can see, you can fantasize on this topic endlessly.


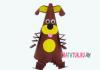
DIY paper cockerel craft for kindergarten or school - original master class with photos
Beautiful paper crafts will be an excellent gift for the New Year or other holiday. In connection with the theme of the Fire Rooster, which is relevant in 2017, in kindergarten or school children are preparing their hand-made surprises for parents. So, today we will make a beautiful rooster or chicken from colored paper. Let's master it original master class with a photo on how to make such a touching and cute paper craft.
We stock up on materials and tools for making a paper cockerel with our own hands in kindergarten or school:
- scissors
- colored paper - a couple of sheets
- paper boxes of different sizes
Step-by-step description of a master class on making a paper cockerel with your own hands:

How to make a children's rooster costume with your own hands for the holiday - video master class
All children love costume parties for the New Year and are happy to dress up as “Pirates”, “Batmen”, “Princesses”. Today we will try to make a rooster costume with our own hands - using our detailed master class on video. Try it - and you will definitely get a cute “bird” suit for your beloved child.
So, 2017 is the Year of the Fire Rooster, bringing us changes and new bright events in life. Therefore, it would not be superfluous to make yourself a small talisman that will always be with us. A DIY rooster craft can be one of the most simple materials– paper, plasticine, cotton pads. We have prepared for you simple and interesting master classes with step-by-step photos and videos on making crafts for the Year of the Rooster with your own hands - in kindergarten or school. So beautiful New Year's toy It will definitely give you a festive mood and “rooster” enthusiasm. Happy New Year 2017!