To decorate a house in rustic style Knitted items are suitable, including runners and rugs. They are made by knitting or crocheting. For rugs, thick yarn is most often used: acrylic, cotton or wool blend.
The best option is acrylic threads. Synthetic yarn looks no worse than natural wool, but will last much longer due to its high strength and the absence of the risk of moths. Products made from acrylic yarn do not deform, do not shrink after washing, do not roll up, and do not prick. Another important advantage is that, unlike wool, acrylic does not cause allergies.
Hemp yarn - suitable option for knitting tracks, if you absolutely want to use natural materials. Hemp fiber repels water, is strong and wear-resistant. The yarn, 100% hemp, is very thick - up to 1000 m per 100 g. Natural colors: white, ivory, light beige. Linen yarn has the same characteristics. It is distinguished by the fact that it absorbs moisture well and dries quickly.
The hook or knitting needles should be twice as thick as the thread.
In addition to regular yarn, fabric strips, cords, and ropes made from plant and synthetic fibers are suitable for knitting rugs. The color and pattern on the product can be very diverse; they are limited only by the imagination of the needlewoman.
Knitted runner
Rectangular crochet runner
The simplest product to make is a rectangular crocheted thread track. To complete the work you will need thick yarn and a hook. suitable size. Procedure:
- Cast on a chain equal to the width of the future rug. Knit two air loops for lifting.
- The first row is double crochets.
- The second row is single crochets under the front wall of the loop.
- The third row is double crochet and single crochet under both walls of the loop.
- The fourth row is single crochets under the front wall.
- Fifth row - double crochets under back wall loops.
- The sixth row and further - repeat the pattern from the second to the fifth row.
Important! To knit such a track, you can use yarn of the same color and tone, several different colors, or several shades of the same color.
 Crochet yarn track pattern
 Path of braids
If you only have thin yarn on hand that is unsuitable for a floor runner, then you can proceed as follows. To complete the work you will need:
- thin yarn of one or three different colors;
- knitting needles or crochet hook;
- sewing threads of a suitable shade;
- needle.
Procedure:
- Knit or crochet at least 36 strips with a width of 2 cm and a length one and a half times longer than that of the future rug.
- Weave braids from three strips.
- Sew the resulting braids together using sewing thread.
- At the beginning and end of the path, weave a thick cord or a wide ribbon across the braids (can be in a contrasting color).
 Path of braids
 Knitted track from old T-shirts
In every home there are many thin knitted items (T-shirts or T-shirts) that are no longer suitable for wear due to loss of shape, fading, stains, but are still durable. They are suitable for making runners. To complete the work you will need:
- old knitted T-shirts, preferably the same color;
- scissors;
- knitting needles number 9 or 10.
Procedure:
- Cut the T-shirts into strips about 1 cm wide.
- Tie the strips together lengthwise.
- Wind the resulting “yarn” into balls.
- Cast on 10 stitches and knit several rows. Measure the resulting sample. Calculate the required number of loops and rows for the future rug. For example, the width of a sample of 10 loops was 7 cm, and the length of 10 rows was 10 cm. Then, if you cast on 100 loops, you will get a track 70 cm wide. For it to have a length of 200 cm, you will need to knit 200 rows (10 cm: 7 p = 1.43 loops in 1 cm, 10 cm: 10 p = 1 row in 1 cm).
- Dissolve the sample.
- Knit several rows with a simple 2 × 2 rib (alternate two knit stitches and two purl stitches).
- Knit a track according to any chosen pattern.
- At the end, knit again with a 2 × 2 elastic band for the same number of rows as at the beginning.
- Bind off the stitches of the last row in the usual way.
 T-shirt path
 If it is difficult to choose a sufficient number of things of the same color, then you can knit a track consisting of multi-colored stripes or squares. In the same way, a rug is knitted with knitting needles from ordinary thick or ribbon yarn, including using leftover threads of different colors, but of similar thickness.
Crochet runner from old jeans
In addition to T-shirts and other knitted items, any home will have a stash of old jeans. They can also be used for knitting tracks. To complete the work you will need:
- old jeans;
- scissors;
- big hook.
Procedure:
- Cut the jeans into thin strips (about 1 cm).
- Roll the denim strips into a skein.
- Crochet with any simple pattern(half-columns, single crochets) rug of the required length.
- The edges of the resulting product are additionally sheathed with fabric of a contrasting color or denim.
Important!“Yarn” from T-shirts can also be used to crochet floor runners.
 Multi-colored crochet T-shirt runner
 Oval knitted runner
Sometimes the design of a room excludes the use of rectangular parts. In this case, an oval floor path is suitable. How to tie it? To complete the work you will need:
- yarn, cord or strips from old things 5 mm thick;
- hook number 6.
Procedure:
- Knit a chain of 30 chain stitches
- First row. Three air loops. Double crochet in the fifth loop from the hook. 28 double crochets. From the last loop, knit an additional 7 double crochets (that is, from the 30th loop you need to knit only eight double crochets). WITH reverse side knit 29 double crochets, and from the first loop knit six double crochets. Using a connecting loop in the third loop of the first column, fasten the first row.
 Knitting an oval rug
 - Knit a track with any chosen pattern (half-columns, double crochets and single crochets). You can find complex and interesting crochet patterns; diagrams with descriptions are available in magazines and on the Internet. Openwork products look especially good.
 Oval knitted runner
 Knitted sisal or jute rope runner
Rope made from natural plant fibers (jute or sisal) is also suitable for making floor carpets - mats. Jute fiber is an inexpensive material and can be dyed any color. Disadvantages - it easily absorbs dirt and is difficult to clean, so jute rugs are not recommended for floor decoration in rooms where high traffic is expected.
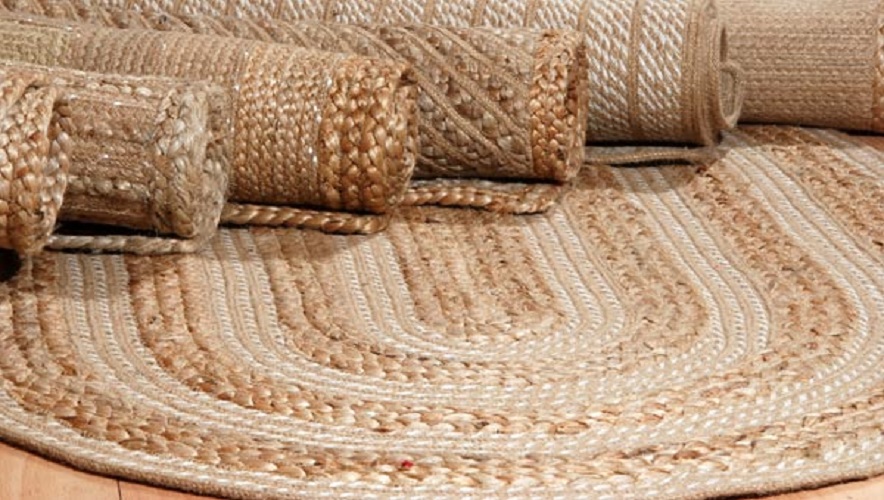 Jute rope walkways
 Sisal is a plant fiber made from agave leaves. This material absorbs little moisture, does not attract dust, has antistatic properties, absorbs sounds, can be painted, is easily stretched, strong and durable. Unlike jute, it absorbs dirt worse and is easier to clean.
As a replacement for sisal, you can use polypropylene rope. This is a synthetic fiber:
- looks almost exactly like sisal;
- moisture resistant;
- resistant to chemically aggressive substances (alkalis, solvents, etc.);
- provides high degree thermal insulation;
- not subject to rotting;
- is not a favorable environment for the appearance and proliferation of fungi and other pathogenic bacteria;
- has dust- and dirt-repellent properties.
A polypropylene runner can be placed in the bathroom or kitchen. Cords are also made from propylene. It differs from rope by the presence of polyamide fibers in the middle, which increases the strength and durability of the product. Polypropylene cord has also become a popular material for knitting rugs and runners.
 Polypropylene walkway
 You can knit rugs from sisal, jute or propylene rope using any pattern suitable for making products from regular yarn.
Conclusion
Knitting a track with your own hands, crocheted or knitted, will not take away large quantity time and effort, while saving money and allowing you to create a unique product that will decorate the room for a long time.
Knitting is an ancient occupation of women.
For some it is just a hobby, but for others it is the meaning of their whole life. But in any case, this is the creation of beauty. Moreover, the beauty is unique, inimitable. Isn't that why now handmade, namely, crochet is becoming more and more widespread?
Having looked at knitted blouses, coats, tablecloths, young girls are happy to take a hook in their hands and study this type of needlework.
As a rule, the first thing a beginning knitter knits is a napkin. After all, you really want to not only learn how to crochet, but also decorate your home.
There are different types of napkins. These are the familiar round ones, and square and rectangular ones.
What do you need to knit a napkin?
- Of course it's a hook.
The hook number varies from 0.75 to 2. Of course, the hook number depends on the yarn with which you are going to knit a napkin. But usually napkins are knitted with thin hooks and from thin yarn.
- Yarn
If you're just starting to crochet, use a light-colored yarn such as white, beige, or Ivory. But you can use yarn of any color.
- Scheme
Even experienced knitters use patterns when knitting napkins. There is such a variety of them. Thanks to the Internet, you can find a knitting pattern for a napkin of any shape and any size.
Schemes of rectangular tracks


Crochet napkins - beautiful accessory for a home that gives a stylish, somewhat classic touch to the entire interior. In addition, knitted napkins are associated with comfort, home, and the care of loved ones.
Such napkins are not at all a relic of the past, as many people think. They can be seen in almost every design and interior magazine; moreover, they are quite actively knitted nowadays, and in addition to the fact that there are an innumerable number of possible models of napkins, new types of these beautiful things for the home are regularly invented. Both experienced and beginner knitters can knit all this, the main thing is to be patient and have the correct knitting patterns.
How to crochet napkins: patterns with descriptions
Looking for interesting schemes When crocheting napkins, you can find the most unusual varieties of these products, which will not only differ in their shapes (round; oval; square; rectangular; diamond-shaped), dimensions (large, like mini-tablecloths; small, like coasters for cups; regular, medium size), methods of knitting (small or large knitting; loin knitting; napkins from motifs; Irish lace), but also methods of decoration (sunflowers, irises, pineapples, butterflies, roses, grapes, geometric figures and much more).
One way or another, the final result depends on the chosen knitting technique, the degree of crochet proficiency, the desire of the knitter and much more. But let's consider the most different models napkins and methods of crocheting them, which can suit craftswomen of all levels.
Simple
The simplest crochet napkins are obtained by choosing simple repeating patterns and simple shapes. For example, some rectangular or round napkins are knitted easily and quickly, while helping to fill the hand for more complex and interesting models knitting.
- solar circle

Popular articles:
A beautiful napkin that will look great in any color, and even more than one. It is quite simple to knit, and to make it even easier, you will need step by step photos work process.
Materials for work:
- cotton yarn of main and contrasting colors;
- hook suitable for yarn;
- scissors;
- large embroidery needle with a large eye.
Progress:
We make a ring with a thread of the main color and fasten the thread.
1st row: we make two air loops.
We tie the ring with eleven loops with a double crochet.
Connect the ring. Pull the thread, tightening the ring, and then work a single crochet into the first stitch of the row.
2nd row: Make three air loops. Work a single crochet stitch on the same row.

Work two single crochet stitches into each stitch of the first row. You should now have 24 loops. Work a single crochet stitch into the first stitch of the row, thus casting it off.
3rd row: make three air loops. Knit two single crochet stitches in the next row, then one double crochet stitch in the next row, and again two double crochet stitches in the same row. You should now have 36 stitches. Work a single crochet stitch into the first stitch of the row, thus casting it off.

4th row: Make three air loops. Knit two single crochet stitches in the next row, then one double crochet stitch in the next row, and again two double crochet stitches in the same row.
You should now have 48 stitches. Work a single crochet stitch into the first stitch of the row, thus casting it off.
Final row: Make a chain of three air loops. Work a single crochet loop on the same row. Make two air loops. Work two single crochet stitches into the same stitch on the bottom row. Skip two rows. Then work two single crochet stitches into the same stitch on the bottom row again. Knit like this in a circle. Finish knitting by pulling the yarn through the loop and cutting it.

Napkin decoration
Take a thread of a contrasting color. We thread the hook into one of the rows (closer to the outer edge of the napkin) and pull it out air loop. Now we thread the hook into the next loop of the row and knit another chain loop. We repeat these steps until we get to the first loop. Pull the thread through the loop and cut it. Insert the thread into the needle and thread the first loop as shown in the photo. Stitch into the last stitch and finish. Simple napkin crochet ready.

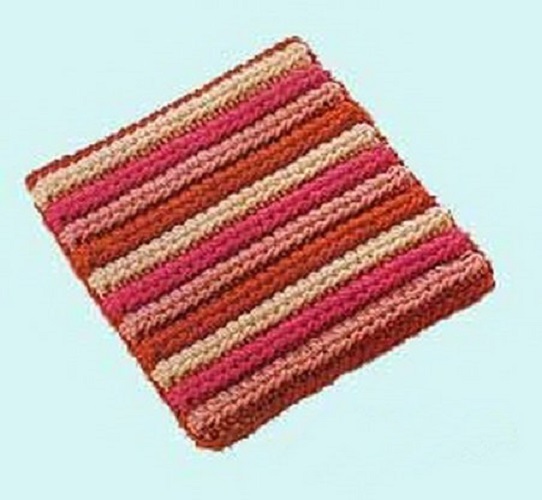
- Napkin track

A great place to start would be simple tracks on the table. They act as napkins, but at the same time they look cool as tablecloths. Let's take a closer look at how to crochet them.
Napkin size:
Materials for work:
- yarn (100% cotton; 65 m/50 g) - 350 g each of yellow, orange and turquoise;
- hook No. 5.
Art. S/N
Start each row with 3 ch. lifting instead of 1st st. s/n and finish 1 tbsp. s/n in the last v.p. replacing the previous row.
Knitting density
14 p. x 8 r. = 10 x 10 cm.
Progress:
For each napkin, make a chain of 50 vp. + 3 ch. rise and knit with the main pattern.
After 120 cm from the starting row, finish the work.
Oval
The oval shape of crocheted napkins looks classically beautiful. Usually this large napkins, which contain interesting complex thematic designs, or floral silhouettes and geometric shapes typical for these products. One way or another, interesting crocheted oval napkins are crocheted with descriptions and patterns, which we will consider below.
- Holiday mood

Large napkin with a pattern of Christmas bells in fillet technique will surprise guests and delight everyone at home with a cozy festive mood.
Napkin size:
Diameter 49x84 cm.
Materials for work:
- yarn (100% cotton; 330 m/50 g) – 150 g red;
- hook No. 1.25.
Napkin knitting pattern:
 Scheme from row 100 to 143.
  Scheme from row 50 to row 100.
  Scheme from 1 row to 50.
 Knit in a fillet pattern. Each cell of the pattern consists of 3 sts. Empty cells consist of 1 st. s/n (or patent, or art. with 2/n) and 2 v.p. Filled cells consist of 3 tbsp. s/n (or patent article s/n, or article s 2/n).
Knitting density:
15 cells wide and 17 r. in height = 10 x 10 cm.
Progress:
Complete the initial chain of 34 vp. + 3 ch. lifting and knitting according to the pattern.
Assembly
- Diamond track

A diamond-shaped napkin can be considered something between oval and rectangular products. In the interior, such a tablecloth will look quite interesting and fresh. With such a napkin you can cover the middle of the dining table, or decorate a chest of drawers. Let's take a closer look at how to crochet a napkin of such an unusual shape.
Napkin size:
Materials for work:
- yarn (100% cotton; 280 m/50 g) – 60 g pink and a little white;
- hook No. 1.5.
Pattern for fillet knitting a napkin:

For 1 empty cell, perform 1 tbsp. s/n and 2 vp, for 1 filled cell – 3 tbsp. s/n. Start each row with 3 ch. lifting instead of 1st st. s/n and end with 1 additional st. s/n in the 3rd v.p. lifting the previous row.
The arrow in the diagram indicates the middle line; the rows end in a mirror image.
After the 37th row, the middle of the part will be reached. Next, read the diagram in the opposite direction and complete rows 37–1. In this case, increases become decreases.
To perform increases and decreases, see the job description.
The numbers on the diagram indicate rows.
Border knitting pattern:

The diagram shows part of the border; continue the rows by analogy.
Start each round row with 1 ch. lifting and finishing 1 connection. Art. For clarity, the border diagram shows the cells of the sirloin pattern. When finished, in the places marked in red on the fillet pattern diagram, perform 3 tbsp. b/n white thread. To move from the cell
If necessary, make a chain of 3 vp to the cell.
Progress:
Complete the initial chain of 19 vp. + 3 ch. rise and knit according to the pattern with a fillet pattern.
To add 2 empty cells at the beginning of the row: perform 11 vp. lifting, then 1 tbsp. s/n in 9th v.p. from the hook, 2 ch, 1 tbsp. s/n in the last column of the previous row.
For an increase at the end of the row: 2 vp, 1 tbsp. from 4/n into the base loop of the last knitted stitch, 2 ch, 1 tbsp. from 4/n to the 3rd link of art. from 4/n.
To decrease a filled cell at the beginning of a row: skip the cells to be decreased using the connector. Art.
To increase at the end of the row: leave the decreased squares unknitted.
Knit the finished piece in circular rows according to the border pattern, with the 1st and 3rd circular rows knitted with pink thread, and the 2nd row with white thread. To change the color, attach a new thread at the arrow using the connector. Art.
Assembly:
Prick the track onto the backing, holding each picot with a pin, sprinkle with starch and let dry.
Square
Square napkins look gentle and beautiful crocheted. Add here harmonious colors and beautiful knitting, interesting floral motifs and other decorative elements - you get a real work of art.
- Flower frame

The beautiful combination of elements, as well as the interesting 3D effect on the edges of this square napkin, makes it stand out among many other crochet similar friends on each other square products.
Napkin size:
Materials for work:
- yarn (100% cotton; 387 m/50 g) – 10–20 g each of white, lilac and blue;
- hook number 1.
Knitting patterns for napkins:

Progress:
For the central motif, use a lilac thread to make an initial chain of 8 chain stitches. and close it into a ring using the connection. Art. Perform 3 v.p. rise instead of the 1st column, then knit 17 st. s/n into the ring and finish 1 connection. Art. in the 3rd ch. rise = 1st row.
Continue working according to scheme 1, starting each circular row with the indicated number of ch. lifting and finishing 1 connection. Art. or 1 tbsp. s/n. If necessary, proceed to the beginning of the next circular row using the connection. Art.
At the end of the 5th circular row, attach a white thread and knit the 6th–12th circular rows.
Then knit each corner separately in rows in the forward and reverse directions with a white thread, each time attaching a white thread using a connector. Art.
Complete rows 13–27 (in the diagram for clarity, green).
For each side of the square, knit 5 motifs: make a chain of 6 vp, close it into a ring using a connector. Art. and knit according to the pattern 4, 2 or 1 circular row. At the same time, in the last row, in the places indicated by the arrows, connect the flower with the previous motif.
For each side, perform 1 middle motif with a lilac thread and on both sides of it 2 blue motifs.
The motifs of each side are additionally connected with a white thread using 8 chains of vp. (marked in red on the diagram).
Then tie each side part with a white thread next to b, simultaneously connecting it to the central part in the places indicated by the arrows in the diagram.
For each corner motif (4 parts), use a lilac thread to make a chain of 6 chain stitches. and close it in a ring using the connection. Art. Perform 3 v.p. rise instead of the 1st column, then knit 15 tbsp. s/n into the ring and finish 1 connection. Art. in the 3rd ch. rise = 1 circular row.
Continue working according to the diagram, while in the 6th circular row attach the part to the central and side motifs in the places indicated by the arrows in the diagram.
Then tie each corner motif on top with a lilac thread, completing the 3rd row of diagram 2. For better clarity, the 2nd row is shown in diagram 2 again.
For greater clarity, only part of the diagram is shown; the rows continue by analogy. The numbers and letters on the diagram indicate circular rows.
Assembly:
- Loin diamonds

Simple, but beautiful napkin without complex drawings Suitable for lovers of minimal style. It knits easily, and the main accent is the color nuances from which diamonds are made.
Napkin size:
Materials for work:
- yarn (100% cotton; 265 m/50 g) – 10–20 g each of white, light green, apricot and pink;
- hook No. 1.5.
Knitting pattern:

For each empty cell, perform 1 tbsp. s/n and 2 vp, for each filled cell - 3 tbsp. s/n.
Start each row with 3 ch. lifting instead of 1st st. s/n and end the connection. Art. The 7th and 14th rows are knitted with white thread, the 8th–13th rows are knitted with green thread, the remaining rows are knitted with pink thread.
To change color, attach a new thread using the connector. Art.
After the 14th row, knit each segment separately in rows in forward and reverse directions, with each row starting with 3 ch. instead of 1st tbsp. s/n and end with 1 additional st. s/n in the 3rd v.p. lifting the previous row.
15th and 16th r. knit with apricot-colored thread, 18th and 19th r. - green thread, 21st and 22nd p. – pink thread, 17, 20 and 23rd r. perform with white thread.
For greater clarity, only part of the diagram is shown; the rows continue by analogy. To make it clearer, these rows are marked in different colors on the diagram. The numbers in the diagram indicate circular rows and rows in forward and reverse directions.
Progress:
Make an initial chain of 12 vp with pink thread. and close it into a ring using the connection. Art.
Perform 3 v.p. rise instead of the 1st column, then take as follows: * 2 ch, 1 tbsp. s/n, 3 vp, 1 tbsp. s/n in the ring, from * repeat 2 more times, finish with 2 vp, 1 tbsp. s/n, 3 v.p. and 1 connection Art. in the 3rd ch. rise = 1st circular row.
Tie a napkin. b/n, while knitting 3 tbsp in each square. b/n, on the corners do 5 tbsp. b/n, above the border of each cell and on each corner, make 1 picot (= 3 vp, 1 st. b/n in the 1st vp).
Assembly
Prick the finished napkin onto the backing, holding each picot with a pin, sprinkle with starch diluted with water and let dry.
Large round
Large round napkins look solemn in the interior. They can be large knit or small and openwork - there are a lot of ways to knit round napkins. Let's take a closer look at how to crochet large round napkins with diagrams and descriptions.
- Festive flower

A beautiful napkin in a Nordic style will not only decorate the holiday table, but also give good mood during weekdays.
Napkin size:
Diameter 54 cm.
Materials for work:
- yarn (100% cotton; 265 m/50 g) – 100 g dark red;
- hook No. 1.5.
Napkin knitting pattern:
 Scheme from 16 to 30 rows.
  Scheme from 1 to 15 rows.
 Progress:
Complete the initial chain of 10 vp. and close it into a ring using the connection. Art. Knit according to the pattern in circular rows. Instead of 1st tbsp. s/n, perform the number of vp indicated in the diagram at the beginning of each row. rise. Finish the row with a connection. Art., Art. b/n or p/st. If necessary, proceed to the beginning of the next circular row using additional connections. Art.
Continue the pattern by analogy until the end of the row (= 8 repeats).
At the end of the 28th row, finish each leaf separately in rows in forward and reverse directions.
Starting from the 2nd leaf, attach a new thread at the arrow. At the end, tie the entire napkin in a circle next to A.
Assembly:
Stretch the napkin, moisten it and leave until completely dry.
- Sirloin wedges

Many people associate the sirloin style with napkins and tablecloths, and it looks very unusual. When creating this model, squares are used in the fillet crochet technique, which are interspersed with openwork triangles. The result is a beautiful, airy, textured piece.
Napkin size:
Diameter 44 cm.
Materials for work:
- yarn (100% cotton; 280 m/50 g) – 60 g white;
- hook No. 1.5.
Knitting pattern:
 Knitting pattern for a round napkin, part 1
  Knitting pattern for a round napkin, part 2
 Progress:
Make an initial chain of 10 vp. and close it into a ring using the connection. Art. Perform 3 v.p. rise instead of the 1st column, then knit according to the pattern, with each circular row starting with the indicated number of ch. lifting and finishing the connection. Art. If necessary, proceed to the beginning of the next circular row using the connection. Art.
After the 29th row, leave the thread and knit each rectangle separately in shortened rows from a to b (this fragment is highlighted in green in the diagram). Each time, attach a new thread using the connector. Art.
Then use the remaining working thread to complete the 30th circular row of the pattern.
For greater clarity, only part of the diagram is shown; the rows continue by analogy.
The numbers in the diagram indicate circular rows, the letters indicate rows in forward and reverse directions.
Assembly:
Pin the finished napkin onto the backing, holding each corner with a pin, sprinkle with starch diluted with water and let dry.
Little ones
Crocheting napkins is quite quick and exciting activity, and embroidering small napkins can be considered a separate type of hobby. These cute miniature napkins can be used as coasters, potholders, or simply serve their main role - to decorate. How to crochet small napkins, let’s look at a few interesting examples knitted products.
- Napkin coasters

Beautiful napkins made from single motifs will perfectly serve as coasters for glasses and cups, and in addition, they are beautiful and delicate decorative elements that will always decorate a table, window sill or cabinet. Let's take a closer look at how to crochet such beauty.
Napkin size:
Diameter 13 cm.
Materials for work:
- cotton mixed yarn (approx. 140 m/50 g) – approx. 50 g blue (= A), hot pink (= B) and melange blue (= C);
- hook No. 4;
- pieces of lilac felt for decoration.
Knitting pattern:

Progress:
Knit the motif 3 times with threads A, B and C, while performing only the 1st–4th round. In addition, in every 4th circle.r. instead of v.p. perform 1 tbsp. b/n in v.p. previous circle. row.
Assembly:
Sew felt decor in the middle of the knitted parts, as shown in the photo or at random.
- Timeless classic

A round napkin with an openwork floral motif is the first thing most people associate with the phrase “ knitted napkin" Such yarn products that decorate a home are still held in high esteem because they look very interesting and add a special flavor to the overall style of the home. Let's try to knit one of these gentle napkins crochet, having considered detailed description and step-by-step photographs.
Materials for work:
- thin yarn;
- a hook suitable for the selected yarn;
- scissors.
Abbreviations in the diagram:
VP– 1 air loop;
RLS– 1 single crochet;
CCH– 1 double crochet;
СС2Н– 1 double crochet stitch;
СС3Н– 1 double crochet stitch.
Knitting pattern:

Progress:
Round napkins are crocheted in the round with the beginning of knitting in the form of a chain of air loops closed in a circle.
1st row: we collect 18 VP. We connect them with a connecting loop.
We make 32 DC in the center of the connected circle, at the beginning of the row we make 3 VP lifts. We close the circle with a connecting loop. Next, each row closes in a circle.
2nd row: knit 6 VP + *1 DC through one loop + 3 VP*. Repeat from *.
3rd row: cast on 7 VP + *1 СС2Н through three loops + 3 VP + 4 СС2Н with one vertex + 1 СС2Н + 3 VP*. Repeat from *.

4 row: make 7 VP + *through three loops 1 СС2Н + 3 VP + 4 СС2Н in the arch of the previous row + 3 VP + 4 СС2Н in the arch of the previous row + 3 VP + 1 СС2Н + 3 VP*. Repeat from *.
5 row: we collect 7 VP + *through three loops 1 СС2Н + 3 VP + 4 СС2Н with one vertex + 3 VP + 4 СС2Н with one vertex + 3 VP + 4 СС2Н with one vertex + 3 VP + 1 СС2Н + 3 VP*. Repeat from *.

6th row: knit 7 VP + *through three loops 1 СС2Н + 3 VP + 4 СС2Н with one vertex + 3 VP + 4 СС2Н with one vertex + 3 VP + 4 СС2Н with one vertex + 3 VP + 4 СС2Н with one vertex + 3 VP+ 1 СС2Н + 3 VP *. Repeat from *.
7th row: we collect 12 VP + *1 СС3Н + 5 VP + 4 СС2Н with one vertex + 3 VP + 4 СС2Н in a chain of three loops of the previous row + 3 VP + 4 СС2Н with one vertex + 5 VP + 1 СС3Н + 7 VP*. Repeat from *.

8th row: dial 7 VP + *(1 СС3Н + 2 VP) repeat 8 times + 3 VP + + 4 СС2Н in a chain of three loops of the previous row + 3 VP + 4 СС2Н in a chain of three loops of the previous row + 3 VP*. Repeat from *.
9th row: We collect 9 VP + *(1 СС3Н + 4 VP) repeat 8 times + 3 VP + 4 СС2Н with one vertex + 3 VP*. Repeat from *.
10th row: We collect 5 VP + * 2 RLS in the same arch + 2 RLS in the next arch + 4 VP *. Repeat from *.

Rectangular
Fans of handmade table decorations will definitely like crocheting patterns for rectangular napkins. These products can easily replace a tablecloth, or become decorative elements on festive table or ordinary shelves, sideboards, cabinets.
- Angel's path

Napkin size:
Diameter 30x85 cm.
Materials for work:
- yarn (100% cotton; 265 m/50 g) – 100 g white;
- hook No. 1.25.
Knitting pattern for the main pattern:
Knit according to the pattern with a fillet pattern. Each cell of the pattern consists of 3 sts. Empty cells consist of 1 st. s/n (or patent, or art. with 2/n) and 2 v.p. Filled cells consist of 3 tbsp. s/n (or patent article s/n, or article s 2/n).

Border
Knit in circular rows according to pattern 2. Start each row as indicated in the pattern.
number v.p. and finish the connection. Art. or p/st.

Knitting density:
13 cells wide and 14 r. in height = 10 x 10 cm.
Progress:
Make an initial chain of 100 vp. + 3 ch. rise + 2 v.p. and knit according to pattern 1 in rows in forward and reverse directions. Perform from the 1st to the 40th row, then turn the pattern and perform from the 39th to the 1st row. (= 79 rubles).
Border:
Tie the finished track around the perimeter in circular rows according to pattern 2. Continue the pattern by analogy to the end of each side. In the 4th row in the middle of each side, perform rapport A once.
Assembly
Stretch the track, moisten it and let it dry.
- Ease

Another model of a crocheted napkin using the fillet technique. It looks very neat due to the delicate pattern on the side and the figured frame around the edges. A napkin is knitted quickly, even if a novice needlewoman wants to make it herself.
Napkin size:
Diameter 35x51 cm.
Materials for work:
- yarn (100% cotton; 560 m/100 g) – 50 g white;
- hook No. 1.5.
Napkin knitting pattern:


For 1 empty cell, perform 1 tbsp. s/n and 2 vp, for 1 filled cell – 3 tbsp. s/n.
Start each row with 3 ch. lifting instead of 1st st. s/n and end with 1 additional st. s/n in the 3rd v.p. lifting the previous row.
The numbers on the diagram indicate rows. For greater clarity, only part of the border diagram is shown; the series can be continued by analogy.
For the border, knit 1 circular row around the perimeter of the napkin according to the appropriate pattern, while attaching a new thread using 1 connection. Art. On each side knit st. b/n, knit at the corners in the direction indicated by the arrows.
Progress:
Complete the initial chain of 112 vp. + 3 ch. rise and knit in a fillet pattern according to the pattern.
Circular row start 1 vp. and finish 1 connection. Art.
The outermost cells of the fillet pattern are shown again in the border diagram.
Assembly
Prick the finished napkin onto the backing, sprinkle with starch diluted with water and let dry.
Video lesson for beginners
Master classes from professionals will help you master the art of crocheting napkins for the home. Crocheting napkins for beginners may seem like a rather complicated task, but thanks to video tutorials, understanding this type of needlework becomes much easier, faster and more enjoyable. IN in this case, we'll talk about big round napkin openwork texture with an interesting “Peacock Feather” pattern.
Video - crocheted napkin:


