Every woman has nylon tights in her wardrobe. And, as a rule, more than one couple, since they have bad habit tear all the time. What to do with torn tights? People no longer store onions in them, but what else are they good for? For example, you can make dolls from tights with your own hands, step-by-step instruction will help with this. A master class on making a baby doll is perfect for beginners.
What you need for the craft:
- Scissors;
- Glue;
- Tights;
- Needle;
- Knitting thread;
- Simple threads;
- Fabric scraps;
- Sintepon.
Cute baby
Cut off the sock from the tights, stuff it with padding polyester and tie it. Outline the neck and sew in this place with thread. Tighten and wrap several times. Make stitches in place of the legs and pull them together. Where the face is, sew a small piece and tighten it - this will be the nose. In the area of the seam of the tights, thread the thread up to the tummy, make a hole in the navel, bring the thread to the back and divide the butt.
Make the ears the same way as the nose. Embroider eyes and eyebrows.
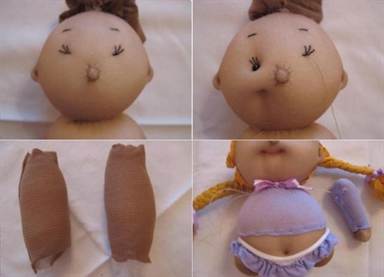
Pull the cheeks from the corner of the mouth to the eye and sew on a bead. Same with the second eye. Stick a red thread into the top of the head and make a smiling mouth. Make a knot at the top and then hide it in your hair.

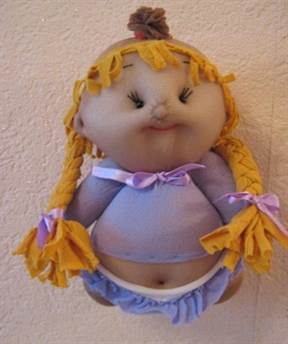
Cut off the excess from the knot on the head and sew arms for the baby from this piece. Sew them to the body. Make hair from knitting threads, and sew clothes from scraps. Here comes the baby.
Dolls can be very different: grandfathers, grandmothers, toddlers, various animals, tumblers.
But there is one type of doll that is different from the rest - butt dolls. They are called that because they consist only of the head and butt. They also jokingly guess how fate is disposed towards you today – face or butt? Making such a doll is not difficult.
Pop doll
You need to take the padding polyester, tear it into small pieces and collect two identical piles.
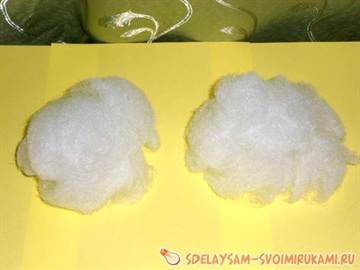
Cover with tights, making balls and tie with a regular hair elastic. These two balls are for the face and butt.
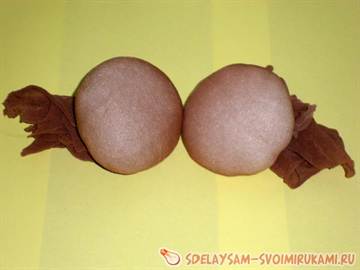
First the face. The base is already there, now make pieces of padding polyester for the cheeks and nose.

Distribute carefully under the fabric, in the head.

Tighten your nose, starting from the bridge of the nose.

Pass the needle several times through the same point, and then bring it diagonally to the place for the nostrils.

Stitch back and forth several times.
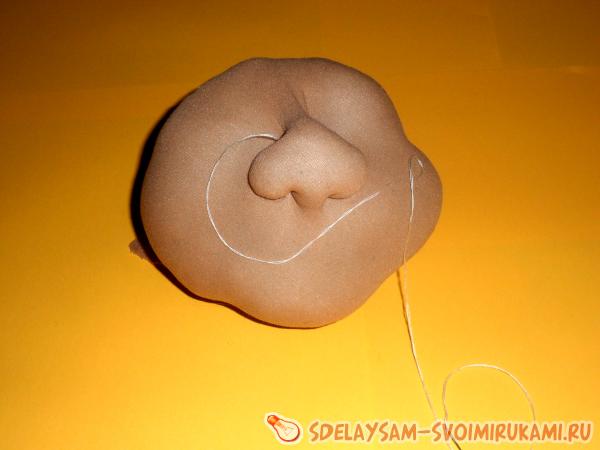
Pull both sides and cut the thread. Cheeks, mouth and lips. Take two needles and threads and stitch the cheeks from top to bottom.

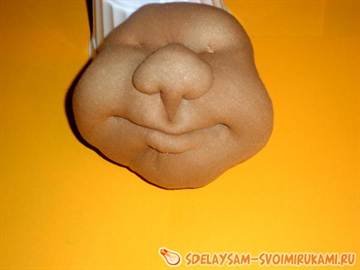
Tie the threads, pulling them well.


Then you need to stitch the sponges. Insert a needle in the place for the lower lip, bring it out under the nose and lower it down. Pull and tie the threads. Give the required form and sew indentations for the eyes.
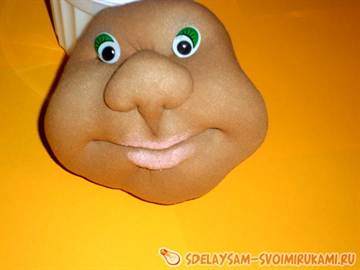
Glue on eyes or buttons. You can draw lips, eyebrows and eyelashes.
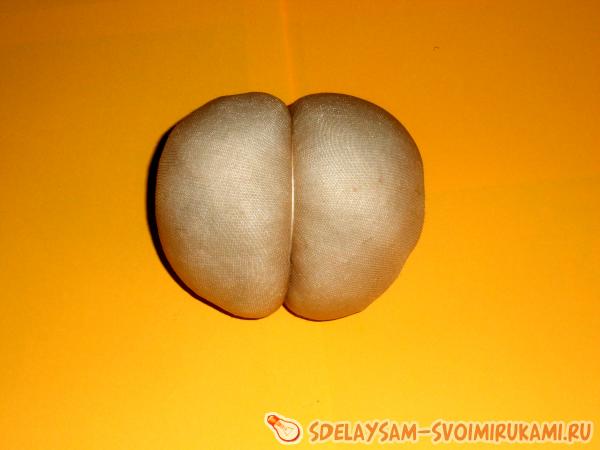
Now the butt. Insert a needle into the place connected with an elastic band and divide into two parts. Sew several times and secure by cutting the thread.
Arms and legs. Cut the wire, about 1 meter at a time. Twist 5 fingers on each. This is a frame, it must be covered with padding polyester, fabric and stitched.

For the legs, make blanks like for the butt and head, but smaller. Make fingers.
Sew the heel.

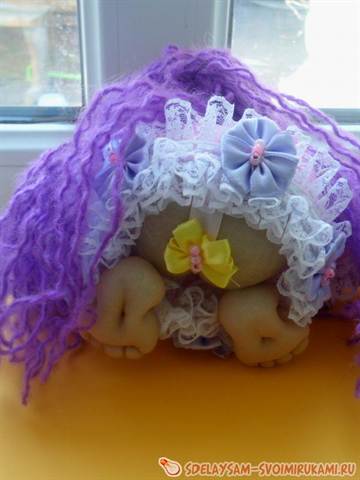
The blanks are ready, you can assemble the doll. You just need to make some clothes for her. Take a piece of fabric and sew it. Tighten at the top with a basting stitch, and sew lace at the bottom. Tape is good for panties. Sew it to the butt and cover the seam with a bow.
Put the dress on your butt, attach your arms and sew it together. Glue the head and hair made from yarn. Glue the legs to the butt and the doll is ready.
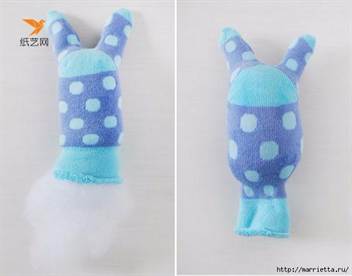
Slick rabbit
Tights can be not only nylon. Simple children's colored tights or socks make wonderful bunnies. To do this you will need a set of things, as in the photo.

If you make it from tights, you need to cut off the bottom and get a sock. Turn it inside out, cut the foot in half lengthwise and sew. Like this.


Turn the sock back inside out. We got ears.

Stuff the sock with padding polyester.
Sew at the bottom in the middle with a needle and across again, like this.
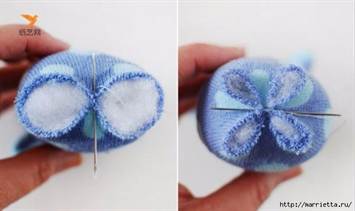
Sew all four petals.
Can be an excellent material for making interesting crafts. Recently, making children's toys, souvenirs and interior items from stockings, socks and footwear has become a very popular area of applied creativity. Many needlewomen create real “masterpieces” from nylon. The dolls are especially charming, bright and elegant.
Nylon is particularly elastic, so it can be used to create beautiful toys, with chubby arms and legs and cute, as if “alive” faces. Their facial expressions are striking in their realism. Textile toys are colorful and very funny. In this article we will talk about making dolls from nylon tights, we will share with you several simple master classes and reveal the secrets of creating frameless and frame toys. We hope our tips will be useful to you.
tights: making masterpieces with our own hands

To make a cute toy, you will need a set of materials, including:
- nylon tights;
- pins;
- two large needles;
- padding polyester;
- insulating tape;
- two large buttons;
- spool of beige thread;
- acrylic yarn;
- floss threads.
You should also prepare various pieces of fabric for making doll clothes and accessories. In addition, you will need a plastic container for drinking yogurt (or any other container that resembles the shape human body) and thick wire. To make this craft, we recommend using tights that are not too thick, with a density no higher than 40 denier. Remember that too strong Lycra products have poor stretch and can make your job more difficult. We also recommend tearing the padding polyester into pieces with your hands, rather than cutting it with scissors, otherwise the surface of the doll may turn out uneven.
Manufacturing technology of frame textile toys
So, dolls from nylon tights are made with your own hands as follows. First, the frame is made. Two wire pieces are inserted into a plastic bottle, which in the future will become the doll’s arms and legs. Next, small pieces are cut from the wire, which will be the fingers. It is advisable to try to maintain proportions when making them different lengths. These segments are attached to the hands using electrical tape. So, wire frame ready. Next, we start working with padding polyester. It will allow us to give our doll’s body beautiful outlines. We cut the padding polyester into strips 2 cm wide. We lubricate the parts of the toy’s body with glue and begin to wrap the resulting strips around the arms, legs, torso and even fingers.
Frame dolls from nylon tights: we’ll make a head with our own hands
After the body of the toy takes on a realistic shape, you can begin making the head. We tear off a piece of padding polyester and give it the shape of a ball.

We make a small protrusion - the nose. We tear off another piece of padding polyester and wrap it around the head. Now we take nylon tights and cut out a rectangle from them. We wrap the padding polyester ball into the resulting segment, gathering the material from above and below. We take two tailor's pins and use them to mark the places of the tension marks. We tighten the bridge of the nose on both sides. Next we need to form the nostrils: we pull them diagonally. We form the wings of the nose. Now we outline the mouth and cheeks. We make two tightenings, forming a smile. If desired, you can also make ears: two places are marked with pins. The drawstrings are made from the center of the ear down and up. We make the doll's eyes from two plain buttons. We paint the pupils with blue and black varnishes. We sew them onto the muzzle. If desired, glue the eyelashes onto the eyelids. Don’t forget to do the eyebrows: highlight them with two horizontal drawers. We got such a cute smiling face.
Transforming the doll's body and sewing clothes

Having made a charming face, you can begin to “stretch” the skin on the toy’s torso, arms and legs. We take a nylon stocking, make a pattern in the form of pants, cut it and sew it together. The result was “skin” for the legs. We stretch the part onto the toy. Now let's make a pattern for the hands. We cut out the parts, sew and dress the toy. Well, that's all, now you know from nylon tights with your own hands. We just have to figure it out nice outfit, make it from pieces of fabric, and also sew the head to the body. Clothes can be absolutely anything - whatever you like. You can sew a dress or a suit. You can make hair from yarn, thread or a piece natural fur. Now you know that sewing a doll from nylon tights is not so difficult. The main thing is to create with pleasure and joy. Good luck with your experiments!
Pop dolls: an original do-it-yourself souvenir for good luck

From nylon tights you can make not only frameless tights - a charming “butt”. It is believed that this is pretty and funny toy attracts good luck and is a lucky talisman. It is often given as a souvenir, with wishes of prosperity and good luck. Now we will tell you how these cute butt dolls are created from nylon tights. You will need the following materials:
- nylon footprint or sock;
- padding polyester;
- beige threads;
- scissors;
- two beads for eyes;
- yarn;
- pieces of fabric;
- ribbons, beads, sequins, etc. decorative elements.

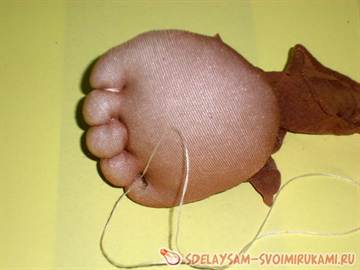
First, take a padding polyester and tear off a fairly large piece. Let's give it a spherical shape. Now let's form a small piece of padding polyester and roll it up - this will be the doll's nose. Next we will make two more pieces for the cheeks. It is advisable to roll the material more tightly. We will form sponges from two small strips. We will also make two more medium-sized balls from padding polyester, which will later become the legs of the butt. Now take the sock and wrap the ball for the head with nylon. Next, insert the ball for the spout into the nylon and place it in the center. We also push through the cheeks and two strips for the lips. Place the legs in the lower left and right corners of the sock. We tighten the edge and fix it with threads (wrap and tighten). We cut off the excess part of the nylon, leaving only a small “tail”. We can easily hide it under the doll’s hair or headdress.
We make tightening on the face of the butt doll: we will form a snub nose

In order to form a funny snub nose, lips and cheeks, you will need to make tightening. For beginners, we advise you to stitch each piece using a new thread. So, let's start making nylon tights with our own hands. First we take a large needle intended for stitching knitted products, and correct all the lumps with it, moving them to the right places. That's it, now you can start straightening your face. To do this we use beige threads and a needle. First, let's shape the doll's nose from nylon tights. The instructions are as follows: take it, squeeze it and stitch it from above (between the eyes), and then tighten it to the desired thickness of the bridge of the nose. Next, we stitch the nose diagonally, forming the first nostril. After this, we raise the needle up to the starting point, and from there we pass the needle into the second nostril. Return the needle to the starting point. Now we let it down again, pierce the place just above the nostril, make a stitch, and go back. We make one more stitch and send the needle up to the starting point of the bridge of the nose. Next, we do the same with the second nostril. You should have a beautiful snub nose. All that's left is to "raise" it a little. To do this, we move the needle up, onto the bridge of the nose, pick up the fabric and pierce the nylon a little higher, and pass the needle back (to the back of the head). Thanks to this, the spout rises. We fasten the thread at the back of the head and make a knot. That's it, the tightening is ready.
Tightening the butt's muzzle: cheeks and lips
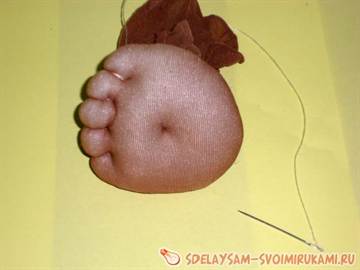
How to make beautiful cheeks? First, we mark a point next to the spout and drive a needle into it, make a stitch, return the needle back, but we do not pierce the fabric into the same hole, but choose a new point, a little closer to the spout, go back and secure it with a knot. On the other side of the nose we make the second cheek by analogy. Let's move on to the lips. We take a thick needle and adjust the padding polyester to the spout. This is necessary to keep your lips plump. We take the needle and pass it to the working point on the left cheek. Making a stitch in right cheek, running the thread between the upper and lower lips. Pull it together and form a knot. Now we put the needle back to the point on the left cheek, laying the thread under the lower lip. They turned out to be a charming mouth. You also need to remember to tighten the legs. Now you know how to sew a doll from tights. It’s not difficult to make such a mini-pop, the main thing is to have fun with it.

How to make eyes for a pop doll?
After the lips, nose and cheeks are ready, you can start making the eyes. You can pick two beautiful buttons or buy ready-made toy eyes. Attach them to the butt's face. Eyelashes will help make your look more expressive. They can either be embroidered or made from ready-made false eyelashes. After designing the face, you can start making hair. In your work, you can use any available materials - fur, yarn, artificial strands. The hair can either be sewn to the head or glued using a hot gun. In addition, you can come up with a charming headdress - a hat, cap or headband. The hair of a “girl” priest can be decorated with bright bows and hair clips. You also need to sew a ribbon or braid to the doll’s head so that the toy can be easily hung.
Outfit for a frameless doll
The clothes for your toy can be anything you like. It can be an ethnic costume, or fluffy skirt. The outfit may reflect national identity. In our case, we will limit ourselves to openwork panties made from a piece of white fabric. Don’t forget about decorating doll clothes with beads, seed beads, and sequins. They will add special beauty to your outfit. Also think about accessories - these could be beads, bows, and ribbons. Dolls made from nylon tights are an excellent way to make the decoration of your home more interesting and cozy. In addition, such unique crafts can become an excellent souvenir for both children and adults.
Every girl has a pair of tights at home that can be used for other purposes. For example, from them you can create a beautiful doll that will become good decoration for the interior of the apartment. It's not at all difficult to do. With just a little practice, you will learn how to create real masterpieces. The finished doll will look very realistic, resembling a small copy of a person. We invite you to learn about techniques for creating dolls from nylon tights.
Types and options
There are several most popular types of tights dolls. They are most often made by both professionals and amateurs. This list includes:
- Pop doll. It has such a strange name because its most expressive parts are the face and butt. Most often, such dolls are made small and must be in a sitting position.
- doll in full height. This option is made using tights and filler. Looks like a small copy of a person.
- Only the doll's head. It is done without the body, focusing on the facial features.
- Frame doll. It is made using a specific frame. Plastic bottles, wire and other available materials can be used as a basis.
Examples of homemade dolls
Children will love this toy

Outfits for the pope doll can be anything

If the popik doll turns its back to you in the morning, the day will be unlucky

This doll is convenient to use as a stand

You can even make a bride and groom out of tights

Couples in love

Such a brownie will protect your home from evil spirits

This doll can also be given to a real bride.
Making a doll from nylon socks

This is what a finished sock puppet should look like
If you are going to make the first doll in your life, we advise you to try making a simple doll.
This toy is very simple, so even novice craftswomen can create it.
- Necessary materials:
- Scissors;
- Wire;
- PVA glue;
- Nylon socks;
- Filler;
- Needle;
- Knitting and regular threads;
Fabric for clothing.
- Step-by-step instruction:
- Take a nylon sock and fill it with filler. We tie a knot.
- Mark the neck area and sew with a basting stitch. Then we tighten the neck and wrap the thread around it a couple more times.
- We stitch the circles in the leg area with stitches and also tighten them.
- We sew a small circle onto the face and tighten it. This will be the nose of the toy.
- Making the ears. To do this, we tighten the thread in two places. We embroider eyes and eyebrows.
- From the corner of the mouth we pass the needle to the eye and tighten it. These will be the baby doll's cheeks.
- Glue beads as eyes. You can use special plastic decorative eyes for toys. They can be attached to PVA or Moment glue.
- In the area of the crown we insert a needle with a red thread and create beautiful smile for our baby doll. Make the knot in such a way that you can later hide it under your hair.
- We take knitting threads and make hair.
- We cut off the excess from the knot on the head and make hands from this nylon for the craft. We sew them to the body.
- We create clothes from scraps of fabric. That's it, our toy using the stocking technique is ready.
Photo master class

Illustration for points 1,2,3,4,5

Illustration for points 6,7,8,9

Illustration for paragraphs 10,11,12
From tights and a plastic bottle

This is what a finished doll should look like from tights and a plastic bottle
This toy is very simple, so even novice craftswomen can create it.
- Plastic bottle;
- Necessary materials:
- Nylon socks;
- Scissors;
- Needle and thread;
- Shreds for clothes.
Fabric for clothing.
- Cut off the bottom part of the bottle and wrap it with padding polyester. Then we stretch a piece of nylon onto the bottle the same length as the prepared bottle.
- Let's start shaping the doll's face. We make a ball from padding polyester, insert it into a bottle covered with nylon tights and use a needle and thread to form a nose. You can add a little more synthetic padding to make your cheeks, forehead and chin more voluminous.
- We glue the eyes, embroider the mouth and “sculpt” a suitable facial expression for our toy.
- We tighten the neck area with threads and give it the desired look.
- We pull the part of the nylon remaining below up and take it out through the neck of the bottle.
- We make hands from wire. We cut small pieces for fingers, wrap them with padding polyester and combine them. One piece needs to be wrapped around the entire arm, from wrist to shoulder. Then we stretch the nylon and give the hands the required shape. We separate the fingers with threads.
- It is not necessary to make legs, since the bottom of the toy can be covered with long clothes.
- That's all! Remember: the design of the doll's clothes depends solely on your imagination.
Beauty in stocking technique on a plastic base (step-by-step photos)

Illustration for point 1

Illustration for points 2,3,4,5

Illustration for paragraphs 6.7
Frame doll
Such toys are the height of hosiery craftsmanship. They are pleasant to hold in your hands, they are very similar to little people. The frame is made of aluminum or copper wire(you can use material of different thicknesses). Ready-made frame dolls will be able to sit and stand.
This toy is very simple, so even novice craftswomen can create it.
- Capron;
- Nylon socks;
- Wire frame (length 30 centimeters);
- Thread and needle;
- Scissors;
- Glue;
- Decorative elements;
- Knitting and regular threads;
Fabric for clothing.
- We make a frame. To do this, take the wire and twist the loops. We will need 12 centimeters for the head, the same amount for the oval body, 16 centimeters for the legs. Separately, we wrap the arms and create loops in the area of the feet for the shoes. Please note that if you want to make a doll a little larger than the size we suggested (for example, fifty centimeters), you will need 1.5 meters of wire. From it you will make a frame.
- Now we make the head and create the face. The head will be a small piece of nylon, tied with threads in several places. The eyes can be embroidered or glued ready-made.
- We make hair from knitting threads. Any other materials suitable for this purpose can be used.
- We make palms from pieces of wire. We wrap them with padding polyester. We pull the nylon on top. Next, we form the fingers with threads and make the doll’s nails.
- We attach our palms to the frame and wrap them with padding polyester. Next, we wrap the entire body with padding polyester and sew on the head.
- The main details are ready. All that remains is to sew clothes for the toy. This stage depends only on your imagination.
- The seams must be carefully masked so that they do not spoil appearance finished product.
Helpful advice: If you decide to sew a small doll, the dimensions of the body and head should be in a ratio of 1:3, for average toy– 1:6, for large – 1:8.
Photo gallery: Making a toy on a frame

Illustration for point 1

Illustration for point 2

Illustration for point 2

Illustration for point 2

Illustration for point 3

Illustration for points 4.5
Pop doll

This is what a finished popik doll should look like
This toy is very simple, so even novice craftswomen can create it.
- Nylon stocking;
- Filler (preferably synthetic winterizer);
- Necessary materials:
- Knitting threads for hair;
- Scissors;
- Needle and thread;
- Fabric for clothing;
- Decorative elements.
Fabric for clothing.
- Take a nylon stocking and twist it in the middle. Let's flash this place. The upper part will be the doll's head, and the lower part will be the torso.
- Next, tear the padding polyester into small pieces. This is necessary to ensure that the base of the doll is perfectly even. It is necessary to stuff the head of the toy especially carefully, since imperfections on the torso can be hidden by clothing, but not on the head.
- We fill the nylon with padding polyester. We form the doll's head. Add another small ball, which will become the nose of the toy. This is the most expressive part of the product. The nose can be made of absolutely any shape. The simplest one is “bulbochka”.
- Use a thread to secure the nose. You need to start from the bridge of your nose. We make a few stitches at the bottom. The resulting notches are the nostrils.
- If you are making a doll from nylon for the first time, mark on it with a pencil the places where you will embroider parts of the face. The mouth can be made smiling. Another option is to embroider the lips with a bow. It is important that they turn out symmetrical. After applying the markings, mark the corners of the lips with small stitches. We bring the thread out each time in the back of the head and fasten it with a knot. You can also sew dimples and cheeks.
- You can make the doll's eyes yourself. Another option is to attach ready-made ones. Eyelashes can be drawn on with a marker or made more realistic using threads.
- Cover the top of the toy's head with hair. To do this, we use knitting threads or artificial hair.
- The main part of the body is the butt. We stuff the lower part of the nylon. Roll into a ball and insert it tightly. Next, we form the buttocks in the same way as we previously formed the lips.
- We twist the wire frame for the arms. We wrap it with padding polyester and wrap it in nylon.
- Making the doll's legs. They should look like a baby's legs. To make them, a few small balls of padding polyester are enough. We fill the nylon with padding polyester and begin to form the fingers. The notch in the middle must be made separately. We attach the legs to the body.
- Our popik doll is ready. Now all that remains is to sew a beautiful outfit for her. Don't forget to make some panties for a small toy.
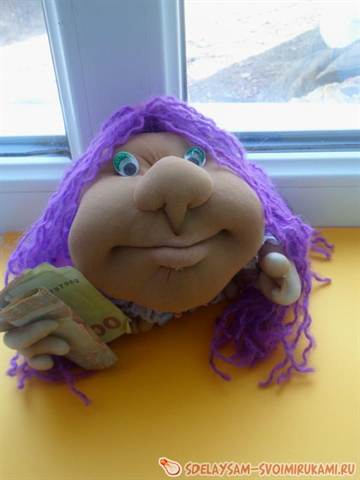
Useful information: For this doll to bring good luck, the owners place money or a bag of coins in her hand.
Creating an original craft in stages

Illustration for point 2

Illustration for point 1

Illustration for point 3

Illustration for point 4

Illustration for point 5

Illustration for point 5

Illustration for point 6

Illustration for point 8

Illustration for paragraph 9

Illustration for point 10
They say that, unlike other dolls, the popik interior doll can to some extent predict the future. All you have to do is hang it on a thread. When you wake up, look at the toy - if it turns to face you, then the day will be successful, but if it turns to the opposite side - you understand!
Video "Do-it-yourself popik-nurse"
All dolls made from nylon are very funny and cute. And most importantly - unique and inimitable. Like all handmade products, they are always created in only one copy. They also have very expressive facial features. With the help of our master class you will learn how to make such dolls very quickly. We dare to assume that, having created one figurine from nylon tights, you will soon want to replenish your collection with many similar products and assemble a whole collection!
Doll
Head
Nose

2.
3.
4.
5.
6.
7.
8.
9. cheeks 
10.
11.
12.
Do not cut the threads.
Mouth

3.
4.
5.
6.
7.
8.
Underlip

2.
3.
4.
5.
6.
7.
8.
bridge of the nose

2.
1.
2.
3.
4.
5.
Let's make ears and sew them on. Let's sew the back of the head....
Hair
At the same time I’ll show you how to make a wig. In the store I buy a children’s New Year’s wig (ours costs 150-200 rubles and is enough for 2 dolls), I rip it into strips


I twist one strip into a snail shape and sew it together. I sew this part on the back of the head. Photo 1 shows the wrong side, photo 2 shows the front side, photo 3 shows the final version. First I sew bangs onto the head, then the back of the head, then strips of the wig down from the back of the head.


torsoand palms
Cut the wire 1m 30 cm for a doll measuring 50 cm. Make a wire frame

PalmsI do it without seams
Make palms out of wire and wrap them with padding polyester. Cut a strip from the tights and cut it lengthwise into 2 parts.

Pull each square onto your palm and wrap it with thread at the wrist.

embroider fingers. Embroider nails on your fingers. In the photo on the left from the palm side, and on the right from back side, I show that all this is without seams and the folds at the wrist are very small.

I screw my palms to my body and wrap the padding polyester around my body. Then I cover the padding polyester with tights and sew on the head.

Dress
1.
2.
3.
4.
5.
6.
7.
8.
9.
10.
11.
12.
Shoes for girls

I use this pattern by enlarging the pattern on the computer. I have a sole length of 12 cm for a doll up to 50 cm

Set the sewing machine to a stitch length of 2mm
1. Glue the dublerin to the fabric with an iron (before doing this, do not forget to soak the dublerin in water and wring it out)

2. Trace the pattern pieces and cut them out.

3. Finish the edges with bias tape (bend the tape halfway in advance and iron it)

Sew the parts


sew the sock with a 4 mm seam and lightly pull the thread.

Cut out the sole from thick cardboard in duplicate. I usually take covers from old books

On sewing machine without thread, sew the edge of the sole so that there are holes (set the machine to 4 mm)

Manually connect the sole to the shoe

Sew the bias tape to the shoe (sew from the side of the shoe). Before you start sewing, burn the edge of the bias tape with a match and sew. As soon as you get to the end, cut off the excess trim and burn the edge too.

From beautiful paper or postcard cut out sole. I also made heels, but they are completely optional

Glue the sole.

The shoes are ready.
If you do not sew the sock with a 4 mm seam and do not tighten the thread, but reduce the sock slightly, you will get shoes with such a toe

New MK on shoes, which even a novice seamstress can handle.

For work, use thick fabric (drape or leather)
1. Cut out from fabric the pattern pieces from the previous MC for shoes + stripes of knitwear or fleece. ь Cut out 4 sole parts from thick cardboard.

2. Cover the edges with bias tape and connect the heel and toe pieces.

3. Slightly stretch a strip of fleece or knitwear and sew it onto the edge of the shoes

4. Insert a cardboard sole into the shoe, glue the edges of the fleece, and glue another part of the sole onto the sole.

Ready!

Boots for boys
For work you will need: fabric for the upper part (jeans, corduroy), fabric for the inner part (cotton), knitwear ( old T-shirt, I have fleece on knitwear), thick cardboard for the sole.

The pattern was made by girls from Osinka. Enlarge the pattern on the computer to the desired size.

1. Treat the top fabric with dublerin (if the fabric is thick enough, you don’t have to do this). Cut out the pattern pieces.

2. Place the pieces right sides together, pin them together and stitch. Turn out. Be sure to iron on the white side. Sew close to the edge. Place the second line at a distance of 5 mm from the first line.

3. Sew the back part to the tongue with a 2 cm seam.

4. Sew the knitted strip in a circle to the shoe, slightly (!) stretching it.

5. Place the sole into the shoe, stretch the jersey, and glue the edge. From beautiful postcard cut out 2 parts of the sole and glue.

6. Heat a knitting needle or a thick needle over a candle and pierce holes for the laces.

7. Insert needles into 2 ends of the ribbon and pull through the holes.

The boots are ready!

To know how to sew a doll from nylon tights, you can watch several master classes on this topic or study detailed instructions on needlework. The resulting toys are original and serve as an excellent hobby for expressing your individuality. There are several manufacturing techniques: from simple to complex, with the manufacture of a frame.
The technique of making dolls from nylon can be simple, which even a beginner can handle in 1 hour, or complex, requiring training and certain skills in working with sewing materials. To sew a doll you will need the following materials:
- scissors, needles, thick and thin threads;
- nylon tights or socks;
- filler: padding polyester or cotton wool;
- scraps of fabric;
- glue;
- for the frame, wire or bottle;
- for decorating wigs, buttons, eyes, ribbons.
Homemade children's toys turn out to be voluminous, soft, and if you use your imagination, you can make not only representatives of women and men, but also domestic or wild animals. The resulting products will serve as decoration for the year and will be an excellent gift or souvenir for any occasion. They can be given to both children and adults, because they can act as a talisman or simply lift their spirits.
Soft nylon dolls
To make it soft dolls from nylon and padding polyester, you need to follow the technique:
- stuffing the stocking section of nylon with filler;
- shaping the body by tightening threads;
- face framing, embroidering eyes, ears;
- forming handles;
- decoration.
The doll turns out to be simple but funny if you decorate it with hair threads and pieces of fabric in the form of clothes. A toy gift can have a different facial expression, be a boy or a girl, or a representative of a different race using dark or colored stockings. The technique is simple and does not require special knowledge in sewing, because even a novice craftswoman can handle it. When the technology is mastered, you can start sewing more complex crafts.
Frame dolls made of nylon stockings
Handmade soft nylon dolls with a frame base are made using the following technique:
- preparing the frame: bottle or wire base;
- covering the frame with nylon and shaping the face with filler;
- making hands covered with wire;
- making clothes.

Doll made from nylon tights for beginners
The question of whether it is made of nylon can be resolved by viewing the instructions and carrying out detailed master class:
- Fill a nylon sock with filler and tie it.
- Separate the neck from the body with a seam, pull it together, and wrap it with thread for a clear line.
- Sew future legs with stitches - circles at the bottom of the sock, pull them together.
- Shape the nose: sew a small circle on the head, pull it off.
- Pass the needle to the stomach, form a navel, and back side buttocks.
- Pull the ears, cheeks, sew on the eyes.
- Use red thread to make a mouth.
- Glue or sew on the hair with colored threads.
- Form arms from soft nylon bags with filling and sew them to the body.
- Decorate with clothes, accessories.
How to make a doll's head from nylon tights
When dolls are sewn from nylon big size, the sculptural elaboration of details – the textile head – becomes important. How to make it:
- Take a nylon sock or stocking, fill it with padding polyester to shape the future nose, and tie it loosely.
- Insert a needle into the side of the upper part of the future head, extend it to the other side, and pull it together to form the bridge of the nose.
- Make the nostrils in the same way, using thread loops for emphasis.
- Pull the loops together to form the nose.
- Add cheek and mouth filler in the form of oblong pieces to the bag.
- Insert a needle into the intended location of the left corner of the mouth, extend it to the left eye, and tighten to form the cheek.
- Repeat for the right side.
- Repeat the steps again to form the lower lip, bringing the needle into the eye to form the depressions.
- Pass the needle in the center of the mouth, bring it to the center upper lip.
- Tighten the thread to create a mouth.
- Make several seams in the area of the bridge of the nose to lengthen it.
- Glue on the eyes, decorate the cheeks, eyebrows, lips with paints or embroidery.
- You can sew threads for the hair, remove a wig from the old doll, or buy a new one.

Doll made from a bottle and a nylon sock
To sew a souvenir toy with a partial frame, use plastic bottle and follow the step by step instructions:
- Take a clean plastic bottle, cut off the bottom, and wrap it with padding polyester.
- Pull the nylon onto the resulting frame.
- Shape the face: take a padding polyester ball, insert it into the bottle, and use a needle to tighten the nose area.
- In the same way, shape the cheeks, forehead, chin, give the face a sculpture and the necessary facial expressions in the form of eyebrows.
- Glue or embroider eyes, mouth, glue eyelashes, decorate freckles or wrinkles with paints.
- Form a neck by pulling it with threads.
- The remaining lower part of the nylon is pulled up, pulled through the neck, and secured with threads.
- Decorate the doll with hair made from threads or a wig.
- Make wire arms. To do this, take 10 pieces of wire, gradually wrap them together with padding polyester, connect them, forming a hand and shoulder. The winding can be replaced with a pattern of hands from padding polyester and socks, which need to be sewn together, cut according to the type of palm, and then the prepared wire is secured there.
- Cover the resulting base with nylon and decorate the fingers and nails with threads.
- If it's a girl, then sew for her long skirt, then the legs won’t need to be done.
- If this is a boy, then make frame wire legs in the same way, stuff them with filler, sew trousers and shoes.
- Don't forget to hide all the joints of the toy parts.
Find out how to do


