Friends, are you ready for the new year? But the holiday is just around the corner. And this is a reason to work fruitfully with your little ones. What am I offering? Today we will talk about how and what kind of New Year's crafts to make from salt dough. Required condition– we will create with our kids. We involve them in as many processes as possible. In fact, the material is safe and easy to clean, so let’s allow the little ones to get their hands dirty.


Do you know what will add significance to these activities? The fact that the child will feel that all this is a very important matter! He will try hard when he finds out that his crafts will decorate the Christmas tree: as toys (we will hang some of them on the tree) or become part of the festive composition.
Let's decide. Remember? We have a main focus - New Year's themes. There is a basic material - salt dough. And in the kitchen of any housewife there is necessary tool. And our children have good helper- We! All that remains is to get down to business.


Ingredients and tools we will need
All we need is:
- Salt;
- Flour;
- Water;
- A little vegetable oil.
Of course, I want the figures to be bright. Therefore, we use any dyes of our choice:
- Food paints;
- Eco-friendly construction;
- Markers;
- Gouache;
- Nail polish (if you need to use very little).
And in order to make dough with your own hands, and then products from the dough, you need tools. Let's prepare in advance:
- Bowl;
- Rolling pin;
- Cup;
- Scissors;
- Pen/felt-tip pen.
We will also need additional tools. We'll talk about this in the next topic, when we look at different ideas for creativity.
Various ideas for decorating works

And there’s a sea of ideas! And, at the same time, boundless! But don’t forget, there are 2 points to consider:
- Abilities and capabilities of babies;
- Crafts should relate to the New Year 2018 theme. This means that, if not the symbol of the year itself, the Dog, we should succeed, then at least try to ensure that golden colors dominate in our products.
And a lot will depend on what tools we have at hand. In principle, absolutely anything can be a tool! And the decoration of the works, and even their form, will depend on what we own.
Now I intend to call something that can be used as a handy tool when making crafts, and how the work will depend on it.
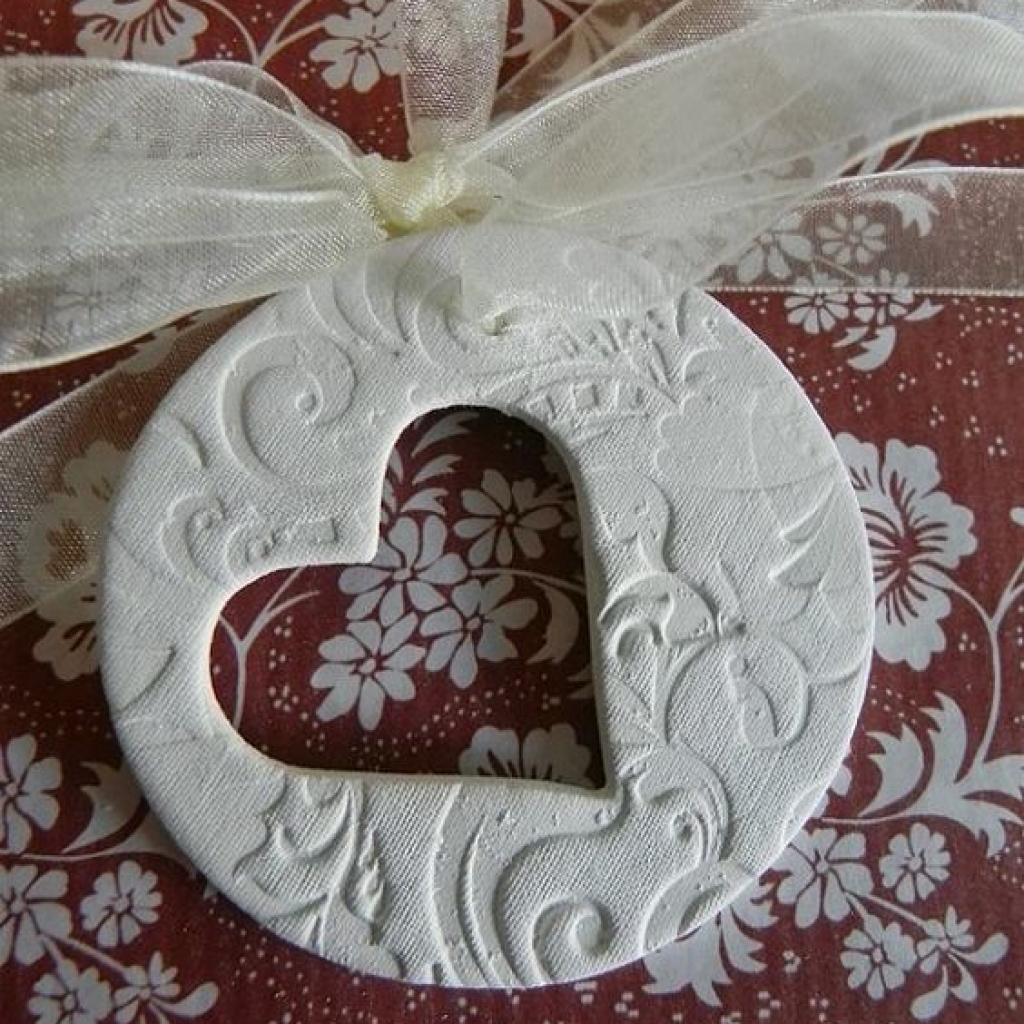
Lace. They will add delicacy to the work. All you have to do is apply them to the dough and roll them over with a rolling pin.
Buttons. It will be simple and interesting for children to press buttons into finished products to create an unusual texture.
Beads. You can simply sprinkle it on your finished work, and everything will immediately shine.
Cocktail straw- This is an excellent “hole maker” that turns ordinary crafts into lace ones.
Marker. They can draw any patterns.
Hands, legs, paws. Attach your little one’s hand and make an impression of the palm; the same can be done with the leg if you have a baby. If your dog doesn’t mind, then the prints of its paws will also look symbolic.
Master Class
And now I’ll share what my baby and I did. And at the same time I will conduct a small master class.
I'll start with our video. In it we show how to knead the dough, how to sculpt a big owl on a Christmas tree, how to decorate a window in the form of a Christmas tree with dough toys.
And now, as promised, a photo lesson: how to make a slightly different owl, hedgehog and snowman.
You all remember the recipe:
- Flour – 1 tbsp;
- Salt – 1 tbsp;
- Water.
It is better to take fine salt. It is cleaner and mixes better with flour and water. But I specifically took a large one, because I mainly intend to bake all the products. And when baked, coarse salt gives an unusual golden color. As for water. I didn’t say how much is needed. It took me half a glass. But it is better to focus on how much the dough will take so that it is not liquid.
I will try to attach a photo to each step.
So, the ingredients:

The dough turns out tough, but very plastic. I divide it into 3 parts.

Of the two, I intend to make figures of a Snowman and a Hedgehog. And I will divide the third part in half, and the baby and I roll out the mass and twist two circles with a glass.
I'm eager to try how flathead owls are made.
And the second part is a toy for the Christmas tree.

Now I will talk about each craft separately.
Snowman
1.Making the base for the snowman. I cut out a circle and decorate it, squeezing out the relief with the tip of a knife.

I divide the remaining mass into 3 parts so that one is large, the second is medium, and the third is small.
I roll the largest piece into a ball in my palms. I make a small depression in the middle.

I do the same with the second one. This way the entire structure will stand firmly without any special fastening.
I insert a thin twig into the middle ball. These are the hands of the Snowman. I place a walnut shell on top. It turns out to be such a hat.

I make the nose from the tip of a toothpick.

How to paint a Snowman? I won't put it in the oven. I'll just wait for the dough to form a crust on top. I have matching colored nail gels. I use them for painting.

The details remain: mouth, eyes, snowflakes based on the Snowman.
And this is what happened to me.

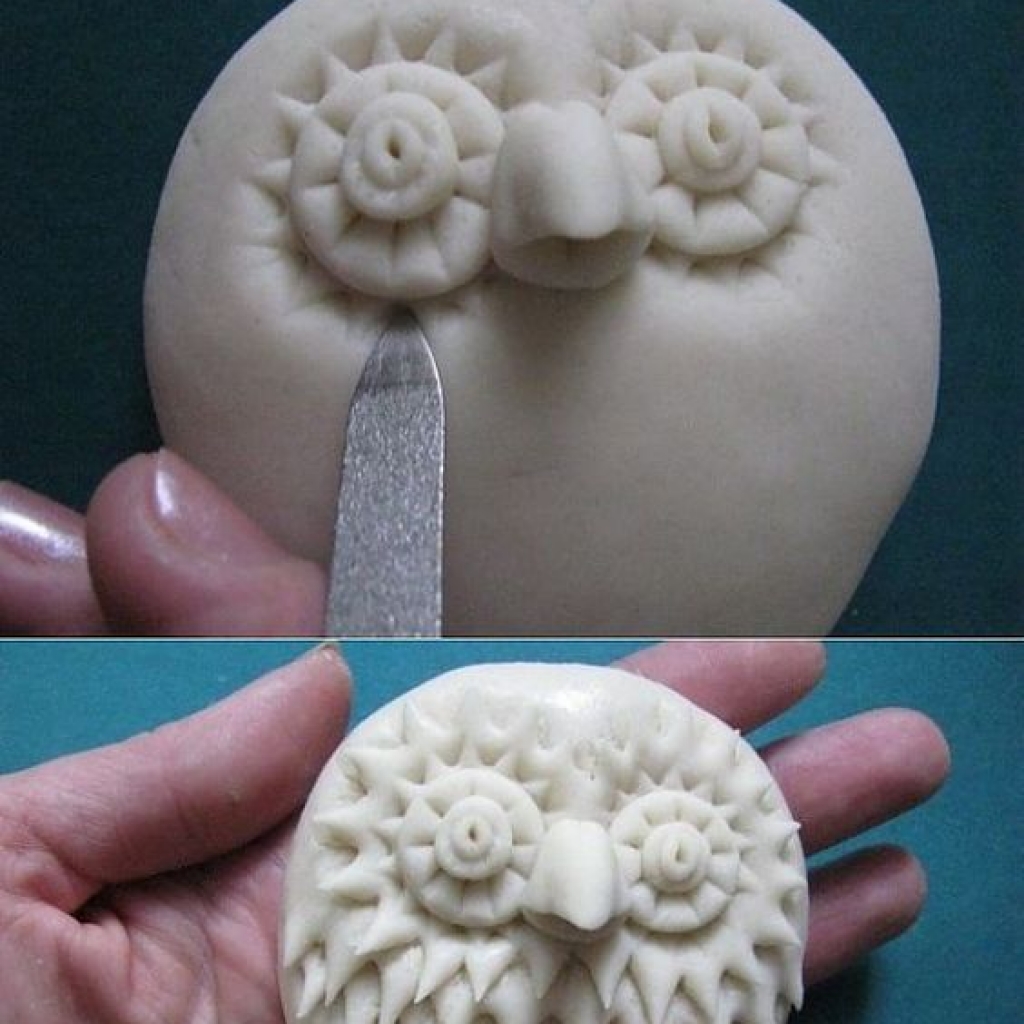
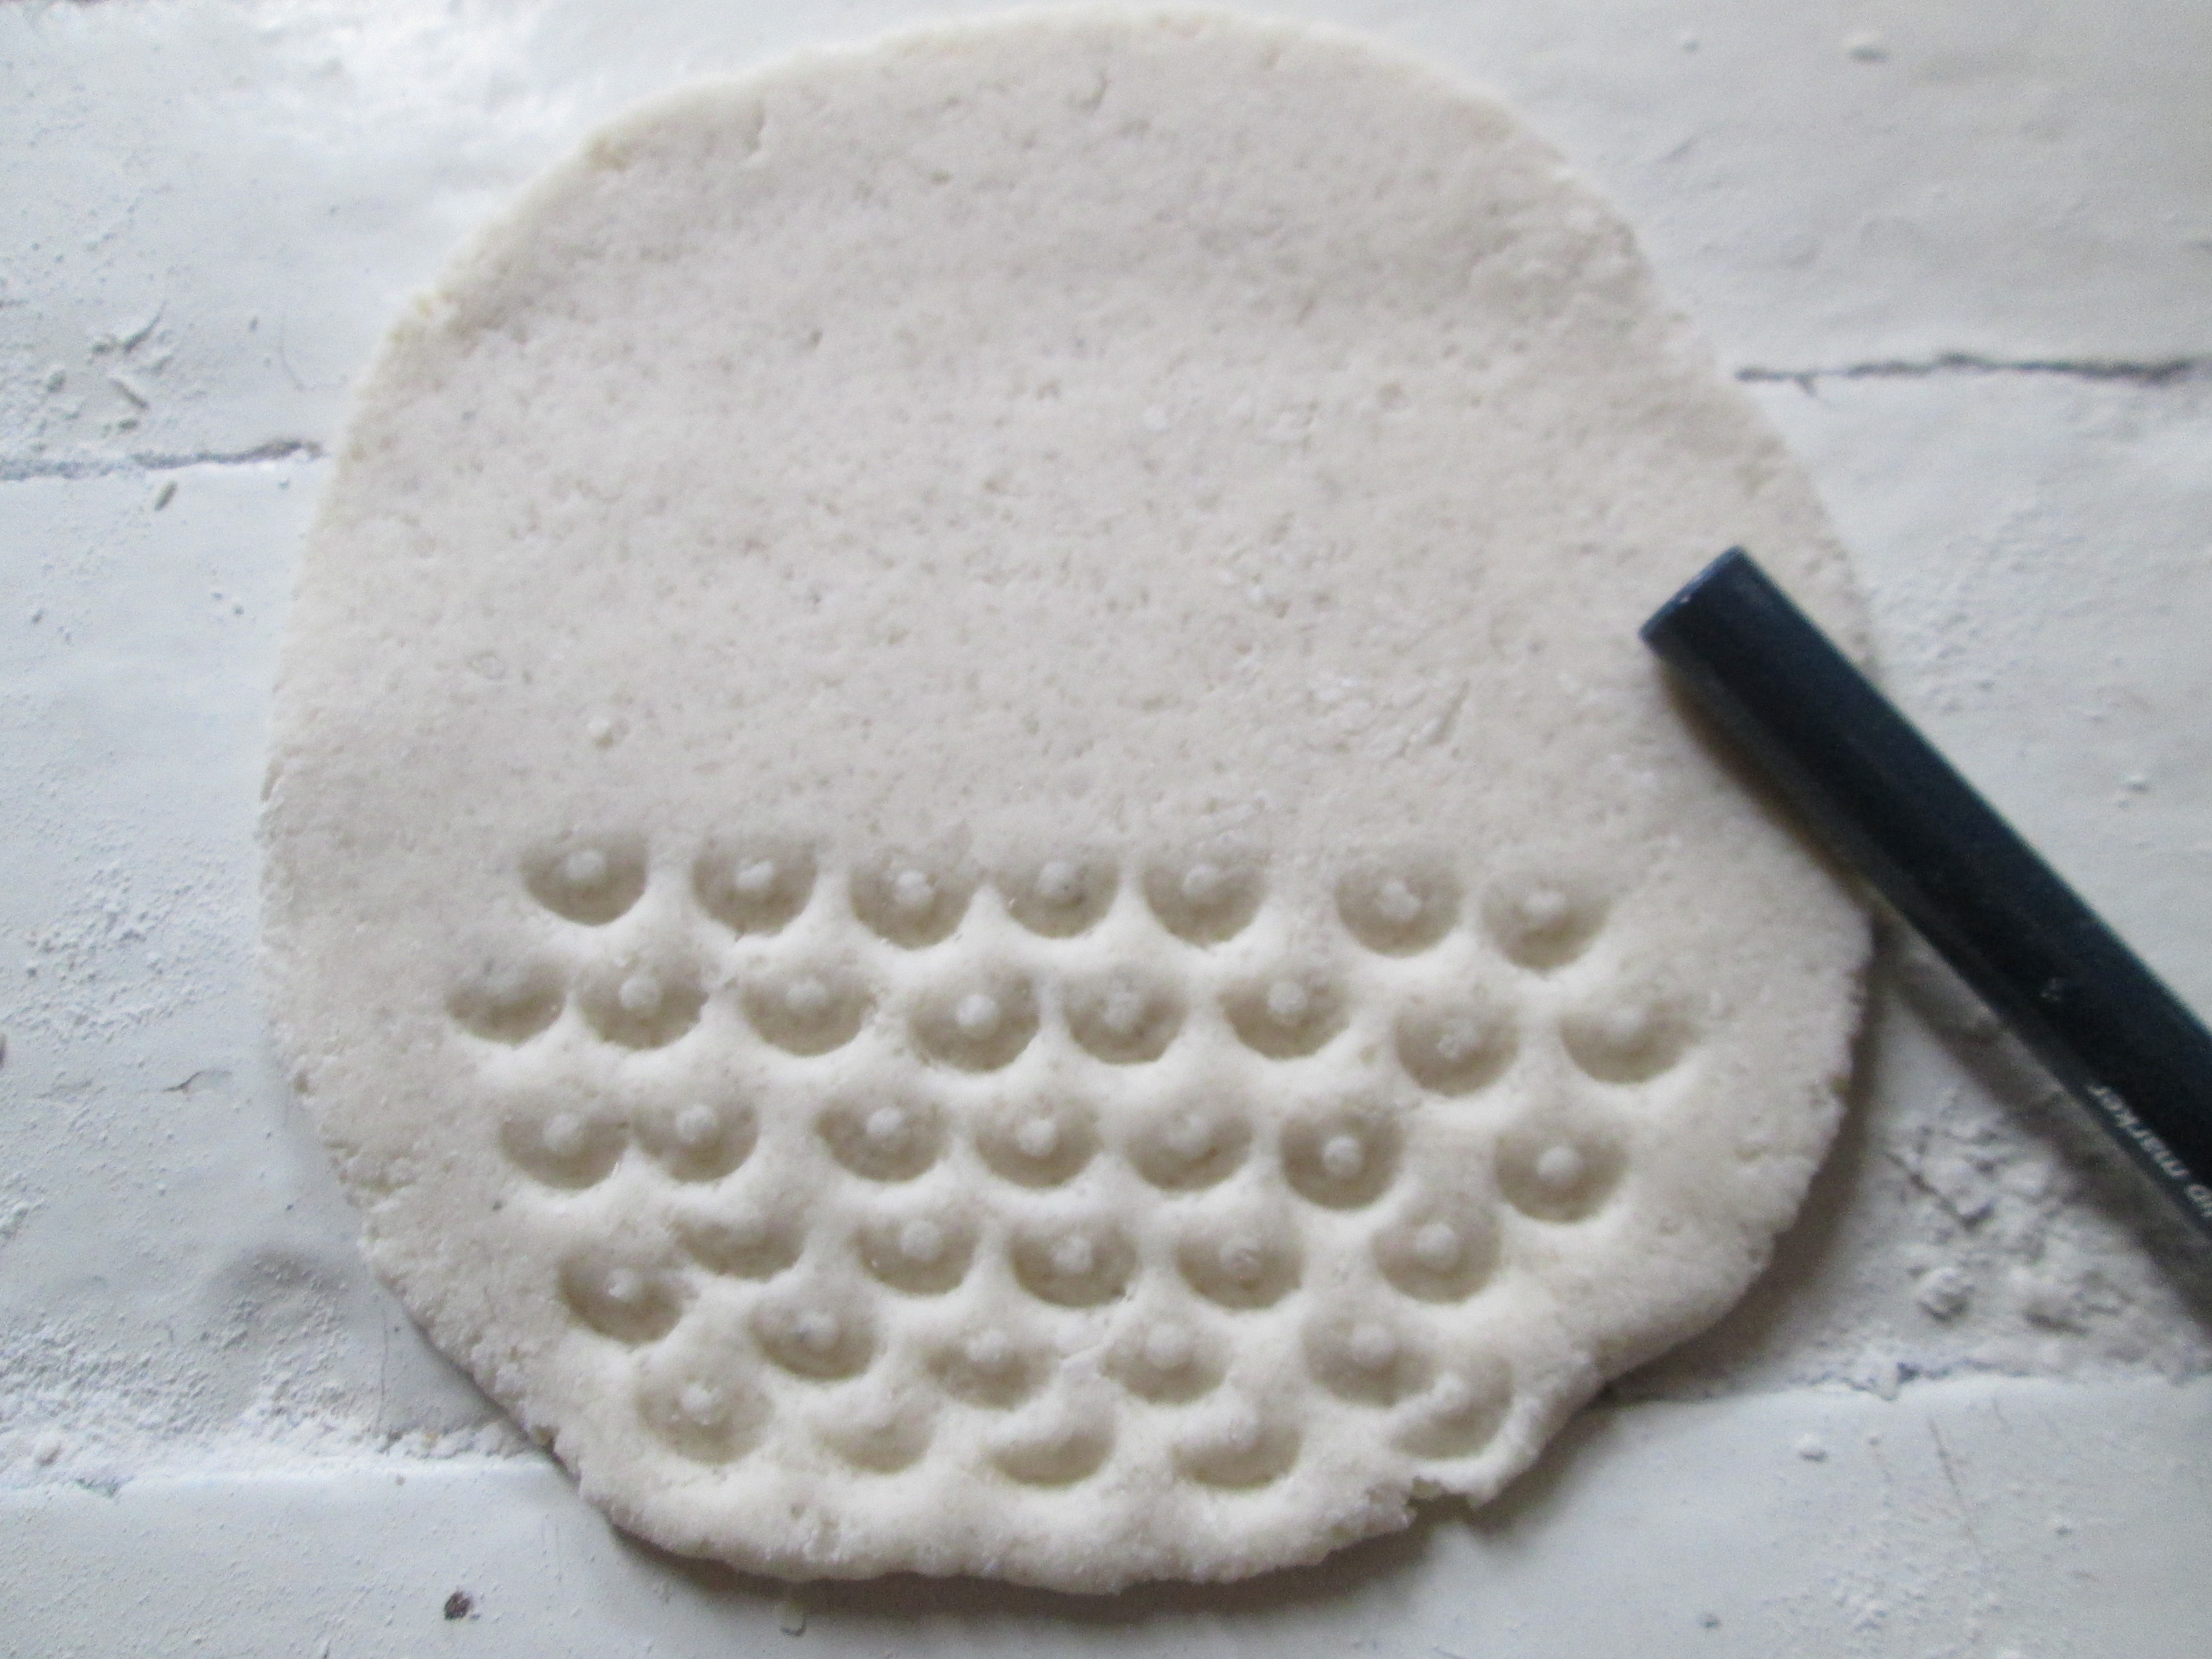
Owl
I press the bottom half of the circle with a pen cap. The result is a feather pattern.
I fold the edges on the sides so that they touch each other.
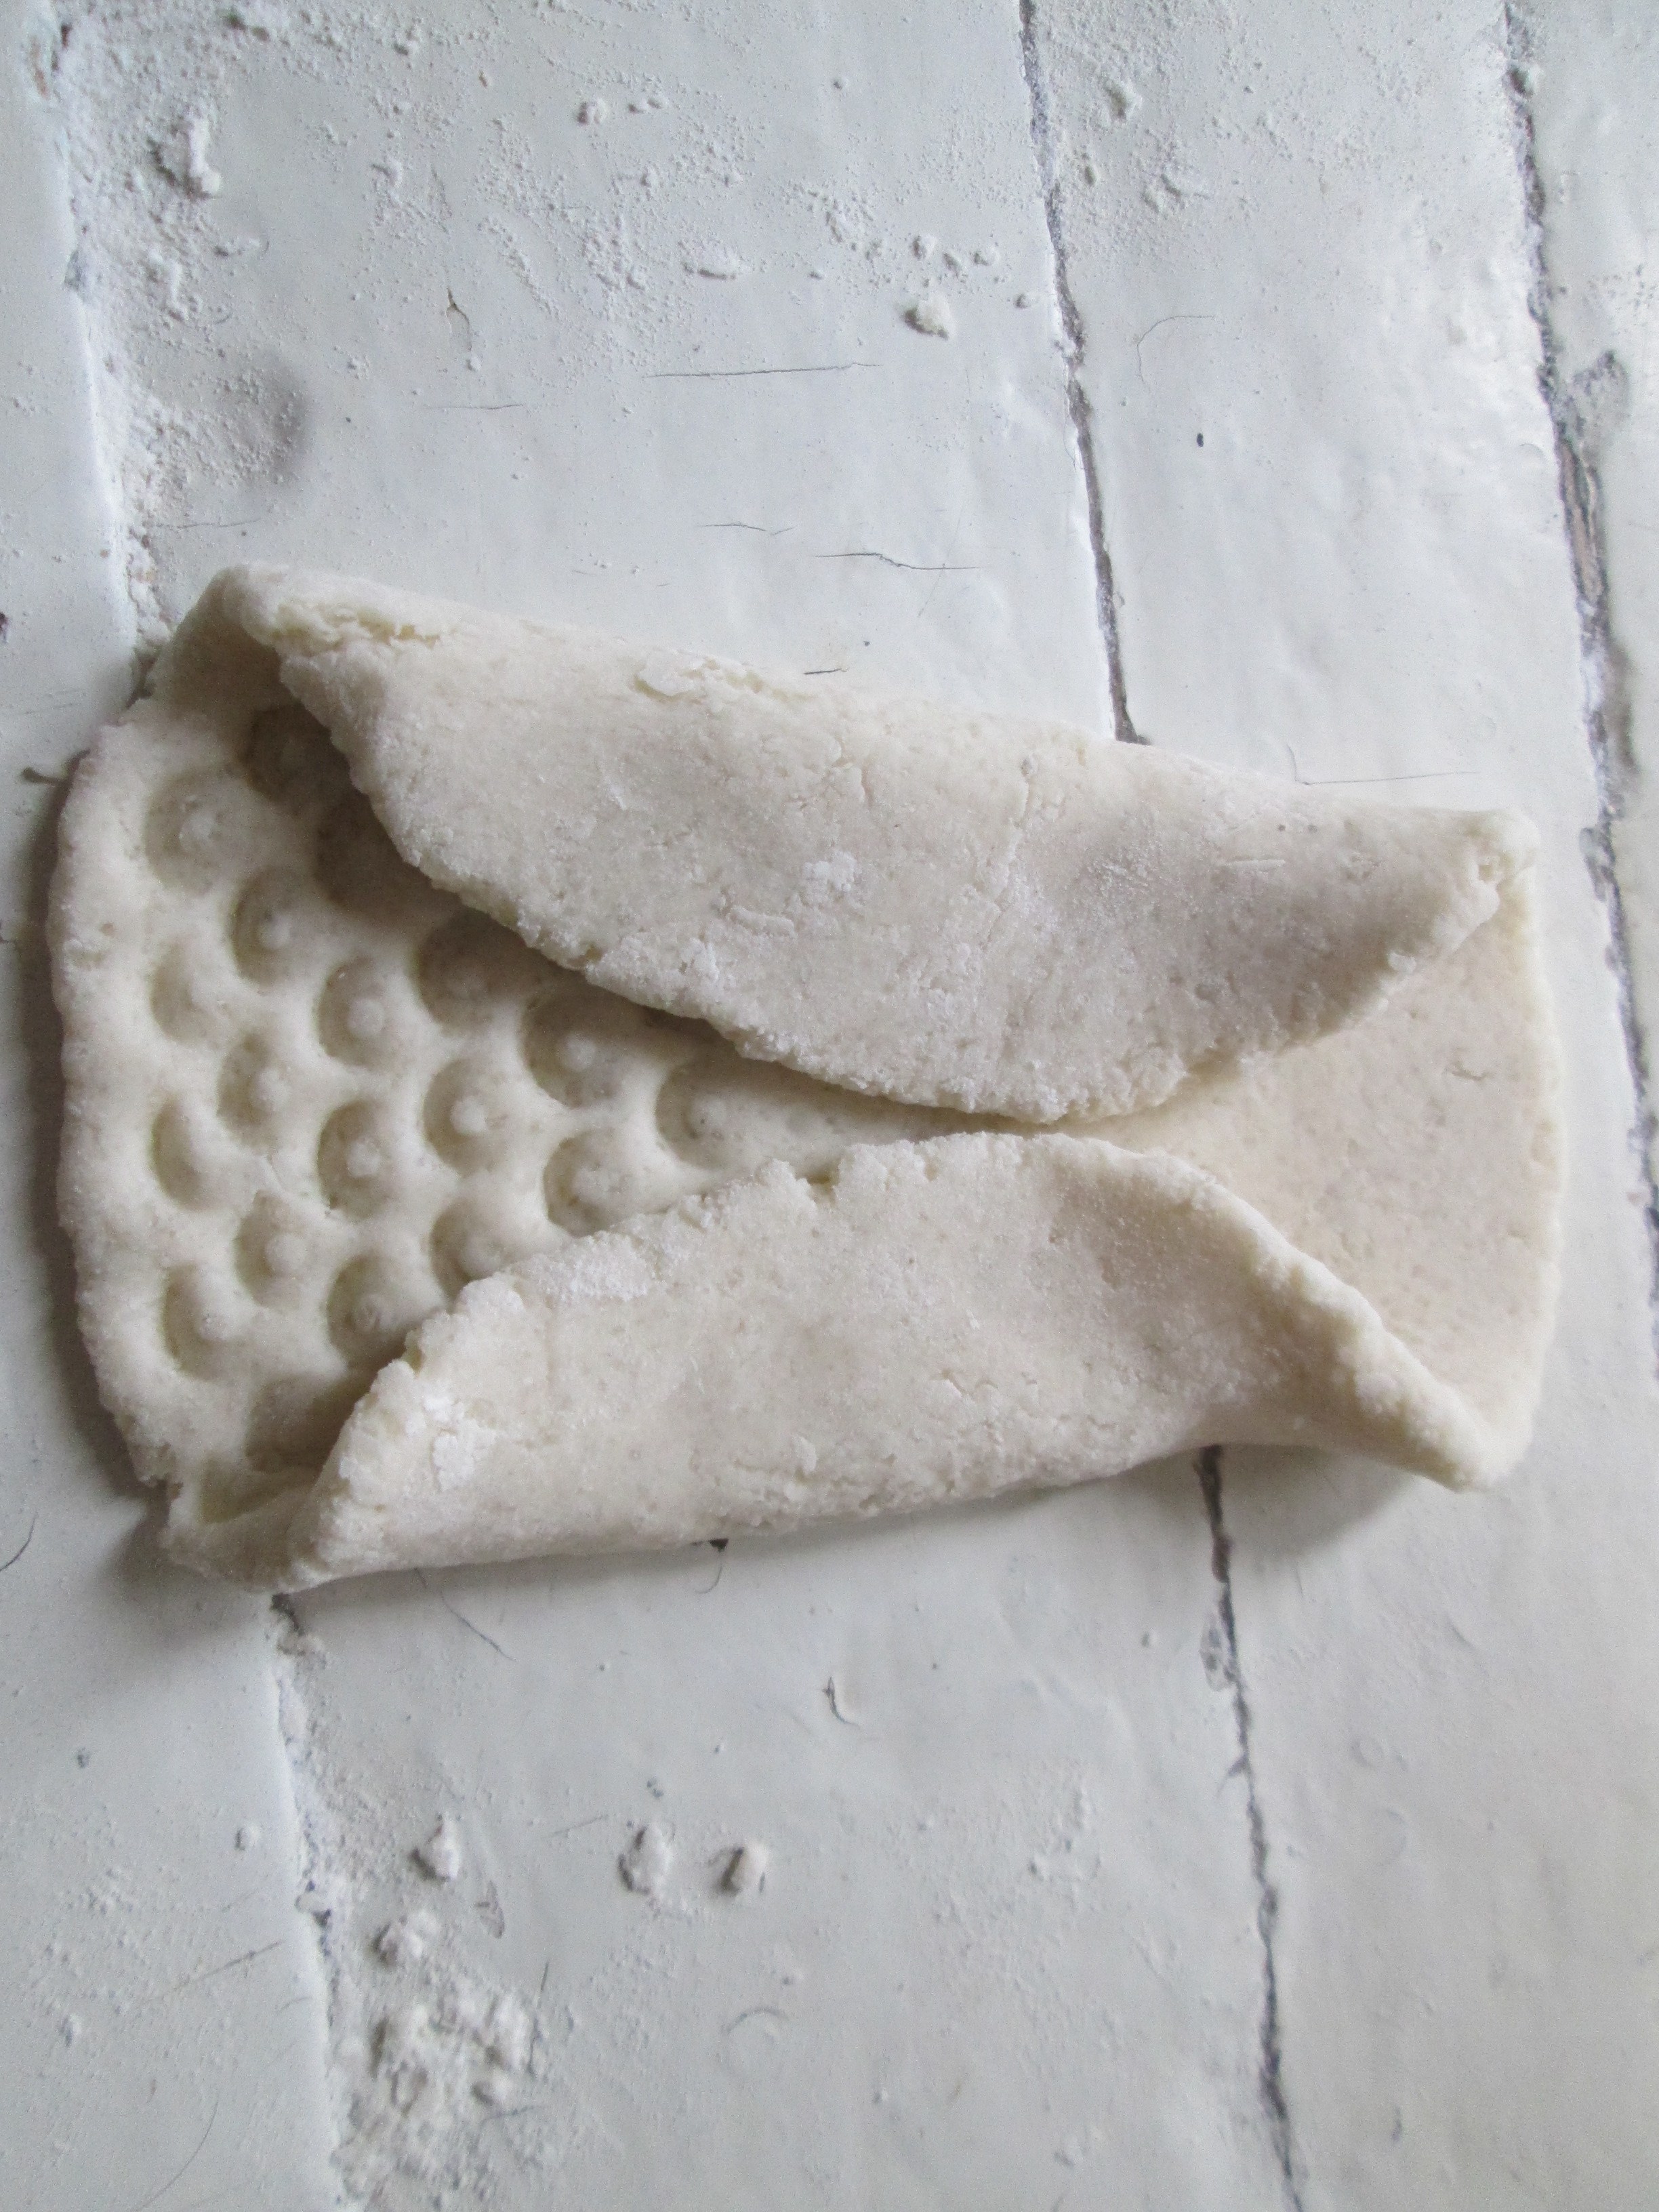
I fold the upper half of the base in half and bend it slightly on top.

I squeeze it out on the top with a cap. Round eyes and draw a beak.
I round the corners at the bottom. I make the “ears” sharper.
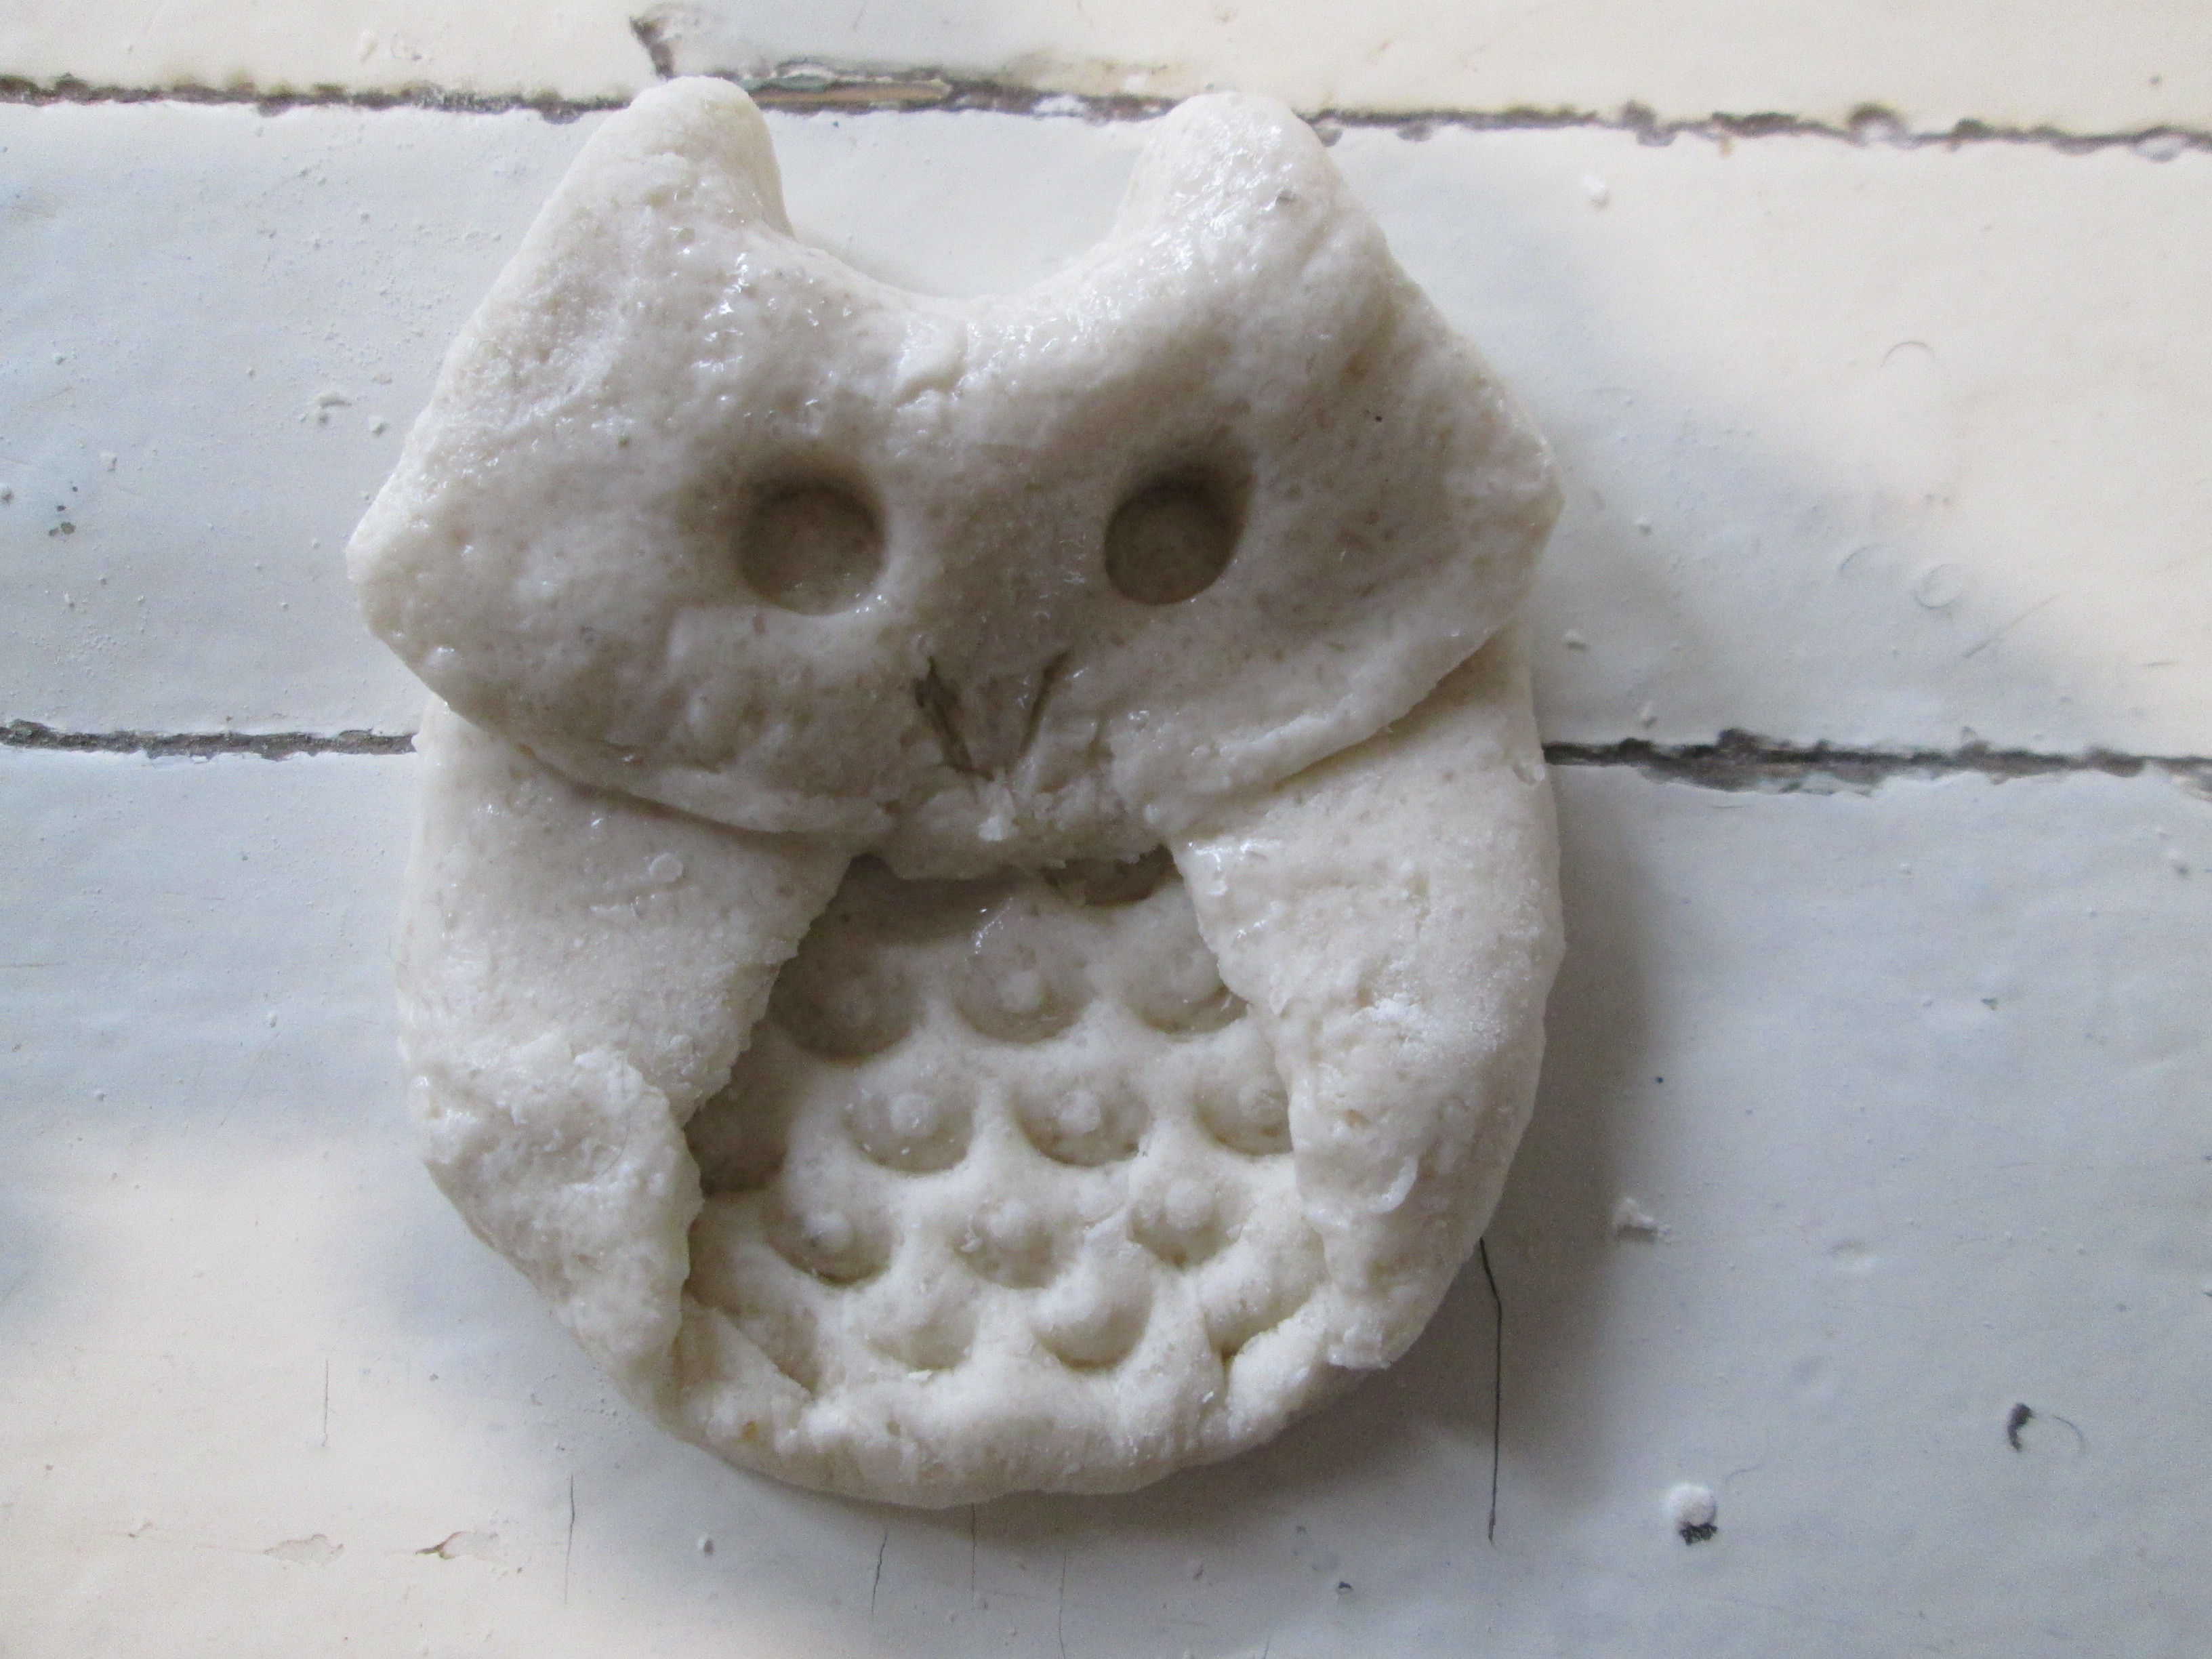
I set it to bake, having previously greased the wings and ears with yolk.

This is the golden Owl after baking for 7 minutes at 180 degrees.

What other owls can you make?

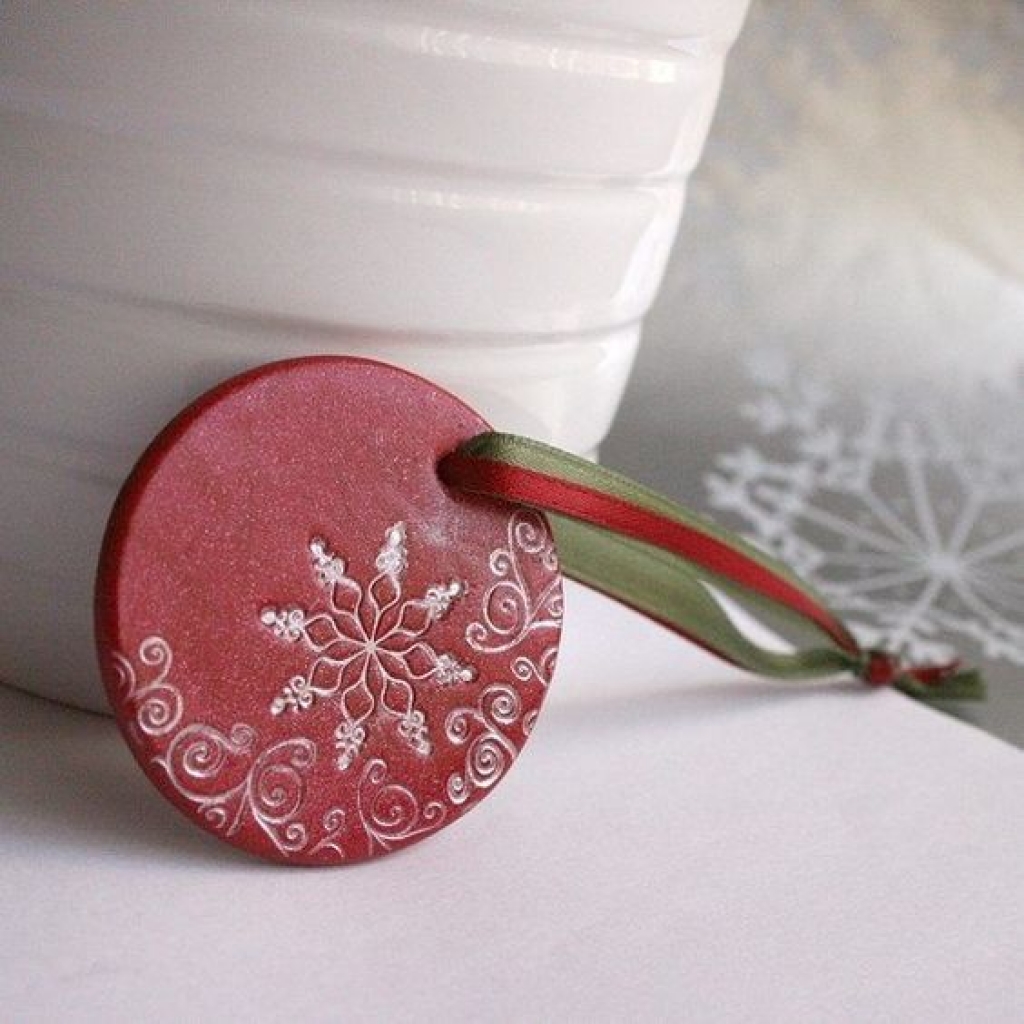
Toy
I pierce the second round blank through the top with a cap. And below I make prints with the same cap.
I set the toy to bake.
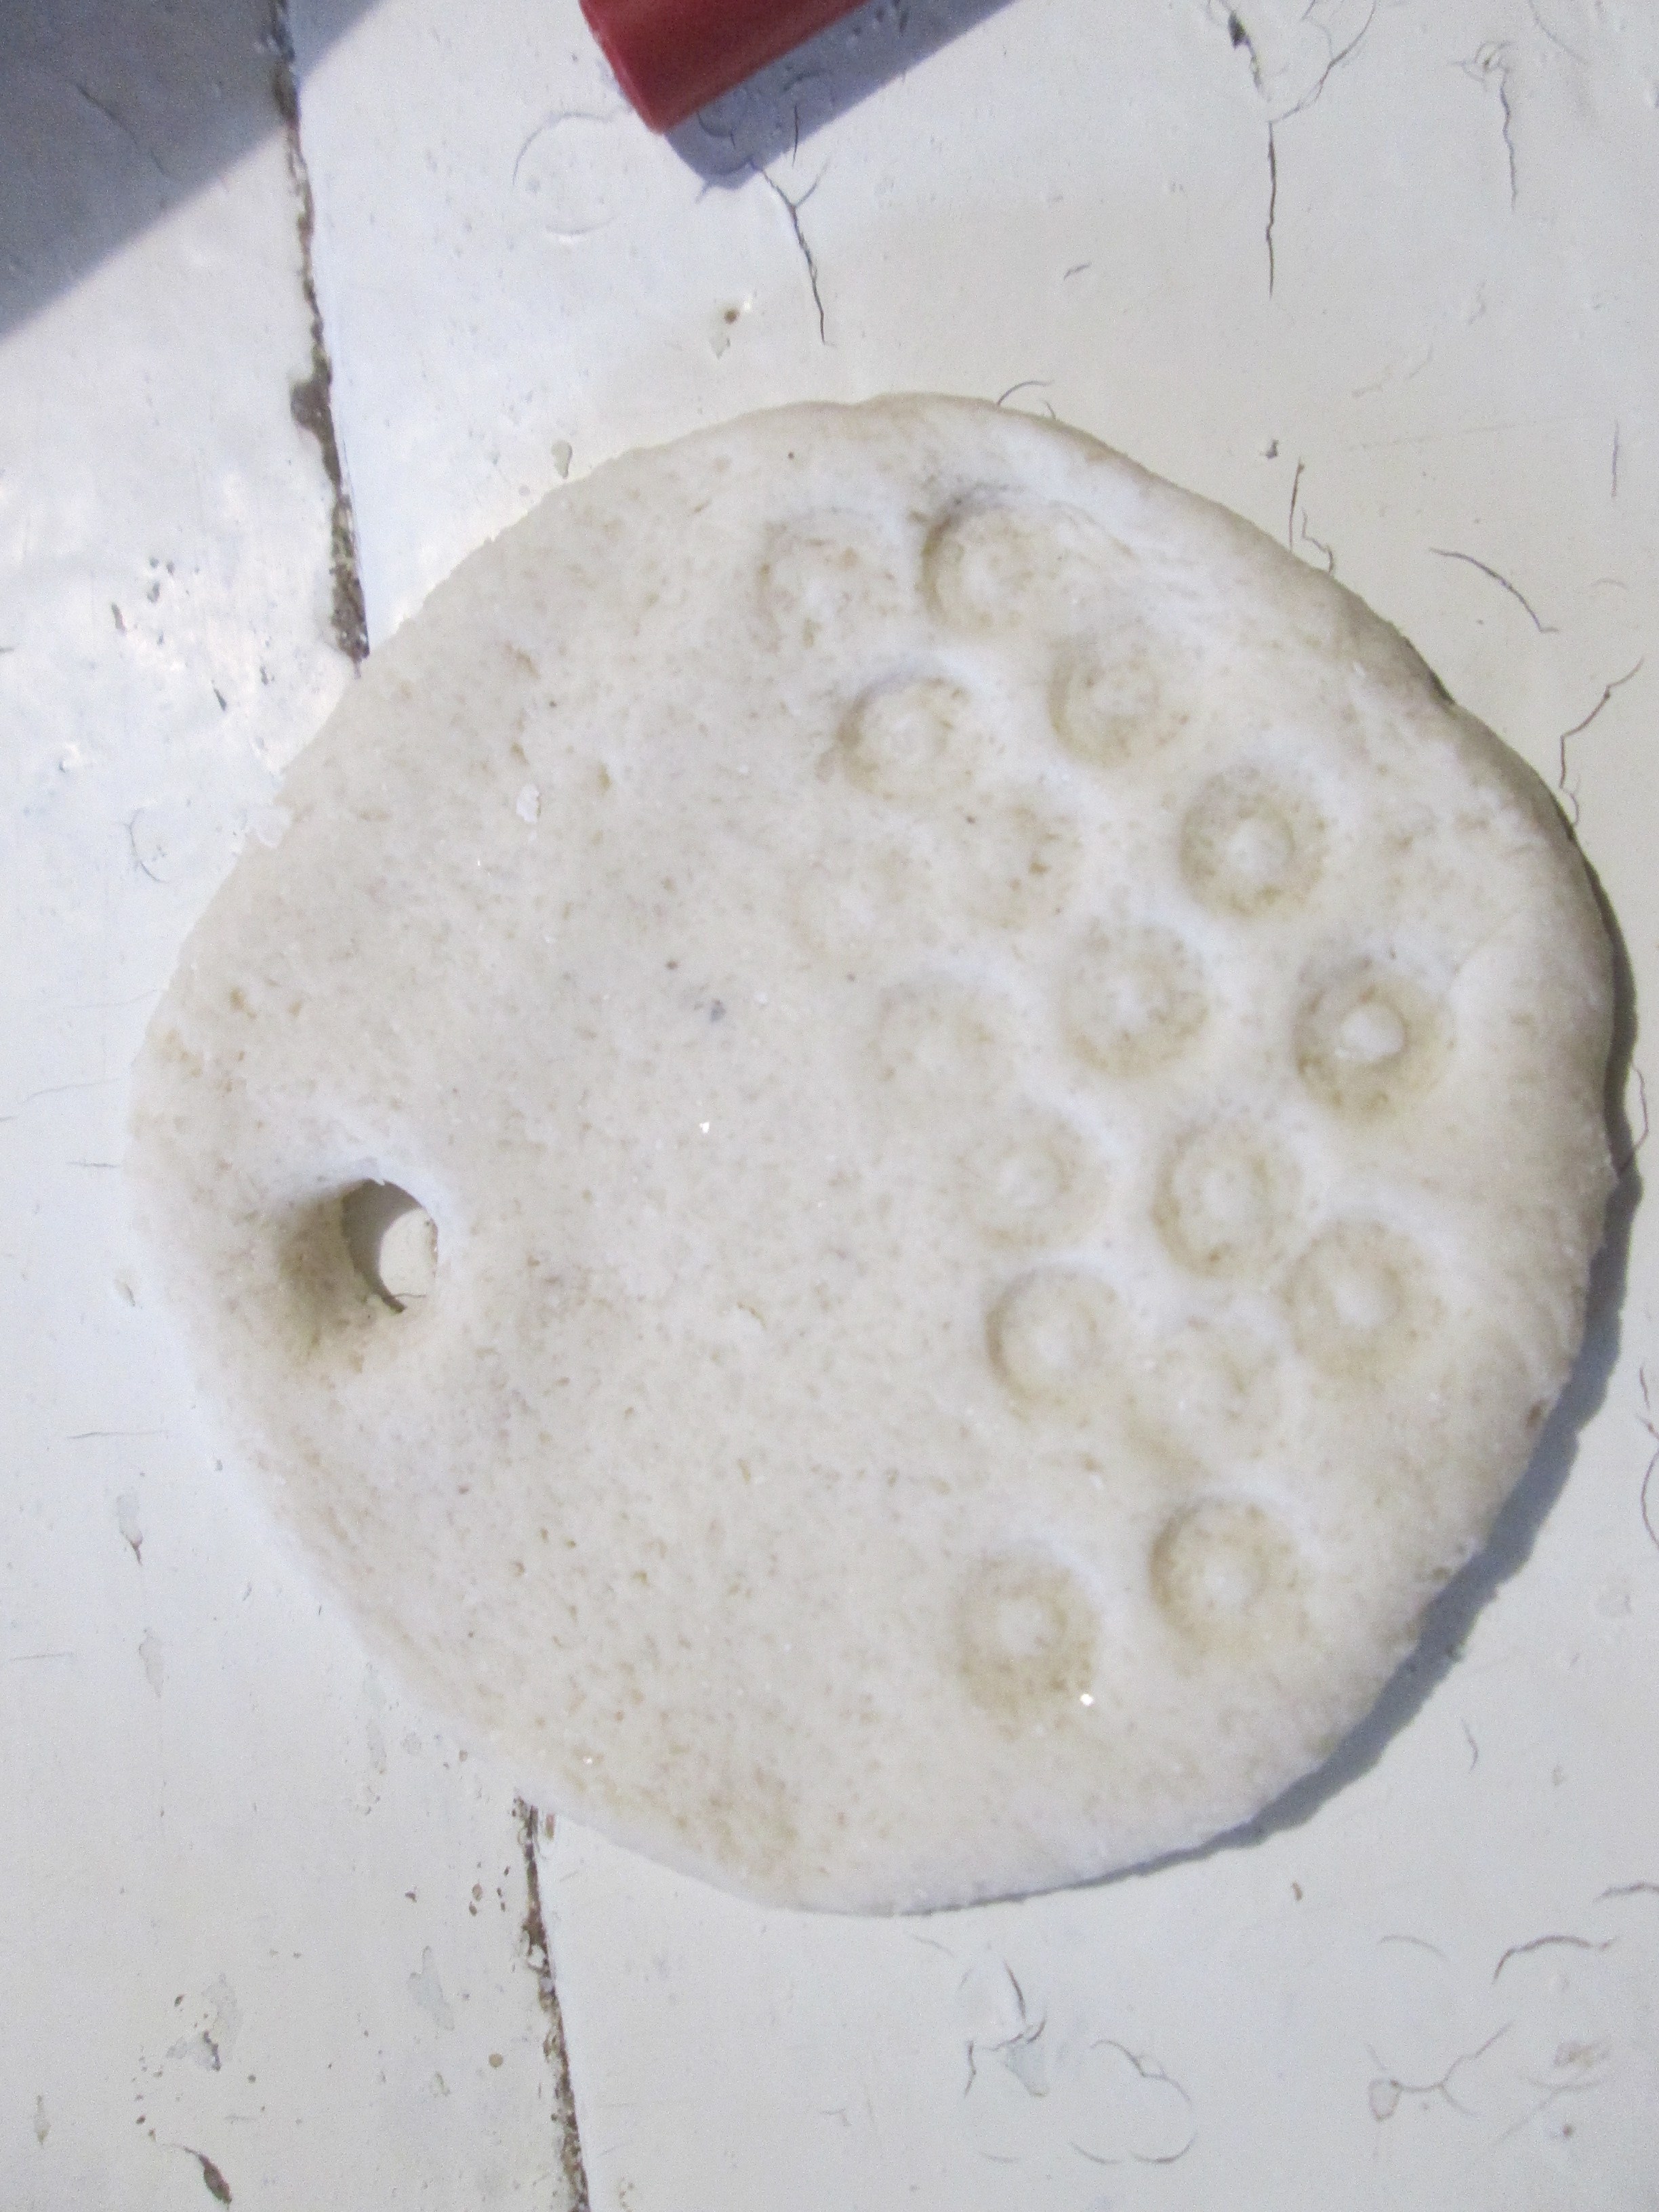
After baking, I apply a little red varnish to all the circles, and draw leaves above them. This is mistletoe. All that remains is to thread the ribbon into the hole and you can decorate the Christmas tree with the toy.

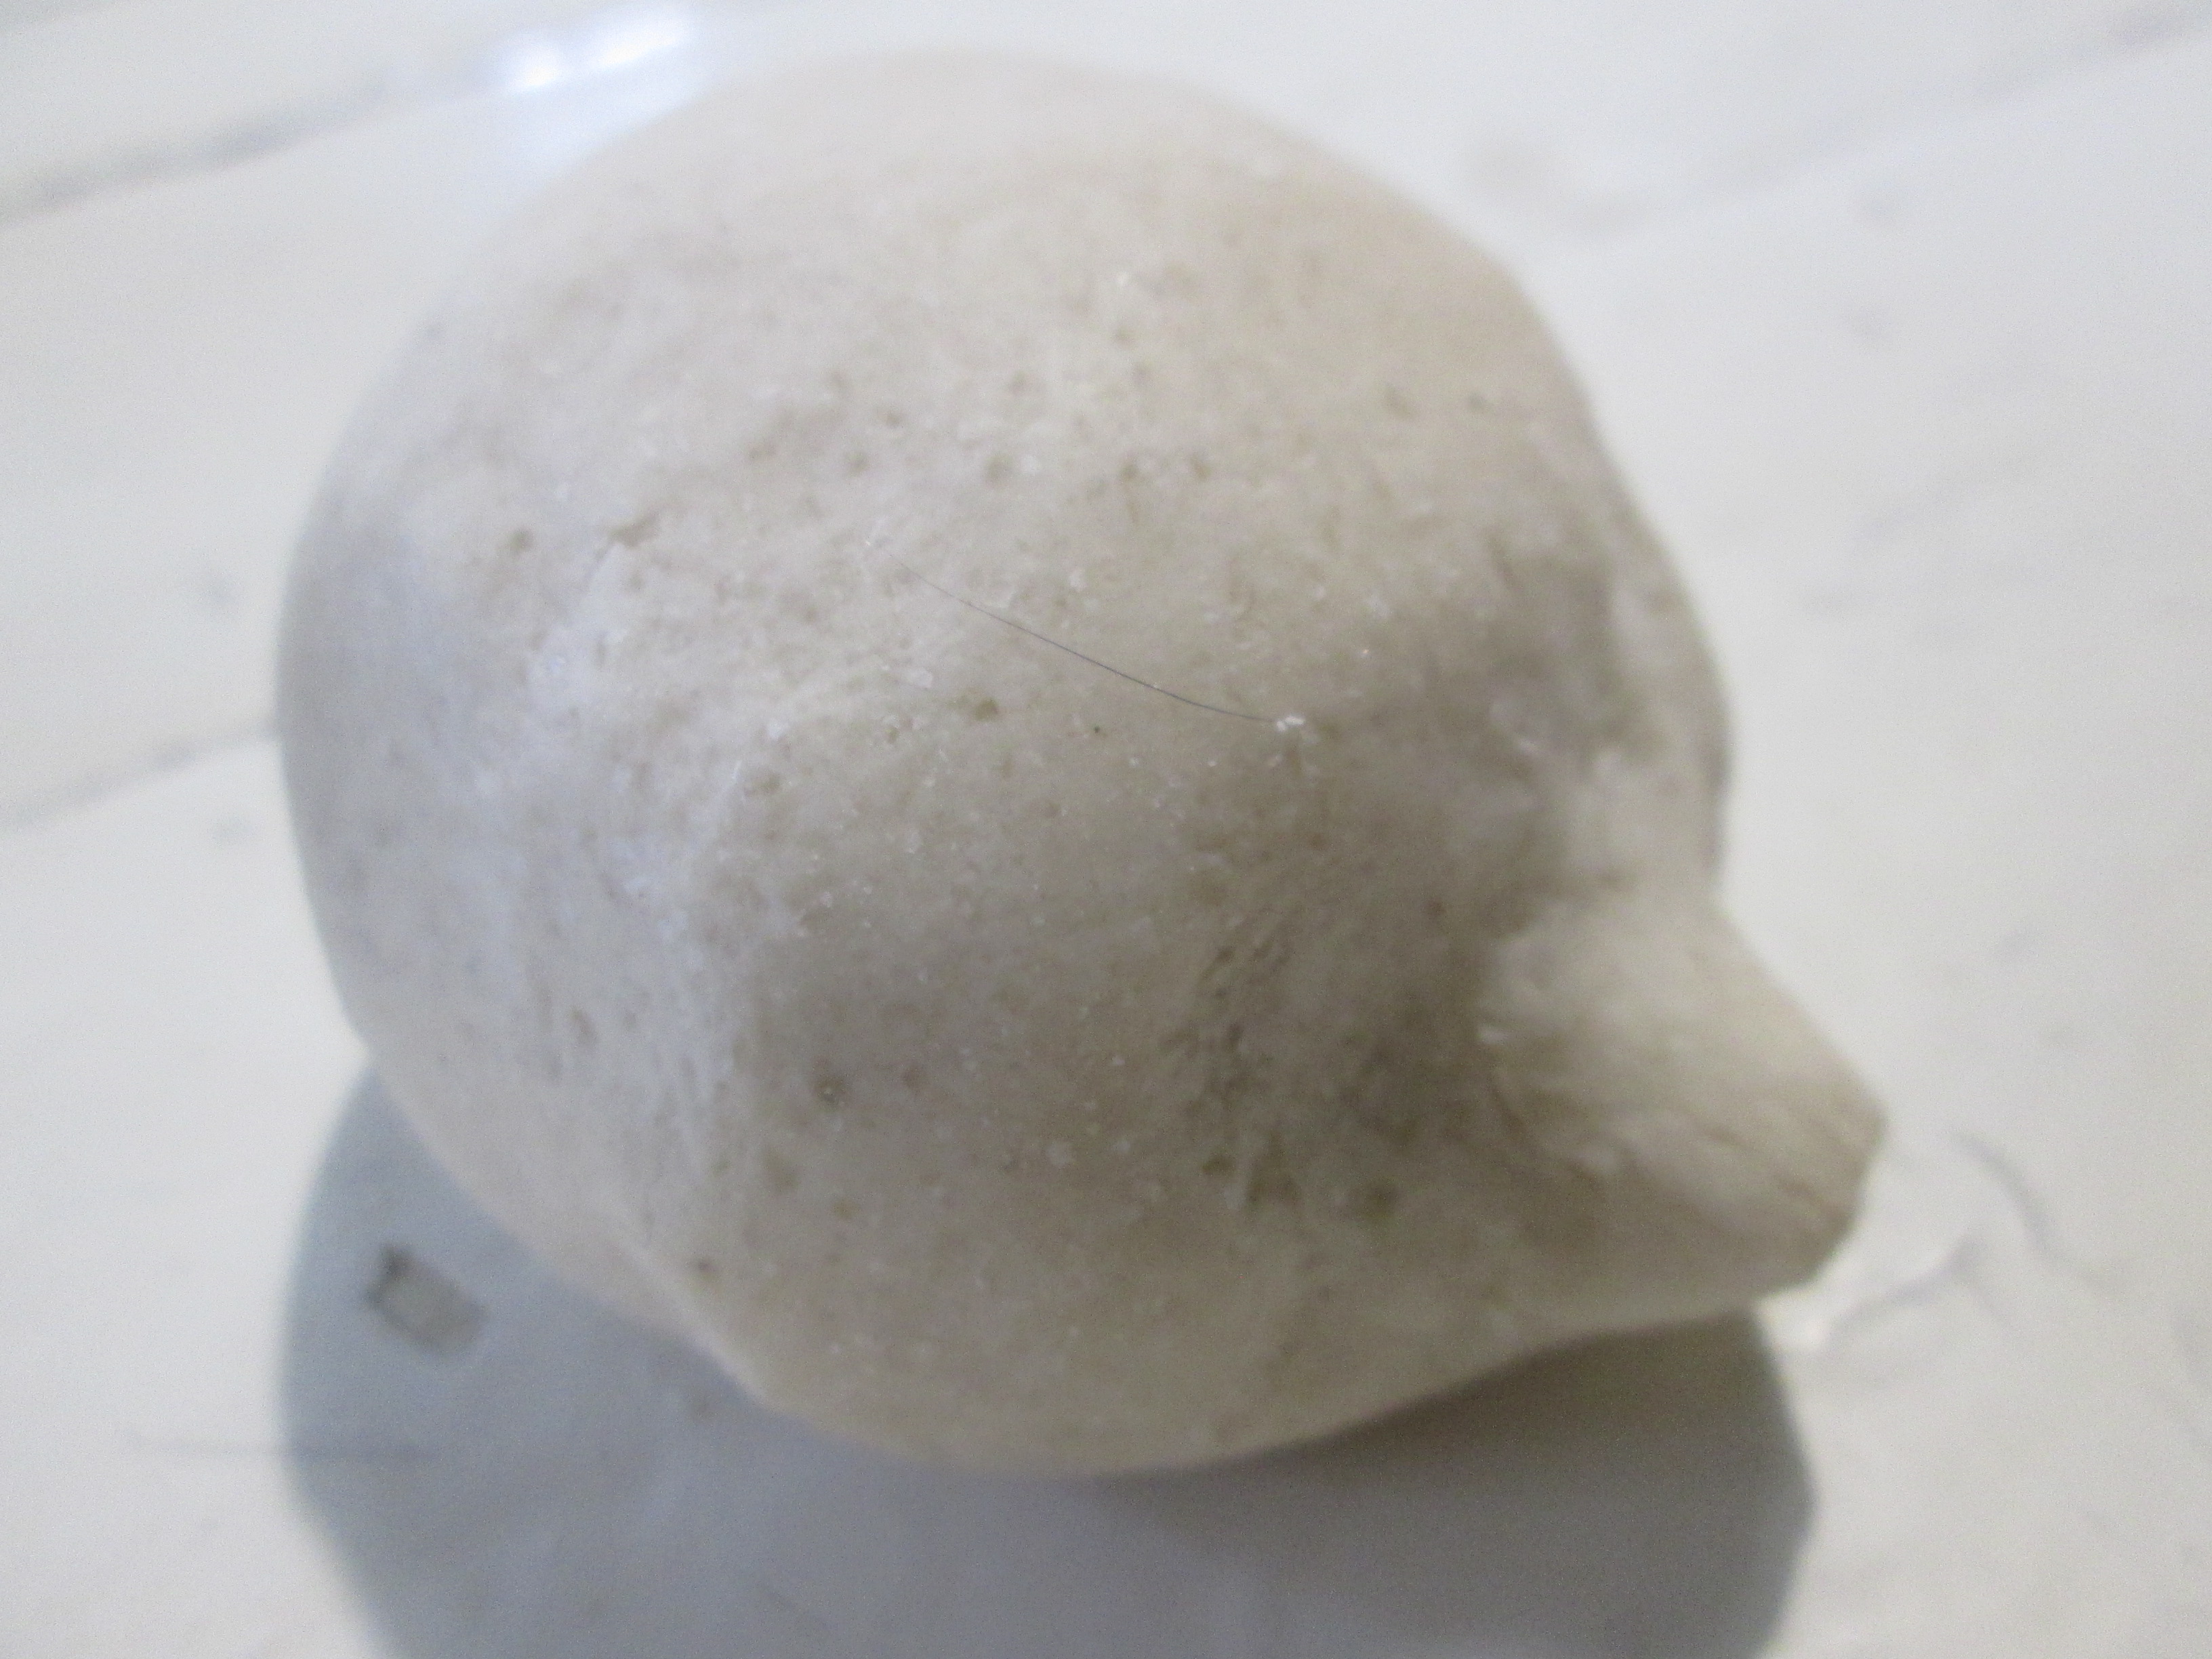
Hedgehog
A small barrel-cylinder is rolled up, in which the nose of the future hedgehog is slightly extended.
“Needles” are cut throughout the body. To do this you will need nail scissors with curved edges.
First, the edges of the scissors are slightly pressed into the dough, then the “needle” is cut.
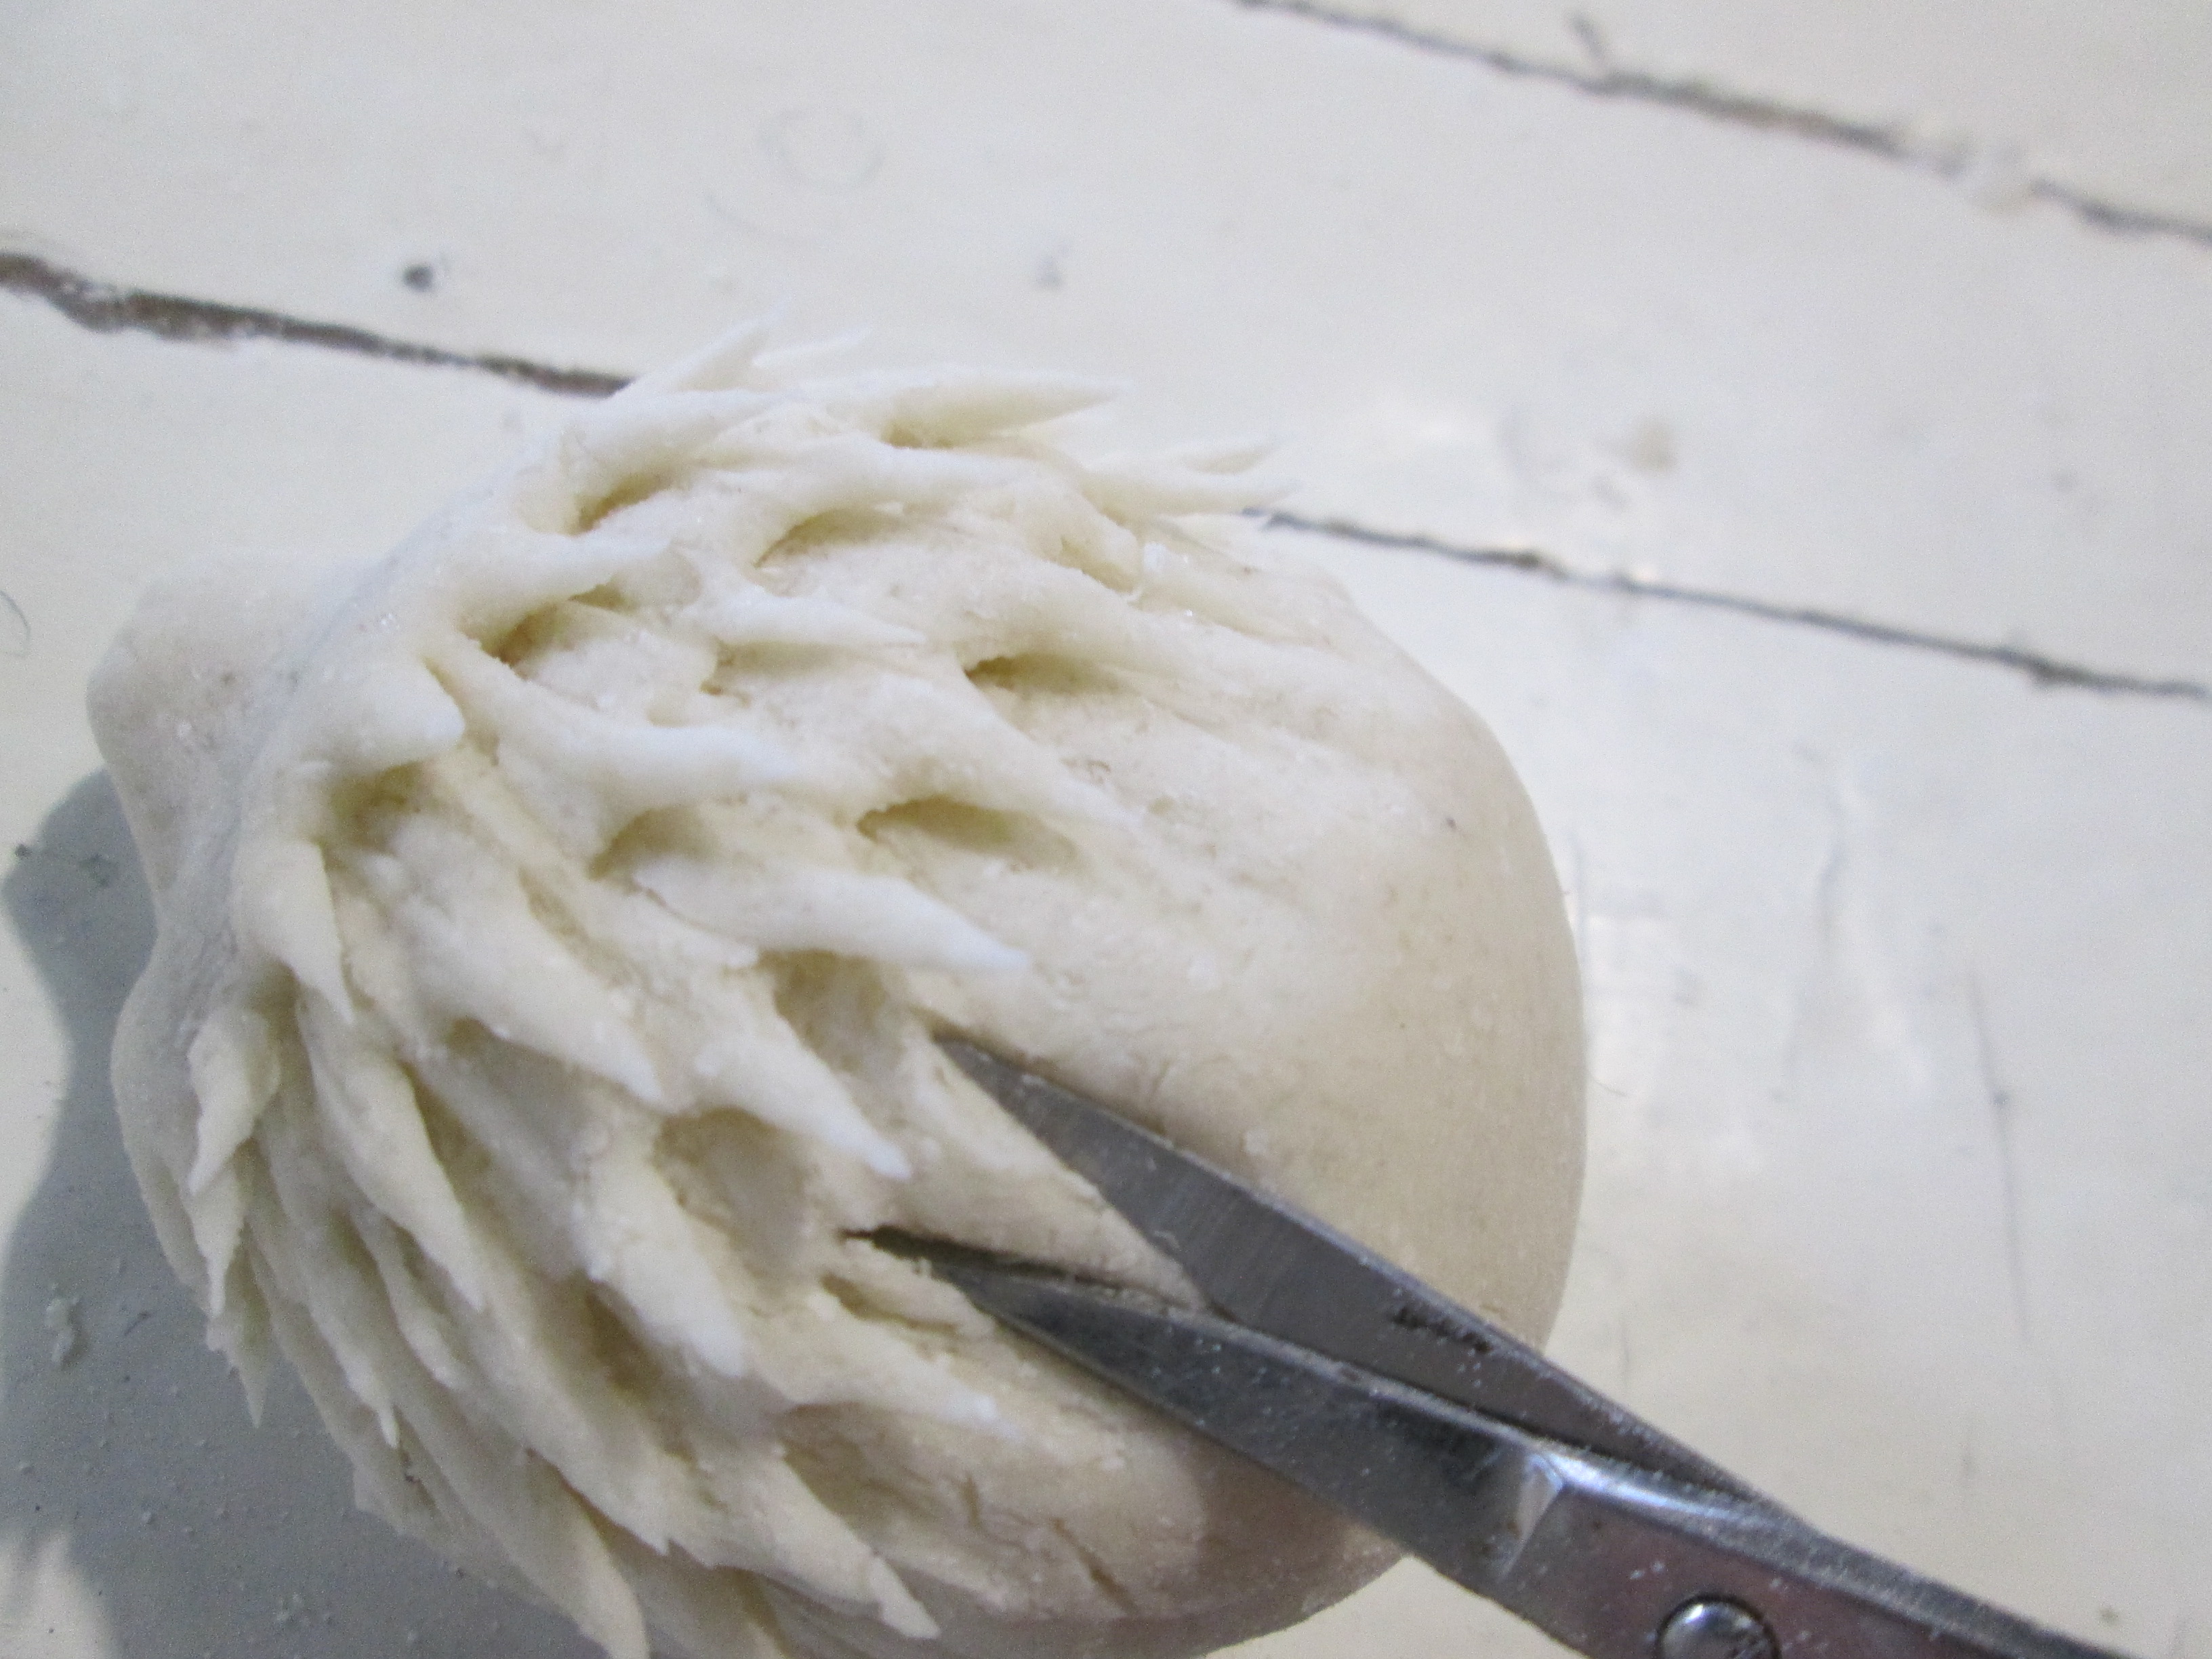
A Christmas tree is made from salt dough using the same principle: its branches are cut with scissors.
Now go over the face and along each edge of the needle with a brush with yolk, and the product can be sent to the oven.
After baking, make a nose and eyes by pressing in a piece of a twig, and the Hedgehog with Golden Needles is ready!

This is how I managed to make 4 toys with my baby!

Vmdeo master classes
Very! I really want you to show off your work! Send the results of your work, share your successes, so that we can be happy for you! That's all for today! I remind you to subscribe and ask, don’t forget to bring your friends: it’s more fun together! All! Bye bye!
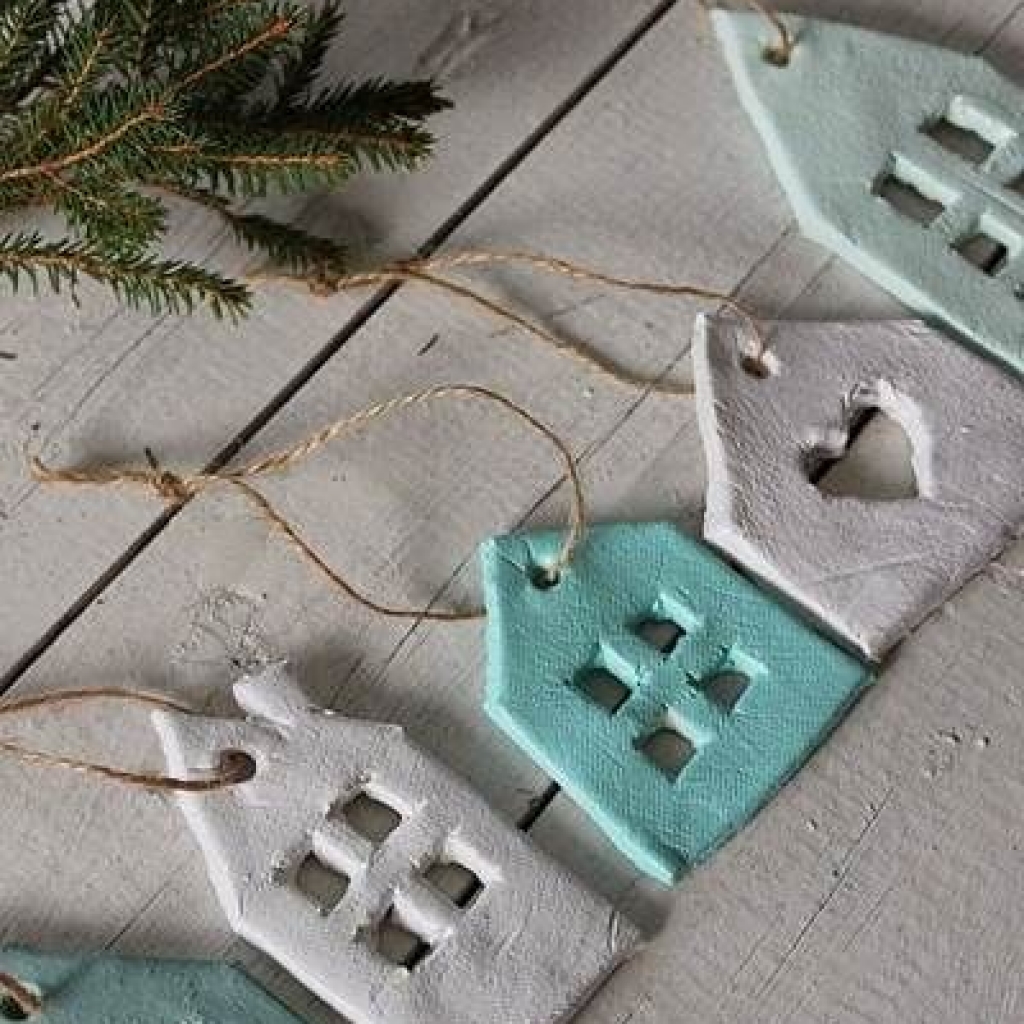
New Year- a wonderful time and the most best time in order to enjoy communication with family and children. Kids love New Year's crafts and homemade Christmas tree decorations. Fiddling with dough is also one of children's favorite pastimes. By combining both, you can decorate the Christmas tree with wonderful unique toys.
In this article:

You will need:
- 1 part fine table salt;
- 1 part white table flour;
- 1/3 part potato starch;
- water for kneading.
All dry ingredients need to be mixed in a bowl and knead the mass, gradually pouring water. The mass should have a pleasant consistency - not stick to your hands, and not be too tight (do not break or crumble).


After the salt dough is ready, decide when you will paint the products. You can paint the mass immediately, or you can paint the toys after baking.


How to dry New Year's crafts?
A few words about drying. To make the dough hard, you can simply wait a few days, or bake it in the oven. You need to preheat the oven to maximum temperature, then place the salted crafts laid out on a baking sheet. Then you need to turn off the oven and do not open it until it has cooled completely. You can bake them over very low heat (like crackers), but then you have to make sure they don’t burn. Another little secret- To prevent the figures from sticking, cover the baking sheet with a baking sleeve.

Of course, not all salt dough crafts can be dried in the oven. For example, those decorated with beads or beads should be dried naturally.
How to paint the finished product?
There are several ways to make products multi-colored. Dry cosmetic pigments and water-soluble food coloring, which are used to make soap, are best suited for this. self made. If they are not available, then you can use Gouache or watercolor paints.

After the salt dough is colored, you need to carefully roll it out with a rolling pin and cut out the desired shapes using molds. Products made from dough of different colors look very interesting (as in the picture). Kids have a lot of fun doing this kind of mixing.

Another way is to make crafts from white dough and then decorate them - there are many ways. Kids will do it with gouache, older children can draw beautiful patterns felt-tip pens or gel pen.


Acrylic paints are a great decoration! If you use silver paint to decorate your crafts, they will look like! Paints with shiny pigments look very good!


Decor ideas
In addition to coloring, there are many ways to decorate future toys. Just do this before you dry them. For example, cut out different holes with a straw.

Or make prints and imprints with stamps or some kind of figures.


Decorate with beads, beads or sparkles!

Dough crafts decorated with cosmetic glitter look very festive! Need something dry ready product Cover with PVA glue and then cover with glitter. You can buy them at any nail fashion store, they cost from 60 to 120 rubles.

New Year's holidays are almost at the doorstep. In this regard, many families began to worry about how to decorate their homes beautifully and unusually, so that the mistress of the coming year, the Yellow Earth Pig, would be amazed with surprise and bestow her favor. Since this animal prefers everything homemade, through which comfort is achieved, most people resort to it in the process of preparing for creativity at home. They create excellent crafts with their own hands from various kinds of available materials, which can later be used to decorate not only the Christmas tree, but the entire room interior. Gifts that include a lot of love, warmth and respect for the person to whom this souvenir is presented are also quite interesting and creative. If you, too, are eager to please your loved ones with similar amenities, then check out our article, in which we will provide you with 17 photo ideas cool crafts DIY salt dough for New Year 2019 ideal forms and variegated colors. Such wonderful tricks will interest not only adults, but also your little children, for whom this activity will be very useful and exciting. And if any difficulties arise in this area, our master classes will come to you at ambulance. Don’t delay your holiday preparations, make the world much more interesting and colorful, richer and kinder today!
Preparing salt dough
Before you start creating holiday crafts for the New Year 2019 from salt dough, you should prepare it yourself. Allow your child to do this, who will receive in this way not only a certain experience, but also great pleasure. Arm yourself necessary products and get to work.
For production you will need:
- 2 cups wheat flour;
- 1 cup “Extra” salt;
- 250 gr. water.
Work process:
- To prepare the dough you need to mix flour and salt.
- Then you need to pour in water. Mix well, gradually adding the remaining amount of flour. Remember, the mass should not be liquid or sticky. By the way, to make the salted dough more elastic and shiny, you should add a little vegetable oil to it during the kneading process.
- Roll the dough into a ball and visually check whether it holds its shape. If yes, it does not spread or crawl on the table, then the material for creativity is ready.
This is how you and your children can easily and simply create with your own hands an excellent pliable material for future creations for the New Year 2019.
Video: recipe for making salt dough for crafts
Salt dough coloring process

Modeling from salt dough is, of course, a fun activity. It’s so nice to make something cool and unusual with your own hands in the form of cool figures for the Christmas tree, magnets for the refrigerator, figurines for beauty and harmony in your home, and so on. However, the further process of coloring them is not convenient for everyone and, let’s say, is within their control, since, if you take into account small children, they do not have the ability to delicately paint over all the details in their crafts, so they need a simpler option with already bright and colorful finished material. And it’s quite easy to make variegated salt dough at home. You can try to decorate it yourself in all the colors of the rainbow, rest assured, you will even like it. For the New Year 2019, such splendor will yield equally attractive creations.
Coloring methods:
- gouache;
- food colorings;
- instant coffee;
- cocoa;
- acrylic paints;
- brilliant green;
- multi-colored ink;
- mascara;
- vegetable or fruit juices;
- sparkles.
Thanks to such a list of diversity, you can achieve excellent results in a fairly short term. But you just need to remember that the dye you choose must have a liquid or paste consistency. If you received the coloring element in the form of tablets or powder, then it is advisable to dilute it a small amount water. All you need is a few drops of this substance, squeezed onto the salt dough for a delicate, faint shade, and if you want to achieve a more rich color, then, naturally, more. After this, you should knead your “building” material properly, adding flour if necessary, and begin the direct creative process. But some craftsmen, after drying decorative items, still resort to re-saturating their crafts using acrylic, watercolor, and oil paints. This finishing touch will add an alluring and perfect gloss to any figurine.
New Year's mosaic made of beads and bugles

If you don’t know what crafts to make from salt dough for the New Year 2019 with your own hands for holiday decor at home, then take advantage of our master class. It is very simple and therefore your children can freely work in this direction on their own, creating beautiful holiday decorations. This activity is perfect for labor lessons at school or the development of children in kindergarten.
To work you will need:
- salty dough;
- plastic covers;
- beads and seed beads;
- gold paint.
Progress:
- To make it beautiful toys on christmas tree, you need to take small caps. Perfect for coffee or other products.
- Then the parts you have chosen need to be decorated with gold paint or you can leave them as they are.
- After this, they need to be filled with salt dough, and a mosaic should be attached on top. If desired, you can use beads, glass beads or other interesting things.
- By attaching a thread to the product, you will get a wonderful DIY craft for the New Year 2019.
To expand your knowledge in the field of New Year's decorations from the above-mentioned material, made with your own hands, we recommend watching our video tutorial. From it you will learn about the existence of some secrets in this work.
Master class: 11 secrets when working with salt dough
New Year's candles

You can create a pleasant magical atmosphere for the New Year 2019 if you have salt dough candles at home. To make this kind of craft, it is important to follow all the work step by step, and the end result is a magnificent decoration made with your own hands quite simply.
To do this you will need:
- salty dough;
- cardboard;
- corrugated paper.
Progress:
- It is necessary to make rings from the salt dough, which should be put on the roll. The latter can be made from ordinary cardboard or use a base from toilet paper.
- Corrugated paper will be needed to create a visible flame that needs to be placed inside the candle. By color you can choose red, yellow or orange paper. If desired, you can place the candle on a cardboard base decorated with salt dough. A handmade craft is ready to decorate home environment for New Year 2019.
Christmas tree decorations made from puff pastry

Before New Year holidays You can organize a great fun activity for children related to puff pastry modeling. This process is very easy to perform and, among other things, brings a lot of pleasure, just like salt dough.
To work you will need:
- puff pastry;
- cookie cutters;
- decorations: beads, beads, rhinestones, etc.
Progress:
- You need to roll out the puff pastry prepared by yourself and form it into figures, which in your own way appearance will remind you of the approaching New Year 2019. And for this, ordinary cookie cutters are used. The resulting crafts can be left in the condition in which they are, but it is best to paint them in different colors. It is recommended to decorate the surface with beads, seed beads or rhinestones. If you prefer plastic beads, you should remember that such products cannot be dried in the oven. You can use various grains. Nowadays, handicraft stores sell a large assortment of accessories, and therefore you can buy absolutely any kind of jewelry.
- Depending on the types of forms, we get wonderful crafts in the shape of hearts, Christmas trees, stars, etc. To create holes in the product, cocktail tubes are used, with which you can make cool patterns with your own hands. Organizing such an activity is perfect for kindergarten. The kids will probably enjoy fiddling with such a pleasant-to-touch material as puff pastry. It is as pliable and soft as salt dough. The point here is diversity, and it’s up to you, dear friends, to choose what you like best.
Don't forget to check out our photo ideas on this topic, and we also have a cool article with many more cool crafts, follow the link and see for yourself.


Christmas tree toys “Hearts” made of puff pastry

For a festive tree for the New Year 2019, it is not necessary to buy toys in the store, because handmade crafts from puff pastry or salted dough will also look great. Moreover, independent creativity is always doubly pleasant. There are no specific instructions required here, it is important to use some recommendations and you will get beautiful decorations.
To do this you will need:
- puff pastry;
- materials for creating prints: hearts or other types of shapes;
- beads;
- ropes or ribbons.
Progress:
- You can create jewelry with your own hands using a method such as a print. To do this, you need to roll out the puff pastry or salt dough and form it into shapes as you wish. You can use baking dishes or any other utensils for this.
- To make a pattern on the surface of the craft, you need to attach shells to it and press a little. The result will be a shell design, but you can use leaves, twigs, etc.
- After this, it is best to decorate them with beads and beads. Painted toys look beautiful. So that they can be hung on the Christmas tree for the New Year 2019, you should make a hole for the rope.
Browse our photo ideas to expand your imagination.


Master class on creating Christmas decorations made from salt dough
New Year's wreath made of salt dough

What could be cooler and more noticeable than a DIY craft made from salt dough for the New Year 2019, made in the form of a wreath. Such a wonderful and quite spectacular decoration can transform not only the doors in your house or apartment, but also, simply, complement and clearly emphasize your New Year's decor generally.
To work you will need:
- salty dough;
- water;
- rolling pin;
- file;
- gouache;
- spray - paint;
- newspapers;
- an oval or round bucket as a base;
- thin tree branches;
- threads;
- a small piece of fabric;
- sponge;
- self-hardening plastic;
- ring for fastening;
- PVA glue;
- heat gun.
Work process:
- To begin with, you should make snowmen from salt dough. They can be the same as in our photo or yours personally, born from your fantasies.
- After this process, it is necessary to dry the resulting products. To do this, you will need to place your creations on a file with a stand and wait a few days for them to strengthen and harden.
- After making sure that your crafts have dried, proceed to their further transformation by painting. To do this, you can use black and brown gouache or something else, more colorful. We take a sponge dipped in paint and carefully treat our product with it.
- Then we wash off the paint with a damp cloth, making it less noticeable, but with a slight tint of brownishness. Then, using other colors, you should bring the decorative coloring to the desired result.
- After this, you need to take a small piece of self-hardening plastic and mold it into a small ball, the size of a cherry pit. Flatten it and attach a metal ring - fastening so that its upper edge slightly peeks out from behind the plastic.
- We take the newspapers you prepared and roll them into thin tubes, the edges of which should be fixed with PVA glue.
- Then we take out a bucket, which we will use as a base for making a wreath. Turn it upside down and wrap the resulting newspaper tubes, connecting them together glue gun. You should end up with an oval or a circle, it all depends on the shape of the container you choose.
- Pre-soak selected tree branches, preferably birch, in boiling water. This way they will become elastic and obedient. Then, after drying them, you should carefully wrap them around a newspaper base (circle or oval) and attach them using threads. The wreath should look lush and not glow through.
- When the DIY craft for the New Year 2019 is almost ready, it will need to be spray-coated with white and then silver paint.
- Decoration should be done using dried orange slices, berries, bows, satin ribbons, rhinestones, beads and other assortment. But most importantly, don’t forget to attach the snowmen you made earlier from salt dough.
Conclusion
Made with the child. Colored and shiny, a little uneven and this makes them even more touching and memorable.
On New Year's Eve, every adult, not to mention children, awakens the desire to create cute little things that bring a feeling of comfort and warmth to the house... And although the stores are overflowing with factory-made toys and New Year's accessories, I want to make something of my own, unique, inimitable.
Elegant toys for the New Year's green beauty can be made from paper, fabric, and thread. Or you can use salt dough - another interesting and quite affordable material. How to do it for the New Year? This is what we will talk about now.
How to make salt dough?
First, you need to prepare the right salt dough. To do this, prepare one measure of fine salt and two measures of flour in advance. Dissolve the salt in warm or hot water, and when it cools, gradually add the salt solution to the flour, stirring constantly. You can add a little sunflower oil to the dough - it will make the mass more elastic and less sticky. However, it is more difficult to mold something from dough with added butter, since its pieces do not adhere well to each other. This option is good for simple single-layer crafts.
The dough should be quite stiff and hold its shape. Let it sit for the gluten to dissolve and get to work. Christmas tree decorations made from salt dough can be easily made using cookie cutters.
DIY New Year's crafts
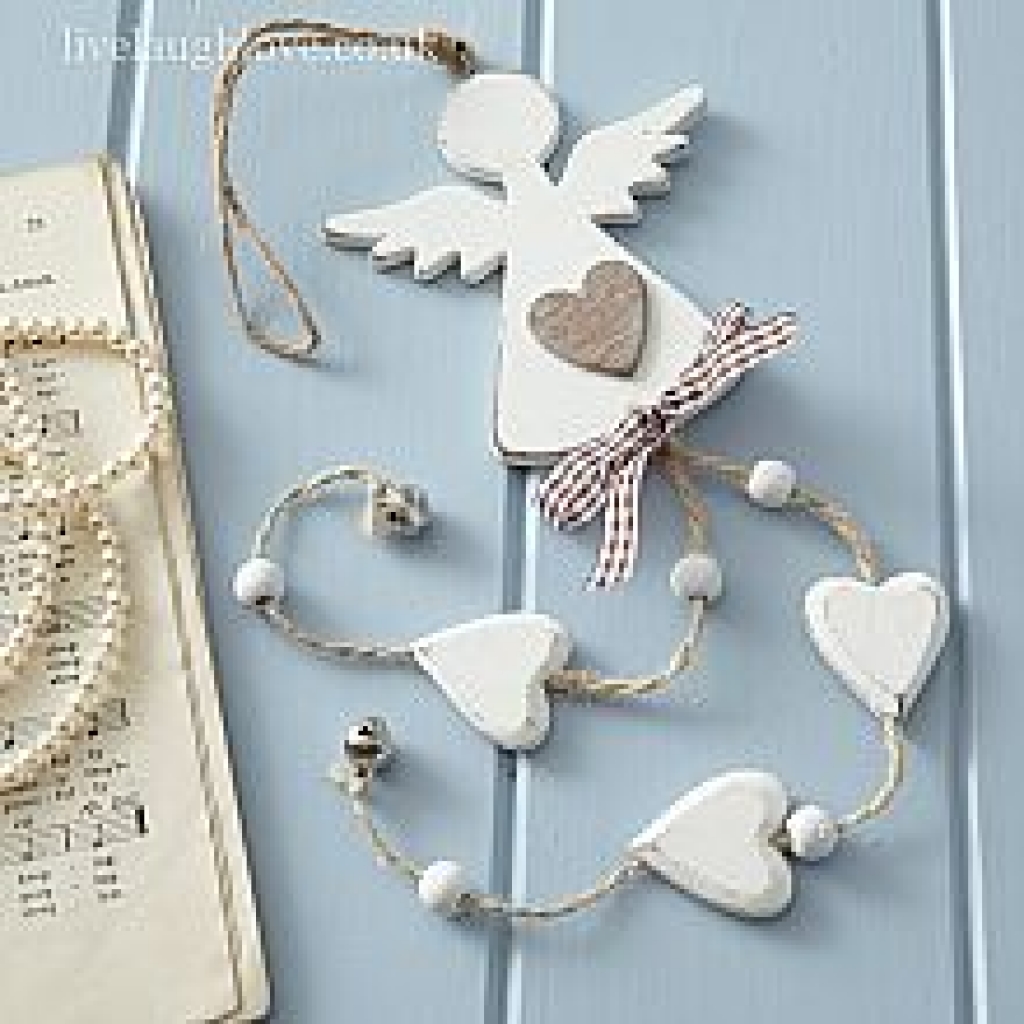
Figures made in this way are very reminiscent of traditional gingerbread and create a homely feeling. You can make cute hearts, Christmas trees and stars: just roll out the dough into a thin (about 1 cm) sheet and invite your child to make figures out of it.

If you don’t have ready-made molds, you can cut them out of tin drink cans, bending them inside the edges so that the baby doesn’t get hurt. Even simple round pendants, which can be made using a glass, a small glass or a small jar, will look beautiful. Don't forget to make a hole for a loop in each figure.


Place the cut out figures on a mesh and let them dry thoroughly; If drying on a dense, flat surface, periodically turn the crafts over. You can use the oven, carefully drying the workpieces at low temperature.

We paint the dried figures with bright colors and cover them with sparkles.

The top of the crafts can be covered clear varnish- this will give them a beautiful gloss.

Thread a ribbon or thick thread - and the decoration is ready.

Christmas tree made of salt dough.

Salt dough heart.

Can be colored Christmas decorations from dough with paints.


The imprint of a child's hand makes a charming Santa Claus. The craft is done using the same technique. Let the craft dry well.

Apply a layer of white paint.

We paint the craft and cover it with varnish. Santa Claus is ready!

You can make wonderful things out of salt dough Christmas decoration"pig with wings"

Do-it-yourself New Year's crafts from salt dough made in this way will become especially dear to children, and the children will be happy to join in the process of decorating the main symbol of the New Year.
DIY New Year's crafts made from salt dough (video)
Christmas tree decorations made from salt dough (sweet and pink):
Alexandra Veselova
Master Class"New Year's toys made from salt dough"
Veselova Alexandra Vladimirovna
New Year is a magical time for our children. And preparing for this magic is interesting and exciting. All the kids love it New Year's crafts made with your own hands. Fiddle with test- also one of the children’s favorite activities. By combining both, you can decorate the Christmas tree with wonderful unique toys.

Progress.
For we need some dough: 2 cups flour, 1 cup fine table salt and a little water.
Mix dry ingredients and gradually add water. The mass should have a pleasant consistency - not stick to your hands, and not be too tight (do not break or crumble).


Ready dough Place it on a flat surface and roll it out.

Using cutters or stacks, cut out the shapes of the intended shape.


We decorate crafts with beads and glass beads. We lay out beads on the watch mold in accordance with the location of the numbers on the dial and the hands. We decorate the Christmas tree by sprinkling it with beads and pressing them a little into dough. We lay out any bead pattern on the bell mold.


Attach a ball from the center of the dial dough, flattening it a little.

Christmas tree blanks toys dry at room temperature for 24 hours, turning them over periodically.
Ready, already dried salt dough toys paint with paints.


And you can admire original crafts and homemade Christmas tree decorations toys.

Fantasize make crafts and make children happy!
Publications on the topic:
Making a loaf of salt dough for children. I needed: 4 cups of flour, 2 cups of coarse salt, 2 cups of water. Mix flour.
Master class for young teachers “Salt dough modeling as a means of developing creativity in preschool children” Master class for young teachers. Topic: “Salt dough modeling as a means of developing creativity in preschool children” Organizers: senior.
2016 is the anniversary year and the kids and I decided to make magnets on a “Space” theme. We needed: 1. Salty dough. There are a lot of recipes.
Materials:1. Fine salt 2. Flour 3. Water 4. Acrylic paints 5. Twine 6. Thermal gun Salt dough recipe: You will need: 2 cups.
Dear colleagues, today I offer you a master class on salt dough “Cat and Fish”. For this we will need: to make the dough:.
Making crafts from salt dough is very exciting activity, which is liked not only by adults, but also by children. Such products can become...


