The idea of making a bouquet of paper flowers is very good. To make paper crafts, we will need to purchase colored paper, cardboard, markers, a stationery knife, tape, scissors and PVA glue.
Paper bouquet
First you need to make three blanks for each flower, two of which should be the same color, they should have six petals.

Place one blank in front of you and glue a circle on top of it.

On the mug, first make holes for the eyes and mouth in the form of a smiley face.

After gluing the mug with the flower, you need to color the eyes with a black felt-tip pen, and then bend the petals inward.

The next step is to cut out the stem, which we then attach to the flower, and on the other side of the flower we need to attach the same blank.
You can also make leaves for the bouquet, which can be made from green paper.

First you need to draw an oval and cut it out, and then use scissors to make notches.

In order for individual pieces of paper crafts to become a single whole, tie the flowers with ribbon or some other fabric to decorate the bouquet.

This bouquet will never fade and will be an excellent decoration for your home.

Simple crafts from plastic bottles
The simplest crafts for children include bottle crafts.

For example, from a bottle you can make a piggy bank, which requires only a marker, a stationery knife, dice (4 pieces), a small bottle, glue and colored paper.

The first step is to cut a straight line, the width of which can be 5 centimeters, and the length of this line should be enough to encircle the bottle.


We draw eyes with a marker, and draw nostrils on the bottle cap. Using a utility knife, cut a hole for coins.

As legs for the pig, you need to attach the dice using glue.
Note!


This craft develops a child’s imagination and is also useful in everyday life.
Ball of thread
The craft can be used as a lampshade for a lamp or simply hung as a decoration.

A ball of thread is made very simply; to make it you will need colored threads, a ball, and transparent glue.

First, we need to inflate the balloon and tie its tip so that the air does not escape.

Then you need to wrap the inflated ball with threads, then apply glue to the surface of the ball and wait until it dries.

Note!

Now you need to separate the ball from the threads, to do this, just pierce it with a needle and the craft is ready.

Plasticine gnome and pine cones
As a simple DIY craft, you can make a gnome. For the craft you will need a pine cone, light-colored plasticine, pieces of fabric, glue and a brush.
First of all, the child should roll a ball from a piece of plasticine, after which, using a brush, the ball should be made with indentations for the nose, eyes and mouth.


At the next stage of our craft, we need to attach the resulting head to the top of the cone.

Then the child must cut out a triangle from the fabric and glue it on the sides, resulting in a cone. The cone will act as a hat for our character.
Note!


Finally, you need to make mittens from fabric, and then attach them to the pine cone using plasticine and our gnome from the pine cone is ready.
Paper bookmark
A paper bookmark is perfect as a simple craft for kindergarten. For children to be able to make this simple craft, they will need a pencil, ruler, colored paper, scissors and glue.

To begin, children must draw a square measuring 20 by 20 centimeters.

Then divide the resulting square into 4 equal parts using a pencil and ruler, resulting in 4 squares measuring 5 by 5 centimeters.

The second step is to divide the upper right and lower left squares in such a way as to obtain triangles, that is, you need to draw a line diagonally from the upper corner to the lower corner.

We don't need the triangles with the outside and can cross them out.

Then you need to cut out a figure from paper without taking into account the crossed out triangles.

The top triangle needs to be trimmed. If everything is done correctly, the paper will be in the shape of a diamond, to which two triangles are glued.

The next step is to fold all the triangles in half, and then one by one place them on the tip of the rhombus. You should end up with a pocket that fits over the tip of the book page.

To make a bookmark original, you can advise children to cut out some kind of applique from colored paper.

Photos of simple crafts


2. Paper plastic art is very similar to sculpture in terms of creativity. But, in paper plastic, all products inside are empty, all products are shells of the depicted object. And in sculpture - either there is an increase in volume additional elements, or the excess is removed (cut off).
Examples: http://stranamasterov.ru/taxonomy/term/462
3. Corrugated tubes - this is the name of the technique for making products, in which for decorating surfaces or for creating volumetric figures use tubes from corrugated paper. Corrugated tubes are obtained by winding a strip of paper onto a stick, pencil or knitting needle and then compressing it. The compressed corrugated tube holds its shape well and has many options for design and use.
Examples:
4. Quilling (from the English quilling - from the word quil “bird feather”) - the art of paper rolling. Originated in medieval Europe, where nuns created medallions by twisting paper strips with gilded edges onto the tip of a bird's feather, creating an imitation of a gold miniature.
Examples:
4. Origami (from Japanese letters: “folded paper”) is the ancient art of folding paper figures. The art of origami has its roots in ancient China, where paper was discovered.
Examples:
Kinds:
- Kirigami is a type of origami that allows the use of scissors and cutting paper in the process of making the model. This is the main difference between kirigami and other paper folding techniques, which is emphasized in the name: kiru - cut, kami - paper.
Pop-up is a whole direction in art. This technique combines elements of techniques.
- Kirigami and Cutting and allows you to create three-dimensional designs and cards folded into a flat figure.
Examples:
- Kusudama (literally “medicine ball” in Japanese) is a paper model that is usually (but not always) formed by sewing together the ends of many identical pyramidal modules (usually stylized flowers folded from a square sheet of paper), so that the body is spherical forms. Alternatively, the individual components can be glued together (for example, kusudama on bottom photo completely glued, not sewn). Sometimes, as a decoration, a tassel is attached to the bottom.
The art of kusudama comes from an ancient Japanese tradition where kusudama was used for incense and a mixture of dried petals; perhaps these were the first real bouquets of flowers or herbs. The word itself is a combination of two Japanese words, kusuri (medicine) and tama (ball). Nowadays, kusudama are usually used for decoration or as gifts.
Kusudama is an important part of origami, particularly as a precursor to modular origami. She is often confused with modular origami, which is incorrect, since the elements that make up kusudama are sewn or glued, and not nested inside each other, as modular origami suggests.
Examples:
- Origami from circles - folding origami from a paper circle. Usually the folded pieces are then glued together into an applique.
Examples:
- Origami modular - creating three-dimensional figures from triangular modules origami - invented in China. The whole figure is assembled from many identical parts (modules). Each module is folded according to the rules of classic origami from one sheet of paper, and then the modules are connected by inserting them into each other. The friction force that appears in this case prevents the structure from falling apart.
Examples:
5. Papier-mâché (fr. papier-mâché “chewed paper”) - an easily moldable mass obtained from a mixture of fibrous materials (paper, cardboard) with adhesives, starch, gypsum, etc. Plasters are made from papier-mâché , masks, teaching aids, toys, theatrical props, boxes. In some cases, even furniture.
In Fedoskino, Palekh, Kholui, papier-mâché is used to make the basis for traditional lacquer miniatures.
You can decorate a papier-mâché blank not only with paints, painting like famous artists, but using decoupage or assemblage.
Examples:
7. Embossing (another name is “embossing”) - mechanical extrusion that creates images on paper, cardboard, polymer material or plastic, foil, on parchment (the technique is called “parchment”, see below), as well as on leather or birch bark, in which a relief image of a convex or concave stamp is obtained on the material itself with or without heating, sometimes with additional use foil and paint. Embossing is carried out mainly on binding covers, postcards, invitation cards, labels, soft packaging, etc.
This type of work can be determined by many factors: force, texture and thickness of the material, the direction of its cutting, layout and other factors.
Examples:
Kinds:
- Parchment - parchment paper (thick waxed tracing paper) is processed with an embossing tool and during processing it becomes convex and turns white. This technique produces interesting postcards, and this technique can also be used to design a scrappage page.
Examples:
- Texturing - applying an image using a cliché onto a smooth material, usually metallized paper, in order to imitate foil stamping. Also used to imitate the skin of certain breeds (for example, a cliché with a pattern imitating crocodile skin, etc.)
*Techniques related to weaving:
Man learned weaving much earlier than pottery. At first, he wove a dwelling from long flexible branches (roofs, fences, furniture), all kinds of baskets for various needs (cradles, boxes, carts, scoops, baskets) and shoes. A man learned to braid his hair.
With the development of this type of needlework, more and more different materials for use appeared. It turned out that you can weave from everything you come across: from vines and reeds, from ropes and threads, from leather and birch bark, from wire and beads, from newspapers.... Weaving techniques such as wicker weaving, weaving from birch bark and reeds appeared. , tatting, knotted macrame weaving, bobbin weaving, bead weaving, ganutel, kumihimo cord weaving, chainmail weaving, net weaving, Indian mandala weaving, their imitations (weaving from paper strips and candy wrappers, weaving from newspapers and magazines)...
As it turned out, this type of needlework is still popular, because using it, you can weave many beautiful and useful things, decorating our home with them.
Examples:
1. Beading, like beads themselves, has a centuries-old history. The ancient Egyptians were the first to learn how to weave beaded threads into necklaces, thread bracelets, and cover women's dresses with beaded nets. But only in the 19th century the real flourishing of bead production began. For a long time, the Venetians carefully guarded the secrets of creating a glass miracle. Craftsmen and craftswomen decorated clothes and shoes, wallets and handbags, cases for fans and eyeglass cases, as well as other elegant items with beads.
With the advent of beads in America, indigenous people began to use them instead of traditional Indian materials. For ritual belt, cradle, headband, basket, hair net, earrings, snuff boxes...
In the Far North, fur coats, high fur boots, hats, reindeer harnesses, leather sunglasses were decorated with bead embroidery...
Our great-grandmothers were very inventive. Among the huge variety of elegant trinkets there are amazing items. Chalk brushes and covers, toothpick cases (!), inkwell, penpick and pencil, collar for your favorite dog, cup holder, lace collars, Easter eggs, chessboards and much, much, much more.
Examples:
2. Ganutel - exclusive Maltese handicraft. It was in the monasteries of the Mediterranean that this technique of creating beautiful flowers to decorate the altar was still preserved.
The ganuteli uses thin spiral wire and silk threads to wrap the parts, as well as beads, pearls or seed beads. Brilliant flowers turn out graceful and light.
In the 16th century, spiral wire made of gold or silver was called “canutiglia” in Italian, and “canutillo” in Spanish; in Russian, this word was probably transformed into “gimp”.
Examples:
3. Macrame (from Arabic - braid, fringe, lace or from Turkish - scarf or napkin with fringe) - knot weaving technique.
The technique of this knot weaving has been known since ancient times. According to some sources, macrame came to Europe in the 8th-9th centuries from the East. This technique was known in Ancient Egypt, Assyria, Iran, Peru, China, and Ancient Greece.
Examples:
4. Weaving lace with bobbins. In Russia, the Vologda, Eletsky, Kirov, Belevsky, Mikhailovsky fisheries are still known.
Examples:
5. Tatting is a woven knotted lace. It is also called shuttle lace because this lace is woven using a special shuttle.
Examples:
* Techniques related to painting, various types of painting and image creation:
Drawing is a genre in the visual arts and a corresponding technique that creates a visual image (image) on any surface or object using graphic means, drawing elements (as opposed to pictorial elements), primarily from lines and strokes.
For example: charcoal drawing, pencil drawing, ink and pen drawing...
Painting is a type of fine art associated with the transmission of visual images through the application of paints to a solid or flexible base; creating an image using digital technology; as well as works of art made in such ways.
The most common works of painting are those made on flat or almost flat surfaces, such as canvas stretched on a stretcher, wood, cardboard, paper, treated wall surfaces, etc. Painting also includes images made with paints on decorative and ceremonial vessels , the surfaces of which can have a complex shape.
Examples:
1. Batik - hand-painted fabric using reserve compounds.
The batik technique is based on the fact that paraffin, rubber glue, as well as some other resins and varnishes, when applied to fabric (silk, cotton, wool, synthetics), do not allow paint to pass through - or, as artists say, “reserve” from coloring individual areas of fabric.
There are several types of batik - hot, cold, knotted, free painting, free painting using saline solution, shibori.
Batik - batik is an Indonesian word. Translated from Indonesian, the word “ba” means cotton fabric, and “-tik” means “dot” or “drop”. Ambatik - to draw, to cover with drops, to hatch.
Batik painting has long been known among the peoples of Indonesia, India, etc. In Europe - since the twentieth century.
Examples:
2. Stained glass (lat. Vitrum - glass) is one of the types decorative arts. Glass or other transparent material is the main material. The history of stained glass begins in ancient times. Initially, glass was inserted into a window or doorway, then the first mosaic paintings and independent decorative compositions, panels made of colored pieces of glass or painted special paints on plain glass.
Examples:
3. Blowing - a technique based on blowing paint through a tube (on a sheet of paper). This ancient technique was traditional for the creators of ancient images (bone tubes were used).
Modern juice straws are no worse in use. They help to blow recognizable, unusual, and sometimes fantastic designs from a small amount of liquid paint on a sheet of paper.
4. Guilloche - the technique of burning an openwork pattern onto fabric manually using a burning machine was developed and patented by Zinaida Petrovna Kotenkova.
Guilloche requires careful work. It must be made in a single color scheme and correspond to the ornamental style of the given composition.
Napkins, panels with appliqués, bookmarks, handkerchiefs, collars - all this and much more, whatever your imagination suggests, will decorate any home!
Examples:
5. Grattage (from the French gratter - scrape, scratch) - scratching technique.
The drawing is highlighted by scratching with a pen or sharp instrument on paper or cardboard filled with ink (to prevent it from spreading, you need to add a little detergent or shampoo, just a few drops).
Examples:
6. Mosaic is one of the most ancient arts. This is a way of creating an image from small elements. Assembling a jigsaw puzzle is very important for a child’s mental development.
Maybe from different materials: bottle caps, beads, buttons, plastic chips, wooden cuts of twigs or matches, magnetic pieces, glass, ceramic pieces, small pebbles, shells, thermal mosaic, Tetris mosaic, coins, pieces of fabric or paper, grain, cereals, seeds maple, pasta, any natural material (scales of cones, pine needles, watermelon and melon seeds), pencil shavings, bird feathers, etc.
Examples:
7. Monotype (from the Greek monos - one, united and tupos - imprint) - one of the simplest graphic techniques.
On a smooth glass surface or thick glossy paper (it should not allow water to pass through), a drawing is made using gouache paint or paints. A sheet of paper is placed on top and pressed to the surface. The resulting print is a mirror image.
Examples:
8. Thread graphics (isothread, thread image, thread design) - a graphic image made in a special way with threads on cardboard or other solid base. Thread graphics are also sometimes called isographics or embroidery on cardboard. You can also use velvet (velvet paper) or thick paper as a base. The threads can be ordinary sewing, wool, floss or others. You can also use colored silk threads.
Examples:
9. Ornament (lat. ornamentum - decoration) - a pattern based on the repetition and alternation of its constituent elements; intended for decoration various items(utensils, tools and weapons, textile products, furniture, books, etc.), architectural structures (both externally and in the interior), works of plastic arts (mainly applied), among primitive peoples also the human body itself (coloring, tattoo). Associated with the surface that it decorates and visually organizes, the ornament, as a rule, reveals or accentuates the architectonics of the object on which it is applied. The ornament either operates with abstract forms or stylizes real motifs, often schematizing them beyond recognition.
Examples:
10. Print.
Kinds:
- Printing with a sponge. Both a sea sponge and a regular one intended for washing dishes are suitable for this.
Examples:
Wood is usually used as the starting material for stamping using a cliche stamp so that it is convenient to hold in the hand. One side is made flat, because Cardboard is glued onto it, and patterns are glued onto the cardboard. They (patterns) can be made from paper, from rope, from an old eraser, from root vegetables...
- Stamp (stamping). Wood is usually used as the starting material for stamping using a cliche stamp so that it is convenient to hold in the hand. One side is made flat, because Cardboard is glued onto it, and patterns are glued onto the cardboard. They (patterns) can be made from paper, from rope, from an old eraser, from root vegetables, etc.
Examples:
11. Pointillism (French Pointillisme, literally “pointing”) is a style of writing in painting that uses pure paints that do not mix on the palette, applied in small strokes of a rectangular or round shape, counting on their optical mixing in the viewer’s eye, as opposed to mixing paints on the palette. Optical mixing of three primary colors (red, blue, yellow) and pairs of additional colors (red - green, blue - orange, yellow - violet) gives significantly greater brightness than a mechanical mixture of pigments. Mixing of colors to form shades occurs at the stage of perception of the picture by the viewer from a long distance or in a reduced view.
The founder of the style was Georges Seurat.
Another name for pointillism is divisionism (from the Latin divisio - division, crushing).
Examples:
12. Drawing with palms. Small children find it difficult to use a paint brush. There is a very exciting activity that will give the child new sensations, develop fine motor skills, and give the opportunity to discover a new and magical world of artistic creativity - this is palm painting. By drawing with their palms, little artists develop their imagination and abstract thinking.
Examples:
13. Drawing with leaf prints. Having collected various fallen leaves, smear each leaf with gouache from the vein side. The paper on which you are going to make a print can be colored or white. Press the colored side of the sheet onto a sheet of paper and carefully remove it, grasping it by the “tail” (petiole). This process can be repeated over and over again. And now, having completed the details, you already have a butterfly flying over the flower.
Examples:
14. Painting. One of the most ancient types of folk crafts, which for several centuries have been an integral part of Everyday life and the original culture of the people. In Russian folk art there is a large number of varieties of this type of decorative and applied art.
Here are some of them:
- Zhostovo painting is an ancient Russian folk craft that arose at the beginning of the 19th century, in the village of Zhostovo, Mytishchi district, Moscow region. It is one of the most famous types of Russian folk painting. Zhostovo trays are painted by hand. Usually bouquets of flowers are depicted on a black background.
- Gorodets painting is a Russian folk art craft. It has existed since the middle of the 19th century. in the area of Gorodets. Bright, laconic Gorodets painting (genre scenes, figurines of horses, roosters, floral patterns), made in a free stroke with a white and black graphic outline, decorated spinning wheels, furniture, shutters, and doors.
- Khokhloma painting is an ancient Russian folk craft, born in the 17th century in the district of Nizhny Novgorod.
Khokhloma is a decorative painting of wooden utensils and furniture, made in black and red (and also, occasionally, green) on a golden background. When painting, silver tin powder is applied to the wood. After this, the product is coated with a special composition and processed three or four times in the oven, which achieves a unique honey-golden color, giving the light wooden utensils a massive effect. Traditional elements of Khokhloma are red juicy rowan and strawberries, flowers and branches. Birds, fish and animals are often found.
Examples:
15. Encaustic (from ancient Greek “the art of burning”) is a painting technique in which wax is the binder of paint. Painting is done with melted paints (hence the name). A type of encaustic painting is wax tempera, characterized by its brightness and richness of colors. Many early Christian icons were painted using this technique.
Examples:
*Techniques related to sewing, embroidery and fabric use:
Sewing is a colloquial form of the verb “to sew”, i.e. something that is sewn or stitched.
Examples:
2. Patchwork, Quilt, Quilting or Patchwork is a folk arts and crafts art with centuries-old traditions and stylistic features. This is a technique using pieces of multi-colored fabrics or knitted elements. geometric shapes for joining in a bedspread, blouse or bag.
Examples:
Kinds:
- Artichoke is a type of patchwork that got its name because of its resemblance to artichoke fruits. This technique has other names - “teeth”, “corners”, “scales”, “feathers”.
By and large, in this technique it all comes down to folding the cut out parts and sewing them onto the base in a certain sequence. Or, using paper, create (glue) various panels of a round (or multifaceted) shape on a plane or in volume.
You can sew in two ways: direct the edge of the blanks to the center of the main part, or to its edges. This is if you sew a flat product. For products of a volumetric nature - with the tip towards the narrower part. The folded parts are not necessarily cut in the shape of squares. These can be rectangles or circles. In any case, we encounter the folding of cut blanks, therefore, it can be argued that these patchwork techniques belong to the family of patchwork origami, and since they create volume, they therefore also belong to the “3d” technique.
Example:
- Crazy quilt. I recently came across this type. In my opinion, this is a multi-method.
The bottom line is that the product is created from a combination of various techniques: patchwork + embroidery + painting, etc.
Example:
3. Tsumami Kanzashi. The Tsumami technique is based on origami. Only they fold not paper, but squares natural silk. The word "Tsumami" means "to pinch": the artist takes a piece of folded silk using tweezers or tweezers. The petals of future flowers are then glued onto the base.
The hairpin (kanzashi), decorated with a silk flower, gave its name to a whole new type of decorative and applied art. This technique was used to make decorations for combs and individual sticks, as well as for complex structures made up of various accessories.
Examples:
* Techniques related to knitting:
What is knitting? This is the process of making products from continuous threads by bending them into loops and connecting the loops to each other using simple tools by hand (a crochet hook, knitting needles).
Examples:
1. Knitting on a fork. An interesting way of crocheting using a special device - a fork curved in the shape of the letter U. The result is light, airy patterns.
2. Crochet (tambour) - the process of manually making fabric or lace from threads using crochet hook. creating not only dense, relief patterns, but also thin, openwork, reminiscent of lace fabric. Knitting patterns consist of different combinations of loops and stitches. The correct ratio is that the thickness of the hook should be almost twice the thickness of the thread.
Examples:
3. Simple (European) knitting allows you to combine several types of loops, which creates simple and complex openwork patterns.
Examples:
4. Tunisian long crochet (both one and several loops can be used at the same time to create a pattern).
5. Jacquard knitting - patterns are knitted on knitting needles from threads of several colors.
6. Sirloin knitting– imitates fillet-guipure embroidery on a special mesh.
7. Guipure crochet (Irish or Brussels lace).
2. Sawing. One type is sawing with a jigsaw. Decorating your life and home with products convenient for everyday life self made or children's toys, you experience joy from appearance and the pleasure of the process of creating them.
Examples:
3. Carving is a type of decorative and applied art. It is one of the types of artistic woodworking along with sawing and turning.
Examples:
* Other self-sufficient techniques:
1. Applique (from the Latin “attachment”) is a way of working with colored pieces of various materials: paper, fabric, leather, fur, felt, colored beads, seed beads, woolen threads, embossed metal plates, all kinds of material (velvet, satin, silk), dried leaves... This use of various materials and structures in order to enhance expressive capabilities is very close to another means of representation - collage.
Examples:
There are also:
- Application from plasticine - plasticineography - the new kind arts and crafts. It represents the creation of stucco paintings depicting more or less convex, semi-voluminous objects on a horizontal surface. At its core, this is a rarely seen, very expressive type of painting.
Examples:
- Application from “palms”. Examples:
- Broken applique is one of the types of multifaceted applique techniques. Everything is simple and accessible, like laying out a mosaic. The base is a sheet of cardboard, the material is a sheet of colored paper torn into pieces (several colors), the tool is glue and your hands. Examples:
2. Assemblage (French assemblage) - a visual art technique related to collage, but using three-dimensional parts or entire objects, applicatively arranged on a plane like a picture. Allows for artistic additions with paints, as well as metal, wood, fabric and other structures. Sometimes applied to other works, from photomontage to spatial compositions, since the terminology of the latest visual art is not completely established.
Examples:
3. Paper tunnel. The original English name for this technique is tunnel book, which can be translated as a book or paper tunnel. The essence of the technique can be clearly seen from the English name tunnel - tunnel - through hole. The multi-layered nature of the “books” that are put together conveys the feeling of a tunnel well. A three-dimensional postcard appears. By the way, this technique successfully combines different types of techniques, such as scrapbooking, applique, cutting, creating layouts and voluminous books. It is somewhat akin to origami, because... is aimed at folding paper in a certain way.
The first paper tunnel dates back to the mid-18th century. and was the embodiment of theatrical scenes.
Traditionally, paper tunnels are created to commemorate an event or are sold as souvenirs to tourists.
Examples:
4. Cutting is a very broad term.
Examples:
They are cut from paper, from foam plastic, from foam rubber, from birch bark, from plastic bottles, from soap, from plywood (though this is already called sawing), from fruits and vegetables, as well as from other various materials. Various tools are used: scissors, breadboard knives, scalpel. They cut out masks, hats, toys, postcards, panels, flowers, figurines and much more.
Kinds:
- Silhouette cutting is a cutting technique in which objects of an asymmetrical structure, with curved contours (fish, birds, animals, etc.), with complex outlines of figures and smooth transitions from one part to another, are cut out by eye. Silhouettes are easily recognizable and expressive; they should be without small details and as if in motion. Examples:
- The cutting is symmetrical. With symmetrical cutting, we repeat the contours of the image, which must fit exactly into the plane of a sheet of paper folded in half, consistently complicating the outline of the figure in order to correctly convey the external features of objects in a stylized form in the appliqués.
Examples:
- Vytynanka - the art of cutting openwork patterns from colored, white or black paper has been around since paper was invented in China. And this type of cutting became known as jianzhi. This art has spread throughout the world: China, Japan, Vietnam, Mexico, Denmark, Finland, Germany, Ukraine, Lithuania and many other countries.
Examples:
- Carving (see below).
5. Decoupage (from the French decoupage - noun, “that which is cut out”) is a technique of decoration, applique, decoration using cut out paper motifs. Chinese peasants in the 12th century. They began to decorate furniture in this way. And in addition to cut out pictures from thin colorful paper, they began to cover it with varnish to make it look like a painting! So, along with beautiful furniture, this equipment also came to Europe.
Today, the most popular material for decoupage is three-layer napkins. Hence another name - “napkin technique”. The application can be absolutely limitless - dishes, books, boxes, candles, vessels, musical instruments, flower pots, bottles, furniture, shoes and even clothes! Any surface - leather, wood, metal, ceramics, cardboard, textiles, plaster - must be plain and light, because... the design cut out of the napkin should be clearly visible.
Examples:
6. Carving (from the English carvу - cut, carve, engrave, slice; carving - carving, carved work, carved ornament, carved figure) in cooking is the simplest form of sculpture or engraving on the surface of products from vegetables and fruits, such short-lived decorations table.
Examples:
7. Collage is a creative genre when a work is created from a wide variety of cut out images pasted onto paper, canvas or digitally. Comes from fr. papier collée - glued paper. Very quickly this concept began to be used in an expanded meaning - a mixture of various elements, a bright and expressive message from scraps of other texts, fragments collected on one plane.
The collage can be completed with any other means - ink, watercolor, etc.
Examples:
8. Constructor (from Latin constructor “builder”) is a multi-valued term. For our profile, this is a set of mating parts. that is, parts or elements of some future layout, information about which was collected by the author, analyzed and embodied in a beautiful, artistically executed product.
Designers vary in type of material - metal, wood, plastic and even paper (for example, paper origami modules). When different types of elements are combined, interesting designs for games and fun are created.
Examples:
9. Modeling - giving shape to a plastic material (plasticine, clay, plastic, salt dough, snowball, sand, etc.) using hands and auxiliary tools. This is one of basic techniques sculpture, which is designed to master the primary principles of this technique.
Examples:
10. A layout is a copy of an object with a change in size (usually reduced), which is made while maintaining proportions. The layout must also convey the main features of the object.
To create this unique piece you can use various materials, it all depends on its functional purpose (exhibition layout, gift, presentation, etc.). This can be paper, cardboard, plywood, wooden blocks, plaster and clay parts, wire.
Examples:
Type of layout - model - is a working layout that depicts (imitates) any significant features of the original. Moreover, attention is concentrated on certain aspects of the modeled object or, to an equal degree, its detail. The model is created to be used, for example, for visual-model teaching of mathematics, physics, chemistry and others school subjects, for a maritime or aviation club. A variety of materials are used in modeling: air balloons, light and plastic mass, wax, clay, gypsum, papier-mâché, salt dough, paper, polystyrene foam, foam rubber, matches, knitting threads, fabric...
Modeling is the creation of a model that is reliably close to the original.
"Models" are those layouts that are in effect. And models that do not work, i.e. "strand" - usually called a layout.
Examples:
11. Soap making. Animal and vegetable fats, fat substitutes (synthetic fatty acids, rosin, naphthenic acids, tall oil) can be used as raw materials to obtain the main component of soap.
Examples:
12. Sculpture (Latin sculptura, from sculpo - cut, carve) - sculpture, plastic - a type of fine art, the works of which have a three-dimensional form and are made of hard or plastic materials (metal, stone, clay, wood, plaster, ice, snow , sand, foam rubber, soap). Processing methods - modeling, carving, casting, forging, embossing, carving, etc.
Examples:
13. Weaving - production of fabric and textiles from yarn.
Examples:
14. Felting (or felting, or felting) – felting wool. There is “wet” and “dry”.
Examples:
15. Flat embossing is one of the types of decorative and applied art, as a result of knocking out a certain ornamental relief, drawing, inscription or round figured image, sometimes close to engraving, on a plate, a new work of art is created.
Processing of the material is carried out using a rod - a hammer, which stands vertically, the upper end of which is hit with a hammer. Moving the coinage gradually appears new form. The material must have a certain plasticity and the ability to change under the influence of force.
Examples:
In conclusion, it should be noted that the division (combination according to any criterion) of most techniques is conditional (subjective), and many techniques of applied creativity are multi-techniques, i.e. they combine several types of techniques.
Happy creativity everyone!
Your Margarita.
New types of handicrafts do not appear very often in the world, but modern girls Those who want to stand out from the crowd have plenty to choose from!
Traditional handicraft techniques rarely go into oblivion; rather, on the contrary, ancient crafts are returning and quickly gaining their fans. But progress does not stand still, and modern technologies and the way of life of people contribute to the emergence of new types of needlework that deserve no less attention than the most ancient techniques. What to do for a girl who wants to be in trend and keep up with the rapid development of the handicraft world.
Street knitting in a new style
The knitting technique has existed for a long time, but modern knitters do not want to limit themselves to creating clothes and home decor items. Today it is fashionable to knit “outfits” for city streets, parks and your own summer cottages. This direction appeared in 2005 absolutely by accident. It was invented by the owner of an American store in order to attract attention to her product. The hobby has received a name and has already won the hearts of Europeans.

Want to try? Start knitting covers for trees, garden flowerpots, and garbage containers. Tie a mesh fence, dress a doghouse or birdhouse, lampposts or flowerpots in a bright “suit”. It is not only fashionable, but also very beautiful!

Diamond embroidery - a Japanese miracle
Studying modern views handicrafts, not to be missed. This fascinating and very beautiful hobby comes from China. In it, the Chinese women combined two ancient techniques at once - mosaic and embroidery with beads and stones. Diamond embroidery technology is not very similar to traditional ones, since needles and fabrics are not used here.

The picture is obtained by laying out patterns of rhinestones on ready-made diagram, pre-coated with special glue. Instead of a needle, tweezers are used, with which the motif is carefully laid out, following the image. The finished work is coated with transparent varnish for durability.
In this way, you can “embroider” not only paintings, but also three-dimensional objects, for example, boxes, vases, bottles.

To try yourself in this new type of needlework, you need to buy a ready-made kit, which includes a diagram with an adhesive surface protected by paper, a set of rhinestones, and tweezers. In large paintings, the adhesive base is covered with sheets of several fragments, which prevents drying out and allows you to stretch out the pleasure of creating a masterpiece for several days.
Polymer clay jewelry
Polymer clay, or plastic, is a relatively new material that needlewomen could not ignore. Plastic has nothing in common with real clay, since it is a typical polymer. with this material it is simple - it is easy to give the plastic mass any shape by mixing shades and colors. Finished goods You can bake it, or you can just boil it in boiling water - it’s faster and much safer.

Mastering new types of needlework, craftswomen learned to create polymer clay elements for jewelry - necklaces, earrings, pendants, bracelets. These can be complex flower figures or ordinary beads reminiscent of minerals.
One of the most interesting trends in this type of creativity is a technique that imitates cross stitch. This kind of work requires perseverance and patience, but the result is worth the try.

Weaving from newspaper tubes
This relatively new type of handicraft was born due to the fact that waste paper collection points were closed, and free advertising newspapers began to appear in boxes every day. Newspapers are used to weave decorative and household items: baskets, vases, laundry boxes, caskets, and all kinds of boxes.

Toys made from nylon socks
Crafts made from denim
Most often, new types of needlework are born from modern materials. This is how crafts from denim, for which, as a rule, they take out-of-fashion or outdated jeans. From durable and practical material, needlewomen learned to sew furniture covers, blankets, rugs, pillows, rugs, and curtains.

Fashionistas are making bags and new coats from denim. Animal lovers come up with costumes for their pets. Creative people create wall panels, playing with different shades of jeans. If you want to be inspired by new ideas, see our other publication on this topic.
Knitting from plastic bags
Some new types of handicrafts appear in the world thanks to concern for the preservation of the environment. Such hobbies include knitting plastic bags. Of course, mostly people take new bags for work, but the idea itself was born precisely at the moment of thinking about their disposal. Where else to put dozens of bags from the supermarket if you don’t learn how to turn them into... beautiful crafts?
Beautiful bathroom rugs, shower slippers, and openwork napkins are knitted from colored garbage bags. The moisture-resistant material is not afraid of mold, so it is actively used for crafts used in wet rooms and in the garden.

Multi-colored polyethylene makes durable and beautiful Fashion bags, baskets for vegetables and fruits, boxes for small items, boxes, cosmetic bags and many other things that can be crocheted.
Parchment Craft - a new word in paper art
– Russian pronunciation of the definition of parchment craft, which translates as parchment craft. The technology for creating crafts was borrowed from the Middle Ages, when the finest untanned leather was used for embossing. Leather is an expensive material, so modern needlewomen at the end of the 20th century began to work with tracing paper and parchment - affordable paper.
The second name of this hobby is pargamano, born from the name of the manufacturer of special paper for this creativity, Pergamano, because it is impossible to get an elegant craft from ordinary tracing paper; you need a special one - with a density of at least 150 g/m2.
unusual or look at the list. To help those in doubt, we have prepared a guide that will help you decide on your choice of hobby.
The world of creative people cannot be limited, we will wait to introduce you to new hobbies, so visit us often and join our groups on social networks to keep up to date with the news.
To keep you in a great mood in any weather, make new things from available materials. Quick crafts that take less than an hour to make.
The content of the article:
Sometimes you want to pamper your child with a new toy, but you don’t have the financial resources or time to make one. Therefore, we decided to select for you the fastest simple crafts, on which you will spend no more than an hour. The family budget will not suffer, since they are made mostly from waste material and all sorts of leftovers.
How to make a doll from threads and a dandelion with your own hands?

You will create it while relaxing in a cozy chair. The main thing is to place everything you need nearby so that you don’t have to get up again. This:
- threads;
- half a sheet of cardboard;
- scissors;
- strip of flesh-colored fabric;
- markers.
- Wrap the threads around the card in an impressive layer.
- Tie the finished winding with thread. Determine where the doll's head will be. Mark it by also rewinding it with thread.
- Do the same for your right and left hands. To make a doll's hands from threads, wrap your hands at wrist level and cut the yarn in the area of the toy's fingers.
- Also use threads to separate the torso from the legs, and perform them using the same technique as the arms, just make them longer.
- Measure a strip of flesh-colored fabric according to the volume of the head, glue its sides.
- Wind hair threads around your hand and cut through the resulting roll on one side. Glue to the head, trim the bangs if desired.
- Use markers of different colors to draw facial features.
- Sew a sweater for a toy or tie it with a piece of fabric to make an apron. You can tie a handkerchief to make it a cloak. Children are happy to make such clothes, and they will certainly appreciate a new doll made from threads.
If you are making a girl doll, then you do not need to mark her legs. Let the threads cut evenly at the bottom become a skirt.
Such simple crafts will surely delight the kids. You can also create a fluffy dandelion from leftover threads.

For this charm you will need:
- yellow and green yarn;
- wire;
- PVA glue;
- knitting fork or metal staple;
- scissors;
- gypsy and thin needle.
- Wind the yellow yarn around a crochet fork. Thread a thread of the same color into the gypsy needle. Sew it down the middle.
- Lubricate the resulting line well with glue. Remove the created fabric of yarn from the fork and roll it with a roller.
- A thread is wound in the middle to give the workpiece a dumbbell shape. Coat the middle of this part with glue on top and wait until it dries.
- Such simple crafts are interesting for both adults and children. They are made quickly, but part of the time is spent waiting for the glue to dry. Therefore, it is better to make crafts in the evening, and continue the entertaining needlework the next day. What are we going to do now?
- Cut the resulting dumbbell in the middle. On the first and second flowers, you need to cut the loops with scissors and carefully comb them to get fluffy caps of two dandelions.
- The green yarn from which we will make sepals must be cut into pieces 4 cm long. We thread the same thread into a gypsy needle, sew the pieces across, but not in the middle, but 2/3 away from the edge.
- Trim the top with scissors, trim it, make another line parallel to the first.
- Lubricate the back side of the flower with glue and attach the sepals here. Wrap it with the same thread you used to stitch it. Glue both ends and leave the workpiece to dry.
- Meanwhile, you will wind the green thread onto the glue-coated wire. You will get a stem.
- Insert a thick needle into the sepal from below and twist to make a hole for the stem. Install it there, having previously lubricated this part with glue.
- The leaves can be crocheted, but since we are making simple crafts, cut them out of green paper or cardboard and glue them onto the stem.
How to quickly make crafts from animal tissue?
If you want to spend less than 30 minutes making a new toy, then make these funny mice. They don't even need to be sewn. By making the slits in a certain way, you will make these rodents.

See if you have:
- pieces of felt;
- juice straws;
- beads or small buttons.
- For each mouse you need to cut two parts from one fabric. The first will become a body, pointed on the muzzle, rounded on the other side. Cut out the ears in the shape of a figure eight.
- From a fabric of a different color you need to cut out a small circle for the nose and two larger ones for the ears, and glue them in place.
- Using scissors or a utility knife, make 4 cuts on the body of the mouse. Two will be vertical, at the back of the head, and the other two you will make in the rump area to place the straw here. Place the ears on the head, threading them through the slits.
- All you have to do is glue beads or buttons instead of eyes and marvel at how quickly crafts are made from simple materials.

If your child is bored, you can make a fabric applique with him. Such funny bunnies are also sewn onto the worn knees of children's trousers to update this item.

Transfer the applique onto the fabric and cut it out. The bunny is decorated by sewing a bow to his ears and a carrot on his body. Attach eyes and other facial features. If this is an applique, then you need to glue the hare onto the cardboard.
And here are some simple crafts - in the shape of birds. You can cut them out from leftover felt, glue on a nose, eyes, wings and perform a home performance.

DIY crafts from pine cones for children

They are also made simply and quickly.
To make gnomes, take:
- Pine cones;
- light plasticine;
- pieces of felt or fleece;
- glue;
- brush.
- Let the child roll a ball out of plasticine and use the back of the brush to make indentations for the eyes, mouth, and nose. They will be filled with pieces of plasticine of the corresponding color. So, the eyes can be brown or blue, the mouth red.
- Attach the head to the top of the pine cone. Cut a triangle out of felt and glue its sides together to form a cone. Place this cap on your character's head.
- Cut out mittens from the remaining fabric and attach them to the pine cone with plasticine.

For a craft made from pine cones like an owl, we will also need:
- 2 acorn caps;
- yellow paint with a brush;
- plasticine;
- accessories in the form of feathers, ribbons.
- First, you need to paint the cone and the acorn cap, and continue subsequent work when they are dry.
- Let the child roll small balls from black plasticine and stick them to upside-down acorn caps - these are the pupils.
- Make a nose out of orange plasticine, attach it in place.
- This owl craft made from pine cones is decorated with feathers or ribbon.
- pine cone;
- pieces of thick fabric;
- two toothpicks;
- cotton wool;
- 2 ice cream sticks;
- white paint.
- Let the child paint the pine cone and remove it until it dries completely.
- Mom will cut out a scarf from plaid fabric and tie it around the snowman’s neck. Make headphones from felt and glue them to the character’s head.
- The child will make a snowman’s nose and mouth out of plasticine and attach it to his face.
- Make your hands from wire wrapped in a strip of fabric or ribbon. You need to wrap the wire around the bump.
- Place toothpicks in the snowman's hands, with pieces of cotton wool glued to the bottom of these sticks.
- Paint the popsicle sticks and when dry, place the snowman on these skis.
They are quick and easy to make and these are the piglets. Glue the scales from the cones to the fir cones in the form of ears. Attach the snouts that will become the acorn caps. You can use plasticine rather than glue for this.

Paint the piglets pink, you can use spray paint for this. Once it's dry, only then will you attach the little black beads that will become the eyes.
For this craft you need an unopened pine cone. But over time, the scales open up. To avoid this, dip the cones in wood glue diluted with water for half an hour.
Remove them from the solution and shake them off. After 3 days, the cone will dry completely, securing the scales, which will now not open. After this, you can cover this natural material with paint and make new objects.
The next simple craft is a forest corner. For her, take:
- CD disk;
- plasticine;
- spruce and pine cone;
- acorn cap;
- glue;
- paints;
- eyes for toys.
- Paint the disc in green color, draw flowers on its surface.
- Let the child roll up the caps and stems of the mushrooms and connect them.
- The base for the hedgehog can be sculpted from plasticine or polymer clay. Then cover it with brown paint.
- When it dries, stick scales from a fir cone into the back of the hedgehog. Place a cap on his head.
- Glue the eyes, nose, mouth, put a cane stick in your hand. In the other there will be a basket with mushrooms, which are molded from plasticine.
- Attach the hedgehog to the stand, then another wonderful craft ready.
Tie floral wire to the pine cones and place picturesque flowers in a jar previously wrapped with twine.

You can also make another craft from pine cones for the garden, such as a wonderful decorative basket.

If you need to quickly make a hedgehog to bring to kindergarten, mold its body and head from beige plasticine, and roll out its eyes and nose from black plasticine. Stick in the seeds, which will become spines.

Simple crafts for a great mood
Now the sun rarely comes out, and the weather is increasingly cloudy. To avoid succumbing to despondency at this time of year, create mischievous tricks that will certainly improve your mood.

Place these cheerful flowers in a vase at home, which can be made from almost nothing. All you need to do is:
- colored paper;
- cardboard from a white box;
- marker;
- stationery knife;
- tape;
- scissors.

Color the eyes with a black marker and bend the petals forward.

Cut a stem from cardboard. At the top, on one side, glue the finished part, on the other, a pre-cut flower with petals.

Fold a green sheet of paper in half, draw an oval line on it, and cut along it. If available, use zigzag scissors. Keep the notches simple.

Tie the paper flowers with a ribbon, and if you have taffeta, then use this fabric for decoration. You have got a bouquet that will never fade and will make you happy.

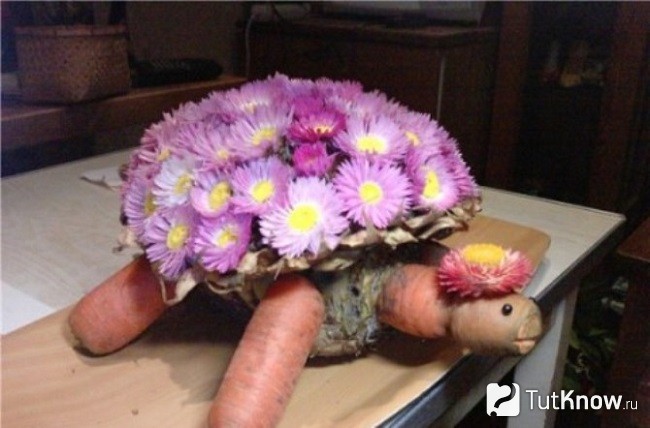
You can attach flowers with a toothpick to washed beets or pineapple. You will get a beautiful shell for a turtle. You will make her arms, legs and head and neck from carrots. Attach these parts to the body using toothpicks as well.
If you want the New Year to come quickly, decorate white objects in your apartment by turning them into snowmen.

Attach black magnets to the refrigerator, and now a holiday character has taken up residence in your kitchen. If you draw on a white vase or glue Round eyes and an orange nose in the shape of a carrot, then another snowman will amuse everyone gathered at the table.
See what other quick and easy crafts you can make.


