Many people believe that making a garland of flags is very simple, so they do not take this activity seriously. And it’s completely in vain, because with the help of such decoration you can decorate the room for any holiday - birthday, wedding anniversary and New Year. All you need is interesting idea, affordable materials, and very little effort.

Advantages
Done with my own hands A garland of flags has many advantages that distinguish it from all other options for festive room decor. It is important that this is a universal decoration that is suitable for celebrations children's day birthdays with family, and for a noisy banquet. A definite plus is the price. To create flags, paper, burlap or cotton fabric is usually used. All this can be purchased at any store at a very affordable price.

It is noteworthy that simple flags can be used to decorate even the largest events. Without special effort and costs, you will decorate the hall even for a wedding of several hundred guests. If you have blank flags, then you can connect them into one garland in just a few minutes, and if you don’t have the required number of flags, you can always simply print them out on a printer. Garlands of flags will become a lifesaver if, shortly before the celebration, you find that you have too few balloons or they have burst - in this case, the decor can be replaced with flags, especially if you use paper.


Garlands can be hung not only on walls, but also on cars, a wedding train or trees. Even the most unpresentable room or cheap car is transformed before our eyes and begins to look truly stylish and atmospheric.

Flaws
There are practically no disadvantages to garlands made from flags; the only disadvantage is associated with the use of paper decorations - they can only be used in interior spaces. You can decorate trees, local areas or cars with them only in the warm season, and even then only in dry and sunny weather. When exposed to rain, the paper quickly becomes wet and loses its aesthetic appeal, and during strong winds, the paper fastening can easily tear.

If you are determined to decorate the street at the place of celebration with such products, then you should give preference to fabric materials, and those that hold their shape well. Then you can hang decorations even in winter in order to make the area near your home truly fabulous and magical on the eve of the main winter celebration.
Types and material used
Garlands of flags are made from simple, uncomplicated materials. Most often, paper is used to create jewelry - usually cardboard or special colored printer paper is used. However, to create a one-time decoration will suit and regular color, preferably double-sided. Laminated material looks good. Paper is used to create square and triangular flags. In addition, you can create voluminous flowers from it and combine them into a beautiful garland.
Fabric is a material resistant to natural conditions. Similar decor can be used both indoors and on the area near the house. You can always apply the design you like onto the fabric, and the material is also easy to wash. Having created such a decoration, you can hang it many more times in a variety of situations. Most often they take ordinary cotton or linen, but in last years The vintage style came into fashion, which slightly changed the trends in creating flag garlands - nowadays, burlap decorations with lace elements are increasingly used.
Flag tape is very convenient, which is a thin braid with ready-made blanks of arbitrary shape, most often triangular or rectangular, the edges can be figured or not. All you need to do to decorate your space is cut the ribbon to size and hang it up. You can add any decorative elements. This is very convenient and allows you to significantly save time and effort, but at the same time the cost ready-made options slightly higher than when creating garlands of flags with your own hands.

Of course, garlands can be made from other materials, for example, many use plastic or plastic bags bright colors however, it is paper and cardboard that are considered the most basic in the manufacture decorative compositions. As for the method of connecting the garland, there are several options. Most often, sewn-on products are used, models with eyelets, and with small holes.


Sew-on ones are made using sewing machine, in this case the blanks are sewn to the tape, if you really want, you can fasten them tightly to each other so that a feeling of a solid line is formed. However, you can leave a small distance between the blanks - it all depends on your imagination. Using this method, you can make several tens of meters of garlands in 15 minutes.

Very often they use a type of garland of flags with neat holes. In this case, each workpiece has 1-2 holes through which the base is passed. Moreover, they can be placed both on top and at opposite ends of the flag. To form a hole, you can use a simple hole punch, then connecting the garland becomes very simple.

The most durable option is considered to be a garland on grommets., they are attached to the holes on the flags and are small plastic or soon metal bushings. Thanks to this device, the holes will not tear, the garland will be suitable for repeated use. Blanks can have a variety of shapes, colors and sizes, although A5 is considered the most universal.

Preparing everything you need to get started
To build a stylish and original garland for the festive decor of the room, first of all you need to prepare the flags themselves. If desired, they can be purchased at the store, but more often flags are made independently from any available materials. If you like the second option, then first you should come up with a flag template, guided only by your imagination. Then everything is simple - if you make a decoration from paper, then you just need to print it on the printer and then cut out the required number of blanks. If you don’t have a printer at hand, then make one stencil and use it to cut all the other flags.


And, of course, you will need braid, fishing line or an elastic band, which will secure the flag. And also a needle and thread for connecting finished elements.
Another useful diagram of checkbox combinations different types and colors– it’s no secret that a product made in monochromatic colors will become boring very quickly, but a multi-colored version will be very original, fresh and colorful.

There are many ideas on how to create beautiful and unusual garlands. Let's look at a few of them.

Classic and original shapes
A classic garland with flags is extremely easy to make.
- Blanks of the desired shape are cut from colored paper. They can be double-sided with a fold at the point of attachment to the tape, or single-sided, then you will need to make 2 holes in the upper part, preferably using a hole punch.
- The flags are placed on the prepared cord. If you are making them double-sided, then each one needs to be bent, thrown over the braid and secured with a stapler, glue or a needle and thread. Single-sided models are put on the cord as if they were stitched.

Keep in mind that one-sided options are preferable for wall decor, but no one should see their reverse side. The color scheme of the garland can be very different - some use contrasts, while others prefer the effect of a smooth color transition. However, if you only have at your disposal White paper, then you can make very original garlands from it. To do this, you need to find and print images with your favorite fairy-tale characters, and then stick them on the flag.


Unusual garlands make them volumetric figures- flowers, hearts, toys. They will please the hero of the occasion and bring a lot of joy to his guests.
Options for a children's party
If you are preparing to host a children's party, then you will need decorations that will quickly create a cheerful mood and a festive atmosphere. A garland of flags is ideal for this; it will look stylish, and you will have to spend very little time. Most easy option is a decoration made from paper flags. In this case, the blanks can be decorated with images fairy-tale heroes, or you can put the inscription “happy birthday” on them.

However, it will be much more interesting and original if you make a garland from pieces of fabric and decorate it with decorative bright buttons. You will need: material, paper, elastic band, buttons and PVA glue. To begin with, you should cut out several templates of various sizes from paper, and you can take any paper, even newspapers and old magazines.

After this, according to the created templates, it is necessary to cut the fabric so that the pieces are slightly smaller than paper. You need to prepare small squares from the scraps, and when everything is ready, lay out all the blanks: on each paper - a cloth one, and on it - a square. It is advisable to choose contrasting colors. If you like the chosen combination, you can safely combine the blanks into one three-layer flag.

Then the main thing begins - decorating the flags. To do this, a button is sewn into the very center or sequins are glued on. This way you can decorate all the flags or alternate “decorative” elements. To complete the work, you need to sew the flags to the ribbon, and the garland is completely ready.
For a family celebration
Any garland ideas are suitable for a family celebration, however, since this is a holiday designed for both younger and older, girls and boys, the garlands should be more universal to suit the tastes and wishes of all family members. Decorations of flags decorated with small paper flowers look very harmonious at such holidays.

To make them, you should cut out a semicircle with the outlines of the petals from double-sided paper, and then collect the buds. To do this, the semicircle is rolled into a cone; three blanks are used for one flower. Then they make a thin spiral from green paper - draw a circle and draw a “snail” inside it, and then cut it out according to the markings. All that remains is to straighten and fix the flowers on a kind of thread; you can attach them with ordinary glue.

As a surprise for your significant other
To decorate a room for your loved one, they often make a garland of hearts. To do this, cut out a large number of blanks of the same size from paper, then fold them into 2 pieces and stitch them. The garland is ready; before use, you should slightly bend the resulting petals to make the decoration look more lively, airy and impressive. Using the same principle, a garland of butterflies is made. Surely your significant other will also like them.
Birthday flags are probably the most traditional and popular holiday decoration. This is due to their amazing ability to revive and transform an ordinary interior into a festive one.
On this page you will find free birthday flag templates and step by step instructions for their production.
But before we start creating these decorations, let's look at what types of flags there are and how they are used in holiday decor.

The most common are paper flags. But sometimes they are made from fabric. And even photographs.They decorate tables and cakes.


Flags come in different shapes.
The traditional one is triangular, but there are also rectangular and oval ones and even in the shape of clouds.Perhaps calling them “flags” is not entirely correct, but their role is the same - to serve as a birthday decoration.


They can be the same color as everything holiday decor, or can contrast with it.


You can read about different color solutions for birthday decorations in our other articles:
Party in pink,
Blue color in holiday decorations,


Flags can be cut from regular colored paper.You can cut out any letters from it and make your own inscription on the decoration.They can successfully complement the thematic design.


Flags can be connected in different ways into a common banner or garland:
Pull the tape through the holes;
Connect adjacent flags with bows;
Secure each flag individually and using decorative clothespins or stationery nails.


We hope these photos of festive interiors have inspired you to create your own garland of flags.
And that means it’s time to get started!
Making instructions: “Do-it-yourself paper birthday flags”
Will need:
Paper;
Sample;
Scissors ;
Thread or tape;
Hole punch (optional).
Free Birthday Flag Templates
 We have prepared for you several birthday flag templates on A4 sheets, which you can download and print for free on a color or regular black and white printer.
Template #1 “Color” - designed for a color printer.
Template No. 2– if you don’t have a color printer, these flags can be printed on a regular one if you use colored paper.
Other checkbox templates and various decorations for your birthday you can download for a symbolic price in the section of our website .
Procedure:
1. Print the template and cut out the flags. If you don’t have a printer, cut out flags from colored or any other paper using the same template and glue the component parts on top of each other.
2. Connect all the flags into a common stretch in the way you like best. For example, make holes and thread ribbon through them, or secure each flag individually.
3. Decorate the room with flags.
If you have already decided on the design of your birthday, you can move on to.
Happy holiday!
Templates for download
Attention!Templates are intended for personal use only - posting templates on the Internet or other use or distribution is possible only with the permission of MasterFuns ()
Very little remains until New Year's holidays. And although the Metal White Rat will come into its own only on January 25, we must prepare for the meeting now. Think over the menu that should include. Think about how to decorate a house, apartment,...
The totem likes everything original, so hand-made or garlands are perfect. The rat loves shine and soft colors. She will especially like gold and silver, white, shades of the pastel spectrum, orange, purple. You should not use everything in one decoration at once; it is better to give preference to one.
I offer you several interesting options, which everyone will surely like and will decorate your home. Many jobs can be done with children or even offered to do something during labor lessons at school.
How to make New Year's garlands with the symbol of the year with your own hands - Rat (Mouse) templates
Themed decorations are the simplest and most original way appease the symbol of the year. Cute, almost cartoonish, images will surely delight children. Therefore, such garlands will decorate a children's room and groups in a kindergarten.

To work we will need:
- thick paper;
- scissors;
- hole puncher;
- braid.
Operating procedure:
Download animal templates. The images are mirrored. This is done so that the garland looks the same from any side. Carefully cut out the shape and glue it together. Use a hole punch to make holes in the animals' ears and thread the ribbon through them.


The finished decoration can be mounted under the ceiling. You can also make simple flags with images.

Catch the flag template and single images of animals. Right-click, download, and then simply enlarge to the size you need. You can also draw the blank by hand.


Another option is to fix it in a spiral on the Christmas tree. You can place the same or different images on one garland.
And try to create another decoration in Japanese technology origami. This work can be entrusted to children 9-10 years old. They will surely love how a simple piece of paper turns into a very cute mouse.

To work we will need:
- paper (regular or special for origami) 15x15 cm;
- rope;
- wide ribbon.
Operating procedure:
Fold the sheet diagonally twice. Make sure that the corners meet clearly, the fold lines are clear and even. Position the workpiece so that the square becomes a diamond. Bring the bottom vertex on the left and right to the center line. Repeat the same steps from the top.
Expand. Fold along the folds, creating a triangle fold in the center. These are future ears. You should get an elongated rhombus. Immediately determine where the mouse’s muzzle will be (in this master class it’s on the bottom) and where the tail will be. Take each triangle-ear by the top point and lead to the base. Iron all folds carefully.
The diagram looks like this.

Lead the lower part of the workpiece with its apex to the triangle, which is formed by the bends next to the “ears”. The vertices should touch. Iron the fold, bend it back. Turn the workpiece over. Fold the halves towards the middle on both sides. Turn inside out. The result is a muzzle.
Grasp the top point of the remaining part of the workpiece. Lower it down, folding it in half. Mark the fold. Carefully unfold and fold the middle inward. Then bend the tip so that it fits slightly inside the first fold. Hide any excess by simply folding it under. This will create the tail and back.
Return to the ears. Fold the top so that it lines up with the back. Take pencils, felt-tip pens and draw a mustache and eyes for the mouse. Attach the finished symbols of the year to a rope with some distance from each other. I use it for this decorative clothespins or bright paper clips.
I suggest tying bows from a wide ribbon between the mice. Its color should match the tone of the central design elements.
Garland of flags made of paper and paper clips for the New Year 2020
It is not difficult to imagine that such multi-colored chains can become the basis of beautiful garlands. You can hang them in this form on a small Christmas tree, they will look bright. But you can also make children’s favorite flags. And come up with your own version of decoration.

What you need to prepare to create a craft:
- a box of multi-colored paper clips;
- colored paper (you can use leftovers from previous creative works, since you will still need to cut the paper into thin strips);
- glue;
- a snowflake-shaped hole punch for decoration (or stickers, printouts of snowflake designs, pens to draw them on, etc.);
- scissors.

How to do
To create the frame, take colored paper clips, coated with enamel or painted in another way. For the flags themselves you will need colored paper. Cut thin strips from it. The width should not exceed the length of the paperclip. Draw a bird on one side so that you can later cut out the corner of the flag.

Thread one side of the strip through a paper clip and pull through. Fold the strip in half crosswise. Glue the ends together. Cut out the bottom part with a birdie shape to create a flag.

Prepare many strips of the same size for decoration.

Insert a different color of paper into the hole of each brightly colored paperclip and turn it into flags in the same way. Use glue and scissors.

Using a shaped hole punch, make a snowfall using not only white, but also colored paper. This way you can mix 3 colors in each link.

Glue snowflakes on both sides of each flag (or use another decoration method, such as adding snowmen, penguins, bullfinches, or other winter objects).

All that remains is to fasten the paper clips using the standard method to form a long chain of flags. The result is a wonderful New Year's garland that will become an unusual holiday decoration.


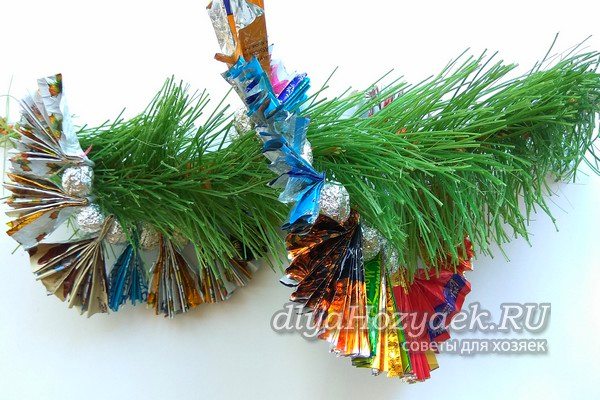
Homemade garland from candy wrappers
You can collect a huge number of candy wrappers of different colors, patterns, textures, you shouldn’t throw away this wealth, because you can make New Year’s crafts from it. It is enough to come up with some fragments that can be endlessly alternated and assembled onto a thread, and you will get an interesting decoration.

To work you will need:
- mix candy wrappers and foil;
- thread and needle;
- stapler if necessary;
- scissors if necessary.

Prepare different wrappers. It is advisable to use different shades, and the sizes can either be the same, or cut them with scissors. All completed parts will be attached to a strong thread.
Step by step work
Roll the silver foil into balls of approximately the same size. They, like beads, will be strung on a thread.

To make fan-shaped pieces to create alternating links, fold each candy wrapper like an accordion. Then bend the resulting strips in the center. Use your fingers to press down on this area to secure the bend.

Take a long thread and thread the needle, tie a knot at the end of the thread. Thread the first foil ball through, then thread the folded part of the fan through.

Thus, alternate the details. Thread the balls and then the wide pieces. You can use a stapler to fasten the side parts, and the garland becomes one whole.

Collect a snake from large quantity segments. If you use the original wrappers of different colors, then the whole structure will turn out to be colorful.

I suggested a great way to utilize the wealth that children collect after each candy they eat. And after the holiday, you will have even more such raw materials, so you can come up with other options for decorating the Christmas tree.
Craft Stars in the form of a garland for the New Year for kindergarten
You can create this beauty with your own hands using glitter foamiran (preferably with an adhesive base). Be sure to involve children in such creativity, because it is for them, by and large, that the room and the Christmas tree are decorated before the fabulous night. Glitter foamiran with an adhesive base is an inexpensive material for children's creativity, which is sold in sets. You can buy yourself such sparkling wealth, then make many stars of different sizes to fill the garland of the desired length. Let's consider a master class on how to make it.

What was used:
- glitter foamiran (thick, sticky with reverse side);
- 2 star templates printed on a printer;
- scissors;
- strong thread (knitting yarn, but can be replaced with nylon or other thread, thin tape).

How to do
Choose 2 sheets of different colors or use the entire mix included in the set for a colorful effect. Print on paper and cut out the stars, you can use parts of two sizes or more. For convenience, stick the templates onto cardboard. Trace the outline of the stars on the back side of the selected sheets of shiny material.

Cut out all the stars along the outline. Make 2 servings if you only choose 2 sheets to work with.

For one star on the garland you will need 2 blanks, since they will be glued together with their back parts. Take a strong thread. Remove the protective paper. Place the thread on the sticky layer in the center.

Cover the top with a second similar star, trying to clearly align the corners to create a symmetrical figure.

Assemble a long garland randomly, alternating parts by color and size. This adhesive-based material adheres well.

A beautiful interior or Christmas tree decoration is ready. It sparkles and sparkles, looks very beautiful, and is easy to do if you work together.


An easy master class on making a garland from colored paper
The name speaks for itself. The work will take very little time, but the result will please you. Such decorations are suitable for home, kindergarten or even school. The idea can be implemented in school labor lessons.
 Source: https://www.youtube.com/channel/UC5ULDV816GiEvfgvrC4hNsg
 To work we will need:
- double-sided colored paper;
- scissors;
- ruler;
- pencil.
Operating procedure:
Fold the paper in half lengthwise. Then again from the blind side. Iron the folds carefully. Place the workpiece with the fold down. Draw a strip 1 cm wide on top. Place marks on the fold line in increments of 1.5 cm. Draw lines. Slice the “noodles” to a horizontal line.

Turn it over. Make cuts between the cuts, also not reaching the edge 1 cm. Carefully unfold the sheet and stretch it. There should be a “network”.

Make a few more blanks in other colors. Glue them together, bringing them to the desired length. The garland can be hung on the window, secured to the tulle with pins.

DIY garland of paper snowflakes for New Year's Eve
I really like the paper analogues of winter precipitation. But I also love garlands. In this master class I propose to combine them. You will get one original decoration.
 Source: https://www.youtube.com/channel/UCWqcfwUxk9a7qGqt7892FFA
 To work we will need:
- white paper;
- scissors;
- pencil.
Operating procedure:
Divide a sheet of paper in half lengthwise. Then cross each half by two more stitches. Fold the resulting rectangle along its width. Each wing is brought to a fold. Fold in half again.

Starting from the fold line, draw the outline of the future snowflake. Carefully cut and then unfold.

Repeat steps 1-3 with the remaining paper. Fasten all parts of the garland together with tape. Add elements until you reach the length you need.

Snowflakes don't have to be white, they can be colored.

How to make a garland of pine cones and bows to decorate a room
Look how beautiful it is! Natural material can be painted with golden paint and bows, beads or Christmas balls. A version of such a craft is presented in this master class, and you can easily reproduce a similar copy with your children to decorate a room or even an entire classroom. The more cones you collect in the park or forest in the fall, the longer the garland you will get.

What you need to prepare for work:
- twine or thin brocade ribbon for the base;
- cones;
- golden acrylic paint with a brush or other paint to cover the surface of the pine cones;
- beautiful satin ribbon with lurex;
- glue;
- half beads;
- Christmas balls.

How to do
Take everything to work necessary materials. You can keep the bows and balloons in the same color scheme; you don’t have to use balloons if you have enough pine cones to fill the decoration. Cover the surface of natural material with golden acrylic paint. If you use a brush, this coating will be uneven. Full coloring can be achieved using spray paint.

Prepare the base of the garland, such as twine or thin brocade ribbon. Attach the cones at some distance from each other using a glue gun.

For additional decoration, prepare bows from satin ribbon, and decorate the middles of the bows with beautiful half-beads.

Glue each resulting bow to the top of the pine cone to hide the places where it is attached to the twine. This way you will already have a modeled beautiful garland, but you can also decorate it additionally.

Between natural materials stick small balls. There you have it, something wonderful is ready. Christmas decoration, which can be hung on the Christmas tree or on the wall. It is unusual, looks elegant, festive and lifts your spirits.


Step-by-step production of the New Year's garland “Snowmen” for windows
On New Year's Eve, glass surfaces are often painted in my family. But how difficult it is to wash them later. And I found an alternative. Making such a decoration is not as difficult as it might seem.
 Source: https://www.youtube.com/channel/UCfUNn0nNcM35FBKL11tB1Iw
 To work we will need:
- A4 paper;
- stationery knife;
- pencil;
- scissors.
Operating procedure:
Divide the paper into long side. Take one half. Fold it in half. Then fold each wing again, towards the fold line. Draw a snowman. Carefully cut along the outline. Open it up.

Repeat step 1-3. Then we color our characters, draw the nose, eyes, buttons and hat. We connect all the parts with tape. Or you can do all this using the applique technique - it will be even more beautiful.

Making a garland from plasticine for a wall or Christmas tree with the children
Candy decoration is popular at all times. Who among us has not made long chains of sweets and hung them on the Christmas tree or on the walls? How nice it is to gradually remove the candies from the branches and enjoy such delicious and favorite treats. This lesson also shows how to make a simple candy garland, but these will not be real sweets, but lollipops made from ball plasticine. Such a craft can be considered as a practical joke, because friends will probably want to eat delicious candies, but it turns out that they are not real at all.

What you need to prepare to make a New Year's craft:
- ball plasticine;
- stapler;
- file or thick plastic bag;
- golden ribbon or serpentine;
- thread (optional).

How to make a decoration
Prepare plasticine for work. It will be used to make candies that resemble candies. You can tie “treats” to the thread or simply staple them together. First, prepare these small pieces.

Turn each into a small slice triangular shape. Connect them together, alternating colors. These slices should be approximately the same size.

To make each lollipop round, fasten together about 4 pieces of two colors around the circumference. You will get two-color caramels. Then continue working the next day, when the plasticine has dried well.

Cut the prepared file or thick plastic bag into squares. Wrap a piece of candy in each one. Also prepare a golden ribbon to tie the ends.

Twist the candy wrappers, the candies will be clearly visible through the transparent plastic, they will be in no way inferior to the real thing. Tie bows at the ends with gold ribbon.

Using a stapler, assemble a garland or tie each candy onto a thread. The result was a beautiful New Year's decoration - bright and believable.


Ideas for making garlands with your own hands from all sorts of things
Shortly before the New Year, all housewives begin to sort through all the boxes, boxes, bags in search of what is high time to throw away. But I ask you not to rush. I offer several master classes in which I will tell you how you can easily turn unnecessary objects into a real masterpiece. I'll start with the original, very fragrant garland. Such eco-friendly jewelry is in trend today. And the Metal Rat likes them too.

A paper garland is quite simple to make; it can be made for a child’s birthday or simply to decorate a room for any holiday. Making the brightest and most spectacular paper garlands is not at all difficult - the instructions will help you do it in literally a matter of minutes.
We make a garland of flowers with our own hands.

Stylized flowers
- We cut out blanks for future flowers from colored paper - a semicircle with markings for the petals. It's better to take bright colors and double-sided colored paper.

- We collect flowers - we glue the cones and collect the buds. Three blanks should form one flower.

- We cut out a spiral from green paper - it will be the basis for our garland. We straighten the base and glue the flowers at approximately the same distance.

- You can decorate a garland using sparkles.

Funny roses
Another garland of paper flowers - this time it's stylized roses. Making such a flower garland from paper with your own hands is quite simple - draw it yourself by hand or print out templates for cutting, and trace them on any paper (by the way, you can use paper with a pattern).

Make a lot of roses - you need to cut out a spiral and then glue an original rose out of it. When there are enough flowers, string the roses on a rope, and your DIY paper garland for a wedding or birthday is ready!

or you can cut out a spiral with a wave, you get a flower like this:

Printable template: 
From felt
It is very easy to make a garland with your own hands from felt.

For this we need:
- colored felt (it is better to take pure shades);
- lace, ribbon or braid;
- sharp scissors;
- sewing machine (or thread and needle).
A DIY felt garland is made like this:

If you already have a flat garland, and now you want to make voluminous ones New Year's garlands, then you will love the butterfly garland.
Making this original Christmas tree garland is very, very simple:
- we cut the blanks (you can use diagrams - you can download them for free, you can cut them by eye);
- we collect bow ties - we sew a large rectangle with thread across it, pull it together, tighten the knot and close it with a small jumper;
- we string the butterflies on a thread or a beautiful cord; you can also use twine or ribbon for the garland;
- straighten the butterflies - your DIY wedding garland is ready!
From hearts
Garlands made of hearts look very impressive - they can be used for any holiday, you can make your own decoration for a wedding or simply decorate an apartment or office for Valentine's Day.

How to make a garland of hearts using colored paper and a stapler:

You can make a one-color garland - for example, in red or pink tones, or you can use paper of several shades (by the way, double-sided colored paper works well for a printer).


There is another option for a garland of hearts made from paper yourself. We will need colored paper, a cutting template (you can download and print), a pencil (to transfer the template onto paper), scissors and a sewing machine.


This DIY heart garland is made like this:
- cut out a lot of hearts, the more the better;

- fold in pairs and stitch on a sewing machine;

- leave some distance if desired and sew the next pair without cutting the thread; sew all the hearts;

- straighten the hearts in each pair so that they turn out three-dimensional figures; our decor is ready.

By the way, a garland of paper circles is made using the same principle - circles of colored paper are folded in pairs and stitched. You can stack three or four blanks, then you will get multi-colored paper balls.


From checkboxes
A flag garland looks very elegant - it can have an inscription happy birthday or welcome, and a garland of flags can be used at any party or children's party.

How to make a garland of flags for a children's birthday with your own hands? Three simple steps:

Simple, isn't it?
For those who want a little more complexity, a garland of flags and fabric. So, we already understand how to make a garland of flags with our own hands, but at what stage should we add fabric and what kind? Again, it's simple.

- From colored paper we cut out the shape of our flag - for example, a triangle.

- Cut out a smaller triangle from fabric and glue it onto paper;

- We sew or glue buttons and sequins on top;

- We sew flags onto the future garland with our own hands or using a sewing machine. It is best to use braid or bias tape and place flags on it.

It is clear that paper garlands are not very durable - they will last a maximum of one or two uses, but what if you want to make something more durable? For example, for a kindergarten you can make a flag garland from fabric.

How to sew a garland of flags step by step:
- We will prepare several colors of fabric;

- make a pattern in the shape of a triangle (you can use triangles of different sizes);

- transfer the pattern to the fabric (it is best to take two or three shades of fabric - a three-color garland looks very beautiful);

- cut out the pattern and fold the triangles in pairs with the front side inward;

- pinned with tailor's pins or basted on a quick fix and then we sew on two sides of each triangle using a machine (I also overlaid the edges) - leave a very small seam allowance, this will make the triangle sharper and more beautiful;

- we turn out the triangles and make rough seams around the perimeter;

- we baste the flags to the tape (in my case, a narrow strip of fabric); sew on a machine;

- remove the basting; wash and iron the product.

Decorative braid with flags made in this way can be used at home and in the kindergarten, you can make special decor for the street (kids especially like this for the New Year).
for the new year
Making Christmas garlands is fun and exciting! To make a beautiful and original garland you will need small candle lamps, narrow tinsel and a couple of jars of paint - special for glass or regular acrylic. The light bulbs are dipped one at a time in paint and dried on a cardboard stand (the bases can be wrapped in cling film to prevent them from getting dirty). Then the light bulbs are glued to the tinsel in a chaotic order, and the unusual Christmas tree garland is ready!

Making another Christmas tree garland is also not too difficult - the main thing is to stock up on a template. For printing, you can use colored paper at once, or you can make one general template and copy it onto paper of any color. Printed or redrawn templates must be cut as shown in the diagram and strung on bright twine.
Print template: 
A garland made of felt balls looks very cozy and very Christmas-like. You can do it together with your child - you just need help. In order to make such an interior decoration, you will need felt balls. No, not even that - A LOT of felt balls.

Making them is quite simple - take some wool for felting in your palm, wet it under the tap, and then lightly roll it into a ball. Add foam or soap and continue rolling. When the ball starts to form, you need to apply a little effort.

If the wool is acting up, try changing the water temperature several times - after a couple of changes from cold to hot water and back again, the fibers begin to fall off. The future ball must be thoroughly rinsed from soap. The ball is ready when it becomes hard.

Make a lot of these balls - they can be the same color (then it’s better to take a contrasting thread for stringing) or different shades, and then just string them on a thread and a needle, and your cozy winter decor is ready. By the way, with such balls you can decorate a Christmas wreath on the door and christmas tree.


Christmas tree patterns: 


Well, I’ve infected you with my handicraft enthusiasm and you already want to make all kinds of garlands from flowers, felt balls, flags and other things? Then it's time to see what other decors are available.
For example, you can make chic wedding garlands with your own hands.
Templates for printing: 
A DIY festive garland for a wedding can be not only solemn, but also very cute - like this country-style flower garland.
Use your imagination - use the materials you have at hand. These can be scraps of colored paper and scrap sheets, scraps of beautiful fabric and thick film, beads and buttons, sequins and feathers, old light bulbs and even small wooden clothespins - holiday decor can be made from literally anything!
Isolina Chubukova
Dear Colleagues!
Nowadays it is difficult to surprise anyone with ordinary checkboxes. But it turned out that such checkboxes, which would be suitable for our children to organize physical education activities, games and holidays, are not sold anywhere. That's why we decided to make these DIY flags. I looked through various MKs on the Internet, but didn’t find anything suitable! But in our kindergarten in middle group teachers Lyudmila Nikolaevna and Natalya Valerievna have just such checkboxes, as we need! So I consulted with my colleagues, agreed with my parents about help, and this is what we got!

For such checkboxes you will need Oxford cloth

Tailor's sharp scissors, furniture stapler with paper clips and

more - wooden sticks. The cross-sectional diameter of such a shaft is 1 cm, we bought the wooden part in the LEROY MERLIN store.

We first wanted to do sushi stick flags. But the sushi sticks are a bit thin. In this photo I showed you ours for comparison. flag and chopsticks for sushi. First, let's cut the fabric according to this pattern.

For this we will need scissors. At first I tried to cut the fabric with a soldering iron, but it was long and tedious. My colleagues fabric for their checkboxes cut with regular scissors and checkboxes After several years of use they have not become frayed at all.

We also decided to cut the fabric with scissors. Then, in accordance with this drawing, we fasten the fabric onto sticks with a furniture stapler.

For each checkbox three paper clips wasted.

Look how they look flags in the hands of a child. I think this size is for the most optimal flags.

This quantity checkboxes there should be enough for all our children! Ulyana's dad helped us make checkboxes! Thank him very much!

And you thanks to all for your attention!
Publications on the topic:
Master class at a conference for parents “What is paper for?” Author: Kushnerova V. N. 04/24/2014 Borodino Problem: What kind of paper can you use to get beautiful blooming flowers? Goal: Consolidate knowledge.
Summary of a drawing lesson for a general developmental group for children 3–4 years old Beautiful flags on a string municipal budget preschool educational institution « Kindergarten No. 1" of the city of Orenburg Synopsis of joint educational.
 Topic: “Multi-colored flags” Objectives: Continue teaching children to draw square, triangular, and rectangular objects. Call
 Goal: To consolidate the techniques of careful gluing, the ability to alternate images by color. Develop a sense of rhythm and a sense of color. Move.
 "Basket with flowers from plastic cups" Goal: Exchange of professional experience with teachers and use of manufacturing technology.
Master class for teachers “Games to relieve psycho-emotional stress” Master class for teachers “Games to relieve psycho-emotional stress” Psycho-emotional stress is a psychophysiological state.
 Master class for teachers “Making the symbol of the New Year - dogs” from scrap materials. Compiled by: Myasnikova E. A., Rashitova G. M.,.


