Good afternoon I hasten to please New Year's ideas toys, and those who have not yet made gifts for New Year, I recommend not to delay this for too long and choose them in this
Tell me, what do you prefer to give for New Year? What about receiving? Probably everyone really likes receiving toys for the Christmas tree, and just all sorts of them. I agree, I remember when I published a post about crafts for the upcoming holidays, so a lot of people sent me wishes and congratulations, so I also want to congratulate everyone on the upcoming holidays!
After writing my last post about New Year’s crafts, I received letters in the mail asking me to publish more options for what can be made from plasticine, and I’m sharing my experiences with you.
She's so beautiful!

Do you like to sculpt Christmas trees and snowmen? Then use these step-by-step instructions with photos:


Where would we be without Santa Claus, children simply love to see him at the holiday, and even more so to make crafts.

These are the kinds of compositions that can come out.

If you want, you can even sculpt Peppa Pig and her brother George from the cartoon.

Or, for example, a mouse or a rat.

You can make a dog lying near the Christmas tree, let it bring good luck and warmth to your home and become a talisman.
Such an affectionate and sad puppy girl.

Or playful Tuzik, what do you choose?

I remember once upon a time I had to work in a kindergarten, you understand that kindergartens are almost not funded, so at that time we made and decorated our group from whatever we could, from all sorts of things in general. It was ordinary polystyrene foam or they took cheap ceiling tiles and this is what happened:

Agree, there seems to be nothing difficult, but it also looks original, with a twist.

Toys made from salt dough are a little more complicated and time consuming.


Beautiful felt toys for the New Year tree
Now, as for felt, well, you can create a lot of ideas and find them on the Internet.


Their diagrams and patterns are quite simple, you can easily draw them yourself.
Funny little deer.

The Christmas tree is a forest beauty.

If you are interested in this Christmas tree, or this bookmark for books in the shape of a dog, then write to me below, I will send you templates and a diagram.


Felt Snow Maiden.

How do you like such wonderful creatures, if you decorate a Christmas tree with them, there are enlarged diagrams, they will appear soon in another post, or write to me and I will send them.

By the way, I was so fascinated by the topic of felt that I will soon write a separate article on this topic, so fans, wait, add my blog to bookmarks and rejoice with me))). By the way, if you need crocheted toys, then don’t hesitate to go here, there’s a whole bunch of them
Master class on paper crafts in the form of balls and lanterns
Who doesn't love balloons on the Christmas tree? Probably everyone just loves them, let's make a simple version.
You will need colored or multi-colored paper, scissors and glue. You will need to cut out 20 circles of the same size from it. And then follow this pattern, roll it up as shown in these pictures.

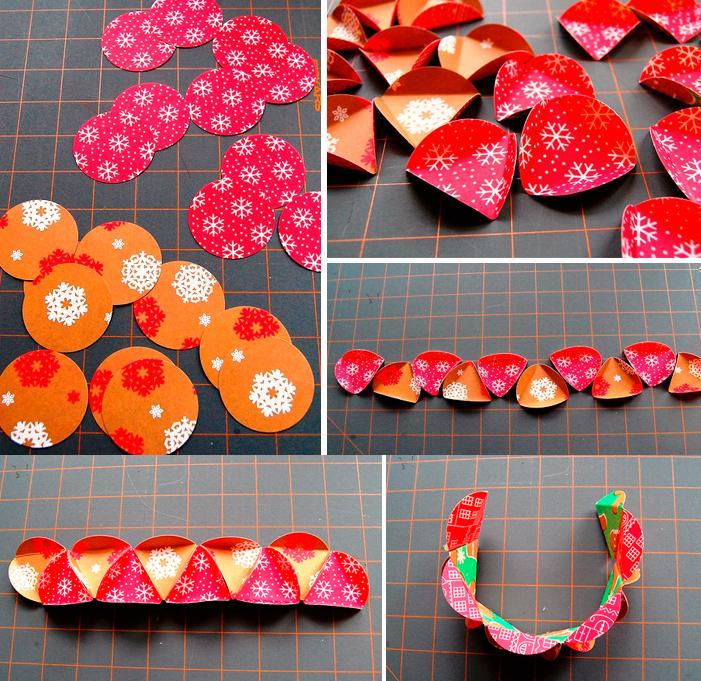
Then glue as shown good glue, it’s better to take Ericruser or PVA.

There is another option for such a ball for a Christmas tree made of paper.

I also give you the most popular type of balloon decoration, in this video everything is shown in great detail and clearly, you just have to repeat necessary actions behind the leader:
And here’s another super idea, you’ve definitely never seen anything like this before:
For school and kindergarten I can offer such interesting flashlights that everyone probably knows and remembers.


And another masterpiece in the form of a garland, it is not something unimaginably beautiful. Watch this video from YouTube channel:
Paper toys for the New Year
First place can rightfully be given to snowflakes different types and in origami style and volumetric options, who needs all sorts of ideas and templates, see snowflake patterns here


It is also easy to fold various figures from paper strips.


We make Christmas decorations for the Christmas tree with our own hands from plastic bottles and light bulbs
A fairly common craft, a souvenir, and someone will even give such a treasure as a gift, I recommend doing it yourself at home. Just be careful if you make a craft from a light bulb, it’s still not for children’s hands.


From plastic bottles will be safer and more durable.

Do you like to do handicrafts? Then you will love making Christmas tree decorations with your own hands! It's nice and exciting activity for the whole family, which will not leave anyone indifferent - you will spend several evenings with pleasure making Christmas tree decorations with your own hands.
What do we use for the material?
What do you need to make your own New Year's decorations? You can use almost anything you can get your hands on. If you want, you can buy special supplies (sold in craft stores), or you can use what you have in any home. So what to prepare:- plain paper (good for making patterns);
- pencils and markers;
- regular cardboard, white and colored (you can use velvet);
- sharp scissors and a breadboard knife;
- glue (PVA or glue gun with rods);
- threads and needles;
- yarn of different shades;
- various decorative materials - these can be sparkles, sequins, confetti, multi-colored foil, stickers and much more.
Simple crafts from scrap materials
Of course, you've probably seen how New Year's balls are made from thread and glue with your own hands, but why not expand the range? We make various Christmas tree decorations with our own hands.From yarn
This is a simple and at the same time spectacular Christmas tree decoration that can decorate any Christmas tree.
For production you will need:
- yarn;
- tailor's pins;
- plate or bowl;
- porous material (for example, a disposable tray);
- cutting paper;
- marker.

The template needs to be attached with pins (or ordinary toothpicks) to the porous material, and the design you need should be laid out on top - first the outline is laid out, then the interior decor. You should not cross the threads too often; the toy should be fairly flat. Once you're done, dry the item and remove it from the pins and tie a loop in the eye. If desired, you can decorate with sparkles or rain.

From wire
How to make New Year's toys with your own hands in just a couple of minutes? Use wire!
To make toys you will need:
- two types of wire - thick and thin (thin wire can be replaced with bright threads, for example, floss. Pure white strong threads look very beautiful);
- beads, beads;
- colored tape;
- pliers.
The ends of the thick wire need to be twisted. You need to string beads and seed beads mixed together on a thin wire, tie the end of the thin wire to the future Christmas tree decoration, and wrap it randomly.

When the toy is evenly wrapped, you need to wrap the free tail of the wire around the toy and tie a ribbon in the shape of a bow - your toy is ready.
Another original idea:

Made from ribbon and beads
Who said that making New Year's toys with your own hands must take a long time and painstakingly? Not at all. In just five minutes you can create one that will decorate both the New Year’s tree and the interior.
You will need:
- beads;
- narrow tape;
- yellow, golden or silver cardboard;
- glue "Second";
- needle and thread.

Interior decor made in this way looks very attractive.
From cardboard - in a couple of minutes
Some New Year's toys made of paper or cardboard take a lot of time to make, but not in this case - here you really only need a couple of minutes to make an elegant hand-made New Year's decoration.So, you will need:
- ordinary cardboard;
- a little twine or thick yarn;
- glue;
- paints and brushes;
- napkin or cloth;
- varied decor.

Use a loose tail of twine to wrap the tree in different directions. After some kind of thread pattern appears on the tree, you can start gluing it with a napkin. You can tear the napkin into pieces, coat the tree well with glue, and seal it tightly with the napkin. This will give a nice texture to the future toy.

After the toy has dried, you can start painting - paint the Christmas tree in green color.

After the paint layer has dried, shade the texture of the toy using a dry, hard brush and white paint, and then decorate it to your taste.

From bright shreds
Here you will need sewing machine, but if you really want to, you can do it without it. This The best way make New Year's toys from cotton wool and fabric - just choose a fabric with a Christmas ornament, or use what you have on hand.
Prepare several paper patterns - for example, deer, stars, gingerbread men, teddy bears, letters and hearts. Cut out fabric blanks with your own hands, sew them in pairs, leaving a small gap (for stuffing), and through this small hole, tightly stuff the toys with cotton wool or padding polyester. It is most convenient to fill with a pencil.
Patterns can be downloaded here:


By the way, don’t forget - we sew on a machine from the inside, but if you decide to make toys from thick fabric with your kids, then it is better to sew them with a decorative seam over the edge - a toy with your own hands will look simply charming and will be suitable for a home Christmas tree or for a kindergarten - Usually, for kindergarten Christmas trees, children make decorations themselves.
Made from twine and cardboard
New Year's toys made of paper and cardboard will be much more interesting if you add a couple more to them simple materials. To make such a toy you will need ordinary cardboard, simple paper or natural twine, a little felt or any other fabric, as well as ordinary paper, a pencil and ruler, and a drop of glue.
The star template can be downloaded here:

First, make a pattern on plain paper, and then transfer it to cardboard. Don't forget that the star must be double. You shouldn’t make the star too thin; it’s better to make it a centimeter or more. The tail of the twine is glued to the cardboard, then you need to gradually wrap the entire workpiece.

Place the thread as tightly as possible so that there are no gaps. To decorate the star, make a couple of leaves and berries from fabric and decorate one of the rays. Your decoration is ready.

From yarn and cardboard
Do you want to make original and at the same time charming Christmas tree decorations with your own hands? Then it's time to make small gift hats with your own hands from scrap materials. This is wonderful New Year's gift, which looks cute and will keep you warm all winter long!
To make Christmas tree decorations in the form of hats, you will need:
- a couple of bushings from toilet paper(you can just glue cardboard rings together);
- remnants of colored yarn;
- beads and sequins for decoration.

The threads need to be cut into pieces of approximately 20-22 centimeters. We fold each piece in half, pass the loop through the cardboard ring, and pull the free edges of the threads through the loop. It is necessary that the thread is firmly fixed to the cardboard base. This needs to be repeated until the cardboard base is hidden under the threads.

All the thread tails need to be pulled through the ring so that our hat has a “lapel”.

Now we pull the loose tails tightly with thread and trim them into a pom-pom shape - the hat is ready! All that remains is to make a loop and decorate your Christmas tree toy with sequins and sparkles.

From beads
Do New Year's toy in the minimalist style is easy and simple - you will need wire, beads and seed beads, a ribbon and a coin (can be replaced with a small candy, but with a coin it looks much more impressive). Try to make this Christmas tree toy with your own hands, the master class is very simple.
Make a loop on the wire and string green beads mixed with large beads on it - they will play the role of New Year's balls on our Christmas tree. Once the wire is filled, give it a herringbone shape by folding it in a spiral.
Once your tree has taken shape, bend the free edge into a loop.

We cut off a piece of ribbon, form a loop from it for hanging and pull it through the Christmas tree, and decorate the free tail with a coin (the easiest way is to glue it with double-sided tape). We tie a decorative bow on the hanging loop - your decor is ready!

Christmas balls
How to do New Year's ball from threads? It’s as simple as shelling pears, watch our master class on spectacular lace balls to the Christmas tree.Required:
- several balloons;
- cotton threads;
- PVA, water and sugar;
- scissors;
- polymer glue;
- spray paint;
- decor

First you need to inflate the balloon - not completely, but according to the size of the future decoration. Mix two tablespoons of water, two teaspoons of sugar and PVA glue (50 ml), and soak the thread in this mixture so that the thread is saturated. Then you need to wrap the ball with thread randomly. The balls need to be dried for several hours. After the glue has completely dried, you need to deflate the ball and take it out, and carefully paint the ball of thread with spray paint and decorate it with sequins and sparkles.
DIY thread Christmas balls will turn out to be very, very impressive if you make them in different tones - for example, red, silver and gold. Try making Christmas balls with your own hands in different techniques- you can sew or knit balls, make them out of cotton wool with your own hands, or, for example, sew them out of felt - you can never have too many of these toys.
From paper
New Year's paper decorations are enjoyed great love For both big and small admirers of the New Year's miracle, try making paper Christmas tree balls with your own hands.
A DIY paper Christmas toy is made like this: 
There is no additional need to decorate such a toy; it is already expressive.

Another ball option:

Or you can make a ball like this according to the master class:


From felt
DIY felt Christmas toys look very warm and cozy, and they are very, very easy to make. To make your own charming felt Christmas tree decorations you will need:- red, white and green felt;
- red, white and green threads;
- Crystal glue;
- scissors and needles;
- cardboard;
- a little satin ribbon;
- soft filler (cotton wool, holofiber, padding polyester).

First, make sketches for your future toys. It can be anything. Once the patterns are ready, transfer them to felt and cut them out. What is good about this material is that it does not crumble, you will not need to additionally process the edge of each workpiece.
Make identical decorative elements - for example, sprigs of holly (by the way, did you know that this is a symbol of joy and Christmas reconciliation?). The berries need to be glued to the leaf using glue, and then a decorative knot should be made - this will give the berries volume.
We sew each piece together in pairs. By the way, it is best to sew it with contrasting threads; it will be fun and elegant. How to make New Year's decorations voluminous? Stuff them with holofiber before sewing them up completely! Straighten the product well, so the Christmas tree toy will be filled more evenly. You can use the back of a pencil for stuffing.
Sew on the decorative elements and your New Year's toy is ready!


Try to sew felt decorations not only for the New Year tree, but also for your home - for example, a Christmas wreath decorated with felt toys looks very stylish. Check out the selection New Year's decorations DIY photos of master classes - and you will understand how many interesting things can be made from ordinary felt in two or three colors.

Master class on how to make New Year's garland do it yourself from felt:

Below you can download templates and patterns of different Christmas trees for felt crafts.
Making toys from paper originated in Japan many centuries ago, it is known as origami. Later, various crafts for the entertainment of children and adults began to be made from this material in Europe. Today they are still just as popular, especially since learning how to make a toy out of paper is not difficult at all, since master classes and photographs of the process of making them can be found everywhere.
Studying emotions
Do you want to learn how to make a paper toy with your own hands that will help your baby learn the world? Then look at the photo below.
To make it you will need a large sheet of plywood, cardboard, colored paper, glue stick, scissors and pushpins with solid round heads.
Operating procedure:
- a piece of plywood is painted or covered with colored paper;
- a circle is cut out of cardboard to represent the person’s face;
- details in the form of eyes, semicircles for the mouth, stripes for eyebrows, circles for cheeks, etc. are drawn on colored paper desired color and drawing;
- cut out the parts and glue the eyes;
- the circle-face is glued to the center of the plywood sheet;
- use buttons to secure eyes, eyebrows and mouth;
- glue the cheeks and nose.
That's it, the toy is ready, and now you can study human emotions together with your baby.
"Bear"
Anyone who wants to learn how to make a toy out of paper to place on a desktop can look at a photo of a craft in the form of Winnie the Pooh.

To make it you will need a regular White paper, scissors and a printer on which to print the silhouette of this fairy-tale character. In this case, you first need to remove the bear’s face from the image using one of the graphic editors. Followed by:
- Cut out the design along the contour and leave a strip below the legs half the height of the figurine and a length equal to the distance between the cuts multiplied by 4. It will need to be bent back like a stand so that the figurine stands.
- Make cuts on both sides of the bear’s “face” and cut out a paper rectangle of such a width that it fits freely into them.
- Move the strip so that it is 1 cm indented to the left of Winnie the Pooh’s head, and draw eyes, a nose, a mouth, etc. on it.
- Extend the paper tape 2-3 cm and draw a face with a different expression, for example sad.
- Repeat the same procedure again, but now feign surprise.
- Glue the ends of the tape together to make a ring.
- Glue a label with some suitable inscription on the bear's tummy.
How to make a paper toy for a Christmas tree
100-150 years ago, Christmas tree decorations were mainly made by hand. And although today there is no shortage of factory-made garlands and balls, hand-made options continue to be in demand. For example, let's look at how to make a paper toy for a Christmas tree.
To work you will need:
- decorative paper or colored, not very thick, coated;
- Super glue;
- polystyrene ball;
- silver thread;
- compass;
- a long pin with a large head.
Operating procedure:
- cut from decorative paper circles with a diameter of 5 cm in the amount of 20-30 pieces;
- cut out spirals from circles;
- wrap them to make buds;
- open the spirals so that the flowers open a little;
- open the circle located at the bottom and pour glue into the middle or apply silicone from a pistol;
- glue the flowers to the ball very tightly, so that the polystyrene is not visible;
- Using a pin, attach a ribbon to the ball and hang the toy on the Christmas tree.

New Year's surprise
To prepare such a Christmas ball, you will need:
- old glossy magazine;
- scotch;
- scissors;
- glue.
Operating procedure:
- a magazine sheet is folded 4 times;
- draw a circle and after cutting it out you get 4 circles
- each circle is folded in half;
- tuck them so that they form cones;
- secure them with tape;
- glue the cones together and get a ball;
- attach a ribbon to the ball and hang it on the Christmas tree or on the ceiling of the room where the New Year is supposed to be celebrated.
Paper toy with beads
Such New Year's craft It's very easy to make; any child can make it.

First you need to cut out a strip of paper 2-3 cm thick and 6 cm long, make an applique on it in the form of some kind of ethnic ornament and roll it into a ring. At the junction of the ends of the ring, you should place them on top of each other and make a hole. You need to insert the ends of a ribbon folded in half into the hole and put on 3-4 bright beads. After tying the knot, you need to pull the ribbon out from the side of the loop and hang the craft on the Christmas tree.
How to make a paper kitten toy
Veterinarians say that pets simply need movement. However, today, for example, kittens are much less active than necessary. To make them run and frolic, you need to interest the kids. In particular, if you are interested in how to make a paper toy for your fluffy pet, just fold the sheet like an accordion and tie it in the middle with a string. You need to tie a string to such a “bow” and tease the baby with it, forcing him to jump and catch the “butterfly”.
You can also make a ball from crumpled up sheets of paper or glue a box with a lid in which you need to cut a lot of holes. They should be of such a diameter that a kitten’s paw can fit into them, and you should put some dry food inside the box.
Comic paper toy
Such a craft will require a lot of patience and skill, but the result will please both you and the person to whom you present such a gift.
Before you make a joke toy out of paper, you need to decide what surprises you will use. Their choice should be made taking into account the person for whom the gift is being prepared.
Next, you need to make individual boxes with lids in the form of pieces of cake. Each of them should be decorated with paper flowers and small surprises should be placed inside.

Before “serving”, the pieces need to be placed on a tray so that a whole “cake” is obtained.
Now you know what toys can be made from paper, and you can keep your children busy with useful and exciting activities.
Hello, friends! Well, have you already started the New Year's bustle? Yesterday we finally bought an artificial one, but there really isn’t much to decorate it with. Therefore, an interesting idea came to my mind about making Christmas tree decorations with my own hands.
I would like to invite you to do such an exciting thing. So throw laziness aside, call your kids and start creating New Year's!
After all, in any case, you have paper, glue, plastic bottles and other available materials. Well, there is, right? We will need all of them today. From them you can make animal faces, carved ones, as well as the Snow Maiden and Father Frost and a bunch of other wonderful decorations. So don’t think for a long time, but rather start the fun process.
Moreover, there will be more than enough ideas for such an undertaking. As always, I tried and found the most best options making toys for the Christmas tree. And if you are ready, then we begin. 😉
Do not forget that in any business you need to use your own imagination. This is the only way you can get amazing and exclusive souvenirs.
DIY Christmas tree toys from scrap materials for children
First of all, I want to offer you interesting ideas on creating jewelry from different and almost any materials that are in every home.
Be sure to involve your children in creativity, because they are the ones who are looking forward to this magical holiday - New Year - more than anything else in the world. And they will be incredibly pleased to hang toys that they make themselves on the Christmas tree.
I suggest you do interesting decoration in the form of a small Christmas tree from an egg tray.
"Christmas tree from an egg tray"

You will need:
- gouache;
- Super glue;
- paper egg packaging;
- scissors;
- brushes;
- PVA glue;
- thread;
- pencil.

Manufacturing process:
1. Take a paper egg carton and cut out 5-7 cells. Cut out parts from them as shown in the photo. Cut one of the cells in half, this will be the top.

2. Glue the parts together to form a tree. Roll the parts that come out of the halves into a cone and glue them at the top.

3. Take green gouache and paint the workpiece.

4. Cut out decorations from the leftover paper packaging and, if necessary, glue them together. Make small balls from a mixture of small pieces of paper and PVA glue.

5. Color the decorations.

6. Decorate the Christmas tree by gluing all the decor. Don't forget to glue the string by which you will weigh the toy.

7. Coat the product clear varnish, dry. All is ready!

If you are a lover of expensive wine, then after emptying the bottle, do not rush to discard its cork. Collect them. And in right time they will be useful to you. For example, use them for the following purposes.
"Souvenir made from wine corks"

You will need:
- 6 natural wine bottle stoppers;
- natural twine;
- Super glue;
- scissors;
- confetti, small beads.

Manufacturing process:
1. Carefully cut each cork into 3 equal parts with a knife.

The knife must be sharp so that the corks do not crumble.
2. You should end up with 18 pieces.

3. Now lay out small triangles from these pieces on a hard surface. One triangle should consist of 6 pieces of corks. There should be 3 triangles in total.

4. Glue each resulting triangle.

5. Cut three 40 cm ropes from twine.

6. Tie each string in the middle, forming a loop.

7. Take a dried triangle, attach a loop knot to the top, coating the place where they touch with glue.

8. Loop the twine around the entire triangle and tie the loose ends tightly in a knot.

9. For a tighter fixation, the thread can also be coated with transparent glue.

10. Make the same thing from the two remaining triangular blanks.


Well, now try to make beautiful snowmen from iron corks.
"Snowmen"

You will need:
- ribbons;
- bottle caps;
- acrylic paints;
- buttons;
- glue.
Manufacturing process:
1. Take three good, non-deformed bottle caps. Wash and dry them. Then paint with white acrylic paint.

2. Once the pieces have dried, glue the lids onto the tape, leaving a loop on top.


4. Cut a small strip from a satin ribbon. This will be a scarf. Tie it over the plugs. And glue a button in the middle. The bright decoration in the shape of a snowman is completely ready.

You can also use not only corks, but also the bottles themselves. Just not glass, but plastic. For example, by cutting them into halves and then gluing the parts to the required length, you get an excellent blank for any toy. Let your imagination run wild. And then, using paints, bring the plastic blanks to life.
This is how beautiful and bright you can make a penguin. I think everything will be clear to you from the diagram.

Or fill the bottles with any New Year's souvenirs, and decorate the top.

You can also cut strips from plastic and assemble a ball.


Here simple idea making small toys from paper and satin ribbons. Find on the Internet New Year pictures, print them in the shape of a circle, cut them out. Then glue it onto the cardboard. Weave the ribbons together and cover the outline with them. Glue the loop.

And here's another one for you paper assembly. This is also a very simple product, just right for kids. Print the diagram and cut it out. Assemble the craft along the fold lines and glue it together. Decorate with beads, plasticine, etc. Glue a bow loop. That's all!

"Crystal Ball"

You will need:
- half beads made of glass and plastic;
- foam balls;
- trimmings of satin ribbons;
- scissors;
- glue gun
Manufacturing process:
1. Take a foam ball and start covering it in a circle with half-beads. At the same time, you can lay out a specific pattern, or make the craft monochromatic.
Remember that the glue must be applied in a thin layer, otherwise the foam will melt.
2. After you have completely covered the entire ball, all you have to do is embellish it a little more. Simply tie a bow from satin scraps and glue to the item. Don't forget about the loop.

In the same way you can make balls from buttons. Just paint the foam balls first, and then glue on the multi-colored buttons.

And disposable plastic cups In general, a godsend for creativity. They just need to be turned upside down and covered with paper decorations, sequins, adhesive tape or painted with paints. And in the end you may end up with ringing bells and funny snowmen.


For variety, choose a very simple product - sew or assemble a large Christmas tree bow. You can make many small bows.

I also came up with the idea of combining the purchased version with homemade creativity. Buy transparent Christmas tree balls, carefully unscrew the top and add glitter. Screw the product. Or apply glue to the surface of the ball in the form of any pattern and also sprinkle with glitter. The crafts come out very beautiful.

Of course, don’t forget about needlework using thick threads and regular glue.


Moreover, the use of this technology will allow you to make anything you want.

You can learn more about this technique here.

And here are the instructions on how such a miracle can be created.


Interesting products are also made from pasta. Usually they are glued together and thus made into snowflakes.


And a cool idea would be to decorate unnecessary old light bulbs. They are usually painted with acrylic paints and decorated with knitted, rag and other attributes.

You can also make toys from salt dough, plasticine or clay.

Or bake real edible souvenirs.

In fact, there are still a large number of holiday products that you can make with your own hands from improvised materials, it’s impossible to list them all. Therefore, we move on.
Christmas tree toys, crocheted with patterns
Now a selection for those who are interested in knitting. I found the coolest, in my opinion, crocheted souvenirs. I am sending it to you along with the diagrams. Knit for good health!
- "Bell";

- "Herringbone";

- "Angel";

- "Snowflake";

- "Father Frost";

- “Sweetie” and “Sock”;

- "Snowmen";

- "Dog";

- "Mouse";

- "Piggy".

DIY Christmas tree decorations made of felt and fabric (patterns and templates included)
From crocheting we move on to sewing from felt and any other fabric. Guys, this time I won’t explain to you what and how to sew, I’m sure you already know all this. After all, the main thing is to find patterns. This is exactly what I will help with.
I pumped up a wide variety of options. I kindly provide them to you. Save, cut and start sewing.


Master class on making a star for the top of a Christmas tree from paper and cardboard
Well, now let’s start making almost the most important attribute of a green tree - a star.
Of course, you can choose another method of making, but I really liked the following magical transformation.
"Star made of shiny cardboard"

You will need:
- shiny cardboard;
- scissors;
- glue gun
Manufacturing process:
1. Take cardboard and cut strips of equal width and length from it.

If your cardboard is shiny on only one side, then first glue two sheets of cardboard together so that both sides are shiny.

3. Now bring the free ends of the strips together and glue them together as shown in the photo.

4. Connect the side strips together. You should end up with something like this.

5. Repeat steps 1 to 4, that is, glue another exactly the same part.

6. Connect and glue the two blanks together so that you end up with an eight-pointed star. Yours volumetric star ready for the top of the spruce.

I think that such a masterpiece will bring a lot of pleasure, especially when the lights flash on the branches and the star also sparkles with new colors.
Christmas tree toy 2020 in the form of a symbol of the year of the mouse
Do you remember what year is coming? That's right, the year of the Rat. So don’t forget to appease the Mistress and make a souvenir in the form of a funny mouse.
“Mouse from a Kinder Surprise container”

You can simply plant such a product on a branch or make a hole and secure it with a string.
You will need: one Plastic container and several pieces of multi-colored plasticine.
Manufacturing process:


Here is a hero for the Year of the Pig.
"Piglet made of colored paper"

You will need:
- double-sided tape on foam;
- pink and red half cardboard;
- black marker;
- pencils;
- markers;
- glue;
- scissors.

Manufacturing process:
1. Take pink half-cardboard and cut out many strips of it, 1 cm wide and 7 cm long.

2. Now use a pencil or scissors to twist each strip.

3. Apply glue to the top of one of the strips, and place another strip on top. Glue the strips in a circle in this way.

4. In the end you should get something like this.


6. Now cut out a long pink strip 0.5 cm wide.

7. Twist the strip so that you get a curl, like a pig’s tail.

8. Glue the tail to the ball.

9. Cut out two circles of different diameters and ears from half-cardboard. Cut out two small circles from red paper - these are the nostrils.

10. Glue a piece of double-sided tape onto a circle of smaller diameter. Attach it to a large circle. Using glue, glue the “nostrils”.

11. Using a black marker, draw eyes and outline the outline.

12. From red paper, cut out two strips 2 cm wide and 5 cm long. Paint them with the same black marker. This will be a scarf.

13. Glue the scarf to the back of the pig's head. Then glue the head to the body (volumetric ball). And don't forget to cut and glue the ribbon loop.

Agree, this is very easy craft and is available for children's creativity.
Step-by-step instructions on how to make a New Year's toy from cotton wool
And what awaits us ahead detailed master class on creating another Christmas tree decoration in the form of a bright cockerel. We will make it from ordinary cotton wool.
"Cotton Cockerel"

You will need:
- cardboard (thick but cutable);
- cotton wool (from a pharmacy, regular in a roll);
- cotton pads;
- white threads;
- potato starch;
- black half-bead eyes;
- tailor's pin (with a loop at the end);
- paints for painting.
Manufacturing process:
1. Take cardboard and draw the outline of a cockerel on it. Cut it out.

2. Unwind the cotton wool from the roll and tightly wrap it around the cut out outline to the legs.

3. Now wind the thread over the cotton wool. Do the same with the leg.


5. From cotton pads cut out the wings (4 pcs.) and parts for the tail (4 pcs.).

6. Cut out one comb and two parts for a beard from a cotton pad.

7. Make a starch paste and coat our rooster figurine with it. Then wrap thin pieces of dry cotton wool around our product. Apply paste to all uneven surfaces. Next, saturate all other parts with paste and carefully attach them to the cockerel. Form folds, fluff the tail, you can additionally make a thin strip of cotton wool and glue it around the neck. Glue on the eyes.

8. Dry the product upside down (hang it on the thread we left). And then paint it to your liking. Cut the thread and insert a pin, thread an elegant rope.

Use this technology to make other animals, fairy-tale heroes and characters.
Christmas tree toy “Garland” made from plastic bottles
Now we will make a decoration in the form of a garland. Moreover, the garland will not be simple, but made from plastic bottles. How do you like this idea? Personally, I'm delighted.
"Flower Garland"

You will need:
- plastic bottles with caps;
- spray paints;
- scissors;
- electric garland;
Manufacturing process:
1. Cut off the tops of the bottles. Make cuts to create a flower.

2. Round the petals and paint the blanks in any color.
3. While the flowers are drying, make cross-shaped cuts in the caps of these bottles. Insert light bulbs from an electric garland into the cuts.

4. When the pieces are dry, screw them to the lids, spread the product over the Christmas tree and turn on the electric garland. Admire the creation!

Well, a simple manufacturing option garlands of icicles.

You will need:

Manufacturing process:

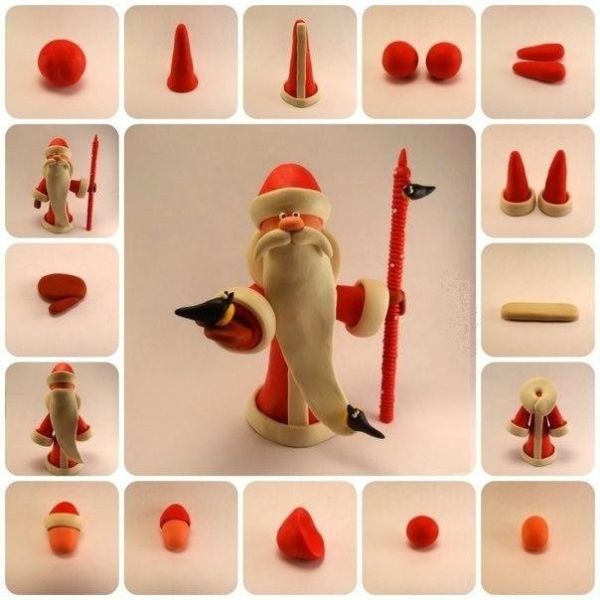
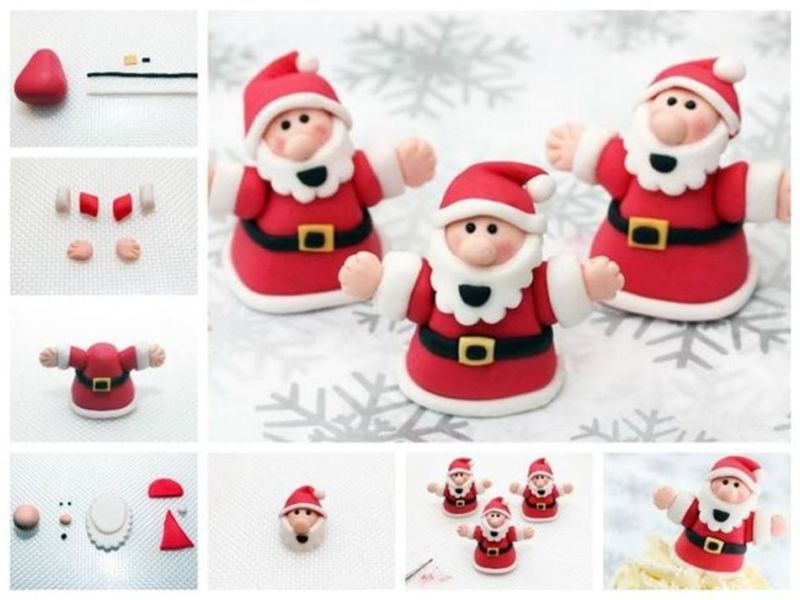
Christmas tree crafts made from polymer clay
I’ll briefly tell you what figures can be made from clay. You can use plasticine as a material.
Here it is important to come up with a character, sculpt the details, then put them together, and then make a loop.
Here are a couple of patterns for sculpting winter characters.
- Father Frost;
- Monkey;

- Girl;

- Snow Maiden;

- Piggy.

And options for finished work.


Video selection of the best wooden Christmas tree toys
Well, if you are interested in woodworking, then you will be interested in the following story. It contains ideas for creating wooden toys at home. So watch and create. By the way, such souvenirs are perfect as...
And this is where I end today. I look forward to your comments! Was I useful and creative? 😀 I think it’s undeniably yes.
I wish you to make what you like and decorate the Christmas tree together with the kids homemade toys. With coming!
We will send the material to you by e-mail
The time has come to actively prepare for the New Year: while there is still a lot of time left before it, it is worth taking advantage of such a valuable resource and making New Year's toys with your own hands from paper and more. The editors of the site undertake to help you with this, as they are also preparing their houses and apartments for the New Year.
Let's start making New Year's paper toys with our own hands: options for holiday decorations
It's amazing that a great variety of things can be made from paper. different decorations, in addition to the well-known lanterns, garlands and snowflakes. Let's deal with paper beauty and let's try to make a New Year's toy with our own hands using photos from the master classes.
Made from paper beautiful figures Father Frost, Snow Maiden, even as a symbol of the coming year, look great like a Christmas tree. We study manufacturing tips various decorations to the Christmas tree and try to put them into practice!
Cute Santa Claus
One of children's favorite hand-made New Year's toys will be the wonderful Santa Claus. This come to life fairy-tale character from a childhood dream will find the most prominent place on the Christmas tree.


Related article:
DIY origami for the New Year: postcards, classic and modular origami, Santa Claus and Snow Maiden, origami Christmas tree, snowflake, origami star, origami animals - in our publication..
Snowman without snow
The snowman is also a traditional winter symbol that children will enjoy making with their own hands. There are several ways to make a small beautiful snowman.


Angels in different ways
The cutest do-it-yourself Christmas tree toy is an angel. A Christmas tree decoration like this always lifts your spirits and will serve as decor for the coming Christmas.


Garlands - large-scale apartment decoration
You can make excellent New Year's toys with your own hands together with your children. So suitable option there will be a process of creating a garland.


Related article:
DIY garlands for the New Year: photo. Christmas tree, paper circles, accordion, corrugated garland and origami, garland made of fabric or felt, pine cones and other material, LED garland decor - in our article.
Flower wreaths and more
Christmas wreaths immediately give a festive and solemn mood to anyone who glances at them. They also make gorgeous wreaths out of paper!


Related article:
: history and tradition of origin, master class on creation, what to make the base for the product from (newspaper, cardboard, pipe insulation), decorating a New Year's wreath with various materials - read the publication.
Stars and snowflakes fall in the apartment directly from the ceiling and walls
The familiar appearance of snowflakes is still popular, but there are other options for making these traditional elements. We also suggest you try to make beautiful ones with your own hands. paper stars. You can make a garland from them, hang them from ceiling beams, a chandelier, glue them to walls and doors, to windows or to a Christmas tree.


Related article:
: the art of quilling and the beauty of paper strips. Stencils for New Year's snowflakes, modular origami, geometric shape, fluffy snowflake, paper Christmas tree star - in our publication.
Making Christmas balls in different ways
How could it be without the ones we are used to? Christmas balls? Paper also makes its own adjustments to production New Year's decor. Let's try to create beautiful balls?


Related article:
corrugated paper, kusudama, origami, paper flowers; New Year's ball made of felt and fabric, decor New Year's ball to the Christmas tree by different means- read in the publication.
Lanterns for the Christmas tree and more
A flashlight is a universal toy, suitable even as a DIY decoration for a city Christmas tree. There is also always a place in the apartment where a New Year's lantern is clearly missing.


How to make your own New Year's toy from yarn, ribbons, beads, felt and pine cones
In addition to paper for making New Year's decor, you should try using various materials. Interesting and beautiful work are obtained from natural material, easy-to-handle felt, beautiful yarn. Acrylic paints, hot glue and PVA glue, glitter and any decorative elements help in the work.
DIY Christmas tree decorations: new life for grandma’s yarn
Any dense threads can be turned into three-dimensional or flat original jewelry for the holiday, which are so good that they keep their shape for many years.


Video: example of a thread toy for the New Year
Making a New Year's toy from ribbons, beads, sequins
A bag of sequins or beads is inexpensive. They decorate any surface or use them as decorative elements for finished products. Glue the decoration with hot glue or super-moment.


It’s easy to make even a large Christmas tree toy with your own hands from fabric, ribbons, and beads. They sell ready-made large-sized foam plastic blanks that just need to be decorated.
Felt toys for the New Year
Small and large New Year's toys can be easily made with your own hands from a material such as felt. This is a fascinating process that always has positive result and at experienced craftsmen, and for beginners.
You also don’t need to spend a lot of time learning the basics of working with felt: the material is easy to cut, it is not difficult to stitch it by hand or sew it on a machine. The edges are decorated with any types of seams.
More often than not, felt serves as the base on which the decor is placed. Decorative elements They also cut it out of felt of a different color, or do embroidery on it, and stick on various beautiful decorations.

Article


