On the eve of Christmas, every person remembers the traditions and customs of this day. The main attribute of the holiday is the Star of Bethlehem, which is what we will make today with our own hands. It is used for caroling and can also become a wonderful decoration for a holiday tree. You can make a star from various materials using a template. In this article you will find a master class on making the Star of Bethlehem from paper, thread and other materials.
Star made of cardboard and fiberboard
To create a large Star of Bethlehem you will need thick cardboard and fiberboard. This will make the structure strong and reliable. Such a star can be used by carolers even in heavy snow and frost.
Materials and tools:
- Stick.
- Cardboard in golden and silver color.
- Fiberboard sheet.
- Strong threads.
- Double sided tape.
- Glue gun.
- A ruler and a simple pencil.
- Scissors.
- Tinsel and rain for decoration.
First you need to draw a star on a sheet of thick cardboard. If you want the structure to be durable, transfer the drawing to a sheet of fiberboard. Cut out the star on both cardboard and a sheet of fiberboard.

Glue cardboard on both sides to the resulting star. It is recommended to glue golden cardboard on one side and silver cardboard on the other.
All that remains is to decorate the star with rain and tinsel, and attach the decor with a glue gun. It's best to attach decorations to the ends of the star, but you can decorate the craft however you like.
It is necessary to make holes at one of the ends of the star, thread a strong thread into them, and reverse side tie a stick. You can use screws instead of threads. To make the holes invisible, cover them with tinsel. Thus, a star for caroling. All that remains is to prepare the carols and go congratulate your friends and family.

Star of Bethlehem made of paper for Christmas tree decoration
DIY star of Bethlehem for the Christmas tree - easy to make and incredible beautiful decoration. It can be used to decorate a holiday tree, window frame or create original Christmas compositions.
Materials and tools:
- Colored paper.
- Glue.
- Scissors.
- A simple pencil.
- Ruler.
- Ribbon.
Cut out two identical squares of any size. How larger size, the larger the star will be. From the inside of the paper, you need to mark the middle of each fold. It is also necessary to make cuts to pre-designated points. After this, the edges need to be folded inward. One of the edges of the beam needs to be coated with glue. The paper edge should be glued together so that a pyramid is formed.
Then you need to make another star out of paper. Apply glue to the folded edges of each star at a 45 degree angle. The finished star can be hung on a Christmas tree or used to decorate the interior for Christmas. To hang a craft on a Christmas tree, you need to glue a ribbon to it.

Star of Bethlehem made of threads
For one way to make an unusual Star of Bethlehem, you can use threads. The star of Bethlehem made from threads turns out airy and unusual. It can be used to decorate a Christmas tree or interior.
Materials and tools:
- Threads.
- Sponges for washing dishes.
- PVA glue.
- Barbecue stick.
- Pre-printed star template.
- Sewing pins.
It is recommended to dilute PVA glue with water to make it sufficiently liquid. To achieve the required thickness of the glue, it must be gradually diluted with cold water, bringing it to such a state that the fingers only stick together a little.
You need to place a thread in the prepared adhesive solution. To make a star you will need about three meters of thread. Leave the thread in the glue for 5-7 minutes so that it is well saturated.
After this, you need to put four kitchen sponges together. To prevent them from moving, glue them together. Attach the star template to the sponge and use it to make marks on the sponge. Place pins on the marks. Step back a little from the template where the stick will be placed.

It is from this place that you should start winding the thread. We draw the thread at the same level to create an outline. Then you need to wind the thread on opposite pins in in no particular order until the thread runs out. Tighten the thread as tightly as possible so that the structure is strong and there is no sagging. At the very end, the thread should end up on the pins, from which the winding process began.
Leave the craft to dry. This will take several hours, but you can speed up the process with a hairdryer. However, a craft that has been dried naturally will be somewhat stronger.
After drying, the star must be removed from the sponges and pins. If there are traces of sponges left on it, carefully remove them. Additionally, you can decorate the craft with sparkles, tinsel or other decorative elements. This DIY Star of Bethlehem will be an excellent decoration for a New Year tree or Christmas interior.

Bright Christmas star
Another unusual way How to make the Star of Bethlehem involves using brightly colored wrapping paper. Manufacturing takes a minimum of time, and it looks bright and unusual. To make it, you need to use shiny, brightly colored wrapping paper.
Materials and tools:
- Bright wrapping paper.
- Scissors.
- Glue gun.
- Threads.
- Newspaper or paper.
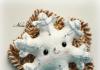
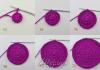
First you need to prepare the basis for the craft. To do this, crumple a ball out of newspaper and wrap it with thread. Apply glue to it. Wrap it up wrapping paper. Most likely, the ball will not turn out perfectly smooth, but all irregularities will be covered by the rays.
Let's move on to making the rays. To do this, you need to cut 10-15 blanks, which are a circle cut in half.
Apply glue to one end of the workpiece and wrap it into a cone. The result is pointed cones, which must be glued onto the base as quickly as possible. closer friend to a friend.

Use the finished star to decorate a Christmas tree or festive interior.
Outside the window, the spring sun shines brightly, which we have all been waiting for for so long. I wish nature would change, and warm days would soon arrive... Why do we get tired so quickly, get irritated for no reason, and the constant cold still won’t go away? The reason is banal - the body does not receive vitamins. You feel this is why you constantly want to sleep, but your mood is at zero. All these are clear signs of spring vitamin deficiency. Like being sick, avitamin...
The department of the municipal government of Dobropilska Municipality is in charge of carrying out monthly monitoring of the population and budgetary organizations for the removal of housing and communal services. Zagalny rіven payment of the population of the Great Dobropil camp on the cob bereznya 2019 rock sklav 83.6%*, zagalny borg 100 383.8 thousand. UAH, including: - payment for services for heat supply 83.6%; - payment for services related to water supply and water supply 81.0...
What a weekend and holidays will be in April 2019? How and how long do Ukrainians vacation for Easter 2019? What other official state and important church holidays Are we celebrating in April 2019? Read more in our article. Spring is already in full swing. It's time to think about vacation, plan holidays and weekends, and to do this, find out in advance when and how many days Ukrainians legally rest in April 2019. State...
Such sanctions are prescribed in the Criminal Code of Ukraine for the distortion of the current election law, falsification of election documents and disruption of the order of financing of a political party and election campaigning. At the beginning of the day, the police recorded 178 cases related to the violation of the election legislation. The greatest number of brutalities took place during the pre-election campaign, hooliganism and bribery of elections. We've moved everything from the cob...
A case of rabies in a cow was recorded in the Volnovakha district of the Donetsk region. This was reported on the website of the Main Directorate of the State Food and Consumer Service in the Donetsk region. On March 5, a veterinarian at a private enterprise reported the death of a cow. The night before, the staff noticed inappropriate behavior in her - the animal was moving despite obstacles. On the morning of March 4th she was isolated in a separate box, where she died on the night of March 5th. Material for research...
Teachers' salaries have increased by 75% in two years. Prime Minister of Ukraine Vladimir Groysman said this today at a meeting of the Cabinet of Ministers, reports an OstroV correspondent. “From the first day of our government’s work, we began to increase the salaries of Ukrainian teachers. If we compare the salary on January 1, 2017 and now, it has increased by 75%. This is still not enough, but this speaks of the government’s priorities to support education,” he said .
The Cabinet of Ministers will introduce additional payments for large families in the amount of 1,629 UAH per child from April 1, and 1,699 UAH from July 1. This decision was made today at a government meeting, Ukrinform reports. "Each large family will receive for the third, fourth, fifth and each subsequent child under 6 years of age monthly allowance from the state in the amount of the subsistence minimum for up to 6 years. Taking into account the cost of living, the average monthly...
AND christmas stars. There can never be too many of these products, because before the New Year you need to decorate everything around, especially the Christmas tree. Christmas star made of modules, brought to your attention in this lesson, looks really festive and elegant. It can't be done quickly, like the usual way symmetrical cutting. You will have to cut out the squares and fold them step by step. However finished product suitable even as a Christmas tree topper - this is a real sparkling christmas star. Let's consider step by step what is needed to make it and how to make it. Master class by Elena Nikolaeva.
Materials for work:
- - sheets of colored paper. The number of sheets depends on the number of snowflake layers you plan to make;
- - half beads, shiny rhinestones, flowers or sequins - everything that is suitable for decorating a star and is in stock;
- - traditional tools for working with paper - scissors, a ruler with a simple pencil and glue.
Start creating a New Year's jewel by selecting paper and glitter. The brightest and boldest shades should show off on the Christmas tree on New Year's and Christmas night. The creation of crafts in this lesson is shown using the example of red and yellow paper, the reverse side of the leaves is white. But the color scheme may be different. Silver or golden paper would look ideal in such a product.

At the star you can perform 5 or more rays. To produce each of them you will need a paper square. It is better to prepare 6 squares so that in the future the rays will be successfully positioned around the circumference. The side of the squares of the first red layer will be 6 cm or more.

Fold the squares into sharp rays. Iron diagonally first. Expand. Fold one side along the fold line, going beyond it.

Then turn the top of the folded corner back, the resulting fold should remain clearly in the center. And bend the corner itself again to show the back of the paper. Make the same bends on the opposite side. The resulting pointed structure will be the ray of the first layer of the future star.

Bend all squares in the same way.

Cut out a circle from paper or cardboard. Lubricate the base with glue. Start attaching paper modules around the circumference.

Make the first layer of the star. This craft in itself already looks harmonious, so at this stage you can stop and decorate such a product with sparkling elements.

But a multi-layered star will look more elegant. To prepare the rays of the second layer, cut out 6 yellow squares with a side of 4 cm or more.

Repeat all the folding operations that were described for the red modules. Make 6 intermediate rays-blanks.

The resulting parts will look unusual from the reverse side. The front can be done on both one and the other side.

Glue the yellow parts into the spaces between the red ones, you can turn them the other way around.

Think about how to decorate the finished Christmas star. Glue half beads on the rays and in the center.

From the reverse side, the craft also looks beautiful, so it can be used as a top or even a top.

Did you like the product and want to order the same from the author? Write to us.
More interesting:
See also:
Christmas tree from sisal "Assorted". Master class
Master class by Evgenia Kaidalova from Ukhta - New Year tree “Assorted”, nomination “Golden Hands”. So...
New Year's night light
The entry in the “Golden Hands” category is a New Year’s night light, made by Victoria Zhilyaeva, 14 years old. Teacher...
Christmas tree toy made of kinder (knitting with beads)
Christmas tree toy (knitting with beads) Knitting with beads is very easy and interesting. We invite you to...
One of the most favorite children's images can rightfully be called various stars. It is almost impossible to draw such a perfect figure without using templates, so you can find many ready-made stencils on the Internet. By cutting out one or more parts, you can create interesting craft. A beautiful five-pointed, or Bethlehem, star, created with your own hands, can become an appropriate interior decoration for the New Year or Christmas holidays.
 On the Internet you can find many templates and stencils of stars for cutting out of paper. All you need to do is download the desired image for free and print it on your printer. To make the workpiece durable, it can be transferred to cardboard. Drawings of the starry sky, transferred to paper using a template, can be an excellent material for cutting out kindergarten or during home lessons on baby development.
Such images can be used to create unusual applications, greeting cards, volumetric crafts. In addition, there are other areas of application for star outline stencils for cutting:
- Interior design. Such blanks are used to create unusual patterns when painting walls and ceilings with the effect of a night sky strewn with celestial bodies.
- Tailoring. Numerous dresses, shirts, skirts and other wardrobe items strewn with stars are made using templates of various sizes.
- Delicious pastries that will look more appetizing and attractive if you decorate them with multi-colored five-pointed figures made of sweet cream, jelly, marmalade, mastic, fruit, etc.
- Creation Christmas decorations made of glass or plastic, which is decorated with a star pattern.
And these are not all areas where stencils of night luminaries are used. The cut out contours can be used when decorating windows on New Year and Christmas, when sewing various textile products. It is not only the scope of application of such paper or cardboard blanks that is striking, but also their diversity.
This can be several figures on one sheet of different sizes, falling celestial bodies, Soviet, Christmas, sheriff's stars of various shapes.
Christmas star made of foam
The main symbol of Christmas, which speaks of the appearance of Christ, is the Star of Bethlehem. It was she who illuminated the path of the wise men who carried gifts to the newborn Jesus. Caroling children and even adults often take with them a colorful attribute in the form of an eight-pointed star, created with their own hands. Various available materials are used for its manufacture. Since the product itself must be durable so that it can be attached to a wooden stick, then better basis will become foam.

To make the Star of Bethlehem craft, you will need the following materials and tools:
- a small piece of polystyrene foam 2−2.5 cm thick;
- an eight-pointed star stencil (the height and thickness of the sample after cutting should be approximately 20 cm);
- mounting knife;
- bells;
- colored cardboard (you can take regular or corrugated);
- beads;
- Christmas tree tinsel;
- liquid nails;
- a simple pencil;
- foil.
 You need to start by creating a solid foundation. First you need to cut out the printed Christmas star template, attach it to the foam, and trace the outline of the image with a simple pencil. After this, you need to arm yourself with a sharp mounting knife to make even cuts on the material.
The cut out star is ready for decoration. First of all, you need to cut out the rays from the colored and corrugated cardboard, as well as a circle that will be the core of the Star of Bethlehem. To make the figure even, it is better to use a compass (you need to draw a circle on a foam piece and red cardboard). The rays can be of different tones.
After the cardboard blanks are cut out, you can start gluing. The rays are attached first, and on top of them is the core circle. To hide all the unevenness after gluing, you should use foil cut into small squares (can be replaced with candy wrappers). Small parts are fixed along the contour of the circle so as to close all the voids.
The colorful rays of the star need to be decorated with multi-colored beads, which will stick well thanks to liquid nails. If some of the glue has come out beyond the aisles of the decorative elements, then it must be immediately removed with a toothpick before it dries.
The next step is to attach bells, which are considered an integral part of such a craft, because they seem to notify everyone about the birth of Jesus Christ. All that remains is to decorate the outline of the rays with Christmas tree tinsel of various colors. To keep the rain well, you should use glue gun, which leaves almost no marks on the surface of the finished product.
The craft will look original if you attach an image of Christ to the core, place pictures with angels on the rays, and replace the bells with pompoms.
With such a star you can decorate a room for Christmas or a long stick that the main costumer will carry during caroling.
Christmas decoration made of woolen threads
A five-pointed red star will be an excellent decoration for a New Year tree or interior for the holiday. wool threads. To make the composition look more diverse, you can use material of other colors. For making original crafts you will need the following materials:

First of all, you need to cut out the star and transfer the image from the stencil to the foam plastic with a simple pencil. After this, you need to create the basis for the future craft - stick a toothpick into each corner of the figure. Dilute PVA glue with cold water (proportions 1:1). Cut the woolen rope longer and tie one end to a wooden skewer. Carefully soak the thread in the prepared solution and stretch it so that you get a clear outline five-pointed star. The void inside the figure can be filled with the remaining piece of string, creating intricate curls and patterns.
All that remains is to wait for the craft to dry completely; to do this, leave the workpiece on the foam along with toothpicks for several hours. After the structure has become solid, you can take out the skewers.
Sparkles scattered on a star, which must first be lubricated, will help make the composition brighter and more original. a small amount glue. A ribbon is attached to the finished Christmas tree decoration. The New Year's decoration in the form of a five-pointed star is ready.
Paper Christmas star
A bright and voluminous eight-pointed star, which you can make together with your child in just a few minutes, will be appropriate New Year's decoration. Ready paper toy Can be hung from the ceiling, frame on the window. It can be used to decorate a Christmas tree or any other holiday composition.
To make a Christmas star out of paper, you need to prepare the following materials:
- square colored sheets (single-sided);
- scissors;
- a simple pencil;
- PVA glue.

The process of making such a craft is very simple, the main thing is to follow the steps in the right sequence. First, fold all the corners of the colored paper so that you get an impromptu envelope. On the back of the sheet, mark the middle with a small dot (use a ruler for accurate measurements). Make small cuts along the folds until the scissor blade reaches the marks. Fold the edges of the paper to create four colored triangles. Lubricate one folded half of the star beam with glue and connect the corners together, forming a small pyramid. The result should be a three-dimensional four-pointed figure.
 The second workpiece is performed in the same way. Now all that remains is to connect the two halves of the Christmas star to each other at an angle of 45 degrees using glue. New Year's craft ready, you just need to attach a ribbon to the top so that you can hang the toy on the Christmas tree.
A variety of stencils will help you create a real masterpiece. Falling, large and small, five and eight-pointed stars can be made with your own hands together with your child using a template, and used to decorate a room, clothes, or homemade baked goods. It is enough to arm yourself with a contour the right size, use your imagination or find interesting ideas on the Internet.
The Star of Bethlehem is a symbol of Byzantium, which is more than two thousand years old. The mysterious celestial body is so beautiful that poets tirelessly describe it, paint artists, and paint icons. The eight-pointed star, a symbol of the Birth of Christ, was given to children for the Christmas holidays; it was used to decorate the top of the New Year tree and hung on the front door, which symbolized peace, kindness and hospitality. The star is also used as an element when decorating and creating iconostases. Despite the fact that today there is no shortage of Christmas tree decorations and various crafts in stores, we will try to tell you how and from what you can make your own Christmas symbol, because everyone knows that what you make with your own hands is much more valuable, since we invest in it soul. So, let's look at making the Star of Bethlehem craft.
Paper star
One of the simplest and most accessible materials for crafts is paper.

You can use any: colored, corrugated, thick, newspaper and even from under boxes. Manufacturing does not require any special skills or equipment. It's very simple. We arm ourselves with pencils, scissors and glue.
Let's move on to the master class:
- For one paper star you will need two square blanks of equal sizes. Fold the paper as shown in the picture;
- Next, measure a distance equal to half the length of the line from the very center, make cuts on the folds;
- Form triangle-shaped cones from the cut edges, coating the sides with glue in advance, and fasten the parts of the square to each other;
- One of the components of the star is ready. Do the same with the other and glue the blanks together.
New Year symbol
At the beginning of the article, we mentioned that you can decorate not only the Christmas tree with a star, but also the front door. In this tutorial we will show you how to make a star out of foam.
For this we need:
- a piece of polystyrene foam (the size is arbitrary, depending on how big you want the star to be at the end of the master class);
- compass;
- pencil;
- stationery knife and scissors;
- thick paper;
- glue;
- wrapping paper or foil (all the wealth that is in stock from past holidays).
So let's get started.
The most important thing is to cut out the base for the star from foam plastic. At this stage, you can use a template, but don’t be upset if you don’t have one, in this master class we will tell you how to make a blank yourself. Take a compass and draw two circles. Their diameters are 20 and 40 cm. Next, measure seven equal parts along the circles and draw rays to them from the center.

Then, draw lines that connect the base to the ends of the corners, and cut the workpiece strictly along the contour.

Prepare the decorated paper and cut out the parts according to the size of the center and rays. Glue on the rays and then the missing parts. In order to wrapping paper not frayed, follow the contour with a beautiful lace, fabric or thicker paper, cut to size and stick on. The top of our beautiful star decorate with bells.

You can complete the work when you decide for yourself that your work is sufficiently decorated. Use your entire flight of imagination in this master class; you can glue beads, wrap the rays with tinsel and even decorate with neon ribbon.

Bethlehem miracle
One more in an original way A straw is used to create a star.
This time the process will be somewhat labor-intensive, but will not lose any of its fascination; it is more convenient to create if you repeat everything with four hands.
What will you need? We stock up on straws, a hammer, a board, nails, thick thread, a pencil, and a ruler.
Place the board as shown in the picture. Count out 50 straws and place them next to each other on a tight thread. Tie them in the middle, forming a bow-shaped blank. While one of you is tying the thread in the middle, the other is straightening the ends in opposite directions. Now, without letting go of the middle of the part, try to make a circle out of the “bow”. Then, fasten all the straws with thread, as tightly as possible in relation to each other. To make the task easier, drive a nail into the very center, which will secure the craft in place.

Now tie the remaining straws in the center. The sticks are tied together, forming several of them. Well, our symbol is ready, all that remains is to form the long rays of the star, for which you need to break the straws in half and along the edges, forming corners. These rays are inserted into the spaces between the ends of the straws. The corners are also knitted using thread.

The pointed rays can be decorated with small Christmas balls, paint it any color or decorate the star's core. Such crafts will not only complement the time spent by adults, but will also give children genuine joy and involvement in an interesting process.
Video on the topic of the article