How to make a hair tie? Girls with long hair often ask themselves this question. A variety of elastic bands can change your hairstyle; they can be chosen both for everyday wear and for an evening out. There are options for little girls and schoolgirls, and there are original products for adult ladies.
Our article is about DIY hair. As the basis for any product, they take a purchased simple elastic band without any decorations and decorate it depending on the wishes, chosen color and style. You can wrap the elastic completely in fabric, or you can just add a central decorative element made of fabric, ribbons or lace. Often a bright brooch or button, beads or rhinestones are sewn into the middle. Let's look at a few interesting ideas how to make a hair tie different ways.
Felt elastic band
This option will do for beginner craftsmen, since making such a craft is quite simple. Take a small circle cut from felt as a base. IN in this case we see that in the sample in the photo below we used yellow. To decorate the elastic you need to prepare many identical pieces of ribbon Pink colour, a package of small decorative lace flowers, beads for decorating the middle and fluffy pompom white.
Decorating the product begins with attaching pieces of tape bent with loops. First, the edges of the tape must be melted with a candle or lighter so that the threads at the edges do not fray later. You can attach the loops with stitches to the felt base or glue them with a glue gun. The next step is to place the flowers close to each other along the inner circumference so that the ends of the ribbon are not visible. All that remains is to glue half beads at an equal distance or sew round beads (you can use rhinestones or stones, beads or other decorative material) and install fluffy ball to the very middle. When everything is ready, with back side Sew the craft onto an elastic band.
Contrast bow
Before you make your own hair tie, consider what color ribbons you will need so that the product matches your clothes and accessories. To make one like this beautiful bow, as in the photo below, you need to buy a wide and narrow tape light chocolate color and white organza. To connect all the layers of the craft, a beige button is used, onto which you can glue a bright crown with rhinestones.

Start working on the wide ribbon. Do not cut off a piece right away, so as not to make a mistake. It is better to first fold a bow consisting of several turns, leaving small beveled edges at the beginning of the work and at the end. Melt them immediately so that the cut sides look neat and the threads do not fray when using an elastic band. At the central point, use matching threads to make several stitches, thereby securing the bow.
The next step is to gather a wide strip of organza folded in half. To do this, stepping back a little from the edge, stitch the entire length of the fabric, tighten the thread and sew it to the bottom tape. Lastly, a thin ribbon bent into loops is attached, and all layers are connected with a decorated button.
Three-layer bows with beads
Before you make a beautiful hair tie as in the photo below, choose wide and thin ribbons of white color and medium width with a contrasting pattern. A bright red heart is chosen as the central holder of all layers.
Long ends leave only on a thin ribbon located on top of two bows. On each hanging edge, string 3 beads, selected in the same color scheme as the ribbons. The edges are tied with tight knots so that the beads do not fall off when moving.
Flowers using the kanzashi technique
How to make small hair ties to make them look impressive? The kanzashi technique will help. This is making beautiful floral elements from simple satin ribbons. The flowers consist of 5 identical petals (two white and three red) and two leaves made of green ribbon. Let's see how to make such elements.

To create a petal, you need to cut squares of white and red colors. Then each is folded in half diagonally. Next, make a couple of folds on each side, gathering the edges in the center. It is most convenient to use tweezers to hold the tissue together. Then the bottom edge is trimmed with scissors and melted with a lighter, pressing all layers with tweezers. One petal is ready! Make all the other parts in the same way and glue them to each other with a glue gun, attaching a small pebble in the center for beauty.
How to make leaves
After making the main flower for the girl’s gum, start working on the leaves. To do this, you need to fold a green ribbon 10 cm long in half. We leave the folded edge untouched, but draw from one of its corners straight line to the opposite one on the other side and cut with scissors according to the intended direction. You will get a triangle. Again, melt the cut edges and press them together with tweezers or your fingers. Hold it a little and they stick together securely without glue.
All that remains is to turn the workpiece over to the other side and attach the leaves under the previously made flower. Here you can use glue gun to join the pieces together and attach the decoration to the elastic itself.
Kanzashi petal bow
Now let's look at how to make a bow-shaped hair tie from a ribbon. You will need a base to place the finished petals. It is most convenient to cut it from a sheet of felt, matched to the color satin ribbon. You already know how to make petals using the kanzashi technique. To make this hair tie, you will need to make 12 identical elements and attach them to a felt base in the shape of two connected triangles.

Between them place a central brooch with shiny rhinestones and a beautiful bow can be attached to an elastic band.
Craft for a bun
A beautiful elastic band for a daughter to put on a bun of hair, they are made from different elements combined in one composition. These include white flowers using the kanzashi technique and large multi-layered details made of contrasting colors. Arrange the assembled elements symmetrically, leaving room for a large bow.

The elastic band looks very impressive due to the combination of different types of petals and fabrics, but all the details look harmonious together. Additional elements beads selected of blue color and large rhinestones.
As you can see, it is not difficult to make a hair tie with your own hands from ribbons and fabric. The photographs presented in the article will make it easier to bring the described work to life. Can be varied and combined different types parts in one product. The main thing is to choose fabrics and decorative elements, which look harmonious together, then the finished elastic band will turn out beautiful and tasteful. Good luck!
Hello, dear readers! It would be quite difficult to do without hair ties, because sometimes you just need to put your hair in a ponytail so that it doesn’t get in the way. It is also necessary to note the fact that it is beautiful collected hair in high ponytail or its other modifications allow you to wonderfully and time-consumingly transform the image. Do you want to learn how to make elastic bands yourself? Then get comfortable in your chairs and study this review, which will tell you how to sew a hair tie.
A high ponytail with a stylish elastic band to match your clothes will look not just good, but really stylish! Well, since you can make such elastic bands yourself, your look will always look just perfect, because all you need to do is select the fabric for the elastic band in accordance with the material and color of the clothing.
DIY hair elastic.
- A piece of fabric of a matching color.
- Scissors.
- Sewing pins.
- Threads.
- Rubber.
- Sewing machine.
How to sew a hair tie from fabric (stages of creation).
We cut out a piece of fabric 20-25 cm long and 6 cm wide. Fold it lengthwise and pin it along the edge with pins.

We machine sew a strip along the edge. But we don’t reach the end by about 1.5 cm.

Turn the resulting tube out of the fabric. We pin and sew the two ends together.


We thread a 10 cm long elastic band inside and sew it by hand.


Then you need to manually sweep the hole into which the elastic was inserted. But you can also sew this hole from the outside using a typewriter, as shown in the video below.

The beauty of this idea is that in order to make a hair tie with your own hands, you can use any available materials without any restrictions:
- fabrics - leather, felt, satin, cotton, and pieces of any size, because such decoration does not require much and it can be sewn not from one, but from several scraps;
- thin inexpensive purchased rubber bands or wire;
- beads, stones, borders and everything else you can think of to decorate your jewelry;
- plastic.
Of course, you will need some available tools and materials to hold it all together:
- threads;
- needles;
- scissors;
- small metal clips and rivets;
- wire;
- glue.
Original decoration for hair are elastic bands that are made by hand. They will highlight your hairstyle and allow you to quickly put your curls in a ponytail or braid. Thanks to the detailed master classes in this article, you will learn how to create beautiful hair jewelry.
New is well forgotten old. Fabric elastic bands are becoming increasingly popular. It turns out that sewing them is very simple, you just need to carefully follow each step in the instructions.
Prepare the following materials:
- a blank in the form of a simple elastic band;
- a strip of fabric measuring 90 cm by 10 cm;
- needle and thread to match the material.
Progress:
- Fold the piece of fabric lengthwise, right side inward. Take the rubber band in your hands. With the ends of the material, grasp the workpiece from the inside.
- Fasten the thread to one of the corners of the strip. Start sewing two opposite edges together, making small stitches as you go.
- Sew the entire piece of fabric in this way.
- For convenience, fold the strip along the inside of the elastic.
- When you have completely sewn the edges of the fabric, secure the thread with a knot.
- Thread thumb under the material.
- Gradually turn the fabric right side out. At the same time, help yourself with your fingers, but do not pull the workpiece sharply, as the seam may come apart.
- You will get this base for the elastic band.
- Fold the edges of the cuts inward and sew them with a hidden seam.
- That's all, the hair elastic made from the material is ready!
Another easy material to work with is tape. They have finished edges, which means the fabric will not fray.
Prepare:
- satin ribbons of different widths;
- scissors and thick thread;
- decor in the form of a button;
- candle or lighter;
- glue gun;
- regular rubber band.
Stages of work:
- Cut the widest tape to a length of 45 cm. Make cuts of the tape at an oblique angle. Now cut each subsequent ribbon 2 cm shorter. In total you need to prepare 5 elastic bands.
Advice. To prevent ribbon cuts from fraying, treat them with fire or a soldering iron.
- Gather the ribbons together. Arrange them as the width of the fabric decreases. So your widest one will be at the bottom, and the narrowest one will be at the top. Visually mark the middle along the longest strip and place the thread.
Advice. If there is no twine to match the color of the ribbons, then use the narrowest ribbon.
- Pull the tapes tightly. Tie the thread tightly into several knots.
- Turn the workpiece over to the reverse side, stretch the thread and tie an elastic band to the central part of the ribbons.
- Glue the decor on top. Don't use it too much big size, since it will look out of place on hanging ribbons.
You can get voluminous hair bands if you knit them from thick threads. To create such an original elastic band, you only need a hook and yarn.
- Make the first loop on the thread. To do this, thread the hook through the loop and tighten it.
- Dial 12 air loops. They will serve as the basis for the entire knitting.
- Thread a braid of thread through an elastic band and connect its ends with a simple stitch.
- Cast on three air loops, then connect to the main part. Continue tying the elastic in columns. You can choose any other crochet pattern that is convenient for you.
- The first row of work should be done in a circle. In this case, tie the last column together with the first.
- Tie the elastic band along the entire length in a similar way.
- Finish the work when you knit to the first row. Tie the edges together, make a knot and cut the thread.
- No one will have such an elastic band!
If you don't know how to knit or sew, then the following instructions for creating hair ties are just for you. The basis for decoration will be chenille wire. It is often used to decorate bouquets.
- fluffy wire pink and green;
- the workpiece is an elastic band.
Master Class:
- Take six pink blanks. Thread them through the elastic band and gather them together.
- Make one revolution around the axis in the central part of the wire. This way you will secure the decor with an elastic band.
- Now start bending the ends of the wire in a spiral.
- Screw it all the way to the center of the knot.
- Prepare all other parts in this way. Twist the wire gradually and the one located nearby.
- As a result, you will get something like this with round petals.
- Form a rose bud. To do this, straighten the wire in a circle and slightly at an angle to the center of the flower.
- For the leaves, use green wire. Twist it with reverse side bud.
- Twist the two ends in the same way as the petals.
- The original elastic band made from fluffy wire is ready!

Thanks to such detailed master classes, you will be able to make your own hair jewelry. The main thing is to follow every step in the instructions.
Modern needlewomen make such skillful decorations that one can only be amazed. They are able to make hair jewelry that will highlight the beauty of the hairstyle in several different techniques. Satin ribbons for elastic bands are considered a convenient material because you can create from them from a flower to a decoration for a bun using simple techniques.
Craftswomen are able to make rubber bands with their own hands from ribbons using several techniques, which, upon careful examination, become quite simple. The main thing in this matter is to learn basic skills, follow diagrams and master classes and use your imagination to make it work beautiful decoration, characterized by individuality and spectacular appearance.
The production of elastic bands is based on the technique of weaving, folding and collecting elements into one large pattern. It is better for beginning craftswomen to take basic skills as a basis, learn them, and then begin to complicate them.
Even simple elastic bands can look impressive on a girl’s hair if they are skillfully decorated. Decoration options finished products become embroidery, weaving, beads, beads, sequins.
You can try the most different variants decorating to make beautiful decorations.
The materials used to make rubber bands are satin ribbons of different colors and shades, beads, seed beads, and decorative elements.
Auxiliary tools you will need are textile glue, scissors, a glue gun, a fire source (candle lighter) and skillful hands. Sometimes craftswomen take a ready-made rubber band purchased in a regular store and decorate it in their own way.
A well-known technique for creating elastic bands from satin ribbons with your own hands is considered japanese art kanzashi. To make a beautiful children's hair accessory that resembles a dahlia or chamomile, girls need to follow the master class:
- From a satin or silk cut, make 16 square patches measuring 5*5 cm, run a lighter along the edges so that the threads do not come out. Repeat for another color (inner petals).
- For the outer row of petals, bend each square diagonally, repeat, pour fire on the corner. For the inner row of petals, the squares are folded diagonally three times.
- Fold the smaller piece inside the larger one and glue it together.
- Make 12 single-layer blanks for additional decoration.
- Cut out 2 circles with a diameter of 3.5 cm and 2.5 cm from thick cardboard and cover with cloth.
- Glue each two-layer petal to a large base in a circle. Repeat for the second tier. Glue single-layer petals to the smaller base. Glue the 2 bases together.
- Decorate with beads, glue the resulting flower to a hairpin or crab.
Do-it-yourself elastic bands made from satin ribbons made from material of different widths are spectacular and voluminous. There is a master class for making an accessory:
- Cut a rectangular blank 9*16 cm from cardboard, draw a horizontal line in the middle. Wrap a ribbon around it.
- Remove the skein without damaging the turns, sew through the middle, and pull until a bow is formed.
- Repeat the technology to make a bow from a different material and a narrower ribbon.
- From fabric of a contrasting color, cut out pieces of the same length and width as the resulting bow, singe the edges.
- Gather all the elements onto a string.
- Cut out a cardboard circle, cover it with fabric, and sew it to an elastic band.
- Glue a bow onto the circle with a glue gun, decorate with small beads, rhinestones, buttons or stones.
To make elastic bands from satin ribbons with your own hands, decorating a bun, girls will need to follow step by step instructions
- Cut 6 pieces of green tape 4*2.5 cm into a dome, singe on both sides to create a wave - these will be leaves. Bend the bottom edge in two places, glue in the center to obtain a concave, smooth part.
- Cut 12 pieces of white tape 4*2.5 cm and 5 pieces 3.5*2.5 cm into a semicircle, singe, and glue into a droplet.
- Glue 5 blanks together by overlapping each other, decorate with stamens.
- Repeat for 14 pink petals from 4.5*2.5 cm pieces.
- Round off the first layer of white parts, glue the remaining petals, and make the second layer around the circumference from pink elements. Glue in the leaves.
- Make 5 similar blanks.
- Bend 4 pink pieces 10*5 in half, glue the ends with the fold, and tie them with a bow. Repeat for 2 white blanks 9*5 cm.
- Fasten 2 white ribbons 8.5*5 cm and a pink one 9*5 cm with a white overlay on the pink layer, form a fold, and decorate the bottom with beads. Glue the bow, masking the middle.
- Glue felt circles with a diameter of 3.5 and 2.5 cm to the back of the bow and flowers, sew all the elements onto a sewn lace elastic band. Decorate the bun.
Decorations in the form of bows look impressive on the hair, which can be made by following the instructions:
- Take 2 ribbons 2.5 cm wide and 0.8 cm long, 1 meter long; 1 ribbon 8 mm wide and 50 cm long.
- Make 2 cardboard templates in the shape of the letter P, 6 and 8 cm in size, cut the edge of the wide ribbon on the bias, lay it along the large template so that the cut and 2 folds are on each edge.
- Fasten the ribbon in the center with pins, sew with a “forward needle” seam, gather, and fasten.
- Repeat for the second bow, sew together, attach a bead in the middle.
Felt elastic band
This option is suitable for beginner craftsmen, since making such a craft is quite simple. Take a small circle cut from felt as a base. In this case, we see that the color yellow was used in the sample in the photo below. To decorate the elastic band, you need to prepare many identical pieces of pink ribbon, a package of small decorative lace flowers, beads to decorate the middle and a fluffy white pompom.
Decorating the product begins with attaching pieces of tape bent with loops. First, the edges of the ribbon must be melted with a candle or lighter so that the threads at the edges do not fray later. You can attach the loops with stitches to the felt base or glue them with a glue gun. The next step is to place the flowers close to each other along the inner circumference so that the ends of the ribbon are not visible.
Do-it-yourself elastic bands from satin ribbons - how to make a beautiful decoration step by step using the kanzashi technique with photos
To make such a hair tie, use: thin cloth any shade. The manufacturing process is very simple:
- Cut a strip 5 cm wide, up to 10-20 cm long (depending on how lush you want to decorate the flower).
- On one side, cut strips along the entire length like a fringe - these will be the petals.
- Take a needle and thread and gather the entire strip onto the thread on the side where there are no cuts.
- Tighten it so that you get a circle with petals on the outside.
- Tie the thread and sew the edges of the fabric.
- You can insert another identical strip of this or any other color into the center, or decorate with a bead suitable size.
- On the reverse side, attach a thin elastic band to the flower, which you will use to tie the strands. Rivets or a small piece of fabric are suitable for this purpose.
This decoration is more suitable for girls and will be a wonderful gift or accessory for a holiday. To understand how to make such a hair tie with your own hands, read the instructions below:
- Take a pink satin ribbon 2.5 cm wide and, using a ruler and a burner, create 5 stripes 7 cm long.
- Do the same with a purple ribbon 5 cm wide, but the stripes should be 10 cm long.
- Fold ribbons of the same color in half and sequentially sweep all the parts onto one thread and tighten so that you get a circle (do this from the side where the edges of the ribbon meet). This way we get one circle of petals.
- Do the same with the second color ribbons.
- Glue one flower on top of the other and a button in the middle.
- On the back side of the flower, glue a clip or elastic band that will hold the bunch of strands well.
What styles are out of fashion, what can be created using the usual headband (also known as a “hoop”) - that’s what interests most of the fair sex. The headband hairstyle is still in fashion, so it will never go out of style!
Why the headband is useful:
- 1. Ma covers up the flaws. Didn't have time to wash your hair or were you lazy? No problem! A voluminous headband will help disguise this “flaw” and no one will even see that the hair is not too fresh!
- 2.Universal and accessible. This accessory is an affordable item if you look hard enough. Therefore, stock up for all occasions at once: for all the outfits from your wardrobe!
- 3. P Suitable for any experiments. With such decoration you can do any experiments, something original, but it will work! For example, you can choose and braid your hairstyle, and decorate it with this stylish attribute. If you choose a headband with an elastic band, then there are countless variations of hairstyles for any celebration! You just need time, patience and the desire to build something like that on your head.
- 5. Comfortable. If you have a hairband that is made of soft material, you don't have to worry about it causing discomfort to your head.
DIY hair tie made from ribbons - excellent little present for your daughter. And if your girl is over 9 years old, recommend that she check out my master class.
Thanks to detailed master class, you can make a beautiful hair decoration with your own hands.

To create the decoration you will need:
- scrunchy;
- cabochon purple;
- scissors;
- ruler;
- satin ribbons 25 mm wide, purple and lilac flowers;
- thread and needle for handmade;
- glue;
- lighter.
- Work should begin with the manufacture of individual parts. You need to prepare 4 pieces of lilac and purple ribbon, each 16 cm long.
- Taking one piece of each color in your hands, you should fold their wrong sides together.
- With the purple part on top, you need to connect the sections of the double part. It is important not to twist or turn the tape. The result is a long and narrow loop.
- Continuing to hold the combined cuts with your fingers, you need to bend the upper part of the loop, folding the part in half.
- In this condition, the part must be secured with a pin. And you immediately need to prepare a second similar part, completely repeating each action.
- The resulting two parts should be stitched manually using a regular needle and thread. You need to sew with small stitches, trying to simultaneously capture all layers of the tape. In this case, both blanks must be sewn together with one thread, without breaking it.
- Next, the resulting stitch should be pulled tightly, gathering the edge of the tape into small folds. After this, you need to make several fastening knots with a needle and cut off the excess thread.
- Now, using a lighter, you should carefully and carefully melt the sections of the tapes.
- The result is half a bow, now you need to make the second part, completely repeating the previous steps.
- The resulting halves should be joined together, gluing the places where the parts are sewn together.
- Now the purple ribbon should be twisted into a tube and, smeared with glue, wrapped around the place where the two halves of the bow are fastened.
- On the wrong side, in the center of the bow, you need to attach a prepared elastic band.
- All that remains is to add a purple cabochon to the middle of the bow and smooth out the edges of the ribbons.
A lush and beautiful bow is ready!
Today I will show you how to make a flower from a satin ribbon. You can decorate with this flower the same hair band, hairpin, gift wrapping.
To create an elastic band you will need:
- glue gun;
- light pink cabochon;
- scissors;
- scrunchy;
- felt circle;
- satin ribbon not exceeding 25 mm wide, lilac color;
- pink satin ribbon 40 mm wide;
- ribbon made of lilac satin with a width of at least 50 mm;
- lighter.
- From a lilac ribbon 5 cm wide, you should prepare squares with sides of 50 mm, in the amount of 18 pieces.
- You need to make squares with a side of 4 cm from pink ribbon. You will need 12 such parts.
- From the narrowest of the prepared tapes you need to make 11 parts.
- Now you can start creating petals from all types of prepared squares. Taking one square, you need to carefully fold it into a triangle, bending the part along its diagonal.
- Having placed the fold strip horizontally towards you, you need to tuck one edge towards the middle and pinch it with your finger.
- Then you need to repeat the action, but with the second side of the fold.
- The result is a square blank, two sides of which consist of connected sections. They should be carefully scorched with fire so that each layer of tape is processed and soldered together.
- Carefully repeating each step, you need to process the remaining large lilac squares.
- Then repeat the processing with the pink parts, obtaining slightly smaller parts.
- Particular care must be taken when processing the smallest squares of lilac ribbon. It is important to ensure that the tape does not deform or singe, and that the edge remains smooth.
- Now you can connect the parts into a decoration. First you need to connect the large parts together. They should be glued by placing them one on top of the other, slightly hiding the singed cut under the fold strip.
- Gradually adding the petals, it is necessary to form a circle and the last detail fasten the first tier of decoration. The result will be a circle of 18 large lilac petals.
- Then you need to make a circle of medium-sized pink parts. You need to glue them together like lilac petals. The result will be a circle of 12 parts.
- And only small details remain, from which you need to make the same circle, but with 11 petals.
- Now you need to connect all the prepared circles together. You should start with the largest, gradually moving to the smaller. First you need to glue a large lilac circle and a pink one, aligning their centers.
- Then you need to attach a small lilac circle, placing it strictly in the center of the pink circle.
- On the bottom side of the circles you need to attach a small circle of felt, which will hide the intersection of the circles and their parts.
- Attach a prepared hair elastic in the center of the attached circle.
- All that remains is to add a lilac cabochon to the front side of the decoration and correct the folds of the petals.
The decoration is ready and now you know how to make a flower from a satin ribbon! You can watch the video.
Read my tips on what else you can make from ribbons yourself.

Give each other gifts on the day of the holiday and just like that for no reason.
Best regards, Natalya Krasnova.
Making beautiful hair bows with your own hands: 13 types of hair decorations
At the moment, long-haired girls are increasingly wondering how to properly sew a hair tie. In such a situation, women use various devices, including a hair tie.
Homemade hair bands will always be distinguished by their originality
Women either buy elastic bands or make them themselves - option 2 is more attractive. A hair tie consists of various available materials: fabric, ribbons, knitting threads, etc.
Currently women are using different ways creating rubber bands - as a result, every girl can sew beautiful hair bands with her own hands.
This material talks about how to make a hair elastic, and also discusses popular elastic bands for hair.
When creating the base of an elastic band for hair, a girl uses the following materials:
- threads matching the color of the fabric;
- a piece of cloth that is 3 times longer than the rubber band, width - any;
- linen elastic band (20 cm);
- takes the prepared piece of fabric in his hands, folds it in half lengthwise and stitches its edges;
- then he folds the stitched piece with holes - one on top of the other - and stitches its edges. At the same time, the girl leaves a hole through which she then turns the cut inside out;
- turns the cut inside out and inserts an elastic band from the underwear into it;
- ties a rubber thread and sews up the hole - and the base is ready!
When making the base of an elastic band for hair, a woman performs the following steps:
WATCH VIDEO INSTRUCTIONS
The girls are currently making different kinds rubber bands
Many girls love to be the center of attention. In such a situation, women use fashionable elastic bands for their hair.
When creating a fashionable elastic band, a girl performs the following actions:
- the future bow is placed in a rubber thread,
- ties it - and the elegant hair product is ready!
When going to a restaurant or other establishments, the girl uses an elegant elastic band for her hair.
When making such a product, a woman uses the following materials:
- inserts the wire into the hole;
- cuts out 2 ovals from fabric, which then sews along the edge and leaves a hole;
- various beads and crochet hook.
When creating an elegant rubber thread, the main thing is to tie the base correctly. The result should be a voluminous loop seam.
While weaving, the woman adds beads. Seamstresses also add beads after weaving - in such a situation, girls pull a thread through an elastic band and hang beads on it.
When making the “Centula Flower” elastic band, a woman performs the following steps:
- rolls the circle around the edge;
- As a result, he sews up the circle and makes tightening, moving from the center.
Such flowers are attached to headbands for babies and girls. In such a situation, the girl takes several circles of different sizes, cuts them along the edge and burns them.
At the end, the woman fastens the circles in the center with a bead - and the five-leaf flower is ready!
If the girl has it in stock original buttons, which do not match clothes, but they can also be used! In such a situation, a woman takes a rubber thread, a button and sews the rubber band to the button.
If the buttons are small and the base is wide, then the girl makes beautiful button decor. In such a situation, a woman can use various feminine devices: ribbons, rhinestones, etc.
When making a rubber thread with lace, a woman follows the same procedure as when creating the base for an elastic band. However, in this situation there is one difference: after stitching, the girl does not turn the workpiece inside out.
As a result, lace elastic bands give the girl a little playfulness.
Many girls have seen the cartoon “The Nightmare Before Christmas”. The main character of this picture is Jack.
When making the “Jack” elastic band, the girl uses the following materials:
- a standard thin elastic band for hair;
- cosmetic markers (for the face);
- other necessary devices.
When creating a “Jack” rubber band, a woman performs the following steps:
- attaches accessories and ribbon bows to the hair;
- then she makes Jack’s face - a circle of fabric, which the girl stuffs with padding polyester and paints - and the “Jack” elastic band is ready!
To make the “Bunny Ears” elastic band, the girl makes a pattern:
- picks up the base for the rubber band;
- ties the ears in a knot around the base - and an elastic band “ bunny ears"Ready! A girl with such an elastic band on her head looks feminine and cute in spring.
Photos of other rubber bands with my own hands
In addition to the above homemade products, girls make the following rubber bands with their own hands:
- elastic bands for hair.
The elastic bow looks very attractive and adds romance to the girl.
You can also make a lot of funny rubber bands from felt - such products also decorate girls.
As a result, every woman can independently make one or another hair tie - accomplish a creative feat and significantly transform her appearance.
All materials are provided for informational purposes only. Before using recommendations regarding the health of your hair, we recommend that you consult with a specialist. Use of site materials is permitted only with an active hyperlink to the site.
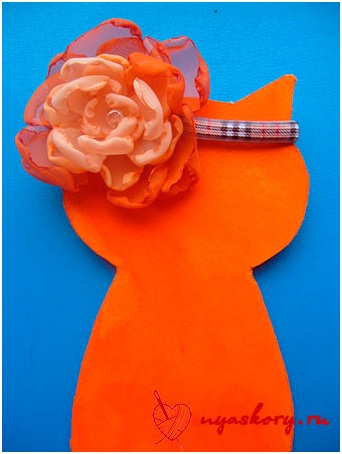
Before you make your own hair tie, consider what color ribbons you will need so that the product matches your clothes and accessories. To make such a beautiful bow as in the photo below, you need to buy a wide and narrow ribbon of light chocolate color and white organza. To connect all the layers of the craft, a beige button is used, onto which you can glue a bright crown with rhinestones.
Start working on the wide ribbon. Do not cut off a piece right away, so as not to make a mistake. It is better to first fold a bow consisting of several turns, leaving small beveled edges at the beginning of the work and at the end. Melt them immediately so that the cut sides look neat and the threads do not fray when using an elastic band. At the central point, use matching threads to make several stitches, thereby securing the bow.
The next step is to gather a wide strip of organza folded in half. To do this, stepping back a little from the edge, stitch the entire length of the fabric, tighten the thread and sew it to the bottom tape. Lastly, a thin ribbon bent into loops is attached, and all layers are connected with a decorated button.
Before you make a beautiful hair tie as in the photo below, choose wide and thin ribbons of white color and medium width with a contrasting pattern. A bright red heart is chosen as the central holder of all layers.
The long ends are left only on a thin ribbon located on top of two bows. On each hanging edge, string 3 beads, selected in the same color scheme as the ribbons. The edges are tied with tight knots so that the beads do not fall off when moving.
How to make small hair ties to make them look impressive? The kanzashi technique will help. This is making beautiful floral elements from simple satin ribbons. The flowers consist of 5 identical petals (two white and three red) and two leaves made of green ribbon. Let's see how to make such elements.
To create a petal, you need to cut squares of white and red colors. Then each is folded in half diagonally. Next, make a couple of folds on each side, gathering the edges in the center. It is most convenient to use tweezers to hold the tissue together. Then the bottom edge is trimmed with scissors and melted with a lighter, pressing all layers with tweezers.
Now let's look at how to make a bow-shaped hair tie from a ribbon. You will need a base to place the finished petals. It is most convenient to cut it from a sheet of felt, matched to the color of the satin ribbon. You already know how to make petals using the kanzashi technique. To make this hair tie, you will need to make 12 identical elements and attach them to a felt base in the shape of two connected triangles.
Between them place a central brooch with shiny rhinestones and a beautiful bow can be attached to an elastic band.
The simplest DIY velvet elastic band
A wide velvet elastic band always looks very luxurious, and making it couldn’t be easier:
- Take 1 or 2 pieces of velvet fabric of any color. If you took 2 pieces, cut out 2 rectangular parts of the same size and sew them together.
- The width of the rectangles is the width of the decoration, the larger it is, the more magnificent the decoration will be, the length is 25-40 cm, so that you can create beautiful assemblies.
- Thread a strong elastic rubber thread inside, which will gather the fabric into waves and hold the bunch of curls well, and tie it.
- Sew up the hole.
- Straighten the decoration.
Plastic rubber band
This version of a homemade decoration for your hair will be a real godsend for fashionistas, as you can unlimitedly show your imagination and make a new model every day. For this:
- Take a piece of plastic.
- Cut out a rectangular piece from it and draw any pattern.
- To seal the paint, cover the top of the design. clear varnish- can also be used for nails. If you want to make your jewelry more elegant, even varnish with glitter is perfect.
- Wait until it dries, and then glue an elastic band to the plastic on the back side, into which you will collect your curls.
Stylish elastic band
Leather jewelry looks very solid and stylish when the elastic band covers the bun of hair in several circles. If you just take a strip of skin, it will slide off, causing constant inconvenience. Therefore, we offer a leather option that will definitely look extraordinary and will hold your curls firmly in the bun:
- Take a strip of leather - at least 30 cm long.
- Cut the edges “on the bias”.
- Mark the center of the strip, secure a regular thin hair elastic in this place on one side with a rivet.
Craft for a bun
A beautiful elastic band for your daughter to put on her hair bun is made from different elements combined in one composition. These include white flowers using the kanzashi technique and large multi-layered details made of contrasting colors. Arrange the assembled elements symmetrically, leaving room for a large bow.
The elastic band looks very impressive due to the combination of different types of petals and fabrics, but all the details look harmonious together. Additional elements included blue beads and large rhinestones.
As you can see, it is not difficult to make a hair tie with your own hands from ribbons and fabric. The photographs presented in the article will make it easier to bring the described work to life. You can vary and combine different types of parts in one product. The main thing is to choose fabrics and decorative elements that look harmonious together, then the finished elastic band will turn out beautiful and tasteful. Good luck!
Hello, my dear friends and blog readers. Today I want to tell you how to easily and simply sew hair ties from fabric. I made mine as a gift for my daughter's eighth birthday.
Dasha has been asking me for rubber bands for a long time, but with work, a dacha and a business, it turned out to be not at all easy to find time for even minimal sewing. Be that as it may, now my daughter is glad that her wish list has become a little shorter, and I’m glad that I found out new way sew an elastic band.
In my youth, I often sewed such elastic bands for myself from different fabrics: velor, velvet, denim, silk. I especially remember one: made from knitwear in natural colors, which I crocheted along the edge. To go with it, I sewed a fabric headband and a top, also crocheted. Since then, the sewing method has been forgotten and I had to go online to remember how such elastic bands are sewn.
Materials:
- rectangle of fabric (I have cotton) measuring 35 cm long and 12 cm wide
- narrow elastic band 18 cm long (I like to use linen elastic for these purposes)
- sewing threads
Preparation method:
And one more angle:

Now one by one:


Do you use fabric hair ties?
Hi all! My friends, although it’s not spring outside yet, the time is not far off when we will all be walking around without hats. It’s worth taking care in advance about how your head will look, especially if you have very long hair. That is why today we will make our own hair ties!
We will move, so to speak, from the most basic to something more complex. In any case, you will definitely cope with all types of these elastic bands, because I will describe in detail how to make each of them
In fact, there are simply an incredibly huge number of ideas for creating rubber bands (and not only). And almost every one of them can be brought to life with the help of simple manipulations. In general, I will show you a lot of hair accessories. Make yourself comfortable, I’ll open the door for you to the amazing (really!) world of hair accessories (no matter how strange it may sound :))
Before you start, take a look here. When you get inspired, come back))
The basis of a hair tie or the simplest model
In order to make the base, you will first need:
- linen or just a thin elastic band (15-20 cm);
- a piece of fabric (the length is approximately 2 - 3 times longer than the length of the elastic band, the width is arbitrary);
- threads in the color of the fabric;
- needle;
- pin;
- scissors.
Take the prepared piece of fabric, fold it in half lengthwise, and sew along the edge. Then fold the stitched piece with the holes facing each other and sew along the edge, leaving an opening for turning inside out. Turn the workpiece inside out.
Now insert the elastic band. Tie it, sew up the hole. That's all. This model can be used as an independent product or as a basis for a more sophisticated elastic band.

DIY hair ties: master classes and photos
You just can’t imagine how many rubber bands you can make! Now let's look at the options for elastic bands that can be made even without serious knowledge of sewing art.
Four variations
To jump into creativity right away, I suggest you take a look at these four rubber band options. You can find each of them in one way or another in my articles about homemade gifts. At the end of the article I provide links to those master classes.
In short: bows are made using multiple folds. In the first case, several ribbons are folded, and in the second, the folds are formed from one strip. The flowers are collected from tightly gathered ribbon glued to the base circle. In the latter case, a bow is also placed on top.
Here's another bow option:
Beautiful and fashionable
I see this model very often now. Do you want to be the center of attention? Then make this beautiful and eye-catching scrunchie. Prepare a piece of fabric, wire, warp and thread with scissors.
Cut two ovals from the fabric and sew them together along the edge, leaving a hole. Insert a wire there. Place the future bow in an elastic band and tie it.
Elegant
There is no shame in wearing such an accessory for the evening. For it, prepare a base, shiny (optional) yarn, various kinds of beads and a crochet hook (although if the yarn is thick enough, you can do it with your hands).
The most important thing here is to tie the base properly. I don’t know what the correct name for this type of binding is, but it reminded me of a voluminous buttonhole stitch. As you weave, gradually add beads (this can be done later by pulling a thread through the elastic and gradually stringing them onto it).

Children's elastic bands for little girls
A five-leaf flower can be created by a simple operation: take a circle, sweep it along the edge, pull it together and stuff it. At the end, sew it up and make several tightenings from the center. 
They love to attach such flowers to the headbands of newborns and young children in general. Take several circles of different sizes, make cuts along the edges and burn them. All that remains is to fasten it in the center with a bead.
Button happiness
Do you have a few original buttons that are definitely not useful for clothes, but do not give rest to your creativity? Then put them to use! Everything is as simple as shelling pears: take an elastic band, a button and sew one to the other. If the buttons are small and the base is wide, then you can simply make button decoration.
All kinds of additional decorations are welcome: ribbons, rhinestones, etc.

Lace elastic
An elastic band can be sewn in the same way as a base for an elastic band, but with one difference: after stitching, the fabric piece does not turn inside out. Lace creates a very light and playful look.

The second option is with lace: this time only the flower is made from this wonderful material, and not the entire elastic band. To do this, just gather the lace and sew it in the center, the rest is a matter of decoration.

Elastic band "Bow"
An elastic band with a bow can be sewn from absolutely any fabric! I decided to experiment with fur
Below I decided to show you in a diagram how I made the bow. First, make the base for the elastic band, and then for the bow, take a wide strip of fabric and sew it in half (the same as for the base).

Then you sew the ends of the bow together, folding the piece in half again. Turn the elastic inside out and pull it in the center with a strip of fabric.
It turns out this cuteness:
From ordinary cotton fabric you will get the following:
Elastic band “Bunny ears”
One day I wandered into a free master class as part of the BiblioTime project (I talked about it). The theme of the handicraft meeting was rubber bands. But if everyone decorated the cut with beads, then I decided to distinguish myself by remembering the “eared” specimens.
Unfortunately, I don’t have any photos of that product, but I can tell you about the creation of an elastic band with ears
To make such an elastic band, you will need a pattern:

Again we need a base for the elastic band. The ears are tied in a knot around it and the result is a romantic and girlishly tender image. What you need for spring

Rubber band "Jack" (Halloween)


