Hello everyone, catch the bouquet. Yes, today we will make our own bouquets of flowers. I will show different ways creating FLOWERS crafts that you can make in kindergarten or at home with your children. Such crafts-bouquets can be done like this gift for mom in kindergarten class. On our website there is an article “”, in which we professionally teach several techniques for creating paper flowers. And in this article we will not dwell on techniques, but rather will give GENERAL IDEAS of how unusually and quickly you can do craft for kindergarten in the form of a bouquet of flowers. In kindergarten they often spend crafts competitions– in the spring, too, so it would be appropriate to bring a bouquet of flowers to the spring exhibition – a craft that will always look advantageous against the backdrop of all the work. A bouquet is always beautiful.
Let's see what flower crafts you can make with your own hands.
Crafts-appliques.
From paper flowers.
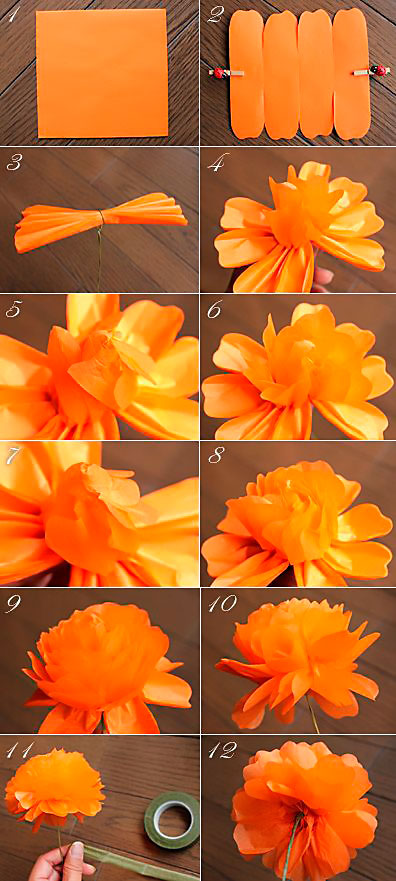
This work in the form of a bouquet of lush flowers is simply and quickly made from ordinary colored paper. Aster flowers are long sheets of paper, cut into fringes and rolled into a tube. Then fluffed with hands.

You can make a basket from two plastic plates. One plate serves as a background. We glue flowers on it from several layers of colored paper. And we cut the second basket so that a long shoot remains in the center (this will be the handle of the basket).

Flowers that consist of from several layers of cardboard- each has its own color. And the green leaves look beautiful too in two-layer design– dark contours of the lower layer and upper smaller contours of light paper.

If you don't have colored paper, you can draw flowers on a white sheet of paper, then cut them out with scissors. We bend each flower silhouette with our hands and glue the center of the flowers. You can cut the petals of each flower and bend them in a convex manner - so that the bouquet is voluminous.

Instead of a vase, you can make corrugated bouquet packaging. It’s as if the bouquet was wrapped in a corrugated bag, as they do in the store. We make an imitation bag for a bouquet from an ordinary fan - we fold a sheet of paper into an accordion, tie it in the middle with a ribbon and stick it on a sheet of paper - on top we decorate a lush composition of a bouquet with flowers. A simple and beautiful flower craft for kindergarten or school.


Craft FLOWERS
with wicker baskets.
The vase for your bouquet can be replaced with a currant. Cut out a trapezoid shape from cardboard. Cut strips from brown paper and glue the strips onto the trapezoid in vertical rows, then horizontal ones. Trim the ends of the strips sticking out beyond the edge of the trapezoid with scissors.
Paper roses are easy to roll. Watch the master class below.

We see ANOTHER WAY to make a wicker basket for a bouquet in the photo below. Step-by-step master class everything shows. We cut the paper piece into a long fringe. Next, we insert the colored stripes by pulling them through the fringe strips.
Next we give this braid the required form– trapezoid, cutting obliquely both side edges of the woven fabric. If desired, cut a hole (separating the handle from the basket part). Or we fill this upper space with flowers and leaves. Such crafts with flowers are good to do at school in grades 1-2 - just simple and understandable for children 7-8 years old, and they can do the whole process themselves, without the help of a teacher.

The baskets in the photo below are made using a similar technique. Here we first cut out the silhouette of the basket from cardboard. Then we make slits in the body of the basket with scissors, and thread paper ribbons through them. Also very quick way make an elegant basket with flowers for the craft.

You can make a three-dimensional flower basket craft. We wrap a long sheet of cardboard in a ring (we fasten several strips of cardboard with a stapler and close them into an oval-shaped ring). Next, we close this cardboard ring and seal it with green paper grass. And then we glue the elements of the fence onto the top of the grass with glue. We attach paper flower figures to the grass. Glue the handle to the inner sides. The center of the basket can be left empty, paper dolls or chicks can be planted there, or filled with small balloons.

Craft flowers
using the ORIGAMI technique.
So I want to give you simple origami patterns for flowers with your own hands. Here below step by step wizard simple flower origami class. Such work can be organized at school in an art lesson. It turns out to be a delicate craft of forget-me-not flowers for mom.


You can find a lot on the Internet yourself. simple circuits for assembling paper flowers.


DIY flowers
from CASSETTES FROM EGGS
We usually throw away egg cartons - but you can use it to make beautiful flowers with your own hands. A great craft for mom on March 8th. Paint with gouache and you're done. Place a plasticine pellet or pompom inside the flower cup for crafts and decoration.

You can refine such a cardboard cup for a flower by gluing it on the outside with petals made of colored paper. It also turns out very elegant. Great craft bouquet for mom.

DIY flowers
from a ROUND ACCORINA.
Fold the strip of paper into an accordion fold. Then we unfold it in a circle to form a round fan fold. We fasten the middle with a drop of glue. Fastening paper flower on the leg.

An accordion of green paper can be folded into a cactus flower shape. You can come up with your own cactus model. In the middle we insert any paper flower made using the origami technique or another simple method.


DIY flowers
CACTi made of paper.
You can also make crafts with your own hands: Cacti flowers - also with beautiful blooming buds. Here are some ideas on this topic.


Craft FLOWERS
Made from crepe paper.
Crafts with appliques made from mint flowers look very nice. crepe paper. Below we see a panel painting of lilac, where crepe paper is crumpled into pellets and then the blue areas of the Lilac appliqué are covered with this relief.

Green leaves are also made from crepe paper; the edge of the leaf is folded into a flagellum to give the leaf a three-dimensional shape. Beautiful and quick craft FLOWERS for the kindergarten.

Leaves of crepe paper can be rolled into a narrow tube and then wrapped in a loop and glued to a round piece of cardboard in the shape of a petal. With these twisted petal loops we paste the entire round cardboard center and cover the top with a snail flagellum made from the same twisted tube of crepe paper.

A wooden skewer will be the stem of the flower (it can be covered with green paint or wrapped with paper tape). To the bottom plastic cup We attach a large piece of plasticine (or dough made from flour and salt) and stick flower stems into this lump. We get a beautiful craft - flowers in a bouquet in a vase. Excellent work for an exhibition in a kindergarten.

We can even make a bouquet using this technique from an ordinary WHITE PAPER NAPKIN - roll it into a tube and bend it in half. And then paint everything on a napkin with gouache on the finished assembled applique.


Crafts FLOWERS
Made from corrugated cardboard.
At a stationery store you can buy sets with colored embossed cardboard. It makes very elegant flower crafts.
You can simply cut out the silhouettes of the petals and stick them in tiers around the center of the middle. Place a bee on top. The bee is made from thin sheets yellow color, twisted into a twist (like we roll up a measuring tape) and then pull this twist (squeeze it out with your finger from the inside) so that the cylinder extends, and the bee becomes oval in shape. All that remains is to secure this oval shape with glue and decorate the bee’s body with stripes and wings.

The pot is easy to make. We take regular gray cardboard from old boxes. We roll it into a tight tube and wrap it with tape. We paste strips of colored corrugated cardboard on top.
You can make craft flowers from corrugated cardboard using a technique similar to quilling. Also roll the flats into round twists, giving them an oval petal shape. Collect flowers. Then make a bouquet.

Craft FLOWERS
In pots.
Crafts: indoor flowers in pots = also looks good as an exhibition project for a kindergarten. Here you need to buy a plastic pot in the store, fill it with dough (flour, salt, water) equal amounts of flour and salt, until the water becomes like plasticine. Fill the pot with this mixture.
We cut out flowers from paper and attach them to skewers ( so that the flower does not slide down the slippery skewer, under the cup of the flower we make a stopper from a lump of green plasticine). On top, where the skewer sticks out of the flower, we also cover it with a piece of plasticine (you can stick it with sparkles or beads) or seal the middle of the flower with a circle of cardboard.
We stick our prepared flowers into the dough inside the pot.


You can use cocktail straws as stems. And make the centers of flowers from plastic stoppers(as in a craft bouquet of daffodil flowers). Here you need to make a hole in the lid with a nail (or a drill) and insert a tube so that the tube does not jump out, make cuts at its tip and push the cut pieces in different directions.


Craft FLOWERS
From yogurt jars.
You can make a beautiful DIY flower craft from empty yogurt jars. The jars are cut in a circle (as seen in the photo) in the shape of rounded petals. A red jar, then a yellow one, then an orange jar fit into each other. The result is an elegant three-color flower bud.

Any flower vase made from yogurt jars will do. But you can make it yourself from an ordinary half-liter glass jar and balloons.
The balloons are cut off at the top to make a pouch. We make several such bags, some higher, the other shorter and alternately put on the jar. First, we put the longest ball bag on the jar, then a shorter one, then an even shorter one, and finally the shortest one. We get a striped rubber jar.

Here's another way to make beautiful flowers from plastic yogurt jars. Each jar is cut into petals - we make a cut along the side of the jar without reaching the bottom. We push the cut parts towards the bottom. Glue a colored paper center onto the bottom. We fix the legs from cocktail tubes. We put the bouquet in a vase. At the bottom of the vase there is a lump of salted dough, we stick tubes into it to fix the bouquet.

You can make a vase in the shape of a cat yourself. We cut the bottle, leaving extensions in the shape of ears, and paint it in White color(pour paint inside, roll on the sides of the vase, dry). Using a marker, draw the cat's face.
Craft FLOWERS
From paper rolls.
From rolls from toilet paper You can also make a beautiful flower arrangement. I kiss the flowerbed with my own hands. Here you just need to make slits in the top of the rolls with scissors and insert the silhouette of a cardboard flower into this slot. A simple children's craft for kindergarten.

In the same way, a roll can become the central element of a daffodil flower. A simple beautiful craft. We make three of these daffodils and arrange them into a bouquet with our own hands.

And here are the scraps of rolls that were painted with gouache and cut- at the top on the cloves, and at the bottom they made a rounded cut. The lower cut of the bud is flattened and clamped with a stapler; don’t forget to insert a cocktail straw inside under the staple. The painted buds were covered with white gouache spots using a cotton swab.

And if you paint the roll with gouache and then cut it on both sides into LONG STRIPS. Bend these strips into a splay. And we will get a shaggy ASTRA flower - an excellent flower craft for children in kindergarten.

We stick a wooden skewer into the side of the middle tubular part of such a flower. And we put a round pellet of plasticine on top of it - this is how we fix the flower on the stem. As you can see simple craft DIY flower made from cheap material.

Craft FLOWERS
From modular origami.
Beautiful flowers can be assembled like a construction set from paper modules. Cacti also bloom magnificently and beautifully. Here's an idea for a craft with flowers on their prickly cacti modular origami. I have already described how to assemble a paper rectangle module yourself in a special article.

Cacti assembled from modules in two shades of green look beautiful and bright. And flowers are also beautiful if they have two shades of pink.

Tulip buds are collected very quickly. In one evening we create such a bouquet with our own hands. The whole family can make modules - it's easy. The three of us sat down and did everything necessary at one time, and then collected the flowers, put wooden skewers on the rods and inserted a bouquet into the craft (a piece of salt dough was placed at the bottom of the vase to fix the flowers in the desired position).

An elegant vase can also be assembled from paper modules as in the photo below. Beautiful craft in the form of one flower in an elegant vase.

The best various crafts FLOWERS can be assembled from modular origami. Even a classic arrangement of petals will produce a different pattern if you insert modules of different colors, along the edges, or in rows or in the center.


You found such interesting and original ideas with flower crafts in our article today. Now you have an idea for your future work. And you feel that you can handle it and even anticipate pleasure. Because it is very nice to create beauty with your own hands. Crafts FLOWERS decorate our lives. Let everything you plan work out.
Olga Klishevskaya, especially for the site
If you like our site, you can support the enthusiasm of those who work for you.
The floral theme is undoubtedly everyone’s favorite in any form. Flowers are beautiful, both natural and artificial. They give positive emotions. They are given to both men and women, regardless of age. Flowers are used to decorate homes, clothes, dishes and other items.
But today we will talk about flower crafts that you can make with your children or on your own. Many ideas and instructions for making them can be gleaned from magazines or the Internet.

But, if you are a creative person and not deprived of imagination, you can show all your abilities by creating new ones original crafts- flowers.


Flower extravaganza - ideas for creativity
On the eve of spring, when nature begins to awaken from sleep, on the eve women's day On March 8, together with your children you can create a paper applique called “Snowdrops on a thawed patch” and give it to your mother or grandmother for the holiday.

This idea is especially good for collective creativity in kindergarten. It's very easy to do. For work you will need: a white sheet of paper, colored paper, scissors and glue. Then cut out the stem and leaves from green paper, and snowdrop petals from blue paper.

Take a blank sheet and lay out the shape of the future flower on it, then glue all the elements to a sheet of paper. The flower is ready. On a sheet you can make an applique of several flowers in the form of a clearing.

Using origami technique
In addition to applique, flower crafts can be made using the origami technique. Create whole bouquet and install in beautiful vase. And when, after some time, you get tired of it, just make a new one in a completely different image. A variety of photos of flower crafts will help you in this choice.

Beautiful do-it-yourself flowers using the origami technique can be different: daisies, roses, tulips, snowdrops, etc. They will perfectly decorate both an apartment and groups in children's institutions.

In addition, the development of motor skills in children is of great importance in their development. A spring mood will be provided to you every day.

Volumetric cards
Well, what would a holiday be without traditional ones? greeting cards. Every child will be happy to give his beloved women beautiful postcard with flowers. For example, with a cute sprig of mimosa, which can be easily created from ordinary yellow or colored napkins for originality.

For beginners making flower crafts, the step-by-step procedure is as follows:

- prepare necessary materials: mimosa template, green gouache, jar of water, brush, PVA glue, yellow paper napkins,
- Roll napkins into hard lumps round shape, on a template in the form of a mimosa, we drip glue into the locations of the flowers and hide them on top with lumps.

The mimosa sprig is ready.

DIY bouquet of roses
Made from corrugated paper, a bouquet of roses of different sizes will look very elegant and festive, and you can place a chocolate candy inside the buds.

After all, as you know, a rose is not only a beautiful, but also a noble flower. Such a bouquet of flowers will decorate any interior, refresh your mood and give positive emotions.


Spring tulips with a surprise
The youngest children can make crafts in the form of tulips by placing lollipop candies in the core of the buds. These truly spring flowers will delight any representative of the fair half of humanity. You can also make color handprints as an application. These will be best crafts on the theme of flowers for mothers.

An interesting craft option is creating tulips from plastic spoons. The creative process includes the following stages:
- first, plastic disposable spoons are painted in different colors: red, yellow, purple, etc. You can even mix them to get a new shade,
- when the paint on the spoons is dry, you need to connect the spoons back side out, and wrap the handles with green paper, making a stem,
- pour red beans inside a plastic cup and place the tulips you made in them,
- Make the leaves for the tulips from satin, tie a bow from this ribbon on the stem.
- disguise the glass using colorful postcard or a fragment of a log.
- decorate any corner of the apartment with a ready-made flower.


Floral-themed crafts made using the iris folding technique will come in very handy. Diagrams and instructions for implementation can be found online and printed for ease of use. Or study detailed master class on crafts on the theme of flowers using this technique.

Bouquet of callas
You can easily make crafts in the form of calla lilies, for which you will need ear sticks and cotton pads. Form a flower from the disks, and place half an ear stick inside, attach a wire stem and wrap it in green paper. The flower is ready.

Make several of them and you'll get a whole bouquet. In addition, it can be an applique on paper, where the flowers will be voluminous, and the stem and petals will be flat, made of colored paper.

What else can you make a flower craft from? In principle, it is not difficult to make flowers from various materials. For example, wire, thread, beads, ribbons and even plastic bottles.

The main thing is the desire to do something with your own hands. Moreover, in creative process children and the rest of the family can be involved, which is very helpful in maintaining excellent family relationships and a warm atmosphere throughout the house. Create something beautiful and be happy!


Photos of flower crafts


Greetings, dear readers and visitors! I have already written several times that I really love decorating gifts in the most unexpected ways. And today I suggest you make paper flowers with your own hands. As many as twenty-odd methods, by the way.
Now, unfortunately, I rarely get around to mass gift wrapping. Moreover, every year there are more and more acquaintances and friends who need to be congratulated along with their relatives. This is very joyful! I love giving presents. But if I choose them very carefully, then lately I have packaged them in organza bags, since I only decide on detailed packaging for single holidays (like birthdays).
However, my passion for all kinds of packaging beauty is difficult to overcome, so today, together with you, I will practice making beautiful flowers using step-by-step schemes.
DIY paper flowers: simple and clever
There will be a lot of master classes, get ready. Good news for all rose lovers: there will be as many as 4 of them.
Aster
Guys, honestly, I'm not very good at naming colors. So if you see a discrepancy that is obvious to you, write in the comments.
So, first in line is the aster. For it, cut out five circles: two large, two medium and one very small. Fold each circle in half three times, then decorate the edge as in the 4th photo. After unfolding the structure, squeeze each petal to give it volume. Stack all the circles and decorate the middle.
Almost calendula
This flower looks much more like a packaging bow. Prepare a square of paper of the required length for it and cut the edges according to step 2. You will need several such blanks. Place them one on top of the other and squeeze them in the center, tightening them with wire or thread.
Now the most important thing is to straighten the petals so that you get a beautiful resemblance to a flower. Accordingly, the more layers, the more petals and the more magnificent the flower in the end.
Tip: make several of these flowers of different sizes and glue them on the packaging next to each other, then you will get a beautiful bouquet.
Calla
To create calla lilies, you can use either regular double-sided paper or foam rubber (I wrote about what it is in the section about the minion).
For calla lilies, take a stamen (you can crumple it out of paper or make it from polymer clay) and a petal made in the shape of a heart. Place the stamen in the petal, fold the edges of the petal over the stamen, gluing them together. All that remains is to unscrew the edges to get maximum resemblance to a calla lily.
Such flowers are well suited for decorating postcards, packaging, and as an independent gift in the form of a bouquet.

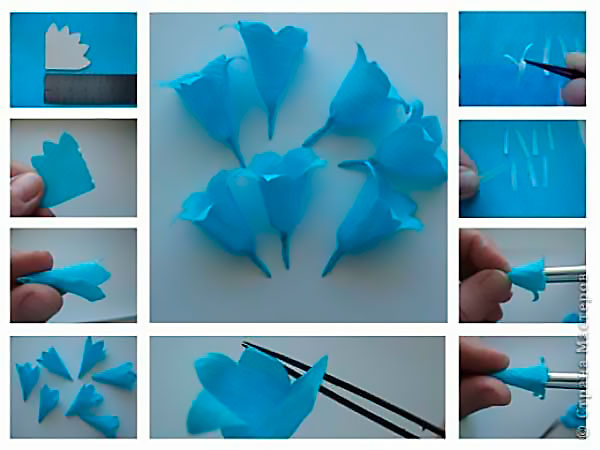
Bell
The master class for the bell is very simple and straightforward. Cut the blank according to the first photo. Glue the edges together and carefully straighten the ends. To make everything look natural, make a center of several elongated stamens, which will need to be glued inside the flower.
By the way, these bells would be great to decorate packaging for March 8th or just a spring birthday.
Lilies of the valley
Well, or something similar. For one flower, take a long rectangle and bend its edge, as in the photo. Cut the wide part so that you get many small strips. Using scissors, twist the strips (to do this, you just need to run the sharp side of the scissors along these strips, lightly pressing the blade against them).
To prevent the flower from falling apart, take a rod and wrap a green stripe around it. Then start carefully twisting the “flower” part, previously coated with glue, on top. Apply the layers tightly so that the greenery does not show through.
But making green leaves is not at all difficult - for them, just fold a rectangle of green paper like an accordion and trim the edges into a triangle. When you unroll, you will get a lot of green leaves ready to be glued to the base.

Poppy
Now we use corrugated paper. Cut out about ten teardrop-shaped petals from it. Stretch the wide part so that the blanks resemble mushrooms.
Take a thin wire and wrap some paper around it - this will be the core. Wind the petals onto this core so that each one slightly overlaps the previous one. When everything is ready, the structure can be pulled together at the bottom so that it does not fall apart.
The master class shows how this flower can be attached to a festive cap, but, believe me, gift box poppy will look great.

Red flower
What is its species? No associations came to mind. But that’s not the point - to create it you will need about ten petals (used, by the way, corrugated paper). Their shape is almost teardrop-shaped. but with a cut end.
Cut out a base circle from thick cardboard. Glue all the petals in layers to this circle, slightly crumpling (doubting? God, how right :_D) the bases, thus forming folds - then the flower will be more voluminous and “fluffy”. Decorate the center with some button or bead.
Such a flower, by the way, will look great from soft felt- this way it will gain durability. And if you attach the base for the brooch at the back, you get two in one - the decoration of the gift and the gift itself.

Extravaganza of color
There are only two flowers, but the bright combinations create a very unusual effect. Take the crepe paper again, cut out a circle and fold it into a “doll” shape. Cut a “skirt” for it, which you wrap around the doll. Attach the petals on top, gluing them in a circle. Glue two wide leaves at the base.
The second flower is very simple - cut the fringe and twist it into several layers. The flowers are very simple, they can make a very interesting gift arrangement.
Unseen flower
To prepare the base for this flower, I advise you to look here - here the base for the second Christmas tree is created in exactly the same way. But then the differences begin - each of the corners needs to be wrapped using a thick wire or knitting needle so that it turns out to be a spiral.
You can leave this design alone, but I suggest you connect several (say, three) pieces using the existing spirals - the wow effect is guaranteed. Then you can also experiment - connecting elements with spirals into unprecedented designs.
Advice: going to a party in Japanese style? Then make such a flower very big size and take it with you - it will serve as an excellent decoration for a chandelier.

Peony
“Pio-, pio-, peonies are given by a new acquaintance...” - words from the song of the underground group “My Michelle” (I’ve been listening to it often lately, inspired by it). We will make from corrugated paper. You will need five sizes of petals, approximately five copies of each (appearance as in the photo).
Stretch the petals so that you get something like a wave (for both large and small ones). Then form a stamen from the same corrugated paper by folding the paper and further compacting it. You can do this on a wire skewer, or you can do it without it.
Glue the petals onto the finished stamen, each one overlapping the previous one. Do not pull the petal too tightly. In the end, all that remains is to cut the green leaves and stick them around the peony.

4 in 1: dandelion, clove, aster, chamomile
All these wonderful creations of nature are made according to one principle - cutting the edge of a strip from which a flower will be made. The final shape of the flower depends on the cutting shape. Please note that some require a core and others do not.
Please note: despite the very simple design, the flowers turn out very realistic. If you have very little time to make, then this is an ideal option.
Experiment and discover your unprecedented plants - be sure to tell us what happens.

Paper roses
Magic roses are one of my favorite flowers
Rose with twisted edge
The main difficulty here is to carefully twist the edge of the corrugated paper, straightening out the folds. Then make sure that the folds are even. Now twist the strip so that the layers fit tightly together. At the end, secure with thread, trim off the excess.

Simple rose
Need to make a plant in five minutes? Then this rose is definitely for you! Just cut out a circle and draw a spiral in it. Cut out a spiral as in the photo and twist the rose, starting from the longest link of the spiral (the central part will serve as the base).

Big rose
Even gigantic, if you follow these exact dimensions. The heart petals are stretched and placed on top of each other in a circle, secured with glue. Green petals are attached at the end. Of course, the flower doesn’t have to be as big as in the photo – go with your preferences.
Twisted paper rose
Once upon a time I already described this method of creating a rose (here is the second one). The principle is absolutely the same, but the sizes of the triangles resulting from twisting must be the same along the entire length of the ribbon, otherwise the flower will not be very neat.
Once I even made a Rosemary doll, which took part in a city exhibition. Her whole body was covered with roses, made exactly according to this method (the roses were made from ribbons, however).

Clover
I'll just show you how to make the base for the four leaf clover. To do this, take a square of paper and fold it in half lengthwise and in half again. Fold the ends towards the center. Cut out a heart from the resulting design. The result will be exactly what we wanted - a happy flower.

Nameless
No matter how I tried, I couldn’t give a clear name. As a result, the product remained just a beautiful flower, reminiscent of kanzashi motifs ( Japanese art production of jewelry from satin ribbons).
The beginning here is the same as in clover. But after bending the edges, you will need to bend the ends so that the length of the bent part is equal to the length of the visible side in the middle. Then these parts are straightened out and their edges are folded so that the sides are even. They are folded again and glued together to form three stamens. There should be three such petals.
This flower is most suitable for decorating a gift in Japanese style.

And again the aster
This time you need to glue the petals along the edge until you reach the desired volume. Decorate the center as you wish or simply fill it with as many petals as possible.

With this, I declare the big flower review closed. I hope you have found exactly the option that will help you decorate your gift in the best possible way. See you soon, subscribe and share with your friends!
Sincerely, Anastasia Skoracheva
Making flowers with your own hands is, of course, a trend, but it originated... back in ancient times. From Ancient Greece and Ancient China, information has reached us about how the craft of creating artificial flowers developed. So this view manual labor- not just a newfangled hobby. By doing it, you are continuing the tradition of thousands of years. Translating the beauty of a flower into available material is not an easy task, but we have collected only simple and proven methods for you!
“Flowers: what to decorate with them”
Traditionally, flowers are placed in a vase, including artificial ones. The advantage is that nothing limits us in choosing a vase. This can be either a beautiful perfume bottle or a thread spool. In this article you will see a variety of examples.
From flowers you can make small bouquets and lush wreaths that hang on the door. And ornate garlands will decorate window openings, window sills, stair railings and flights, walls, balconies. They are equally relevant for the decor of the living room, bedroom, kitchen, nursery and bath. Necessary for decorating a bedside table and table setting.
Mostly, artificial flowers are made from paper - this is the most convenient and pliable material. In second place is fabric: thin silk, lace, or, conversely, thick felt, leather or tweed. In the article we have selected many master classes that will allow you to choose the method of making flowers with your own hands. Although, none of them are so difficult that you will have noticeable difficulties!
"Paper Flowers"
Paper (colored, plain, newspaper, hard, rough, glossy, shiny, etc.) will be useful to us not only for creating paintings with our own hands - making flowers out of it is as easy as shelling pears! Are we sure?
"Flowers from book pages"
- The topic of crafts from book pages is inexhaustible! Typography gives the products a special charm, so that impeccability of execution fades into the background. Therefore, forget about classic colored paper for a while and try to make a rose flower with your own hands as in the photo below. Remember that newsprint is not suitable here, due to its thinness; you need a book or high-quality magazine page.

- To make it more like real flowers, the very edges of the petals can be painted - with a spray or with heavily diluted watercolors.

- Plain paper looks great too rich color in combination with book pages or notes. This handmade item will be a worthy decoration for a library or tea table.

- Remember - the thicker the paper you choose, the wider your options for coloring flowers. It's easier to make them white initially and then add colors as needed. Acrylic or gouache works best for coloring - when working with them, your workpieces will not get wet or lose their shape.

"Colored paper"
Choose the most plain paper For self-made make your own flowers, you can also use any packaging material. The main thing is that it is not thick cardboard, it will be difficult to work with.
"Simple daisies"
- Sometimes the most simple options look the most impressive. Even a child can make flowers, as in the illustration below. And they look very stylish!

"Roses-candlesticks"
- A delicate candlestick made of paper roses for your interior is made by analogy with the previous flowers and is attached to a flexible wire pulled into a circle. Create flowers of different sizes, and you will get this unusual decoration.

"Flowers from baking molds"
Take a closer look, do the bowls of these flowers remind you of anything? Well, cupcake tins, of course! To make these flowers with your own hands, you will need:
The only caveat is that the molds must be of different sizes. We carefully pierce their base and place them on the wire, starting with the smallest one. We knead the mold with our fingers to give it a more elongated shape. We fit them tightly to each other, giving a slightly disheveled natural look. At the end of the work, drop a little glue onto a toothpick and fasten the layers together deep inside so that the upper part of the petals remains movable. Ready!
To make it even more interesting, you can combine molds of different colors and patterns in your work.


"Flower from the Card"
In the article about DIY interior ideas, we talked about products made from geographical maps. If you liked it, then take note of this unusual example making a rose. You can use a new atlas with bright glossy pages, or you can take an aged monochromatic map.

"Flowers for table setting"
When buying ice cream, would you prefer a waffle cone or paper cup? We vote for the horn - and we suggest you make an unusual decoration for table setting, which you can use on holidays and on weekdays. First, let's learn how to make the same beautiful flowers with your own hands!

"We'll need it"

Draw the same pattern on a piece of paper irregular shape, as in the first photo. Cut it out, then roll it into a tube. We repeat the operation until we achieve the desired splendor of the flower. We fasten each circle of petals together with glue.

Now that the technology for making the flower is known, we can move on. So, let's put it on the table:
- small waffle cone,
- stationery knife,
- glue gun,
- a small flower pot or other beautiful base,
- several types of colored paper - yellow, red, pink, orange for flowers, green for leaves, striped for a horn.
"Sequencing"
That's all! Such DIY flowers for decorating a room will bloom on the gloomiest and rainiest day, so don’t put off making them.

"Flower garlands"
What about really big flowers made by yourself? Let's create a garland that will be a key accessory for any holiday. Such unusual thing simply cannot pass unnoticed!

“What is required and how is it done”
- wrapping or corrugated paper in two colors,
- thin wire,
- pliers,
- scissors.


"Flowers made of thread and fabric"
Working with fabric is a little more difficult than working with paper. But flowers made from it with your own hands also turn out more realistic. You don't need a lot of material to make a flower. This way, you can always wisely dispose of accumulated scraps.
"Pompom Flowers"
- Do you know how to make pompoms from wool yarn? If yes, then the manufacturing process is clear to you. If not, read on. And you will understand how to make flowers that look like roses or peonies in a vintage style.

“Let’s get ready and get started”
Wrap the thread around the fork as shown in the photo. This is approximately 50-60 revolutions. Cut a small piece of thread from the ball, pass it under the previously stretched thread and tie it into a knot, as in the second photo. Then remove the yarn from the fork and cut the loop on both sides. Cut off the excess yarn and shape the pompom into a ball shape. Then easily slide it onto a thin wire and place it in a beautiful jar.


"Flowers-balls"
- To make such lush flowers with your own hands for a room, as in the photo below, half an hour will be enough for you. All you need for this: plain fabric, preferably thin corrugated. The diameter of the ball will depend on the width of the piece of fabric; estimate it in advance. The rest is quite simple - we collect the textiles into an accordion along the short side, turning the rectangular ends into semicircular ones, cutting off the corners. Pull the strip tightly in the middle and fluff it into a ball. Ready!

"Flower pendants"
- For your baby's room you will need decorations that are as bright, safe, soft and non-toxic as possible and are difficult to tear or wrinkle. In addition, it is necessary that they are easy to wash and, if necessary, replace with new ones. Not an easy task! It’s easier to solve it yourself than to go to the store. The ideal option would be hand-made butterflies or flowers made from thick, pleasant-to-touch fabric. Traditionally, parents choose felt for this. You can easily sew or cut out anything you want from it, and be calm about the health and safety of your baby!

"Applique flowers"
Below we will describe three ways to decorate the interior with flowers through textiles. But these methods can also be used for furniture. For example, you can decorate curtains, bed linen, pillows, bedspreads, towels, canopies, etc. with homemade flowers.
"For pillows"
- Pleated fabric flowers in the interior can be used not only on their own, but also to decorate furniture, accessories, and textiles. In the photo you can see an example of a DIY pillow to which a huge fabric flower was sewn. Here you are limited only by your imagination, because this accessory can be pinned to a blanket, curtains, headboard, chair back - whatever your imagination takes you to!

"For curtains"
- The same applies to knitted flowers. We are used to seeing them only on clothes. But, by analogy with the previous ones, nothing prevents you from using them in the design of the room. For example, you can sew curtains with your own hands and strew them with artificial flowers to decorate the interior, as in the photo below. These are not elements holiday decor, but part of the everyday environment. If you want the flowers not to be too conspicuous, just make them from the same fabric as the curtains, as in the above example.

"For bedspreads"
- You can also make a replacement accessory that you can easily remove if you get tired of it. If your blanket is made of high-quality expensive fabric, but at the same time it looks quite boring, you will agree that you will not change it. This is where a knitted or sewn cape made from many small flowers will come to the rescue.
It is done simply: circles of fabric with a floral print are folded and carefully ironed. The leaves are cut out of thick fabric, and veins are embroidered on them using a simple stitch. Then all the small flowers are sewn together into a long piece, and the leaves are sewn on both narrow edges. The cape is ready! You can decorate chairs and armchairs with the same products, and put a similar rug under the bed.

"Combining"
Paper or fabric flowers for interior decoration are a great material to combine with anything. Everything we described above can only be a blank, and you are free to add the final individual touches to the product yourself. Do you want to create a delicate fabric composition? Additionally, wrap the flower with a lace ribbon and trim it with beads. Need to spruce up your paper flower a little? Place a large artificial pearl in its center or drop a few rhinestones on the petals. Replace wire with natural wooden twigs, paint newspaper with gold spray, and create unusual perforations on leather flowers. In a word - create without limiting yourself in anything!

This thematic section is only for those who love flowers. That is, absolutely for everyone. Its pages contain many publications about real and man-made flowers. Flowers are joy, happiness, the personification of youth, freshness and positive vitality nature. They are given to us so that we learn to enjoy beauty, life, and appreciate every moment of it! No wonder flowers have always been and will remain the best gift and an exquisite compliment. We are sure that you will appreciate the impressive variety of flower-themed gift crafts that you can make with your children. And be sure to choose from them those that will be useful to you in your work.
Flowers are the subject of our admiration and source of inspiration!
Contained in sections:Includes sections:
- Crafts and bouquets of sweets. Candy gifts, suite design, flowers
Showing publications 1-10 of 3713.
All sections | Flowers. Flower themed crafts
Master Class « Flower using paper art technique» . Municipal budget preschool educational institution « Kindergarten No. 57", Solnechnogorsk. Prepared by teacher N. Yu. Staiko. Stages of work. 1. Choose the napkins you need colors. 2. Cut them into strips, 1.5 -2... wide.
 Galina Chelnokova Master class “Rose for my beloved mother” On the eve of any holiday, we want something unusual, interesting, new, refined. Something that would be remembered for a long time. I believe that a gift made by the hands of children will be the best, the most expensive. After all, the child is...
Flowers. Crafts on a floral theme - Master class “Autumn Bouquet”
Publication “Master class “Autumn...”  Master class on appliqué for secondary children preschool age"Together with parents on the topic: "Autumn bouquet." Goal: Development creativity children while making crafts using the 3D applique technique “autumn bouquet”. Objectives: Teach origami techniques and...
 Image library "MAAM-pictures"
 Materials for the master class: a set of colored paper, glue, scissors, colored pens, red ribbon. Stages of the “Merry Bouquet” master class for mom. 1. Glue small circles onto large circles. 2. We collect the circles into a bouquet, then glue them...
 Project passport Master class for parents on the topic “Bouquet for Mom.” Type of project: social, practice-oriented, creative. Project duration: short-term, November 22. Project participants: children of the group early age, parents and educators Akhmatova Z.A,...
 Natalya Shuvalova. Master Class " Winter bouquet"Craft for the New Year. The coming winter days have added more troubles to people. Winter will either hit you with frost, or warm you with thaw. And the children run to enjoy the white, clean snow, and build a snow woman and a fortress. And so...
Flowers. Crafts on a floral theme - Applique postcard for the younger group “My bouquet for mom!”
 At the end of November, all the people of our country celebrate the most precious day in every person’s life - Mother’s Day. Any child will be pleased to make a Mother’s Day card for their dear mother with their own hands. And let the craft not stand out with special accuracy and correctness...


